Configure programas no aplicativo de manutenção
Sobre programas
Traditionally, public health information systems have been reporting aggregated data of service provision across their health programs. This does not allow you to trace the people provided with these services. In DHIS2, you can define your own programs with stages. These programs are an essential part of the "tracker" functionality which lets you track individual records. You can also track other ‘entities’ such as wells or insurances. You can create two types of programs:
| Program type | Descrição | Examples of use |
|---|---|---|
| Event program | Single event without registration program (anonymous program or SEWoR) Anonymous, individual events are tracked through the health system. No person or entity is attached to these individual transactions. Has only one program stage. | To record health cases without registering any information into the system. To record survey data or surveillance line-listing. |
| Single stage Tracker program | Single event with registration program (SEWR) An entity (person, commodity, etc.) is tracked through each individual transaction with the health system Has only one program stage. A tracked entity instance (TEI) can only enroll in the program once. | To record birth certificate and death certificate. |
| Multi-stage Tracker program | Multi events with registration program (MEWR) An entity (person, commodity, etc.) is tracked through each individual transaction with the health system Has multiple program stages. | Mother Health Program with stages as ANC Visit (2-4+), Delivery, PNC Visit. |
To create a program, you must first configure several types of metadata objects. You create these metadata objects in the Maintenance app.
| Object type | Descrição | Available functions |
|---|---|---|
| Event program | A program to record single event without registration | Create, edit, share, delete, show details and translate |
| Tracker program | A program to record single or multiple events with registration | Create, edit, share, delete, show details and translate |
| Program indicator | An expression based on data elements and attributes of tracked entities which you use to calculate values based on a formula. | Create, edit, clone, share, delete, show details and translate |
| Program rule | Allows you to create and control dynamic behaviour of the user interface in the Tracker Capture and Event Capture apps. | Create, edit, clone, delete, show details and translate |
| Program rule variable | Variables you use to create program rule expressions. | Create, edit, clone, delete, show details and translate |
| Relationship type | Defines the relationship between tracked entity A and tracked entity B, for example mother and child. | Create, edit, clone, share, delete, show details and translate |
| Tipo de entidade rastreada | Types of entities which can be tracked through the system. Can be anything from persons to commodities, for example a medicine or a person. A program must have one tracked entity. To enrol a tracked entity instance into a program, the tracked entity of an entity and tracked entity of a program must be the same. Note A program must be specified with only one tracked entity. Only tracked entity as same as the tracked entity of program can enroll into that program. | Create, edit, clone, share, delete, show details and translate |
| Atributo de entidade rastreada | Used to register extra information for a tracked entity. Can be shared between programs. | Create, edit, clone, share, delete, show details and translate |
| Programa | A program consist of program stages. | Create, edit, share, delete, assign to organisation units, show details and translate |
| Estágio do programa | A program stage defines which actions should be taken at each stage. | Create, edit, share, change sort order, delete, show details and translate |
| Program indicator group | A group of program indicators | Create, edit, clone, share, delete, show details and translate |
| Validation rule | A validation rule is based on an expression which defines a relationship between data element values. | Create, edit, clone, share, delete, show details and translate |
| Program notification | Automated message reminder Set reminders to be automatically sent to enrolled tracked entity instances before scheduled appointments and after missed visits. | Create, edit and delete |
| Program stage notification | Automated message reminder Set reminders to be automatically sent whenever a program stage is completed, or before or after the due date. | Create, edit and delete |
Configure programas de eventos no aplicativo de manutenção
Sobre programas de eventos
Single event without registration programs are called event programs. You configure them in the Maintenance app. Event programs can have three types of data entry forms:
| Form type | Descrição |
|---|---|
| Básico | Lists all data elements which belong to the program. You can change the order of the data elements. |
| Section | A section groups data elements. You can then arrange the order of the sections to create the desired layout of the data entry form. |
| Custom | Defines the data entry form as HTML page. |
Note
Custom forms take precedence over section forms if both are present.
If no custom or section form is defined, the basic form will be used.
The Android apps only support section forms.
You can create program notifications for event programs. The notifications are sent either via the internal DHIS2 messaging system, via e-mail or via text messages (SMS). You can use program notifications to, for example, send an automatic reminder to a tracked entity 10 days before a scheduled appointment. You use the program’s tracked entity attributes (for example first name) and program parameters (for example enrollment date) to create a notification template. In the Parameters field, you'll find a list of available tracked entity attributes and program parameters.
Fluxo de trabalho: crie um programa de evento
-
Insira os detalhes do programa do evento.
-
Atribuir elementos de dados.
-
Crie formulário (s) de entrada de dados: ** Básico **, ** Seção ** ou ** Personalizado **.
-
Atribua o programa à (s) unidade (s) de organização.
-
Crie notificações de programa.
Crie ou edite um programa de evento
Insira os detalhes do programa do evento
-
Abra o aplicativo de ** Manutenção ** e clique em ** Programa ** > ** Programa **.
-
Clique no botão Adicionar e selecione ** Programa de Evento ** no menu pop-up.
-
Insira os detalhes do programa e clique em Avançar.
Field Description Name The name of the program. Color Color used for this program in the data capture apps. Icon Icon used for this program in the data capture apps. Short name A short name of the program. The short name is used as the default chart or table title in the analytics apps. Description A detailed description of the program. Version The version of the program. This is used for example when people collect data offline in an Android implementation. When they go online and synchronize their metadata, they should get the latest version of the program. Category combination The category combination you want to use. The default setting is None. Open days after category option end date If you selected a category combination other than None, you may enter zero or a positive number. This lets you enter data for this program for a category option up to the specified number of days after that category option's end date. Completed events expiry date Defines the number of days for which you can edit a completed event. This means that when an event is completed and the specified number of expiry days has passed, the event is locked.
If you set "Completed events expiry days" to 10", an event is locked ten days after the completion date. After this date you can no longer edit the event.Expiry period type
Expiry daysThe expiry days defines for how many days after the end of the previous period, an event can be edited. The period type is defined by the expiry period type. This means that when the specified number of expiry days has passed since the end date of the previous period, the events from that period are locked.
If you set the expiry type to "Monthly" and the expiry days to "10" and the month is October, then you can't add or edit an event to October after the 10th of November.User assignment of events Select check box to enable user assignment of the event
This means that in the form there will be a list of users to which the event can be assigned.Block entry form after completed Select checkbox to block the entry form after completion of the event of this program.
This means that the data in the entry form can't be changed until you reset the status to incomplete.Feature type Sets whether the program is going to capture a geographical feature type or not.
- None Nothing is captured.
- Polygon An area is captured. For single event programs the area will be the area representing the event being captured. For tracker programs, the area will represent the area of the enrollment.
- Point A point/coordinate is captured. For single event programs the point will be representing the event being captured. For tracker programs, the point will represent the enrollment.Validation strategy Sets the server and client side validation requirement.
Data type validation is always performed regardless of the validation strategy. An integer field is never stored containing text, for example.
- On complete This option will enforce required field and error messages to be fixed when completing the event, but the event can be saved to the server without passing these validation requirements. For legacy reasons, this is always the validation strategy for tracker programs, where each data value in the event is stored to the server while entering data.
- On update and insert This option will enforce required field validation when saving the event to the server regardless of the completion status. When using this option no events can be stored without passing validations.Pre-generate event UID Select checkbox to pre-generate unique event id numbers. Custom label for report date Type a description of the report date.
This description is displayed in the case entry form. -
Clique próximo.
Atribuir elementos de dados
-
Clique em ** Atribuir elementos de dados **.
-
In the list of available items, double-click the data elements you want to assign to the event program.
-
(Opcional) Para cada elemento de dados, adicione configurações adicionais:
Setting Description Compulsory The value of this data element must be filled into data entry form before you can complete the event. Allow provided elsewhere Specify if the value of this data element comes from other facility, not in the facility where this data is entered. Display in reports Displays the value of this data element into the single event without registration data entry function. Date in future Will allow user to select a date in future for date data elements. Mobile render type Can be used to select different render types for mobile devices. Available options vary depending on the data element's value type. For example, for a numerical value you may select "Default", "Value", "Slider", "Linear scale", and "Spinner". Desktop render type WARNING: NOT IMPLEMENTED YET.
Can be used to select different render types for desktop (i.e. the web interface). Available options vary depending on the data element's value type. For example, for a numerical value you may select "Default", "Value", "Slider", "Linear scale", and "Spinner". -
Clique próximo.
Crie formulários de entrada de dados
The data entry forms decide how the data elements will be displayed to the user in the Event Capture app.
-
Clique em ** Criar formulário de entrada de dados **.
-
Clique em ** Básico **, ** Seção ** ou ** Personalizado **.
-
To create a Basic data entry form: Drag and drop the data elements in the order you want.
-
Para criar um formulário de entrada de dados de ** Seção **:
-
Click the add button and enter a section's name, description and render type for desktop and mobile.
-
Clique na seção para que seja destacada por uma linha preta.
-
Add data elements by clicking the plus sign next to the data elements' names.
-
Repeat the above steps until you have all the sections you need.
-
Change the section order: click the options menu, then drag the section to the place you want.
-
-
To create a Custom data entry form: Use the WYSIWYG editor to create a completely customized form. If you select Source, you can paste HTML code directly in the editing area. You can also insert images for example flags or logos.
-
Clique próximo.
Acesso
Access options decide who can capture data for the program or view/edit the program's metadata. A program can be shared to organisation units, and in addition, the main program and any program stages' access options can be configured through the Sharing dialog. Access options are available in the Access tab.
Atribuir unidades de organização:
-
In the organisation tree, double-click the organisation units you want to add to the program.
You can locate an organisation unit in the tree by expanding the branches (click on the arrow symbol), or by searching for it by name. The selected organisation units display in orange.
Alterar funções e acesso:
-
Role para baixo até a seção ** Funções e acesso **.
The first row shows the main program's access options, and each subsequent row shows the options of one program stage. Program stages with a warning icon (exclamation mark) contain access options that deviate from the main program, meaning they are accessed by a different combination of users.
-
Clique em uma das linhas e a ** caixa de diálogo Compartilhamento ** será exibida.
-
Modify the access options accordingly. See documentation on the sharing dialog for details.
-
Clique no botão ** Aplicar **.
-
Repeat the process for each program/program stage. You can also copy all access options from the main program to your child programs:
-
Select the program stages you want to have similar access options as the main program by toggling the checkboxes on the right hand side of the program stages. You can also choose to Select all program stages, Deselect all program stages or Select similar stages, in terms of access options, to that of the main program. Similar stages are toggled by default.
-
Clique em ** Aplicar aos estágios selecionados **
-
Criar notificações de programa
-
Crie a mensagem que deseja enviar:
-
Clique em ** O que enviar? **.
-
Insira um nome.
-
Create the Subject template: Double-click the parameters in the Template variables field to add them to your subject.
Note
The subject is not included in text messages.
-
Create the Message template: Double-click the parameter names in the Template variables list to add them to your message.
Dear A{w75KJ2mc4zz}, You're now enrolled in V{program_name}.
-
-
Define when you want to send the message:
-
Clique em ** Quando enviar? **.
-
Selecione um ** Gatilho de notificação **.
Notification trigger Description Program stage completion The program stage notification is sent when the program stage is completed Days scheduled (due date) The program stage notification is sent XX number of days before or after the due date
You need to enter the number of days before or after the scheduled date that the notification will be sent.
-
-
Define who you want to send the message to:
-
Clique em ** Quem enviar? **.
-
Selecione um ** Destinatário da notificação **.
Notification recipient Description Tracked entity instance Receives program notifications via e-mail or text message.
To receive a program notification, the recipient must have an e-mail address or a phone number attribute.Organisation unit contact Receives program notifications via e-mail or text message.
To receive a program notification, the receiving organisation unit must have a registered contact person with e-mail address and phone number.Users at organisation unit All users registered to the selected organisation unit receive program notifications via the internal DHIS2 messaging system. User group All members of the selected user group receive the program notifications via the internal DHIS2 messaging system Program attribute Receives program notifications via e-mail or text message.
To receive a program notification, the recipient must have an e-mail address or a phone number attribute.Data element Receives program notifications via e-mail or text message.
To receive a program notification, the recipient must have an e-mail address or a phone number data element.Web hook TBA -
Click Save.
-
-
Repita as etapas acima para criar todas as notificações de programa de que você precisa.
-
Clique em Salvar.
Note
You configure when the program notifications are sent in the Data Administration app > Scheduling > Program notifications scheduler.
Click Run now to send the program notifications immediately.
Select a time and click Start to schedule the program notifications to be sent at a specific time.
Informações de referência: Parâmetros de notificação do programa
| Notification type | Variable name | Variable code |
|---|---|---|
| Programa | Current date | V{current_date} |
| Days since enrollment date | V{days_since_enrollment_date} | |
| Enrollment date | V{enrollment_date} | |
| Incident date | V{incident_date} | |
| Organisation unit name | V{org_unit_name} | |
| Program name | V{program_name} | |
| Estágio do programa | Current date | V{current_date} |
| Days since due date | V{days_since_due_date} | |
| Days until due date | V{days_until_due_date} | |
| Due date | V{due_date} | |
| Organisation unit name | V{org_unit_name} | |
| Program name | V{program_name} | |
| Program stage name | V{program_stage_name} | |
| Event status | V{event_status} |
Configure programas rastreadores no aplicativo de manutenção
Sobre os programas Tracker
Single or multiple event programs with registration are called Tracker programs. A program must be specified with only one tracked entity. Only tracked entities that are the same as the tracked entity of program can enroll into that program. A program needs several types of metadata that you create in the Maintenance apps.
Fluxo de trabalho: crie um programa rastreador
-
Insira os detalhes do programa rastreador.
-
Insira os detalhes da inscrição.
-
Atribuir atributos e criar ** seção ** ou formulário de registro ** personalizado **.
-
Crie estágios do programa.
-
Configure o acesso e atribua às unidades de organização.
-
Criar programa e notificação (ões) de estágio do programa.
Crie ou edite um programa Tracker
-
Abra o aplicativo de ** Manutenção ** e clique em ** Programa ** > ** Programa **.
-
Clique no botão Adicionar e selecione ** Programa Rastreador ** no menu pop-up.
Insira os detalhes do programa
| Campo | Descrição |
|---|---|
| Nome | The name of the program. |
| Cor | Color used for this program in Tracker capture. |
| Ícone | Icon used for this program in Tracker capture |
| Nome curto | A short name of the program. The short name is used as the default chart or table title in the analytics apps. |
| Descrição | A detailed description of the program. |
| Version | The version of the program. This is used for example when people collect data offline in an Android implementation. When they go online and synchronize their metadata, they should get the latest version of the program. |
| Tracked Entity Type | The tracked entity type you want to use. A program can only have one type of tracked entity. |
| Category combination | The category combination you want to use. The default setting is None. |
| Open days after category option end date | If you selected a category combination other than None, you may enter zero or a positive number. This lets you enter data for this program for a category option up to the specified number of days after that category option's end date. |
| Display front page list | Select checkbox to display a list of Tracked Entity Instances in Tracker Capture. If not selected, the Search will be displayed. |
| First stage appears on registration page | Select checkbox to display the first program stage together with the registration (enrollment). |
| Access level | Choose the access level of the program. |
| Completed events expiry days | Defines the number of days for which you can edit a completed event. This means that when an event is completed and the specified number of expiry days has passed, the event is locked. If you set "Completed events expiry days" to 10", an event is locked ten days after the completion date. After this date you can no longer edit the event. |
| Expiry period type Expiry days | The expiry days defines for how many days after the end of the previous period, an event can be edited. The period type is defined by the expiry period type. This means that when the specified number of expiry days has passed since the end date of the previous period, the events from that period are locked. If you set the expiry type to "Monthly" and the expiry days to "10" and the month is October, then you can't add or edit an event to October after the 10th of November. |
| Minimum number of attributes required to search | Specify the number of tracked entity attributes that needs to be filled in to search for Tracked Entities in the Program. |
| Maximum number of tracked entities to return in search | Specify the maximum number of tracked entities that is allowed to match a search outside capture scope. This setting can be used to force the user to search in a more targeted manner and narrow down the search results, rather than allowing a user to search and see a large number of results outside their capture scope. Enter 0 for no limit. More info here. |
Enter enrollment details
| Campo | Descrição |
|---|---|
| Allow future enrollment dates | Select checkbox if you want to allow tracked entity instances to be enrolled in the program on a future date. |
| Allow future incident dates | Select checkbox if you want to allow the incident date in the program to be on a future date. |
| Only enroll once (per tracked entity instance lifetime) | Select checkbox if you want a tracked entity to be able to enroll only once in a program. This setting is useful for example in child vaccination or post-mortem examination programs where it wouldn’t make sense to enroll a tracked entity more than once. |
| Show incident date | This setting allows you to show or hide the incident date field when a tracked entity enroll in the program. |
| Custom label for incident date | Defines the meaning of the incident date in this program. For example: In an immunization program for child under 1 year old, the incident date is the child's birthday. In a maternal program, the incident date is the date of last menstrual period. |
| Custom label for enrollment date | Defines the meaning of the enrollment date in this program, typically representing the date when the tracked entity is enrolled into the program. |
| Custom label for: - enrollment(s) - event(s) - program stage(s) - follow-up - registering unit - relationship - note - tracked entity attribute | Renames standard DHIS2 terms for this program. These labels only affect how the terms are displayed in the user interface and do not change their meaning. Note: Only Enrollment, Event, and Program Stage support plural forms; all other labels do not. Currently, these custom labels are used only by the DHIS2 Android app. |
| Ignore overdue events | When a tracked entity enrolls into the program, the events corresponding to the program stages are created. If you select this checkbox, the system will not generate overdue events. |
| Feature type | Sets whether the program is going to capture a geographical feature type or not. * None: Nothing is captured. * Polygon: An area is captured. For single event programs the area will be the area representing the event being captured. For tracker programs, the area will represent the area of the enrollment. * Point: A point/coordinate is captured. For single event programs the point will be representing the event being captured. For tracker programs, the point will represent the enrollment. |
| Related program | Choose a Tracker program which is related to the program you are creating, for example an ANC and a Child program. |
Atribuir atributos de entidade rastreados.
-
In the list of Available program tracked entity attributes, double-click the attributes you want to assign to the program.
-
(Optional) For each assigned attribute, add additional settings:
| Setting | Descrição |
|---|---|
| Display in list | Displays the value of this attribute in the list of tracked entity instances in Tracker capture. |
| Mandatory | The value of this attribute must be filled into data entry form before you can complete the event. |
| Date in future | Will allow user to select a date in future for date attributes. |
| Mobile render type | Can be used to select different render types for mobile devices. Available options vary depending on the attribute's value type. For example, for a numerical value you may select "Default", "Value", "Slider", "Linear scale", and "Spinner". |
| Desktop render type | WARNING: NOT IMPLEMENTED YET. Can be used to select different render types for desktop (i.e. the web interface). Available options vary depending on the attribute's value type. For example, for a numerical value you may select "Default", "Value", "Slider", "Linear scale", and "Spinner". |
- Criar formulário de registro
O formulário de registro define como os atributos serão exibidos ao usuário em aplicativos de consumo, como Android e Tracker Capture.
1. Clique em ** Criar formulário de registro **.

2. Clique em ** Seção ** ou ** Personalizado **.

3. Para criar um formulário de ** Seção **:

    1. Clique no botão Adicionar e insira o nome da seção, a descrição e o tipo de renderização para desktop e celular.
    2. Clique na seção para que seja destacada por uma borda preta.
    3. Adicione elementos de dados clicando no sinal de mais ao lado do nome dos elementos de dados que deseja adicionar.
    4. Repeat above steps until you have all the sections you need.
        To change the section order: click the options menu, then drag the section to the place you want.

4. Para criar um formulário de registro ** Personalizado **: Use o editor WYSIWYG para criar um formulário totalmente personalizado. Se você selecionar Código-fonte, poderá colar o código HTML diretamente na área de edição. Você também pode inserir imagens como bandeiras ou logotipos.

5. Clique em adicionar estágio.
Crie estágios do programa
A program consists of program stages. A program stage defines which actions should be taken at each stage.
Note
Changes to a program stage are not saved until you save the program.
- Clique no sinal de mais para criar um estágio do programa.
- Enter program stage details:
- Insira um nome.
- (Optional) select a Color and an Icon that will be used by the data capture apps to identify this program stage.
- Insira uma ** Descrição **.
- Enter the required number of days into the Scheduled days from start field: The first event in this program stage will be scheduled this many days after the enrollment or the incident date, depending on the configuration. If Show incident date in Enrollment details is configured, the system will use incident date as start. If Generate events based on enrollment date in Program stage details is configured the system will use enrollment date as start.
- Insira os detalhes do estágio do programa que podem ser repetidos.
- Especifique se o estágio do programa é ** Repetível ** ou não.
- Selecione um ** Tipo de período **.
- Clear Display generate event box after completed if you don't want to display Create new event box to create new event for a repeatable stage after you click Complete for an event of the stage in data entry form. This field is selected by default.
- Enter Standard interval days. This value will be the suggested interval between the last event in a repeatable stage and the scheduled date of the next event.
- (Optional) Select a Default next scheduled date. This will show a list of assigned data elements of type date. If an element is selected, the Tracker client will use this as the default scheduled date. The data element can be used by program rules to dynamically schedule intervals between events.
- Insira os detalhes do formulário
| Opção | Açao |
|---|---|
| Auto-generate event | Clear check box to prevent creating an event of this program stage automatically when a entity is enrolled in the program. |
| Open data entry form after enrollment | Select check box to automatically open the event of this stage as soon as the entity has enrolled into the program. |
| Report date to use | If you have selected the Open data entry form after enrollment check box, also select a Report date to use: Date of incident or Date of enrollment. This is the date used as report date for an event that has been opened automatically. If the Report date to use is selected as one of those two ('incident date'/'enrollment date'), in Dashboard, the 'Report date' of the event will be set as one of those two. |
| User assignment of events | Select check box to enable user assignment of the program stage. This means that in Tracker capture there will be a list of users to which the event can be assigned. |
| Block entry form after completed | Select check box to block the entry form after completion of the event of this stage. This means that the data in the entry form can't be changed until you reset the status to incomplete. |
| Ask user to complete program when stage is completed | Select check box to trigger a pop-up which asks the user if he/she wants to create the event of next stage. |
| Ask user to create new event when stage is complete | Select check box to trigger a pop-up which asks the users if he/she wants to create a new event of this stage when an event of this stage is completed. This property is active only if you have selected Repeatable. |
| Generate events by enrollment date | Verifique nele as datas de vencimento de geração automática de eventos das fases do programa deste programa com base na data de inscrição. Se não estiver marcada, as datas de vencimento são geradas com base na data do incidente. |
| Hide due dates | Select checkbox to hide due dates for events. |
| Feature type | Sets whether the program is going to capture a geographical feature type or not. * None: Nothing is captured. * Polygon: An area is captured. For single event programs the area will be the area representing the event being captured. For tracker programs, the area will represent the area of the enrollment. * Point: A point/coordinate is captured. For single event programs the point will be representing the event being captured. For tracker programs, the point will represent the enrollment. |
| Pre-generate event UID | Select check box to pre-generate unique event id numbers. |
| Custom label for report date | Defines the meaning of the report date in this program stage. This description is displayed in the data entry form. |
| Custom label for due date | Defines the meaning of the due date in this program stage. |
| Custom label for: - event(s) - program stage | Renames standard DHIS2 terms for this program. These labels only affect how the terms are displayed in the user interface and do not change their meaning. Note: Only Event supports the plural form; Program Stage does not. Currently, these custom labels are used only by the DHIS2 Android app. |
-
Atribua elementos de dados ao estágio do programa:
-
In the list of Available data elements, double-click the data elements you want to assign to the program stage.
-
For each assigned data element, review the properties. You can select:
-
| Opção | Açao |
|---|---|
| Obrigatório | The value of this data element must be filled into data entry form before completing the event. |
| Allow provided elsewhere | Specify if the value of this data element comes from other facility, not in the facility where this data is entered. |
| Display in reports | Display the value of this data element into the single event without registration data entry function. |
| Date in future | Allow to select a date in future for date data elements. |
| Skip synchronization | Allow data element to be skipped when running data synchronization jobs. |
| Mobile render type | Can be used to select different render types for mobile devices. Available options vary depending on the attribute's value type. For example, for a numerical value you may select "Default", "Value", "Slider", "Linear scale", and "Spinner". |
| Desktop render type | WARNING: NOT IMPLEMENTED YET. Can be used to select different render types for desktop (i.e. the web interface). Available options vary depending on the attribute's value type. For example, for a numerical value you may select "Default", "Value", "Slider", "Linear scale", and "Spinner". |
-
Crie formulários de entrada de dados para a fase do programa
The data entry forms decide how the data elements will be displayed to the user in the Tracker Capture app.
-
Clique em ** Criar formulário de entrada de dados **.
-
Clique em ** Básico **, ** Seção ** ou ** Personalizado **.
-
To create a Basic data entry form: Drag and drop the data elements in the order you want.
-
Para criar um formulário de entrada de dados de ** Seção **:
-
Click the add button and enter a section's name, description and render type for desktop and mobile.
-
Clique na seção para que seja destacada por uma borda preta.
-
Add data elements by clicking the plus sign next to the data elements' names.
-
Repeat the above steps until you have all the sections you need.
-
Change the section order: click the options menu, then drag the section to the place you want.
-
-
To create a Custom data entry form: Use the WYSIWYG editor to create a completely customized form. If you select Source, you can paste HTML code directly in the editing area. You can also insert images for example flags or logos.
-
Clique em adicionar estágio.
Acesso
Access options decide who can capture data for the program or view/edit the program's metadata. A program can be shared to organisation units, and in addition, the main program and any program stages' access options can be configured through the Sharing dialog. Access options are available in the Access tab.
Atribuir unidades de organização:
-
In the organisation tree, double-click the organisation units you want to add to the program.
You can locate an organisation unit in the tree by expanding the branches (click on the arrow symbol), or by searching for it by name. The selected organisation units display in orange.
Alterar funções e acesso:
-
Role para baixo até a seção ** Funções e acesso **.
The first row shows the main program's access options, and each subsequent row shows the options of one program stage. Program stages with a warning icon (exclamation mark) contain access options that deviate from the main program, meaning they are accessed by a different combination of users.
-
Clique em uma das linhas e a ** caixa de diálogo Compartilhamento ** será exibida.
-
Modify the access options accordingly. See documentation on the sharing dialog for details.
-
Clique no botão ** Aplicar **.
-
Repeat the process for each program/program stage. You can also copy all access options from the main program to your child programs:
-
Select the program stages you want to have similar access options as the main program by toggling the checkboxes on the right hand side of the program stages. You can also choose to Select all program stages, Deselect all program stages or Select similar stages, in terms of access options, to that of the main program. Similar stages are toggled by default.
-
Clique em ** Aplicar aos estágios selecionados **
-
Criar notificações de programa
You can create program notifications for programs with registration and their program stages. The notifications are sent either via the internal DHIS2 messaging system, via e-mail or via text messages (SMS). You can use program notifications to, for example, send an automatic reminder to a tracked entity 10 days before a scheduled appointment. You use the program’s tracked entity attributes (for example first name) and program parameters (for example enrollment date) to create a notification template.
-
Open the Maintenance app and click Program and then notifications.
A list of existing program notifications for the selected program opens. If the program doesn't have any program notifications, the list is empty.
-
Clique no botão Adicionar e selecione ** Notificação do Programa **.
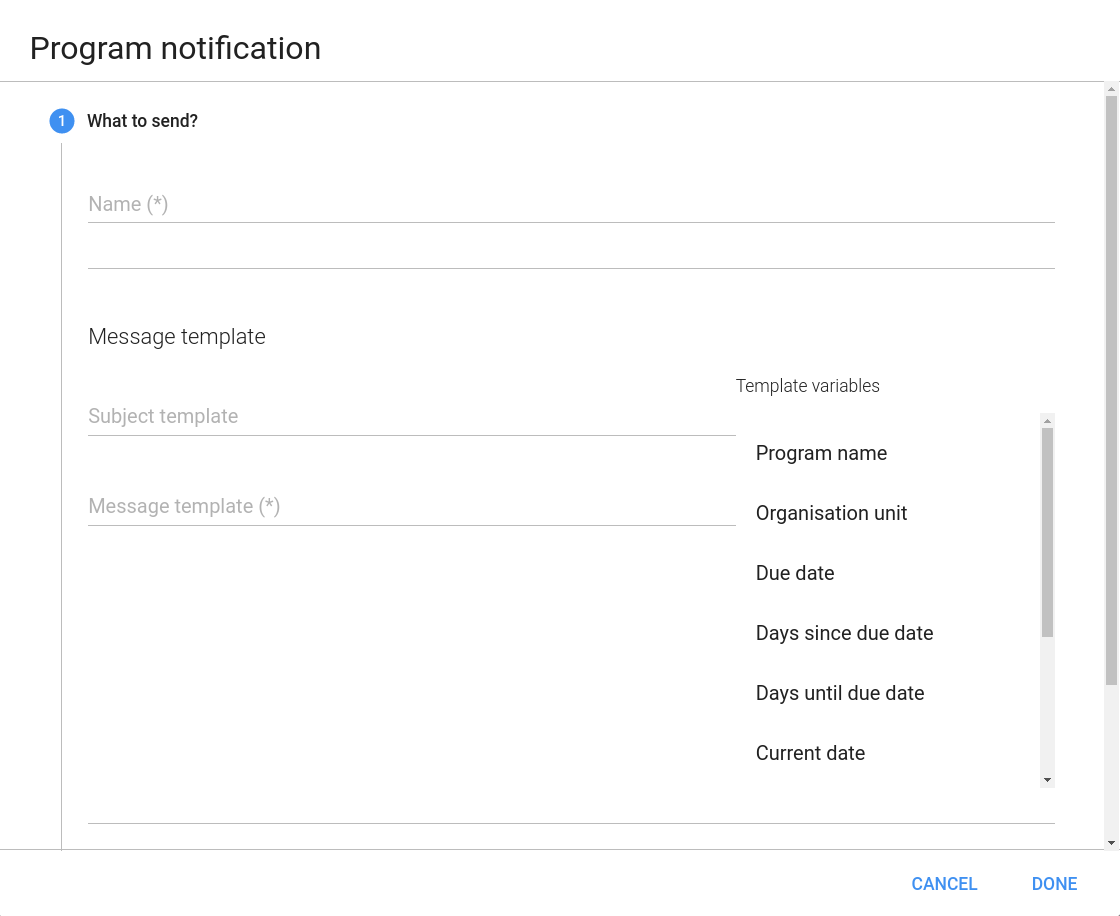

-
Insira um nome.
-
Crie o ** modelo de assunto **.
Double-click the parameters in the Parameters field to add them to your subject.
Note
The subject is not included in text messages.
-
Crie o ** modelo de mensagem **.
Double-click the parameter names in the Parameters field to add them to your message.
Dear A{w75KJ2mc4zz}, You're now enrolled in V{program_name}.
-
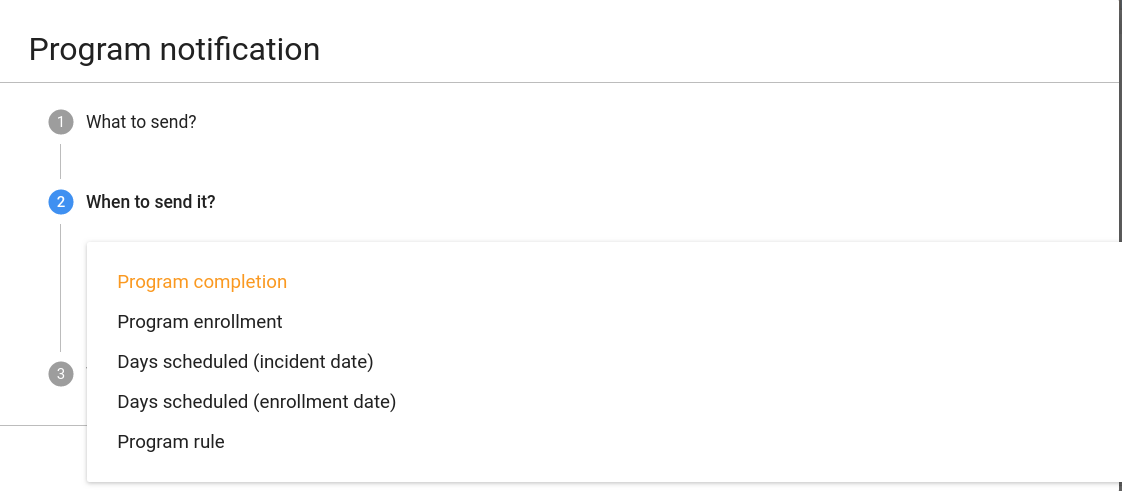
In the When-to-send it field, select what should trigger the notification.
Trigger Description Note Program enrollment The program notification is sent when the TEI enrols in the program. - Program completion The program notification is sent when the program of TEI is completed - Days scheduled (incident date) The program notification is sent XX number of days before or after the incident date You need to enter the number of days before or after the scheduled date that the notification will be sent. Days scheduled (enrollment date) The program notification is sent XX number of days before or after the enrollment date You need to enter the number of days before or after the scheduled date that the notification will be sent. Program Rule Notification will be triggered as a result of program rule execution. Program rule with ProgramRuleActionType.SENDMESSAGE need to be in place to make this trigger successful. -
In the Who-to-send-it field, select who should receive the program notification.
Recipient type Description Note Tracked entity instance Receives program notifications via e-mail or text message. To receive a program notification, the recipient must have an e-mail address or a phone number attribute. Organisation unit contact Receives program notifications via e-mail or text message. To receive a program notification, the receiving organisation unit must have a registered contact person with e-mail address and phone number. Users at organisation unit: All users registered to the selected organisation unit receive program notifications via the internal DHIS2 messaging system. - User group All members of the selected user group receive the program notifications via the internal DHIS2 messaging system - Limit To Hierarchy Send notification only to those users who belong to any of the organisation unit in the hierarchy. This option is only available when User Group is selected as recipient. Parent OrgUnit Only Send notification only to those users who belong to parent organisation unit. This option is only available when User Group is selected as recipient. Program Attribute TrackedEntityAttribute can also be selected as recipient. This parameter will only be effective if TrackedEntityAttribute value type is PHONE_NUMBER/EMAIL. -
Clique em Salvar.
Crie uma notificação de estágio do programa
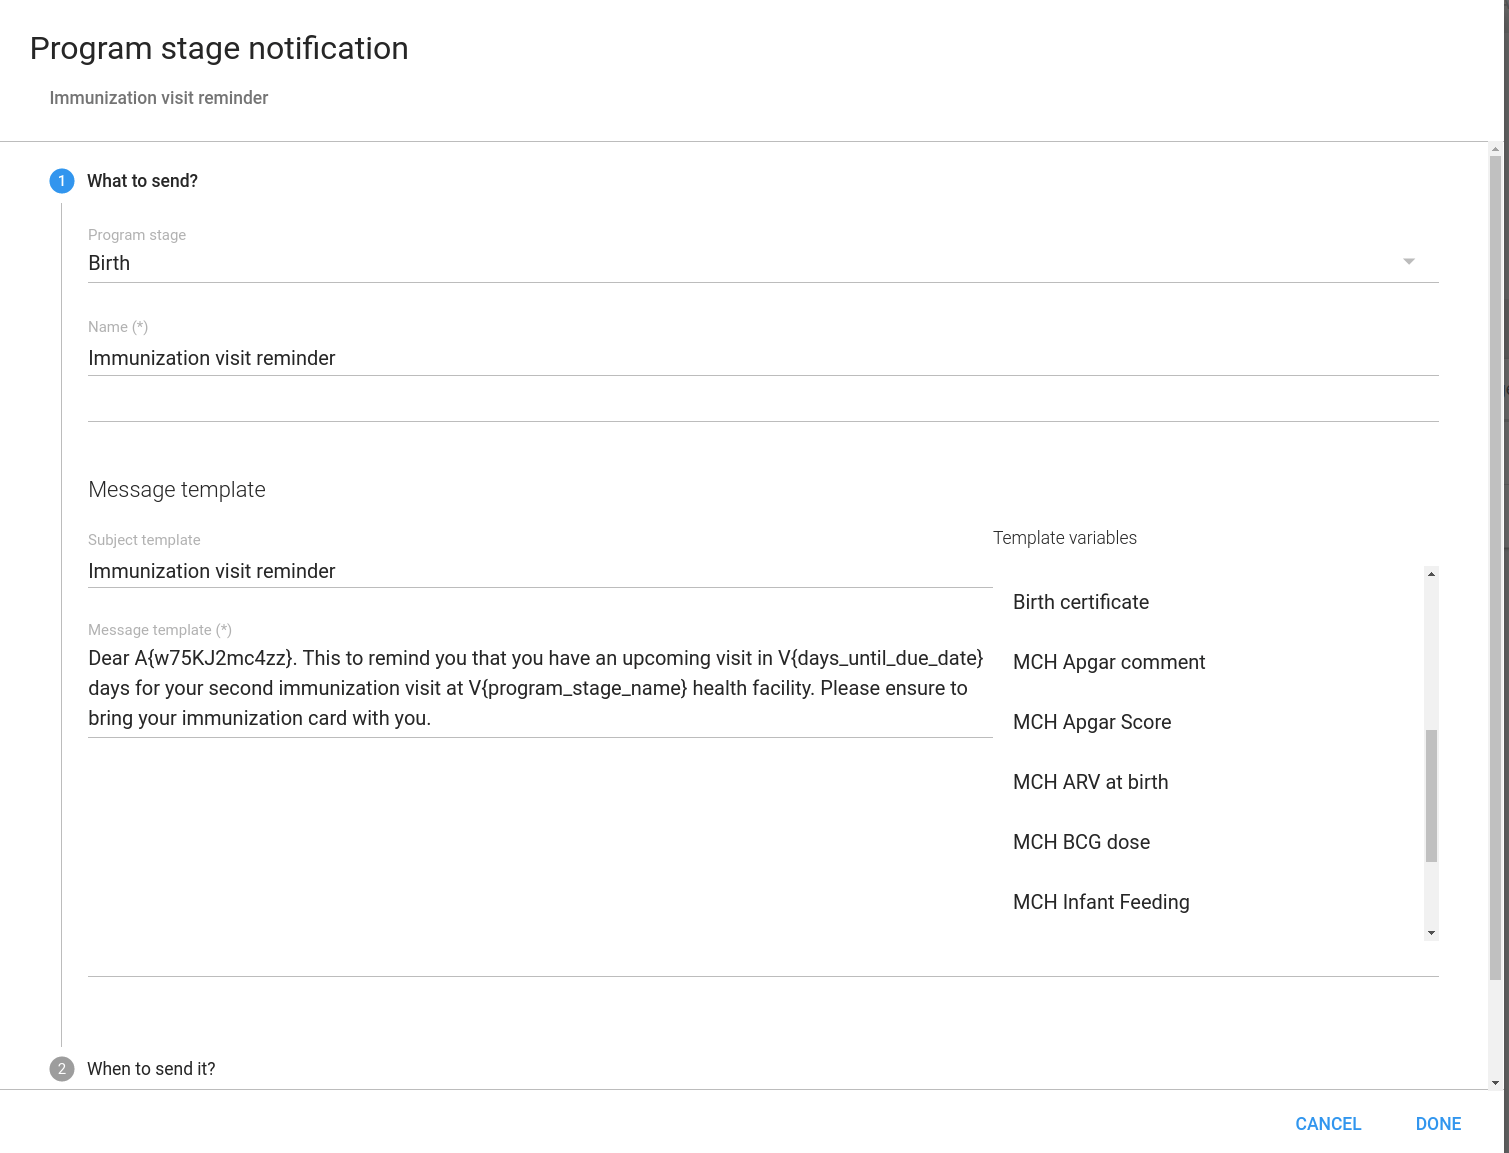
-
Open the Maintenance app and click Program and then notifications.
A list of existing program stage notifications for the selected program stage opens. If the program stage doesn't have any program stage notifications, the list is empty.
-
Clique no botão Adicionar e selecione ** Notificação de estágio do programa **.
-
Clique em ** Adicionar novo **.
-
Insira um nome.
-
Crie o ** modelo de assunto **.
Double-click the parameter names in the Parameters field to add them to your subject.
Note
The subject is not included in text messages.
-
Crie o ** modelo de mensagem **.
Double-click the parameter names in the Parameters field to add them to your message.
Dear A{w75KJ2mc4zz}, please come to your appointment the V{due_date}.
-
In the When-to-send-it field, select what should trigger the notification.
Trigger Description Note Program stage completion The program stage notification is sent when the program stage is completed - Days scheduled (due date) The program stage notification is sent XX number of days before or after the due date You need to enter the number of days before or after the scheduled date that the notification will be sent. Program Rule Notification will be triggered as a result of program rule execution. Program rule with ProgramRuleActionType.SENDMESSAGE need to be in place to make this trigger successful. -
Allow notification to be sent multiple times
This flag can be used if notification is required to be sent multiple times. For example in case of repeatable program stage, same notification will be sent as many times as the stage is repeated.
-
-
In the Recipients field, select who should receive the program stage notification. You can select:
Recipient type Description Note Tracked entity instance Receives program notifications via e-mail or text message. To receive a program stage notification, the recipient must have an e-mail address or a phone number attribute. Organisation unit contact Receives program notifications via e-mail or text message. To receive a program stage notification, the receiving organisation unit must have a registered contact person with e-mail address and phone number.
The system selects the same organisation unit as where the event took place.Users at organisation unit: All users registered to the selected organisation unit receive program notifications via the internal DHIS2 messaging system. - User group All members of the selected user group receive the program notifications via the internal DHIS2 messaging system - Limit To Hierarchy Send notification only to those users who belong to any of the organisation unit in the hierarchy. - Parent OrgUnit Only Send notification only to those users who belong to parent organisation unit. - Data Element Data Element associated with ProgramStage can be selected as recipient. Data Element will only be effective if DataElement has value type PHONE_NUMBER/EMAIL. Tracked Entity Attribute Tracked Entity Attribute associated with ProgramInstance/Enrollment can be selected as recipient. Attribute will only be effective if it has value type PHONE_NUMBER/EMAIL. Web Hook Web hooks are automated HTTP messages sent to an external URL configured in web hook URL field. Notification template variables will be sent as key-value pairs in the HTTP request. - -
Clique em Salvar.
Informações de referência: Parâmetros de notificação do programa
| Notification type | Variable name | Variable code |
|---|---|---|
| Programa | Current date | V{current_date} |
| Days since enrollment date | V{days_since_enrollment_date} | |
| Enrollment date | V{enrollment_date} | |
| Incident date | V{incident_date} | |
| Organisation unit name | V{org_unit_name} | |
| Program name | V{program_name} | |
| Estágio do programa | Current date | V{current_date} |
| Days since due date | V{days_since_due_date} | |
| Days until due date | V{days_until_due_date} | |
| Due date | V{due_date} | |
| Organisation unit name | V{org_unit_name} | |
| Program name | V{program_name} | |
| Program stage name | V{program_stage_name} | |
| Event organisation unit | V{event_org_unit_id} | |
| Enrollment organisation unit | V{enrollment_org_unit_id} | |
| Program stage id | V{program_stage_id} | |
| Program id | V{program_id} | |
| Program instance id/Enrollment id | V{enrollment_id} | |
| Tracked entity id | V{tracked_entity_id} | |
| Event/Execution date | V{event_date} |
Configurar indicadores de programa
Sobre os indicadores do programa
Program indicators are expressions based on data elements and attributes of tracked entities which can be used to calculate values based on a formula. Program indicators consist of an aggregation type, an analytics type, an expression and a filter.
Program indicators are evaluated based on the assigned aggregation type, expression and filter. The order of evaluation is:
-
The filter will filter the events which become part of the evaluation/aggregation routine.
-
The expression will be evaluated per event.
-
All evaluated expression values will be aggregated according to the aggregation type of the program indicator.
| Program rule component | Descrição |
|---|---|
| Tipo de agregação | The aggregation type determines how the program indicator will be aggregated. The following aggregation types are available: * Average * Average (number) * Average (number, disaggregation) * Average (sum in organisation unit hierarchy) * Average (sum of numbers) * Average (sum of numbers, disaggregation) * Average (Yes/No) * Count * Custom The "custom" aggregation type allows you to specify the aggregation type in-line in the expression. All other aggregation types are applied to the entire expression. Using the "custom" aggregation type might lead to an exception of the order of evaluation described above where individual parts of the expression can be evaluated and aggregated, as opposed to the entire expression being evaluated prior to aggregation. * Default * Max * Min * None * Standard deviation * Sum * Variance |
| Analytics type | The available analytics types are event and enrollment. The analytics type defines whether the program indicator is calculated based on events or program enrollments. This has an impact on what type of calculations can be made. * Events implies a data source where each event exists as an independent row. This is suitable for performing aggregations such as counts and sums. * Enrollments implies a data source where all events for a single enrollment is combined on the same row. This allows for calculations which can compare event data from various program stages within a program enrollment. |
| Organisation unit field | Determines which organisation unit is assigned to program indicator values. For Event programs (without registration) the options are: * Event organisation unit (default): where the event took place * any data elements of value type Organisation Unit (if any) assigned to the program For Tracker programs (with registration) and analytics type Enrollment the options are: * Registration organisation unit: where the tracked entity instance was created * Enrollment organisation unit (default): where the tracked entity instance was enrolled in this program * Owner at start organisation unit: where the tracked entity instance was owned at the start of the reporting period * Owner at end organisation unit: where the tracked entity instance was owned at the end of the reporting period For Tracker programs (with registration) and analytics type Event the options are: * Event organisation unit (default): where the event took place * any data elements of value type Organisation Unit (if any) assigned to the program * Registration organisation unit: where the tracked entity instance was created * Enrollment organisation unit: where the tracked entity instance was enrolled in this program * Owner at start organisation unit: where the tracked entity instance was owned at the start of the reporting period * Owner at end organisation unit: where the tracked entity instance was owned at the end of the reporting period |
| Analytics period boundaries | Defines the boundaries for the program indicator calculation. The boundaries determine which events or enrollments gets included in aggregations, always relative to the aggregate reporting period start and end. When creating the program indicator, the default boundaries will get preselected based on analytics type. * For analytics type event, the default boundaries will be configured to encapsulate any events with an event date after the reporting period starts and before the reporting period ends. * For analytics type enrollment, the default boundaries will encapsulate all enrollments with an enrollment date after the reporting date starts and before the reporting period ends. In addition, the default enrollment program indicator evaluates the newest event for all program stages regardless of date. It is possible to change the upper and lower boundaries to include a longer or shorter period relative to the reporting period, or delete one of the boundaries - in effect returning all data before or after a certain period. It is also possible to add more constraints, for example to make an enrollment program indicator only include event data up to a given point in time. * Boundary target: Can be incident date, event date, enrollment date or custom. Designates what is being constrained by the boundary. custom is used make boundary that target either a date data element, tracked entity attribute or the presence of an event in a program stage. This is done with a custom expression on the form: - Data element of type date: #{programStageUid.dataElementUid}. #{A03MvHHogjR.a3kGcGDCuk6} - Tracked entity attribute of type date: #{attributeUid}. A{GPkGfbmArby} - Presence of one event in a specific program stage: PS_EVENTDATE:programStageUid. PS_EVENTDATE:A03MvHHogjR Note This boundary target is only applicable to Analytics type Enrollment * Analytics period boundary type: Defines whether the boundary is an end boundary - starting with "before...", or a start boundary - "after...". Also defines whether the boundary relates to the end of the aggregate reporting period or the start of the aggregate reporting period. * Offset period by amount: In some cases, for example cohort analytics, the boundary should be offset relative to the aggregate reporting period when running pivots and reports. The offset period by amount is used to move the current boundary either back(negative) or forward(positive) in time. The amount and period type together will determine how big the offset will be. An example can be when making a simple enrollment cohort program indicator for a 1 year cohort, it might be enough to offset each boundary of the program indicator with "-1" and "Years" * Period type: See above. Can be any period, e.g. Weekly or Quarterly. |
| Expression | The expression defines how the indicator is being calculated. The expression can contain references to various entities which will be substituted with a related values when the indicator is calculated: * Data elements: Will be substituted with the value of the data element for the time period and organisation unit for which the calculation is done. Refers to both program stage and data element. * Attributes: Will be substituted with the value of the attribute for the person / tracked entity for which the calculation is done. * Variables: Will be substituted with special values linked to the program, including incident date and date of enrollment for the person, current date and count of values in the expression for the time period and organisation unit for which the calculation is done. * Constants: Will be substituted with the value of the constant. The expression is a mathematical expression and can also contain operators. For single event programs and tracker programs with analytics type event, the expression will be evaluated per event, then aggregated according to its aggregation type. For tracker programs with analytics type enrollment, the expression will be evaluated per enrollment, then aggregated according to its aggregation type. |
| Filtro | The filter is applied to events and filters the data source used for the calculation of the indicator. I.e. the filter is applied to the set of events before the indicator expression is being evaluated. The filter must evaluate to either true or false. It filter is applied to each individual event. If the filter evaluates to true then the event is included later in the expression evaluation, if not it is ignored. The filter can, in a similar way as expressions, contain references to data elements, attributes and constants. The program indicator filter can in addition use logical operators. These operators can be used to form logical expressions which ultimately evaluate to either true or false. For example you can assert that multiple data elements must be a specific value, or that specific attributes must have numerical values less or greater than a constant. |
In the Maintenance app, you manage the following program indicator objects:
| Object type | Available functions |
|---|---|
| Program indicator | Create, edit, clone, share, delete, show details and translate |
| Program indicator group | Create, edit, clone, share, delete, show details and translate |
Crie ou edite um indicador de programa
** Nota **
Um indicador de programa pertence a exatamente um programa.
-
Open the Maintenance app and click Indicator > Program indicator.
-
Clique no botão adicionar.
-
Selecione um ** Programa ** e digite:
-
Nome
-
Nome curto
-
Código
-
Cor
-
Ícone
-
Descrição
- Selecione o número de ** decimais na saída de dados **.
-
-
Selecione um ** Tipo de agregação **.
-
Select if you want to Display in form.
-
Atribua uma ou várias ** Legenda ** s.
-
(Optional) Enter a Category option combination for aggregate data export.
-
(Optional) Enter an Attribute option combination for aggregate data export.
-
Crie a expressão.
-
Clique em ** Editar expressão **.
-
Create the expression based on mathematical operators and the attributes, variables and constants listed to the right.
-
-
Crie o filtro.
-
Clique em ** Editar filtro **.
-
Create the expression based on mathematical operators and the attributes, variables and constants listed to the right.
-
-
Clique em Salvar.
Criar ou editar um grupo indicador de programa
-
Open the Maintenance app and click Indicator > Program indicator group.
-
Clique no botão adicionar.
-
Insira ** Nome ** e ** Código **.
-
In the list of available program indicators, double-click the program indicators you want to assign to your group.
-
Clique em Salvar.
Informações de referência: exemplos de expressão e filtro por tipo de valor
The table below shows examples of how to write expressions and filters for different data element and attribute value types:
| Value types | Example syntax |
|---|---|
| Integer Negative integer Positive or zero integer Positive integer Number Percentage | Numeric fields, can be used for aggregation as an expression, or in filters:#{mCXR7u4kNBW.K0A4BauXJDl} >= 3 |
| Yes/No Yes only | Boolean fields. Yes is translated to numeric 1, No to numeric 0. Can be used for aggregation as an expression, or in filters:#{mCXR7u4kNBW.Popa3BauXJss} == 1 |
| Text Long text Phone number | Text fields. Can be checked for equality in filters:#{mCXR7u4kNBW.L8K4BauIKsl} == 'LiteralValue' |
| Date Age | Date fields. Most useful when combined with a d2:daysBetween function, which produces a number that can be aggregated as an expression or used in filters:d2:daysBetween(#{mCXR7u4kNBW.JKJKBausssl},V{enrollment_date}) > 100 Can also directly be checked for equality in filters: #{mCXR7u4kNBW.JKJKBausssl} == '2011-10-28' |
Informações de referência: funções, variáveis e operadores para usar em expressões e filtros de indicadores de programa
An expression that includes both attributes, data elements and constants looks like this:
(A {GPkGfbmArby} + # {mCXR7u4kNBW.NFkjsNiQ9PH}) * C {bCqvfPR02Im}
An expression which uses the custom aggregation type and hence can use inline aggregation types looks like this:
(sum (# {mCXR7u4kNBW.K0A4BauXJDl} * # {mCXR7u4kNBW.NFkjsNiQ9PH}) / sum (# {mCXR7u4kNBW.NFkjsNiQ9PH})) * 100
Note how the "sum" aggregation operator is used inside the expression itself.
Adding comments in program indicator expression or filter
Uniform syntax is supported for both singleline and multiline comments
d2:hasValue(#{mCXR7u4kNBW.NFkjsNiQ9PH}) /* this is comment */

d2:hasValue(#{mCXR7u4kNBW.NFkjsNiQ9PH}) && /* this is
comment */
d2:daysBetween(V{enrollment_date},PS_EVENTDATE:mCXR7u4kNBW)
Funções para usar em uma expressão ou filtro de indicador de programa
The program indicator expression and filter support a range of functions. The functions can be applied to data elements and attributes:
| Função | Arguments | Descrição |
|---|---|---|
| d2: hasValue | (object) | Returns true if the data element/attribute has a value. Can be used in filters to distinguish between the number 0 and no value, and to distinguish between explicit "No" and no selection for a Yes/No field. |
| d2:minutesBetween | (datetime, datetime) | Produces the number of minutes between two data elements/attributes of type "date and time". When the first argument datetime comes before the second argument datetime, the number will be positive - in the opposite case, the number will be negative. The static datetime format is 'yyyy-MM-dd hh:mm'. Any of the arguments can be replaced with PS_EVENTDATE:(programStageUid) to compare the latest event date from a given program stage. |
| d2: dias entre | (date, date) | Produces the number of days between two data elements/attributes of type date. When the first argument date comes before the second argument date, the number will be positive - in the opposite case, the number will be negative. The static date format is 'yyyy-MM-dd'. Any of the arguments can be replaced with PS_EVENTDATE:(programStageUid) to compare the latest event date from a given program stage. |
| d2: semanas entre | (date, date) | Produces the number of full weeks between two data elements/attributes of type date. When the first argument date comes before the second argument date, the number will be positive - in the opposite case, the number will be negative. The static date format is 'yyyy-MM-dd'. Any of the arguments can be replaced with PS_EVENTDATE:(programStageUid) to compare the latest event date from a given program stage. |
| d2: meses entre | (date, date) | Produces the number of full months between two data elements/attributes of type date. When the first argument date comes before the second argument date, the number will be positive - in the opposite case, the number will be negative. The static date format is 'yyyy-MM-dd'. Any of the arguments can be replaced with PS_EVENTDATE:(programStageUid) to compare the latest event date from a given program stage. |
| d2: anos entre | (date, date) | Produces the number of full years between two data elements/attributes of type date. When the first argument date comes before the second argument date, the number will be positive - in the opposite case, the number will be negative. The static date format is 'yyyy-MM-dd'. Any of the arguments can be replaced with PS_EVENTDATE:(programStageUid) to compare the latest event date from a given program stage. |
| d2:condition | (boolean-expr, true-expr, false-expr) | Evaluates the boolean expression and if true returns the true expression value, if false returns the false expression value. The conditional expression must be quoted. The true-expr and false-expr arguments must follow the rules of any program indicator expression (including functions). |
| d2: zing | (expression) | Returns zero if the expression is negative, otherwise returns the expression value. The expression must follow the rules of any program indicator expression (including functions). |
| d2: oizp | (expression) | Returns one if the expression is zero or positive, otherwise returns zero. The expression must follow the rules of any program indicator expression (including functions). |
| d2: zpvc | (object, [,object ...]) | Retorna o número de valores numéricos zero e positivos entre os argumentos de objeto fornecidos. Pode ser fornecido qualquer número de argumentos. |
| d2:relationshipCount | ([relationshipTypeUid]) | Produces the number of relationships of the given type that is connected to the enrollment or event. When no type is given, all types are counted. |
| d2: contagem | (dataElement) | Useful only for enrollment program indicators. Counts the number of data values that has been collected for the given program stage and data element in the course of the enrollment. The argument data element is supplied with the #{programStage.dataElement} syntax. |
| d2: countIfValue | (dataElement, value) | Useful only for enrollment program indicators. Counts the number of data values that matches the given literal value for the given program stage and data element in the course of the enrollment. The argument data element is supplied with the #{programStage.dataElement} syntax. The value can be a hard coded text or number, for example 'No_anemia' if only the values containing this text should be counted. |
| d2:countIfCondition | (dataElement, condition) | Useful only for enrollment program indicators. Counts the number of data values that matches the given condition criteria for the given program stage and data element in the course of the enrollment. The argument data element is supplied with the #{programStage.dataElement} syntax. The condition is supplied as a expression in single quotes, for example '<10' if only the values less than 10 should be counted. |
| E se | (boolean-expr, true-expr, false-expr) | Evaluates the boolean expression and if true returns the true expression value, if false returns the false expression value. This is identical to the d2:condition function except that the boolean-expr is not quoted. |
| is | (expr1 in expression [, expression ...]) | Returns true if expr1 is equal to any of the following expressions, otherwise false. |
| é nulo | (object) | Returns true if the object value is missing (null), otherwise false. |
| não é nulo | (object) | Returns true if the object value is not missing (not null), otherwise false. |
| firstNonNull | (object [, object ...]) | Returns the value of the first object that is not missing (not null). Can be provided any number of arguments. Any argument may also be a numeric or string literal, which will be returned if all the previous objects have missing values. |
| maior | (expression [, expression ...]) | Returns the greatest (highest) value of the expressions given. Can be provided any number of arguments. Each expression must follow the rules of any program indicator expression (including functions). |
| menos | (expression [, expression ...]) | Returns the least (lowest) value of the expressions given. Can be provided any number of arguments. Each expression must follow the rules of any program indicator expression (including functions). |
| log | (expression [, base ]) | Returns the natural logarithm (base e) of the numeric expression. If an integer is given as a second argument, returns the logarithm using that base. |
| log10 | (expression) | Returns the common logarithm (base 10) of the numeric expression. |
Um filtro que usa a função "hasValue" tem a seguinte aparência:
d2: hasValue (# {mCXR7u4kNBW.NFkjsNiQ9PH})
Um filtro que usa a função "relationshipCount (relationshipTypeUid)" tem a seguinte aparência:
d2: relationshipCount ('KLkjshoQ90U')
A filter that uses the "is( x in y, z )" function looks like this:
is(#{oahc9ooVema} in 'New', 'Relapse')
Uma expressão que usa as funções "zing" e "oizp" tem esta aparência:
d2: zing (A {GPkGfbmArby}) + d2: oizp (# {mCXR7u4kNBW.NFkjsNiQ9PH}))
Uma expressão que usa a função "daysBetween" tem a seguinte aparência:
d2: daysBetween (# {mCXR7u4kNBW.k8ja2Aif1Ae}, '2015-06-01')
Uma expressão que usa a função "yearBetween" para comparar o último evento do estágio do programa 'mCXR7u4kNBW' com a data de inscrição se parece com isto:
d2: dias entre (V {enrollment_date}, PS_EVENTDATE: mCXR7u4kNBW)
Uma expressão que usa a função "condição" tem a seguinte aparência:
d2: condição ('# {mCXR7u4kNBW.NFkjsNiQ9PH}> 100', 150,50)
Uma expressão que usa a função "countIfValue" para contar apenas o número de vezes que o valor 10 foi coletado tem a seguinte aparência:
d2: countIfValue (# {mCXR7u4kNBW.NFkjsNiQ9PH}), 10)
Uma expressão que usa a função "zpvc" tem esta aparência:
d2: zpvc (A {GPkGfbmArby}), # {mCXR7u4kNBW.NFkjsNiQ9PH}), 4, -1)
Uma expressão que usa as funções "if" e "isnull" tem a seguinte aparência:
if (isNull (A {GPkGfbmArby}), 10,20)
Uma expressão que usa a função "firstNonNull" tem a seguinte aparência:
firstNonNull (A {GPkGfbmArby}), # {mCXR7u4kNBW.NFkjsNiQ9PH}, 44)
Uma expressão que usa a função "maior" tem esta aparência:
maior (# {mCXR7u4kNBW.k8ja2Aif1Ae}, # {mCXR7u4kNBW.NFkjsNiQ9PH}, 1)
Variáveis para usar em uma expressão ou filtro de indicador de programa
The program indicator expression and filter support a range of variables:
| Variável | Descrição |
|---|---|
| event_date | The date of when the event or the last event in the enrollment took place. |
| creation_date | A data de quando um evento ou inscrição foi criado no sistema. |
| due_date | A data de vencimento de um evento. |
| sync_date | A data de quando o evento ou inscrição foi sincronizado pela última vez com o aplicativo Android. |
| incidente_data | A data da incidência do evento. |
| enrollment_date | A data de quando a instância da entidade rastreada foi inscrita no programa. |
| enrollment_status | Can be used to include or exclude enrollments in certain statuses. When calculating the haemoglobin improvement/deterioration throughout a pregnancy, it might make sense to only consider completed enrollments. If non-completed enrollments is not filtered out, these will represent half-finished ANC followups, where the final improvement/deterioration is not yet established. |
| current_date | A data atual. |
| valor_contagem | O número de valores não nulos na parte da expressão do evento. |
| zero_pos_value_count | O número de valores numéricos positivos na parte da expressão do evento. |
| event_count | The count of events (useful in combination with filters). Aggregation type for the program indicator must be COUNT. |
| inscrição_conta | The count of enrollments (useful in combination with filters). Aggregation type for the program indicator must be COUNT. |
| tei_count | The count of tracked entity instances (useful in combination with filters). Aggregation type for the program indicator must be COUNT. |
| org_unit_count | The count of organisation units (useful in combination with filters). Aggregation type for the program indicator must be COUNT. |
| program_stage_name | Can be used in filters for including only certain program stages in a filter for tracker programs. Uses the name of the program stage:V{program_stage_name} == 'ANC first visit' |
| program_stage_id | Can be used in filters for including only certain program stages in a filter for tracker programs. Uses the unique identifier of the program stage:V{program_stage_id} == 'YPSSfbmAtt1' |
| analytics_period_start | Can be used in filters or expressions for comparing any date to the first date in each reporting period.d2:daysBetween(#{WZbXY0S00lP.w4ky6EkVahL}, V{analytics_period_start}) |
| analytics_period_end | Pode ser usado em filtros ou expressões para comparar qualquer data com a última data inclusiva em cada período de relatório. |
| event_status | Can be used in filters or expressions for comparing event status.V{event_status} == 'COMPLETED' |
| complete_date | Contains completion date of the event. If the event is not yet complete, then "completed_date" contains nothing. |
A filter that uses the "Analytics period end" variable to only include women who has an LMP that would be in the first trimester:
d2: daysBetween (# {WZbXY0S00lP.w4ky6EkVahL}, V {analytics_period_end}) <= 84
An expression that uses the "value count" variable looks like this:
(# {A03MvHHogjR.a3kGcGDCuk6} + # {A03MvHHogjR.wQLfBvPrXqq}) / V {value_count}
An expression that uses the "event_date" and "incident_date" variables looks like this:
d2: daysBetween (V {incident_date}, V {event_date})
Operadores para usar em um filtro de indicador de programa
| Operator | Descrição |
|---|---|
| and | Logical AND |
| or | Logical OR |
| == | Equal to |
| != | Not equal to |
| < | Less than |
| <= | Less than or equal to |
| > | Greater than |
| >= | Greater than or equal to |
These operators can be used to form logical expressions which ultimately evaluate to either true or false. For example you can assert that multiple data elements must be a specific value, or that specific attributes must have numerical values less or greater than a constant.
Um filtro que usa atributos e elementos de dados tem a seguinte aparência:
A {cejWyOfXge6} == 'Feminino' e # {A03MvHHogjR.a3kGcGDCuk6} <= 2
Tip
DHIS2 is using the JEXL library for evaluating expressions which supports additional syntax beyond what is covered in this documentation. See the reference at the project home page to learn how you can create more sophisticated expressions
Setting up new Program disaggregation Mappings
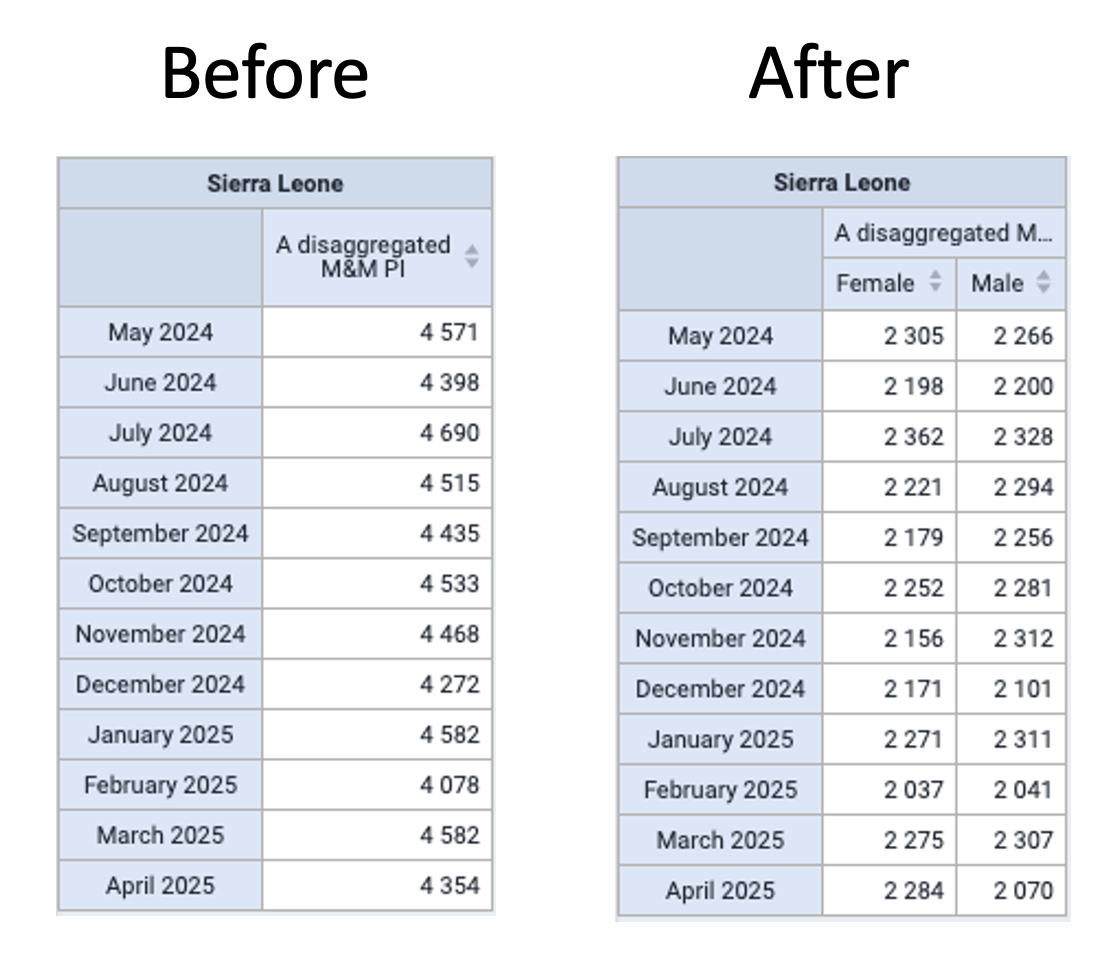
DHIS2 v42 introduces the ability to assign Disaggregation Category Combinations to a Program Indicator and create a mapping between the program data and each category option contained in the combination. This creates a relationship between the tracker and aggregate data models which allows for analysing individual data in the same way and alongside aggregated data.


The Program Indicator Disaggregation mappings, defined at the Program level, provide a connection between the two data models within DHIS2. This ultimately allows a user to create disaggregated views of program data within the Data Visualizer using a single Program Indicator where previously one for each disaggregation was needed.
-
Install or update the new Maintenance app (Preview)
If your instance does not already have the new version of the maintenance app installed go to the App Management App and search for Maintenance in the App Hub and install the app. If you already have it installed, then you should update the app to the latest version. Updates to this app are continuously released so it is good to make sure that you are using the most recent release.

Note Version 0.63.0 might be superseded by a newer version by the time you read this, update to the latest -
Load the Program Disaggregation section of the Maintenance (Preview) App by selecting Program Disaggregations under the Other section or browsing to yourinstanceurl/apps/maintenance-preview#/programDisaggregations/

Program Disaggregation screen -
Select a Program from the drop down to enter the edit section and add Mappings to, for this example we will use the Inpatient morbidity and mortality program
-
This will load the Program Indicator Mapping and Categories definition screen
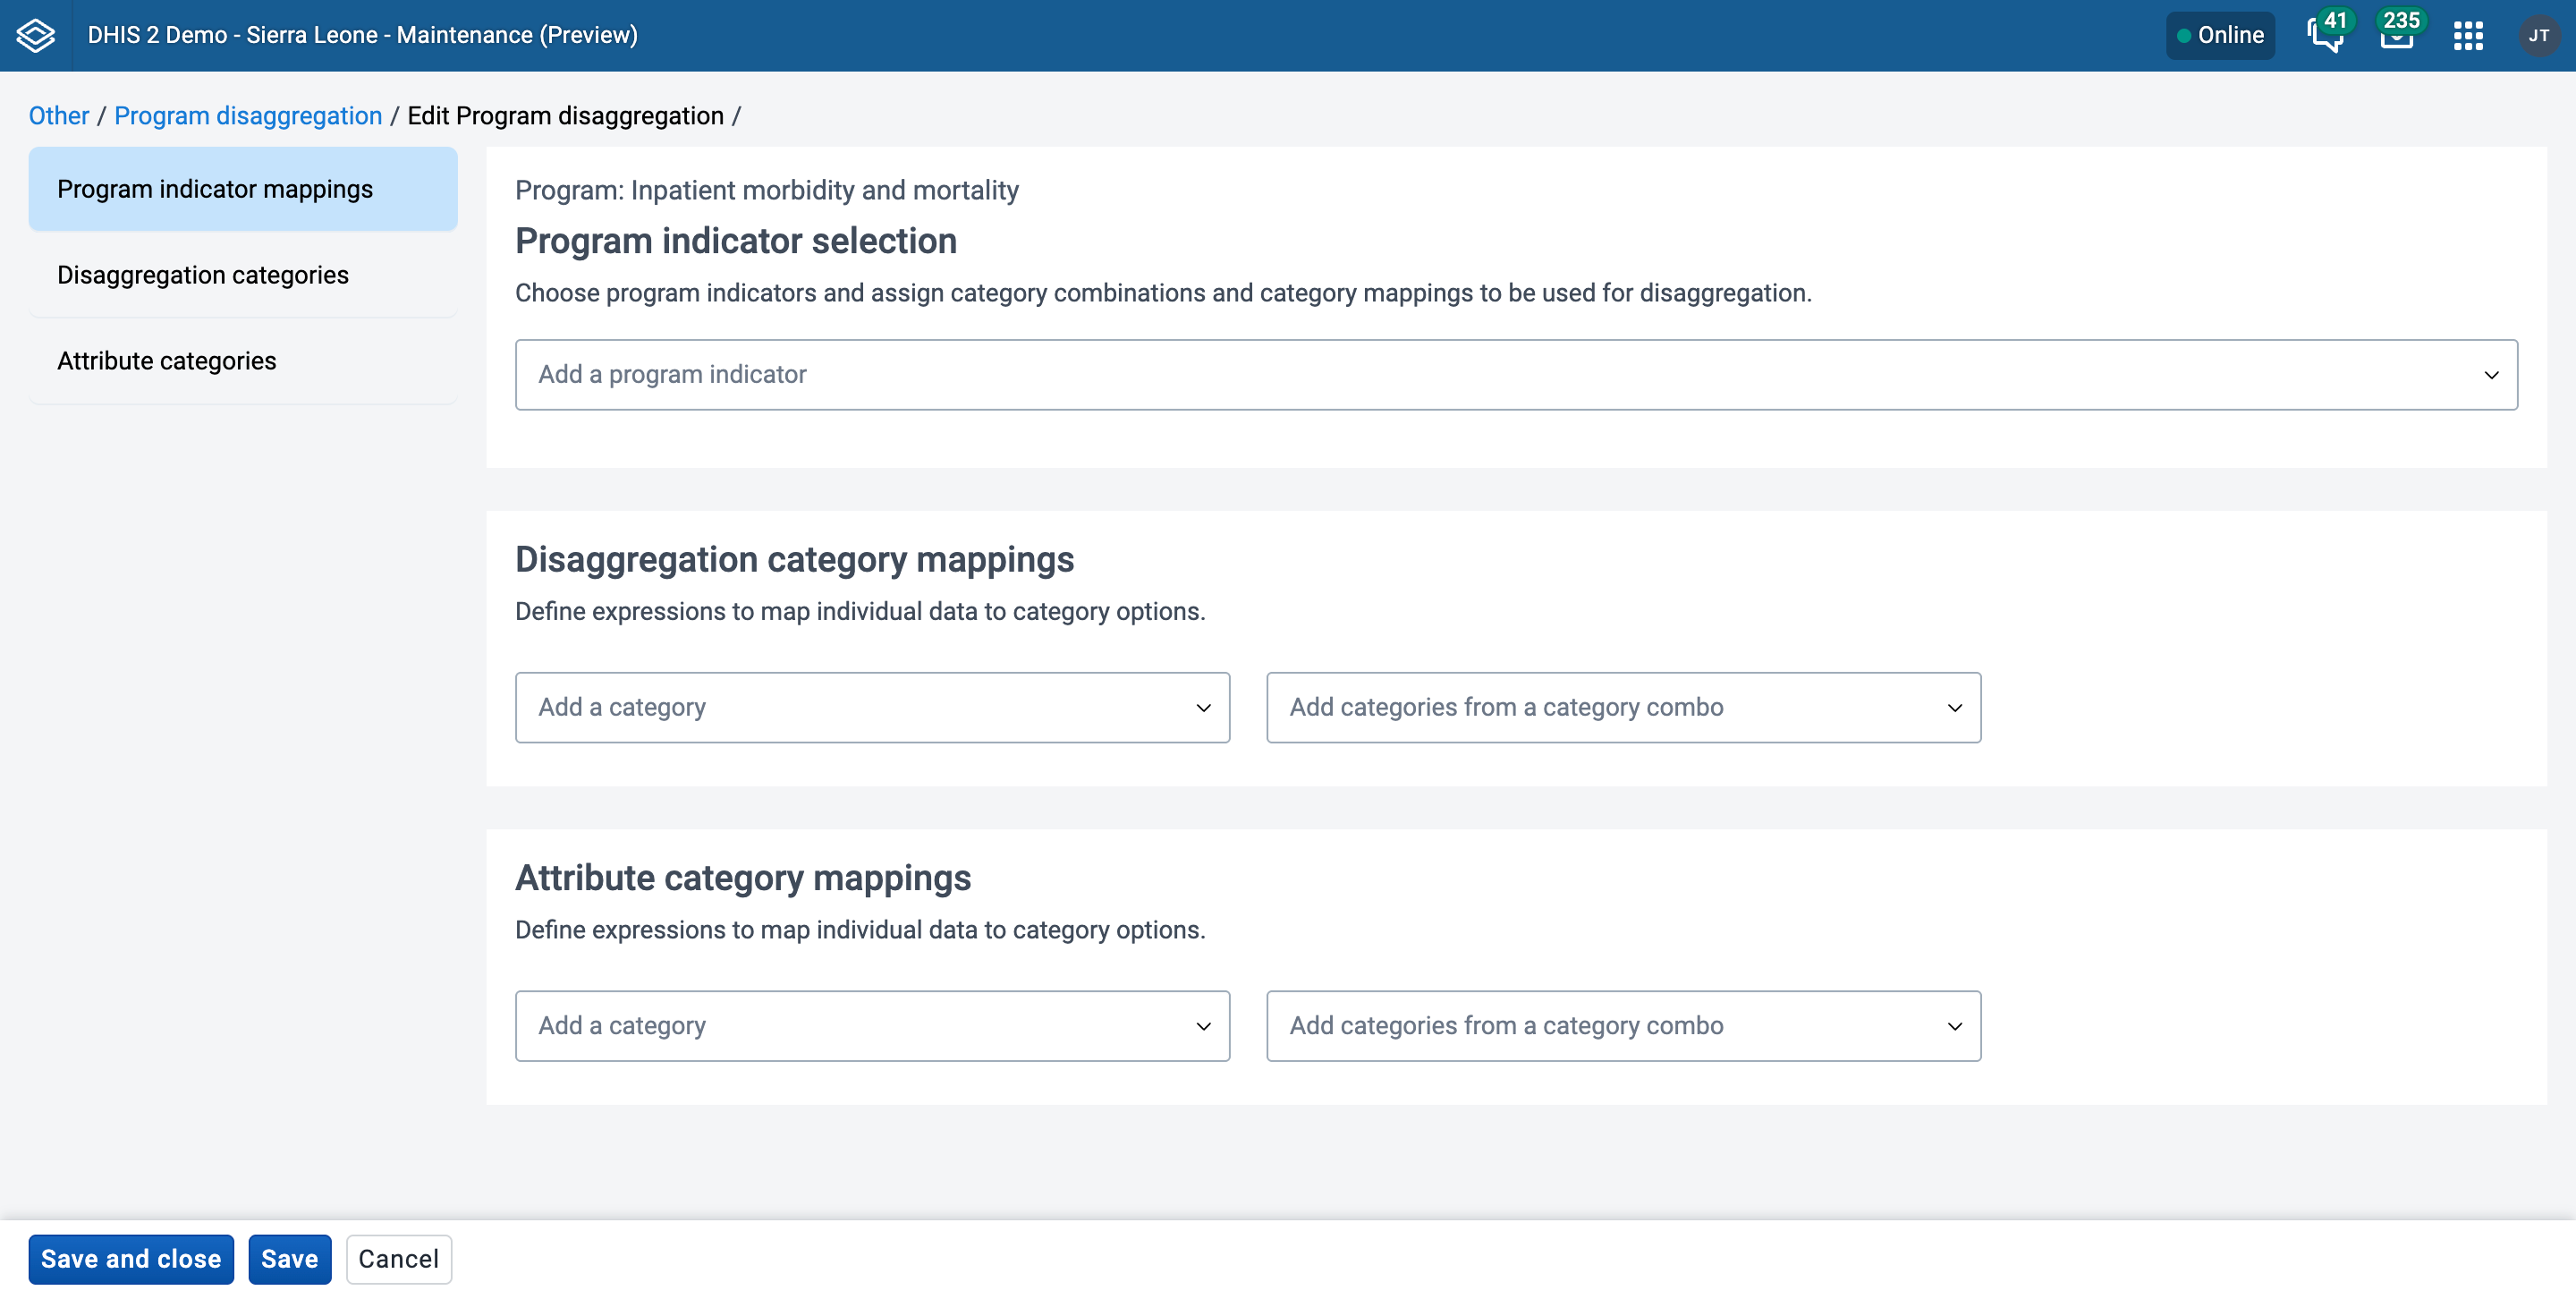
Program Indicator Selection -
Select a Program Indicator from the drop down list, in this example we will use BMI
-
Under Disaggregation category combination Select Gender and U5y (you may need to create a new category combination containing the categories Gender and Under 5/5 and above of age if not present)

Loading this category combination will display the Mapping selection drop down for each of the categories defined, as this is the first time these categories have been selected there are no mappings currently available.
-
Under the Disaggregation categories section you should see both of the categories from the combination added as suggestion. Click Add category for both Gender and U5y
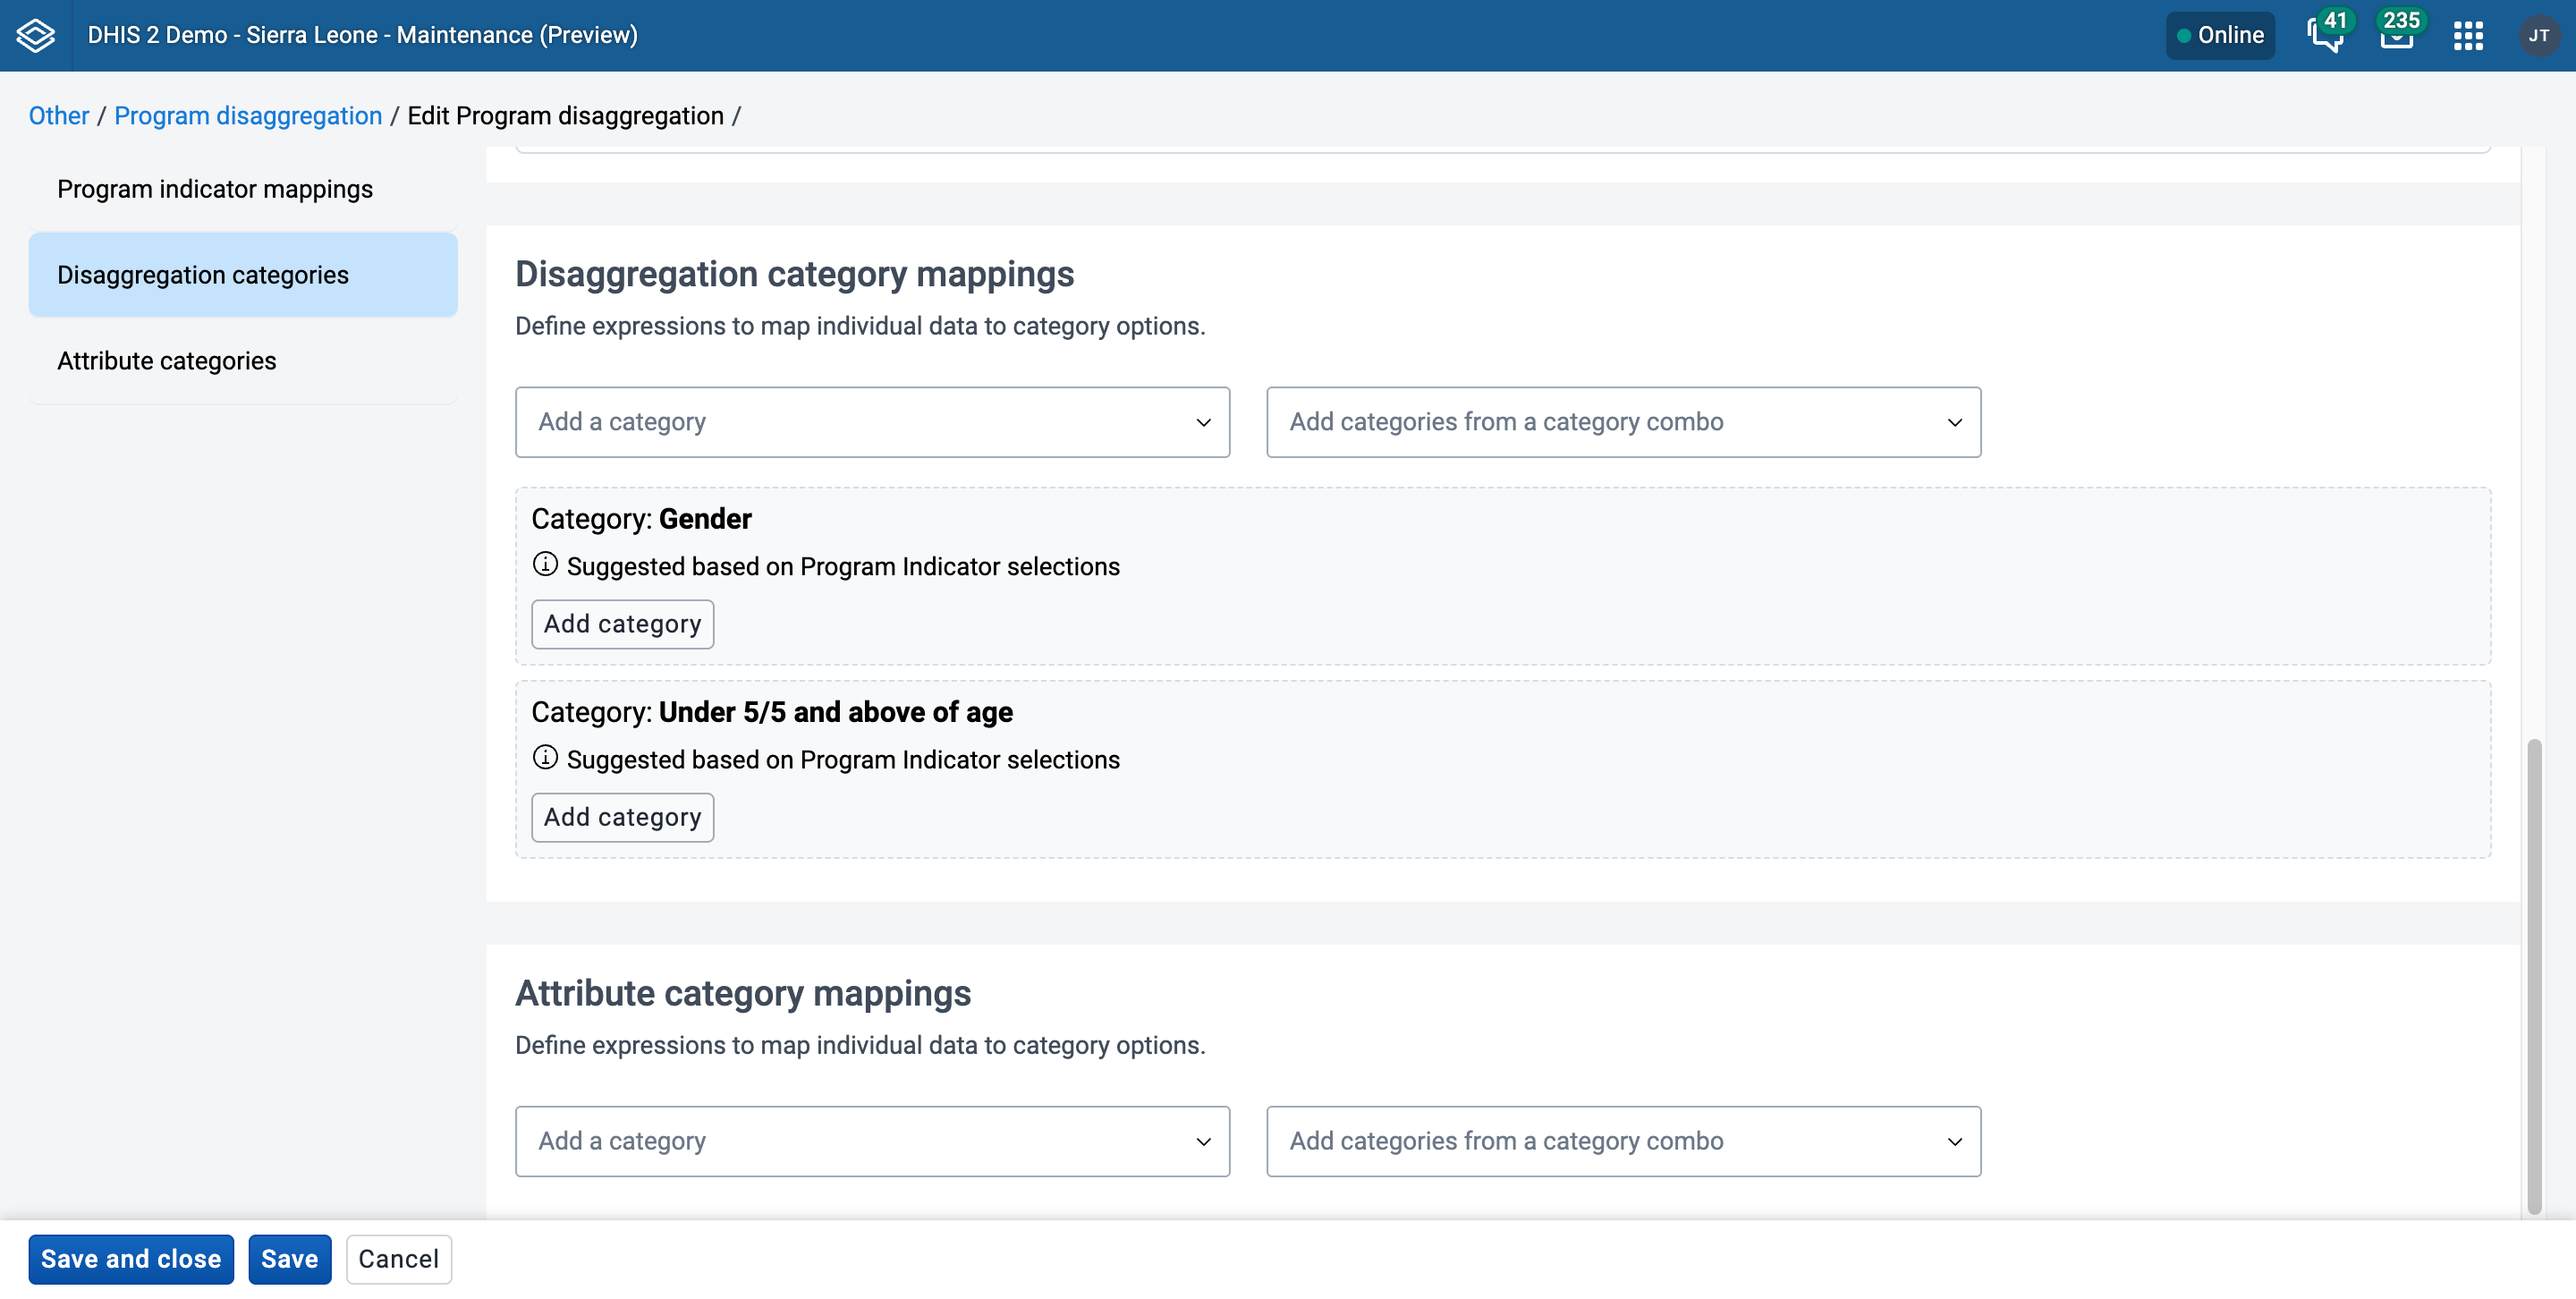
Create the category mappings
-
In the text field under each Category enter an expression using the Program Data Elements and Attributes that defines the category. The expression uses the same syntax as the Filter section of the Program Indicator creation screen. It is recommended to open a Program Indicator within the Program you are mapping, use the Filter screen to construct the expression and then copy it into this field. This allows you to use the inbuilt expression validation of the Program Indicator filter builder. Program Indicator functions and Variale operators
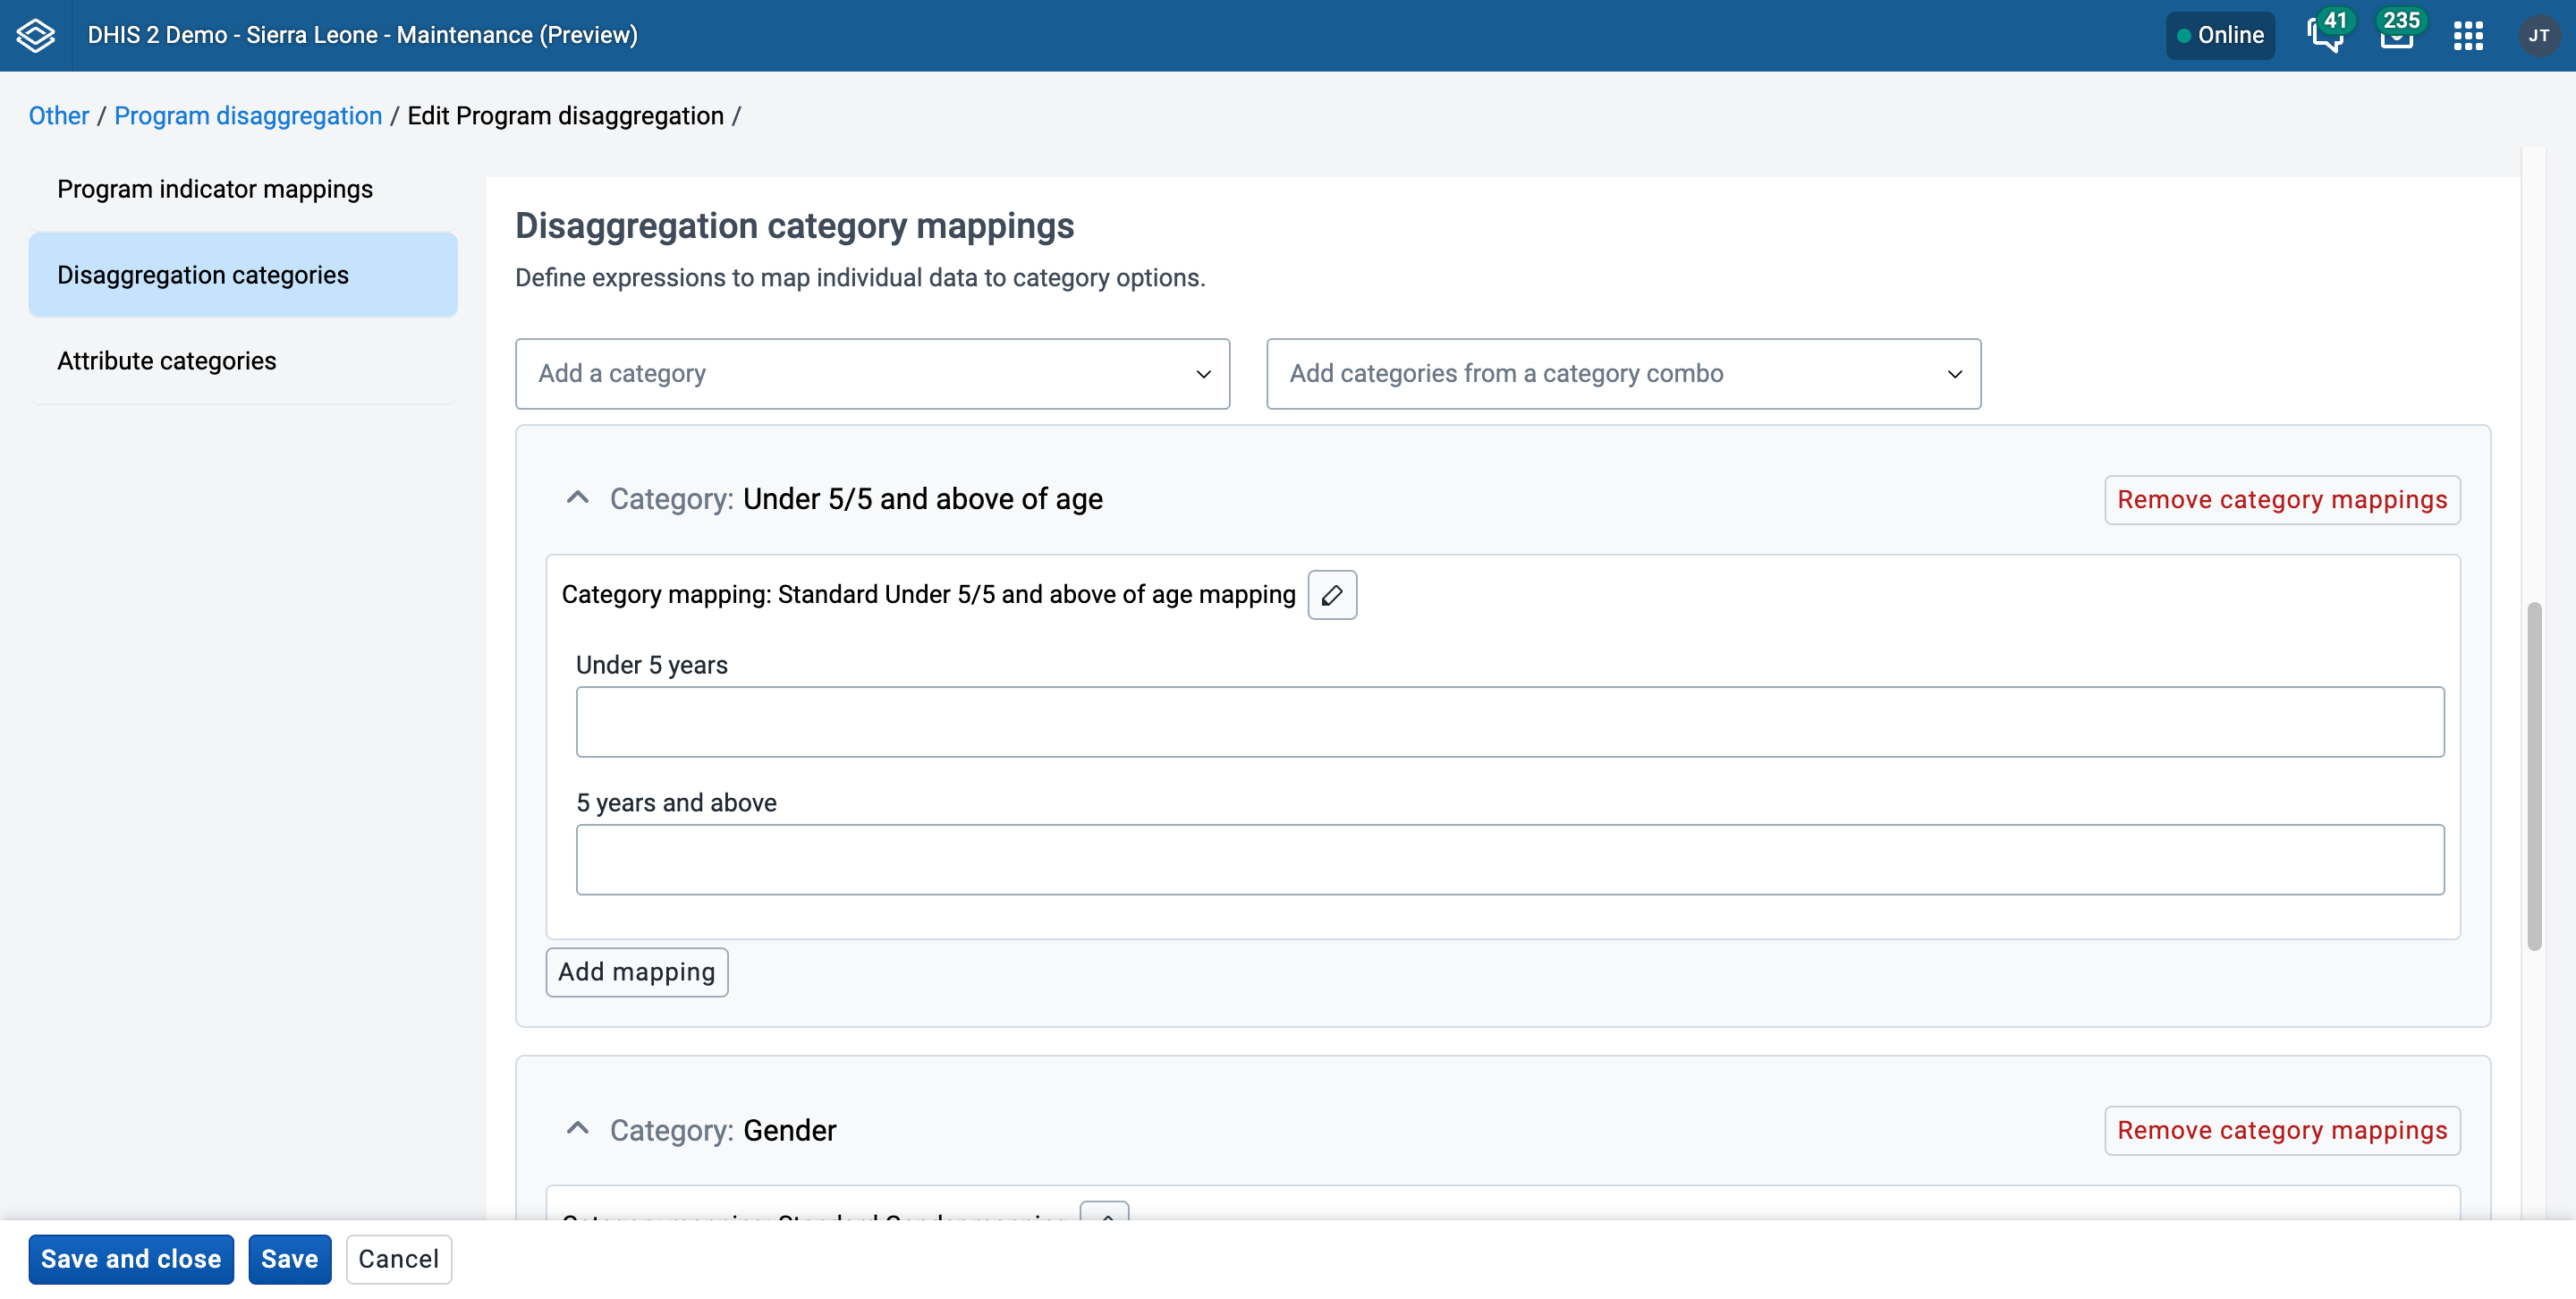

This example is linking the value selected in the Gender data element in the Program to the category option. Since the Option set in this case is a text field the expression is set to match the text ‘Female’. The next example for age shows a different way to define the relationship.

To add the mapping for the Under 5 years and 5 years and above, since it is a numerical field you can use the operators
>>=<<===!=to define the relationship
-
When mappings for all the category options are complete, click Save and exit
-
Open Data Visualizer, first let’s look at how these data were previously displayed. To do this create a visualisation to show the data of the 5 existing Program indicators with the built in disaggregations shown below.
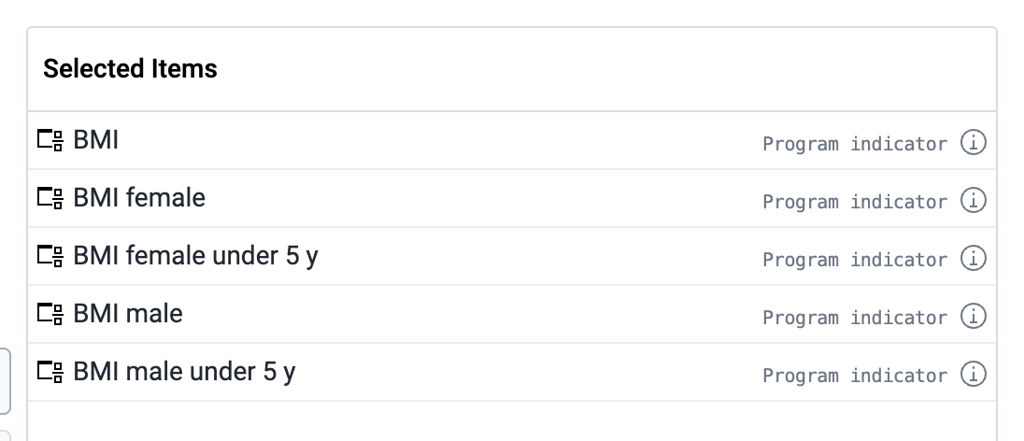

-
Now remove the 4 Program Indicators with disaggregations specified and leave only the BMI Program Indicator.

-
You can now add Gender and Under 5/5 and above of age as disaggregation categories from the Your Dimensions column for the Program Indicator, click update and see the results.
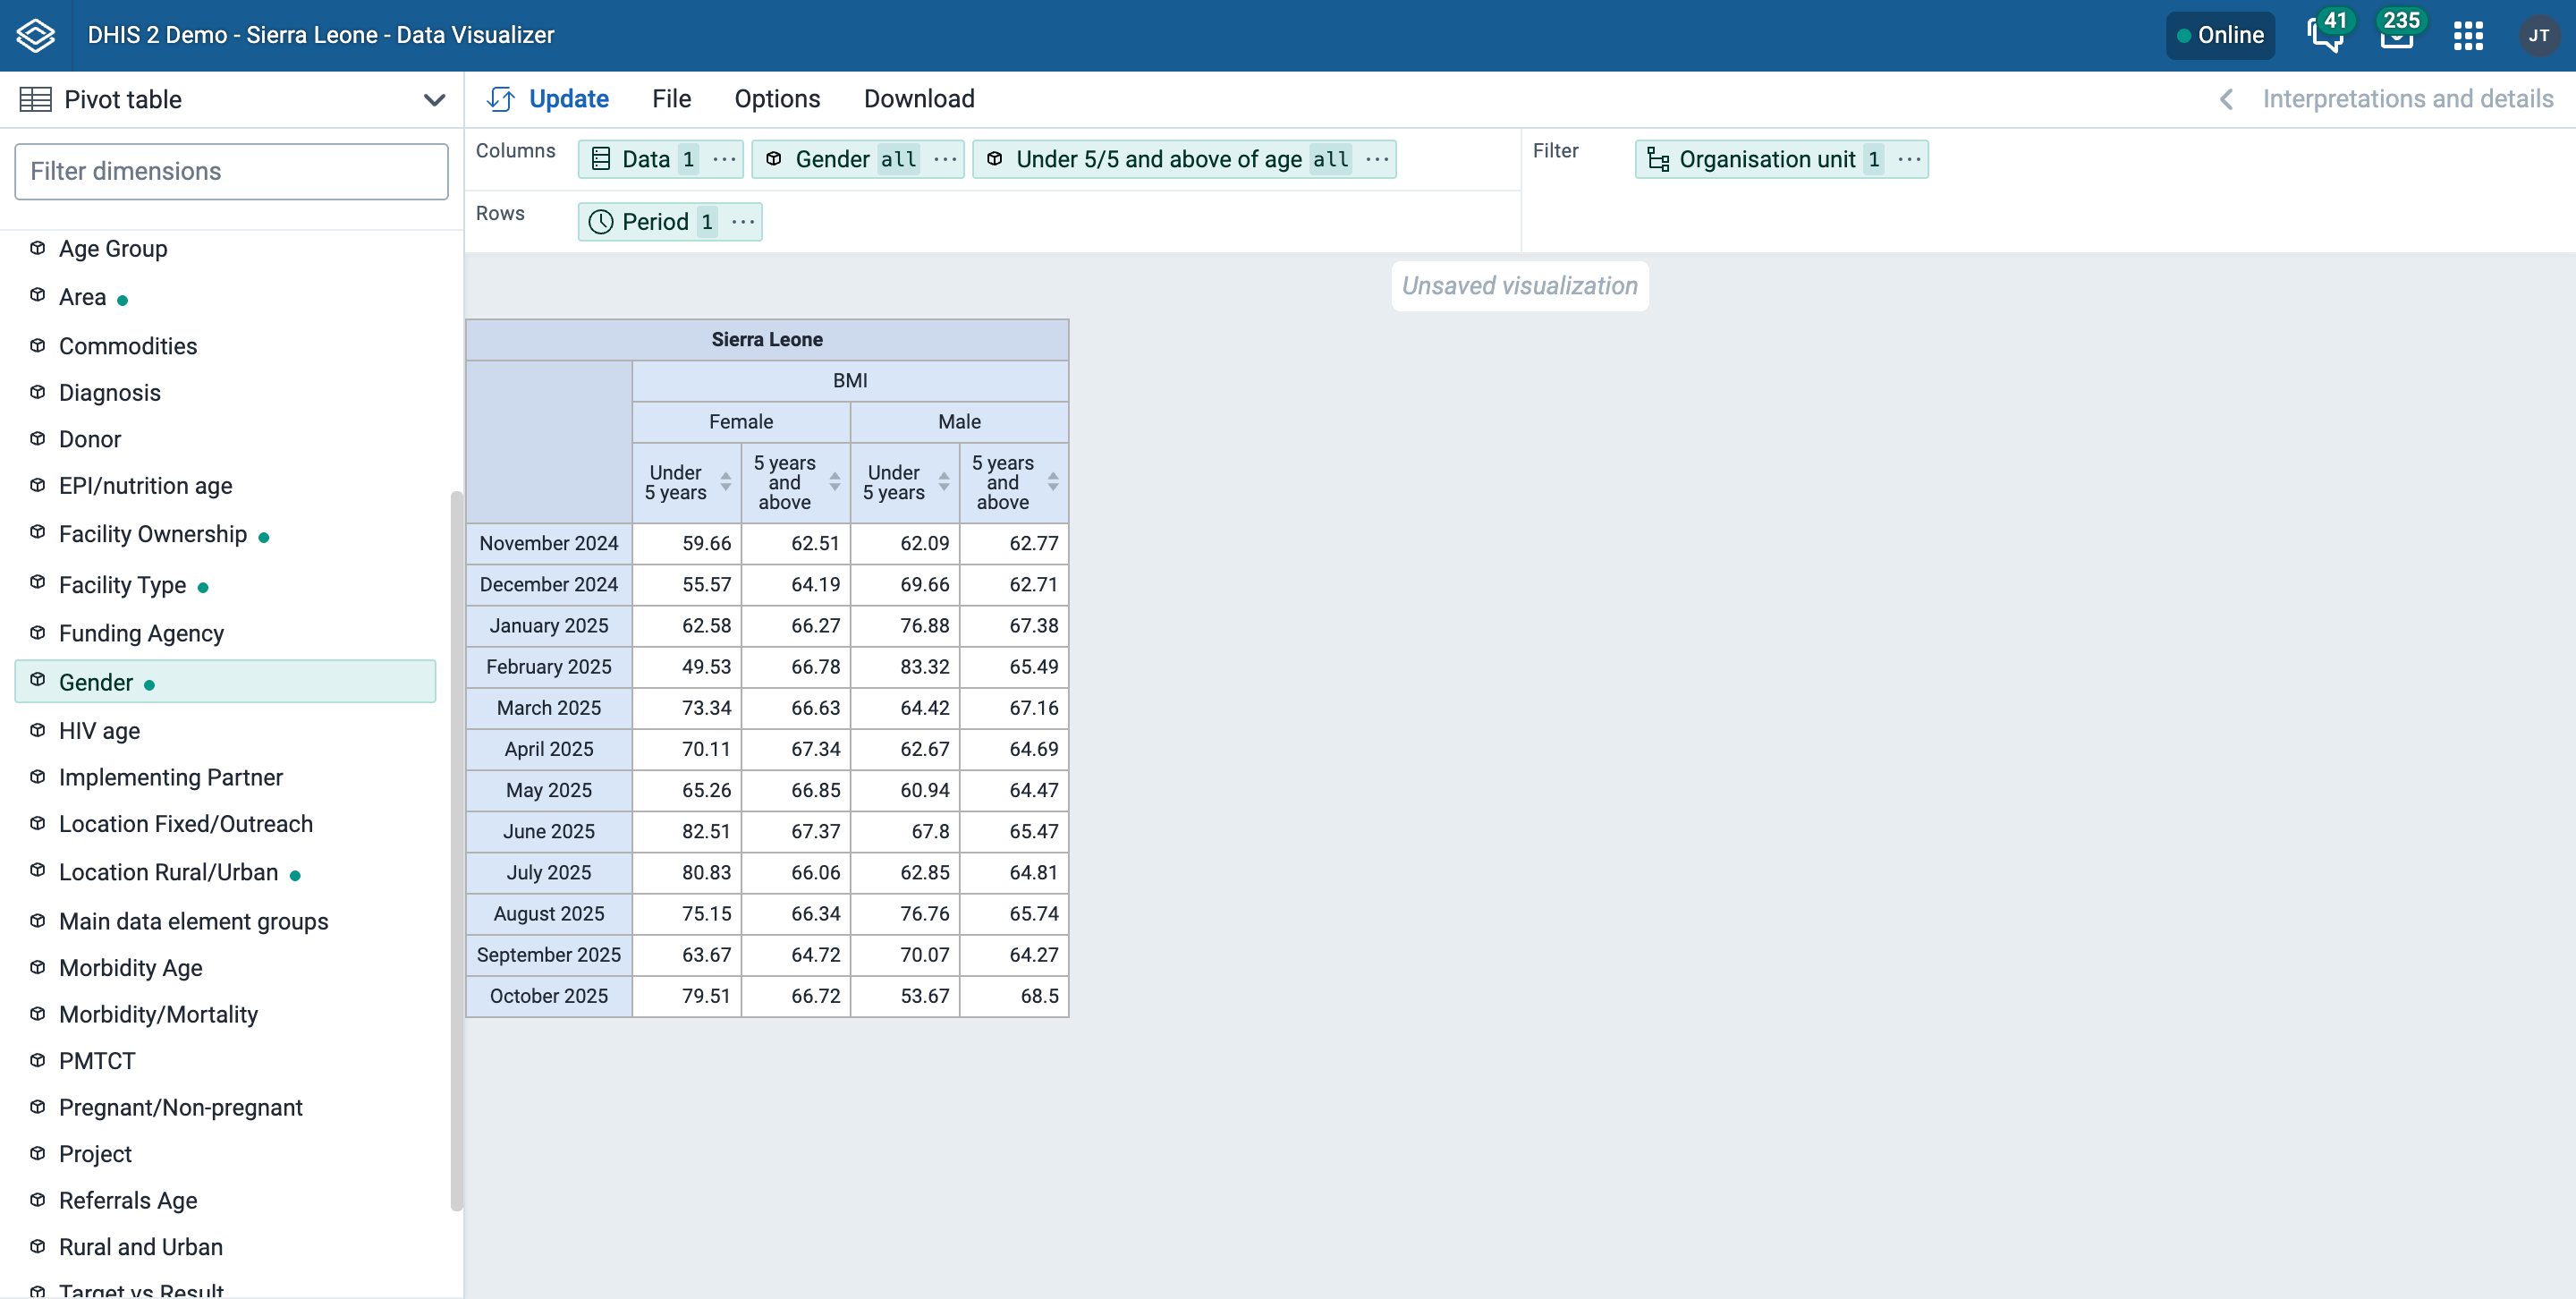
You can now compare the data from the two separate program indicators and the single program indicator that has been disaggregated.
Transferring Program Indicator data via the Aggregate data exchange app
In addition to viewing a disaggregated Program Indicator in the Data Visualiser you can now transfer the Program Data, via the Disaggregated Program indicator, into a Data Element that shares the same Category Combination.

By adding the ID of a Data Element in the Data element for aggregate data export field and then setting up the aggregate data exchange app* to transfer data you can save Program data in the aggregate data model

Configurar regras de programa
Sobre as regras do programa
Program rules allow you to create and control dynamic behaviour of the user interface in the Tracker Capture and Event Capture apps. During data entry, the program rules expressions are evaluated each time the user interface is displayed, and each time a data element is changed. Most types of actions will take effect immediately when the user enters values in the Tracker Capture and Event Capture apps.
| Program rule component | Descrição |
|---|---|
| Program rule action | Each program rule contains one or multiple actions. These are the behaviours that are triggered in the user interface when the expression is true. Actions will be applied at once if the expression is true, and will be reverted if the expression is no longer true. There are several types of actions and you can have several actions in one program rule. |
| Program rule expression | Each program rule has a single expression that determines whether the program rule actions should be triggered, if the expression evaluates to true. If the expression is true the program rule is in effect and the actions will be executed. If the expression is false, the program rule is no longer in effect and the actions will no longer be applied. You create the expression with standard mathematical operators, custom functions, user-defined static values and program rule variables. The program rule variables represent attribute and data element values which will be evaluated as part of the expression. |
| Program rule variable | Program rule variables lets you include data values and attribute values in program rule expressions. Typically, you'll have to create one or several program rule variables before creating a program rule. This is because program rules expressions usually contain at least one data element or attribute value to be meaningful. The program rule variables are shared between all rules in your program. When you create multiple program rules for the same program, these rules will share the same library of program rule variables. |
In the Maintenance app, you manage the following program rule objects:
| Object type | Available functions |
|---|---|
| Program rule | Create, edit, clone, delete, show details and translate |
| Program rule variable | Create, edit, clone, share, delete, show details and translate |
Fluxo de Trabalho
-
In the Maintenance app, create program rule variable(s) if needed.
-
No aplicativo ** Manutenção **, crie a regra do programa:
-
Insira os detalhes da regra do programa.
-
Crie a expressão de regra do programa.
-
Defina as ações da regra do programa.
-
-
In the Tracker Capture or Event Capture apps, verify that the program rule behaves as expected.
Crie ou edite uma variável de regra de programa
-
Open the Maintenance app and click Program > Program rule variable.
-
Clique no botão adicionar.
-
Select a Program and enter a Name
Please note that the name of the program may not contain any of the following excluded keywords: -
and-or-not -
Selecione se deseja ** Usar código para conjunto de opções **.
This option is only effective when the data element or tracked entity attribute is connected to an option set. If you don't select this option, the program rule variable will be populated with the option set's name. If you select the option, the program rule variable will be populated with the option set's code instead.
-
Selecione um ** Tipo de fonte ** e insira as informações necessárias.
Depending on the source type, you'll have to select, for example, a Program stage, Data element or Tracked entity attribute.
The source types determine how the program rule variable is populated with a value.
Source type Description Data element from the newest event for a program stage This source type works the same way as Data element from the newest event in the current program, except that it only evaluates values from one program stage.
This source type can be useful in program rules where the same data element is used in several program stages, and a rule needs to evaluate the newest data value from within one specific stage.
In order to know what event is the newest, the report date (event date) is used. If you have many events with the same report date, the system choose the one with the latest createdAt property of the event.Data element from the newest event in the current program This source type is used when a program rule variable needs to reflect the newest known value of a data element, regardless of what event the user currently has open.
This source type is populated slightly differently in Tracker Capture and Event Capture apps:
Tracker Capture: the program rule variable will be populated with the newest data value collected for the given data element within the enrollment.
Event Capture: the program rule variable will be populated with the current events data.
NB Future dates are "newer" than current or past dates.
In order to know what event is the newest, the report date (event date) is used. If you have many events with the same report date, the system choose the one with the latest createdAt property of the event.Data element in current event Program rule variables with this source type will contain the data value from the same event that the user currently has open.
This is the most commonly used source type, especially for skip logic (hide actions) and warning/error rules.Data element from previous event Program rule variables with this source type will contain the value from a specified data element from a previous event. Only older events is evaluated, not including the event that the user currently has open.
This source type is commonly used when a data element only should be collected once during an enrollment, and should be hidden in subsequent events.
Another use case is making rules for validating input where there is an expected progression from one event to the next - a rule can evaluate whether the previous value is higher/lower and give a warning if an unexpected value is entered.Calculated value Program rule variable with this source type is not connected directly to any form data - but will be populated as a result of some other program rules ASSIGN action.
This variable will be used for making preliminary calculations, having a ASSIGN program rule action and assigning a value, this value can be used by other program rules - potentially making the expressions simpler and more maintainable.
These variables will not be persisted and will stay in memory only during the execution of the set of program rules. Any program rule that assigns a data value to a preliminary calculated value would normally also have a priority assigned - to make sure that the preliminary calculation is done before the rule that consumes the calculated value.Tracked entity attribute Populates the program rule variable with a specified tracked entity attribute for the current enrollment.
Use this is the source type to create program rules that evaluate data values entered during registration.
This source type is also useful when you create program rules that compare data in events to data entered during registration.
This source type is only used for tracker programs (programs with registration). -
Clique em Salvar.
Crie ou edite uma regra de programa
** Nota **
Uma regra de programa pertence a exatamente um programa.
-
Open the Maintenance app and click Program > Program rule.
-
Clique no botão adicionar.
-
Enter the program rule details. These fields are not shown to the end user, they are only meant for the program administrator.
-
Programa
-
** Regra de gatilho apenas para a fase do programa **
If a program stage is selected, the program rule will only run for the selected program stage, as opposed to being run for every program stage in the program.
-
Nome
-
Descrição
-
Prioridade
Let's say you have 16 program rules in your program. You configure the program rules with the following priority settings:
-
Prioridade 1 para regra de programa A
-
Prioridade 2 para regras de programa B - K
-
Sem prioridade para regras de programa L - P
Result: the system runs the program rules in the following order:
-
Regra do programa A
-
Program rules B - K (you can't find out or configure in which order the system runs these program rules)
-
Regras do programa L - P.
-
-
-
Click Enter program rule expression and create the program rule expression with the help of variables, functions and operators.
-
Click Define program rule actions and create the actions executed when the expression is true.
-
Click the add button, select an Action and enter the required information.
Depending on the action type, you'll have to perform different types of settings. For some action types, you must also enter free text or create expressions.
Action type Required settings Description Assign value Data element to assign value to
Tracked entity attribute to assign value to
Program rule variable to assign value to
Expression to evaluate and assignUsed to help the user calculate and fill out fields in the data entry form. The idea is that the user shouldn’t have to fill in values that the system can calculate, for example BMI.
When a field is assigned a value, the user sees the value but the user can't edit it.
NOTE: To assign a value to a tracked entity attribute, the user needs to open the tracked entity profile widget for the rule to trigger.
Example from Immunization stock card i Zambia: The data element for vaccine stock outgoing balance is calculated based on the data element for incoming stock balance minus the data elements for consumption and wastage.
Advanced use: configure an 'assign value' to do a part of a calculation and then assign the result of the calculation to a program rule variable. This is the purpose with the "Calculated value" program rule variable.Display text Display widget
Static text
Expression to evaluate and display after static textUsed to display information that is not an error or a warning, for example feedback to the user. You can also use this action to display important information, for example the patient's allergies, to the user. Display key/value pair Display widget
Key label
Expression to evaluate and display as valueUsed to display information that is not an error or a warning.
Example: calculate number of weeks and days in a pregnancy and display it in the format the clinician is used to see it in. The calculation is based on previous recorded data.Error on complete Data element to display error next to
Tracked entity attribute to display error next to
Static text
Expression to evaluate and display after static textUsed whenever you've cross-consistencies in the form that must be strictly adhered to. This action prevents the user from continuing until the error is resolved.
This action differs from the regular Show error since the error is not shown until the user tries to actually complete the form.
If you don't select a data element or a tracked entity attribute to display the error next to, make sure you write a comprehensive error message that helps the user to fix the error.Hide field Data element to hide
Tracked entity attribute to hide
Custom message for blanked fieldUsed when you want to hide a field from the user.
Custom message for blanked field allows you to define a custom message displayed to the user in case the program rule hides and blanks out the field after the user typed in or selected a value.
If a hide field action hides a field that contains a value, the field will always removed. If no message is defined, a standard message will be displayed to alert the user.Hide section Program stage section to hide Used when you want to hide a section in a program stage from the user. Prevent adding new events to stage Program stage where users will not be able to add new events Used when you do not want users to add any more events to a program stage. Existing events will not be hidden. Make field mandatory Data element to make mandatory
Tracked entity attribute to make mandatoryUsed when you want to make a data element or tracked entity attribute mandatory so they have to be filled out before the form can be saved. Show error Data element to display error next to
Tracked entity attribute to display error next to
Static text
Expression to evaluate and display after static textUsed whenever there are rules which must strictly be adhered to. The show error action prevents the user from continuing until the error is resolved.
Such a strict validation should only be used when it's certain that the evaluated expression is never true unless the user has made a mistake in data entry.
It's mandatory to define a message that is shown to the user when the expression is true and the action is triggered.
You can select which data element or tracked entity attribute to link the error to. This will help the user to fix the error.
In case several data elements or attributes are involved, select the one that is most likely that the user would need to change.Show warning Data element to display warning next to
Tracked entity attribute to display warning next to
Static text
Expression to evaluate and display after static textUsed to give the user a warning about the entered data, but at the same time to allow the user to save and continue.
You can use warnings to help the user avoid errors in the entered data, while at the same time allow the user to consciously disregard the warnings and save a value that is outside preset expectations.
Static text defines the message shown to the user when the expression is true and the action is triggered.
You can select which data element or tracked entity attribute to link the error to. This will help the user to fix the error.
In case several data elements or attributes are involved, select the one that is most likely that the user would need to change.Warning on complete Data element to display warning next to
Tracked entity attribute to display warning next to
Static text
Expression to evaluate and display after static textUsed to give the user a warning if he/she tries to complete inconsistent data, but at the same time to allow the user to continue. The warning is shown in a dialog when the user completes the form.
Static text defines the message shown to the user when the expression is true and the action is triggered. This field is mandatory.
You can select which data element or tracked entity attribute to link the error to. This will help the user to fix the error.
If you don't select a data element or a tracked entity attribute to display the error next to, make sure you write a comprehensive error message that helps the user to fix the error.Send Message Message template to send Send Message triggers a notification based on provided message template. This action will be taken immediately. The message template will be parsed and variables will be substituted with actual values. Schedule Message Message template to send
Data field which contains expression to evaluate the date which notification should be sent at. If this expression results in any value other than Date, then resultant will be discarded and notification will not get scheduled.Schedule Message will schedule notification at date provided by Expression in the data field. Sample expression is given below
d2:addDays( '2018-04-20', '2' )
Message template will be parsed and variables will be substituted with actual values.Schedule event Program stage to schedule event for
Expression to evaluate the scheduled dateAutomatically schedules a new event for the specified program stage on the date returned by the expression. The expression must evaluate to a valid date; if it does not, no event will be scheduled.
The event is only scheduled once — if the rule condition evaluates to true again, no duplicate event is created.
Useful for programs where the timing of the next visit or follow-up can be derived from existing data, for example scheduling a second vaccination dose a fixed number of days after the first.
Example expression that schedules an event 28 days after a recorded date:
d2:addDays(#{dateOfFirstDose}, 28)Hide option Data element to hide option for
Tracked entity attribute to hide option for
Option that should be hiddenUsed to selectively hide a single option for an option set in a given data element/tracked entity attribute.
When combined with show option group the hide option takes precedence.Hide option group Data element to hide option group for
Tracked entity attribute to hide option group for
Option group that should be hiddenUsed to hide all options in a given option group and data element/tracked entity attribute.
When combined with show option group the hide option group takes precedence.Show option group Data element to show option group for
Tracked entity attribute to show option group for
Option group that should be shownUsed to show only options from a given option group in a given data element/tracked entity attribute. To show an option group implicitly hides all options that is not part of the group(s) that is shown. -
Click Save.
-
(Optional) Repeat above steps to add more actions.
-
-
Clique em Salvar.
Exemplo: regras do programa
Note
You can view all examples on the demo server: https://play.dhis2.org/dev/dhis-web-maintenance/#/list/programSection/programRule
This example shows how to configure a program rule which calculates number of weeks and days in a pregnancy and display the result in the format the clinician is used to see it in. The calculation is based on previous recorded data.
-

-

-

A expressão completa no campo ** Dados **:
d2: concatenar (d2: semanasEntre (# {lmp}, V {current_date}), '+',
d2: módulo (d2: daysBetween (# {lmp}, V {current_date}), 7))

This example shows how to configure a program rule to display text in the Feedback widget in the Tracker Capture app.


This example shows how to configure a program rule to always display certain data in the Feedback widget in the Tracker Capture app. This is useful when you want to make sure that vital data, for example medicine allergies, is always visible.


By using a program rule of type "Assign value" you can calculate the "Gestational age at visit" value and fill it in the data entry form. You configure the program rule to calculate "Gestational age at visit" based on either "LMP date" or "Ultrasound estimated due date".


Informações de referência: operadores e funções para usar na expressão de regra de programa
Note
When using absolute dates in program rule expressions, always use 'YYYY-MM-DD' date format irrespective of the System Date format setting.
Tip
You can nest functions within each other and with sub-expressions to form more complex conditions. An example that produces the gestational age in weeks, based on last menstrual date:
d2:floor( d2:daysBetween(#{lastMenstrualDate},V{event_date}) / 7 )
Tip
The source type will determine how the d2: function calls will evaluate a (sourcefield) parameter.
Example: where #{hemoglobinCurrent} is set to source type Data element in current event. The following function call with evaluate whether haemoglobin is entered in the current event.
d2:hasValue( 'hemoglobinCurrent' )
Example: where #{hemoglobin} is set to source type Data element from the newest event in the current program. The following function call with evaluate whether there exists a value for the haemoglobin in any event in the enrollment.
d2:hasValue( 'hemoglobin' )
Example: where #{hemoglobinPrevious} is set to source type Data element from previous event . The following function call with evaluate whether there exists a value for the haemoglobin among the events preceding the current event.
d2:hasValue( 'hemoglobinPrevious' )
| Operator | Descrição |
|---|---|
| + | Add numbers together |
| - | Subtract numbers from each other |
| * | Multiply two numbers |
| / | Divide two numbers |
| % | The modulus of two numbers |
| && | Logical AND. True only when the expression on the left and right side is true. The left and right side can be yes/no, yes only or a sub-expression in parenthesis. |
| || | Logical OR. True when either the expression on the left or the expression on the right side is true. The left and right side can be yes/no, yes only or a sub-expression in parenthesis. |
| > | Left number greater than right number |
| >= | Left number greater than or equal to right number |
| < | Left number less than right number |
| <= | Left number less than or equal to right number. |
| == | Left side equal to right side. Supports numbers, text, yes/no and yes only. |
| != | Left side not equal to right side. Supports numbers, text, yes/no and yes only. |
| ! | Negates the following value. Can be used for yes/no, yes only or a sub-expression in parenthesis. |
| () | Parenthesis is used to group sub-expressions. |
| Função | Arguments | Descrição |
|---|---|---|
| d2: addDays | (date, number) | Produces a date based on the first argument date, adding the second argument number of days. An example calculating the pregnancy due date based on the last menstrual period: d2:addDays(#{lastMenstrualDate},'283') |
| d2: ceil | (number) | Rounds the input argument up to the nearest whole number. Example: d2:ceil(#{hemoglobinValue}) |
| d2: concatenar | (object, [,object, object,...]) | Produces a string concatenated string from the input parameters. Supports any number of parameters. Will mainly be in use in future action types, for example to display gestational age with d2:concatenate('weeks','+','gestationalageDays'). |
| d2:contains | (text,text, ...) | Searches an expression for one or more substrings. Returns true if the expression contains all the substrings. For example, the following are all true: contains("abcd", "abcd"); contains("abcd", "b"); and contains("abcd", "ab", "bc"). Comparisons are case-sensitive. |
| d2:containsItems | (text,text, ...) | Searches an expression for one or more items. The expression is made up of comma-separated elements. containsItems returns true if every item exactly matches an element in the expression. For example, containsItems("abcd", "abcd") and containsItems("ab,cd", "ab", "cd") are true, but containsItems("abcd", "b") and containsItems("abcd", "ab", "bc") are false. Comparisons are case-sensitive. containsItems can be used for multi-valued data elements to see if an item is contained in the data element values. |
| d2: contagem | (sourcefield) | Counts the number of values that is entered for the source field in the argument. The source field parameter is the name of one of the defined source fields in the program - see example Example usage where #{previousPregnancyOutcome} is one of the source fields in a repeatable program stage "previous pregnancy":d2:count('previousPregnancyOutcome') |
| d2: countIfValue | (sourcefield,text) | Counts the number of matching values that is entered for the source field in the first argument. Only occurrences that matches the second argument is counted. The source field parameter is the name of one of the defined source fields in the program - see example. Example usage where #{previousPregnancyOutcome} is one of the source fields in a repeatable program stage "previous pregnancy". The following function will produce the number of previous pregnancies that ended with abortion:d2:countIfValue('previousPregnancyOutcome','Abortion') |
| d2: countIfZeroPos | (sourcefield) | Counts the number of values that is zero or positive entered for the source field in the argument. The source field parameter is the name of one of the defined source fields in the program - see example. Example usage where #{fundalHeightDiscrepancy} is one of the source fields in program, and it can be either positive or negative. The following function will produce the number of positive occurrences:d2:countIfZeroPos('fundalHeightDiscrepancy') |
| d2: dias entre | (date, date) | Produces the number of days between the first and second argument. When the first argument date comes before the second argument date, the number will be positive - in the opposite case, the number will be negative. The static date format is 'yyyy-MM-dd'. Example, calculating the gestational age(in days) of a woman, based on the last menstrual period and the current event date: d2:daysBetween(#{lastMenstrualDate},V{event_date}) |
| d2:extractDataMatrixValue | Get GS1 value based on application identifier | Given a field value formatted with the gs1 data matrix standard and a string key from the GS1 application identifiers. The function looks and returns the value linked to the provided key. Example expression: d2:extractDataMatrixValue( 'gtin', A{GS1 Value} ) |
| d2: chão | (number) | Rounds the input argument down to the nearest whole number. An example producing the number of weeks the woman is pregnant. Notice that the sub-expression #{gestationalAgeDays}/7 is evaluated before the floor function is executed:d2:floor(#{gestationalAgeDays}/7) |
| d2:hasUserRole | (user role) | Returns true if current user has this role otherwise false Example expression: d2:hasUserRole('UYXOT4A3ASA') |
| d2: hasValue | (sourcefield) | Evaluates to true of the argument source field contains a value, false if no value is entered. Example usage, to find if the source field #{currentPregnancyOutcome} is yet filled in: d2:hasValue('currentPregnancyOutcome') |
| d2:inOrgUnitGroup | (text) | Evaluates whether the current organisation unit is in the argument group. The argument can be defined with either ID or organisation unit group code. The current organisation unit will be the event organisation unit when the rules is triggered in the context of an event, and the enrolling organisation unit when the rules is triggered in the event of a TEI registration form. Example expression: d2:inOrgUnitGroup('HIGH_RISK_FACILITY') |
| d2:inUserGroup | (text) | Returns true if current user is part of this user group otherwise false. The user group is defined by the ID. Example expression: d2:inUserGroup('HrXOT4trAFG') |
| d2:lastEventDate | Get the last event date for entered data | Gets the event date when the underlying data element was entered in the previous event in a program stage |
| d2: esquerda | (text, num-chars) | Evaluates to the left part of a text, num-chars from the first character. The text can be quoted or evaluated from a variable: d2:left(#{variableWithText}, 3) |
| d2: comprimento | (text) | Find the length of a string. Example: d2:length(#{variableWithText}) |
| d2:maxValue | Get maximum value for provided item | Function gets maximum value of provided data element across entire enrollment. Example expression: d2:maxValue( 'blood-pressure' ) |
| d2:minValue | Get minimum value for provided item | Function gets minimum value of provided data element across entire enrollment. Example expression: d2:minValue( 'blood-pressure' ) |
| d2: módulo | (number,number) | Produces the modulus when dividing the first with the second argument. An example producing the number of days the woman is into her current pregnancy week: d2:modulus(#{gestationalAgeDays},7) |
| d2: meses entre | (date, date) | Produces the number of full months between the first and second argument. When the first argument date comes before the second argument date, the number will be positive - in the opposite case, the number will be negative. The static date format is 'yyyy-MM-dd'. |
| d2: oizp | (number) | Avalia o argumento do tipo número como um se o valor for zero ou positivo, caso contrário, como zero. |
| d2: certo | (text, num-chars) | Evaluates to the right part of a text, num-chars from the last character. The text can be quoted or evaluated from a variable: d2:right(#{variableWithText}, 2) |
| d2: redondo | (number [, decimals]) | Rounds the input argument to the nearest integer. An optional second argument can be provided to specify a number of decimal places to which the number is to be rounded. Example: d2:round(1.25, 1) = 1.3 |
| d2: substring | (text, start-char-num, end-char-num) | Evaluates to the part of a string specified by the start and end character number. Example expression: d2:substring(#{variableWithText}, 1, 3) If the #{variableWithText} in the above example was 'ABCD', then the result of the evaluation would be 'BC' |
| d2: dividir | (text, delimiter, element-num) | Split the text by delimiter, and keep the nth element(0 is the first). The text can be quoted or evaluated from a variable, the delimiter must be quoted: d2:split(#{variableWithText}, '-', 1) Note: comma delimiter(,) is not supported. |
| d2: validatePattern | (text, regex-pattern) | Evaluates to true if the input text is an exact match with the supplied regular expression pattern. The regular expression needs to be escaped. Example expression, triggering actions if a number is not on the pattern 9999/99/9: !d2:validatePattern(A{nrc},'\\d{6}\/\\d{2}\/\\d') Example expression, triggering actions that if the address is not consisting of letters or white spaces, then a white space, then a number: !d2:validatePattern(A{registrationAddress},'[\\w ]+ \\d+') Example, triggering actions if a name contains any numbers: !d2:validatePattern(A{name},'[^\\d]*') Example expression, triggering actions if a mobile number contains the illegal number sequence 555: d2:validatePattern(A{mobile} ,'.*555.*') |
| d2: semanas entre | (date, date) | Produces the number of full weeks between the first and second argument. When the first argument date comes before the second argument date, the number will be positive - in the opposite case, the number will be negative. The static date format is 'yyyy-MM-dd'. |
| d2: anos entre | (date, date) | Produces the number of years between the first and second argument. When the first argument date comes before the second argument date, the number will be positive - in the opposite case, the number will be negative. The static date format is 'yyyy-MM-dd'. |
| d2: zing | (number) | Avalia o argumento do tipo número para zero se o valor for negativo, caso contrário, para o próprio valor. |
| d2: zpvc | (object, [,object, object,...]) | Retorna o número de valores numéricos zero e positivos entre os argumentos de objeto fornecidos. Pode ser fornecido com qualquer número de argumentos. |
| d2:zScoreWFA | Z-Score weight for age indicator | Calculates z-score based on data provided by WHO weight-for-age indicator. e varies between -3.5 to 3.5 depending upon the value of weight. Example expression: d2:zScoreWFA( ageInMonths, weight, gender ) Gender > Gender is considered female by default. Any of the following codes can > be used to denote male: 'Male', 'MALE', 'male', 'ma', 'm', 'M', 0, false |
| d2:zScoreHFA | Z-Score height for age indicator | Calculates z-score based on data provided by WHO height-for-age indicator. Its value varies between -3.5 to 3.5 depending upon the value of height. Example expression: d2:zScoreHFA( ageInMonths, height, gender ) |
| d2:zScoreWFH | Z-Score weight for height indicator | Calculates z-score based on data derived from the WHO weight-for-length and weight-for-height indicators. The data used for girls can be found here and for boys here. Its value varies between -3.5 to 3.5 depending upon the value of the weight. Example expression: d2:zScoreWFH( height, weight, gender ) |
| AI | Data Title | Descrição | Fixed Length |
|---|---|---|---|
| 00 | SSCC | SSCC (Serial Shipping Container Code) | 20 |
| 01 | GTIN | Global Trade Item Number | 16 |
| 02 | CONTENT | GTIN of Trade Items Contained in a logistic unit | 16 |
| 10 | LOT_NUMBER | Batch or lot number | Variável |
| 11 | PROD_DATE | Production date (YYMMDD) | 8 |
| 12 | DUE_DATE | Due date (YYMMDD) | 8 |
| 13 | PACK_DATE | Packaging date (YYMMDD) | 8 |
| 15 | BEST_BEFORE_DATE | Best before date (YYMMDD) | 8 |
| 16 | SELL_BY | Sell by date (YYMMDD) | 8 |
| 17 | EXP_DATE | Expiration date (YYMMDD) | 8 |
| 20 | VARIANT | Internal Product variant | 4 |
| 21 | SERIAL_NUMBER | Serial number | Variável |
| 22 | CPV | Consumer product variant | Variável |
| 235 | TPX | Third Party Controlled, Serialised Extension of Global Trade Item Number (GTIN) (TPX) | Variável |
| 240 | ADDITIONAL_ID | Additional product identification assigned by the manufacturer | Variável |
| 241 | CUSTOMER_PART_NUMBER | Customer part number | Variável |
| 242 | MTO_VARIANT_NUMBER | Made-to-Order Variation Number | Variável |
| 243 | PCN | Packaging component number | Variável |
| 250 | SECONDARY_SERIAL | Secondary serial number | Variável |
| 251 | REF_TO_SOURCE | Reference to source entity | Variável |
| 253 | GDTI | Global Document Type Identifier | Variável |
| 254 | GLN_EXTENSION_COMPONENT | GLN Extension component | Variável |
| 255 | GCN | Global Coupon Number (GCN) | Variável |
| 30 | VAR_COUNT | Variable count | Variável |
| 310* | NET_WEIGHT_KG | Net weight, kilograms (variable measure trade item | Variável |
| 311* | LENGTH_M | Length or first dimension, metres (variable measure trade item) | Variável |
| 312* | WIDTH_M | Width, diameter, or second dimension, metres (variable measure trade item) | Variável |
| 313* | HEIGHT_M | Depth, thickness, height, or third dimension, metres (variable measure trade item) | Variável |
| 314* | AREA_M2 | Area, square metres (variable measure trade item) | Variável |
| 315* | NET_VOLUME_L | Net volume, litres (variable measure trade item) | Variável |
| 316* | NET_VOLUME_M3 | Net volume, cubic metres (variable measure trade item) | Variável |
| 320* | NET_WEIGHT_LB | Net weight, pounds (variable measure trade item) | Variável |
| 321* | LENGTH_I | Length or first dimension, inches (variable measure trade item) | Variável |
| 322* | LENGTH_F | Length or first dimension, feet (variable measure trade item) | Variável |
| 323* | LENGTH_Y | Length or first dimension, yards (variable measure trade item) | Variável |
| 324* | WIDTH_I | Width, diameter, or second dimension, inches (variable measure trade item) | Variável |
| 325* | WIDTH_F | Width, diameter, or second dimension, feet (variable measure trade item) | Variável |
| 326* | WIDTH_Y | Width, diameter, or second dimension, yards(variable measure trade item) | Variável |
| 327* | HEIGHT_I | Depth, thickness, height, or third dimension, inches (variable measure trade item) | Variável |
| 328* | HEIGHT_F | Depth, thickness, height, or third dimension, feet (variable measure trade item) | Variável |
| 329* | HEIGHT_Y | Depth, thickness, height, or third dimension, yards (variable measure trade item) | Variável |
| 330* | GROSS_WEIGHT_GF | Logistic weight, kilograms | Variável |
| 331* | LENGTH_M_LOG | Length or first dimension, metres | Variável |
| 332* | WIDTH_M_LOG | Width, diameter, or second dimension, metres | Variável |
| 333* | HEIGHT_M_LOG | Depth, thickness, height, or third dimension, metres | Variável |
| 334* | AREA_M2_LOG | Area, square metres | Variável |
| 335* | VOLUME_L_LOG | Logistic volume, litres | Variável |
| 336* | VOLUME_M3_LOG | Logistic volume, cubic metres | Variável |
| 337* | KG_PER_M2 | Kilograms per square metre | Variável |
| 340* | GROSS_WHEIGHT_LB | Logistic weight, pounds | Variável |
| 341* | LENGTH_I_LOG | Length or first dimension, inches | Variável |
| 342* | LENGTH_F_LOG | Length or first dimension, feet | Variável |
| 343* | LENGTH_Y_LOG | Length or first dimension, yards | Variável |
| 344* | WIDTH_I_LOG | Width, diameter, or second dimension, inches | Variável |
| 345* | WIDTH_F_LOG | Width, diameter, or second dimension, feet | Variável |
| 346* | WIDTH_Y_LOG | Width, diameter, or second dimension, yards | Variável |
| 347* | HEIGHT_I_LOG | Depth, thickness, height, or third dimension, inches | Variável |
| 348* | HEIGHT_F_LOG | Depth, thickness, height, or third dimension, feet | Variável |
| 349* | HEIGHT_Y_LOG | Depth, thickness, height, or third dimension, yards | Variável |
| 350* | AREA_I2 | Area, square inches (variable measure trade item) | Variável |
| 351* | AREA_F2 | Area, square feet (variable measure trade item) | Variável |
| 352* | AREA_Y2 | Area, square yards (variable measure trade item) | Variável |
| 353* | AREA_I2_LOG | Area, square inches | Variável |
| 354* | AREA_F2_LOG | Area, square feet | Variável |
| 355* | AREA_Y2_LOG | Area, square yards | Variável |
| 356* | NET_WEIGHT_T | Net weight, troy ounces (variable measure trade item) | Variável |
| 357* | NET_VOLUME_OZ | Net weight (or volume), ounces (variable measure trade item) | Variável |
| 360* | NET_VOLUME_Q | Net volume, quarts (variable measure trade item) | Variável |
| 361* | NET_VOLUME_G | Net volume, gallons U.S. (variable measure trade item) | Variável |
| 362* | VOLUME_Q_LOG | Logistic volume, quarts | Variável |
| 363* | VOLUME_G_LOG | Logistic volume, gallons U.S. | Variável |
| 364* | VOLUME_I3 | Net volume, cubic inches (variable measure trade item) | Variável |
| 365* | VOLUME_F3 | Net volume, cubic feet (variable measure trade item) | Variável |
| 366* | VOLUME_Y3 | Net volume, cubic yards (variable measure trade item) | Variável |
| 367* | VOLUME_I3_LOG | Logistic volume, cubic inches | Variável |
| 368* | VOLUME_F3_LOG | Logistic volume, cubic feet | Variável |
| 369* | VOLUME_Y3_LOG | Logistic volume, cubic yards | Variável |
| 37 | COUNT | Count of trade items or trade item pieces contained in a logistic unit | Variável |
| 390* | AMOUNT | Applicable amount payable or Coupon value, local currency | Variável |
| 391* | AMOUNT_ISO | Applicable amount payable with ISO currency code | Variável |
| 392* | PRICE | Applicable amount payable, single monetary area (variable measure trade item) | Variável |
| 393* | PRICE_ISO | Applicable amount payable with ISO currency code (variable measure trade item) | Variável |
| 394* | PRCNT_OFF | Percentage discount of a coupon | Variável |
| 395* | PRICE_UOM | Amount Payable per unit of measure single monetary area (variable measure trade item) | N4+N6 |
| 400 | ORDER_NUMBER | Customers purchase order number | Variável |
| 401 | GINC | Global Identification Number for Consignment (GINC) | Variável |
| 403 | ROUTE | Routing code | Variável |
| 410 | SHIP_TO_GLOB_LOC | Ship to / Deliver to Global Location Number (GLN) | Variável |
| 411 | BILL_TO_LOC | Bill to / Invoice to Global Location Number (GLN) | Variável |
| 412 | PURCHASED_FROM | Purchased from Global Location Number (GLN) | Variável |
| 413 | SHIP_FOR_LOG | Ship for / Deliver for - Forward to Global Location Number (GLN) | Variável |
| 414 | LOC_NUMBER | Identification of a physical location - Global Location Number (GLN) | Variável |
| 415 | PAY_TO | Global Location Number (GLN) of the invoicing party | Variável |
| 416 | PROD_SERV_LOC | Global Location Number (GLN) of the production or service location | Variável |
| 417 | PARTY | Party Global Location Number (GLN) | Variável |
| 420 | SHIP_TO_POST | Ship to / Deliver to postal code within a single postal authority | Variável |
| 421 | SHIP_TO_POST_ISO | Ship to / Deliver to postal code with ISO country code | Variável |
| 422 | ORIGIN | Country of origin of a trade item | Variável |
| 423 | COUNTRY_INITIAL_PROCESS | Country of initial processing | Variável |
| 424 | COUNTRY_PROCESS | Country of processing | Variável |
| 425 | COUNTRY_DISASSEMBLY | Country of disassembly | Variável |
| 426 | COUNTRY_FULL_PROCESS | Country covering full process chain | Variável |
| 427 | ORIGIN_SUBDIVISION | Country subdivision Of origin | Variável |
| 4300 | SHIP_TO_COMP | Ship-to / Deliver-to company name | Variável |
| 4301 | SHIP_TO_NAME | Ship-to / Deliver-to contact | Variável |
| 4302 | SHIP_TO_ADD1 | Ship-to / Deliver-to address line 1 | Variável |
| 4303 | SHIP_TO_ADD2 | Ship-to / Deliver-to address line 2 | Variável |
| 4304 | SHIP_TO_SUB | Ship-to / Deliver-to suburb | Variável |
| 4305 | SHIP_TO_LOCALITY | Ship-to / Deliver-to locality | Variável |
| 4306 | SHIP_TO_REG | Ship-to / Deliver-to region | Variável |
| 4307 | SHIP_TO_COUNTRY | Ship-to / Deliver-to country code | Variável |
| 4308 | SHIP_TO_PHONE | Ship-to / Deliver-to telephone number | Variável |
| 4310 | RTN_TO_COMP | Return-to company name | Variável |
| 4311 | RTN_TO_NAME | Return-to contact | Variável |
| 4312 | RTN_TO_ADD1 | Return-to address line 1 | Variável |
| 4313 | RTN_TO_ADD2 | Return-to address line 2 | Variável |
| 4314 | RTN_TO_SUB | Return-to suburb | Variável |
| 4315 | RTN_TO_LOCALITY | Return-to locality | Variável |
| 4316 | RTN_TO_REG | Return-to region | Variável |
| 4317 | RTN_TO_COUNTRY | Return-to country code | Variável |
| 4318 | RTN_TO_POST | Return-to postal code | Variável |
| 4319 | RTN_TO_PHONE | Return-to telephone number | Variável |
| 4320 | SRV_DESCRIPTION | Service code description | Variável |
| 4321 | DANGEROUS_GOODS | Dangerous goods flag | Variável |
| 4322 | AUTH_LEAV | Authority to leave | Variável |
| 4323 | SIG_REQUIRED | Signature required flag | Variável |
| 4324 | NBEF_DEL_DT | Not before delivery date time | Variável |
| 4325 | NAFT_DEL_DT | Not after delivery date time | Variável |
| 4326 | REL_DATE | Release date | Variável |
| 7001 | NSN | NATO Stock Number (NSN) | Variável |
| 7002 | MEAT_CUT | UN/ECE meat carcasses and cuts classification | Variável |
| 7003 | EXP_TIME | Expiration date and time | Variável |
| 7004 | ACTIVE_POTENCY | Active potency | Variável |
| 7005 | CATCH_AREA | Catch area | Variável |
| 7006 | FIRST_FREEZE_DATE | First freeze date | Variável |
| 7007 | HARVEST_DATE | Harvest date | Variável |
| 7008 | AQUATIC_SPECIES | Species for fishery purposes | Variável |
| 7009 | FISHING_GEAR_TYPE | Fishing gear type | Variável |
| 7010 | PROD_METHID | Production method | Variável |
| 7020 | REFURB_LOT | Refurbishment lot ID | Variável |
| 7021 | FUNC_STAT | Functional status | Variável |
| 7022 | REV_STAT | Revision status | Variável |
| 7023 | GIAI_ASSEMBLY | Global Individual Asset Identifier (GIAI) of an assembly | Variável |
| 703* | PROCESSOR_NUMBER | Number of processor with ISO Country Code | Variável |
| 7040 | UIC_EXT | GS1 UIC with Extension 1 and Importer index | Variável |
| 710 | NHRN_PZN | National Healthcare Reimbursement Number (NHRN) - Germany PZN | Variável |
| 711 | NHRN_CIP | National Healthcare Reimbursement Number (NHRN) - France CIP | Variável |
| 712 | NHRN_CN | National Healthcare Reimbursement Number (NHRN) - Spain CN | Variável |
| 713 | NHRN_DRN | National Healthcare Reimbursement Number (NHRN) - Brasil DRN | Variável |
| 714 | NHRN_AIM | National Healthcare Reimbursement Number (NHRN) - Portugal AIM | Variável |
| 723* | CERT_NUMBER | Certification reference | Variável |
| 7240 | PROTOCOL | Protocol ID | Variável |
| 8001 | DIMENSIONS | Roll products (width, length, core diameter, direction, splices) | Variável |
| 8002 | CMT_NUMBER | Cellular mobile telephone identifier | Variável |
| 8003 | GRAI | Global Returnable Asset Identifier (GRAI) | Variável |
| 8004 | GIAI | Global Individual Asset Identifier (GIAI) | Variável |
| 8005 | PRICE_PER_UNIT | Price per unit of measure | Variável |
| 8006 | ITIP | Identification of an individual trade item piece (ITIP) | Variável |
| 8007 | IBAN | International Bank Account Number (IBAN) | Variável |
| 8008 | PROD_TIME | Date and time of production | Variável |
| 8009 | OPTSEN | Optically Readable Sensor Indicator | Variável |
| 8010 | CPID | Component/Part Identifier (CPID) | Variável |
| 8011 | CPID_SERIAL | Component/Part Identifier serial number (CPID SERIAL) | Variável |
| 8012 | VERSION | Software version | Variável |
| 8013 | GMN | Global Model Number (GMN) | Variável |
| 8017 | GSRN_PROVIDER | Global Service Relation Number (GSRN) to identify the relationship between an organisation offering services and the provider of services | Variável |
| 8018 | GSRN_RECIPIENT | Global Service Relation Number (GSRN) to identify the relationship between an organisation offering services and the recipient of services | Variável |
| 8019 | SRIN | Service Relation Instance Number (SRIN) | Variável |
| 8020 | REF_NUMBER | Payment slip reference number | Variável |
| 8026 | ITIP_CONTENT | Identification of pieces of a trade item (ITIP) contained in a logistic unit | Variável |
| 8110 | COUPON_USA | Coupon code identification for use in North America | Variável |
| 8111 | POINTS | Loyalty points of a coupon | Variável |
| 8121 | POSITIVE_OFFER_COUPON_USA | Paperless coupon code identification for use in North America | Variável |
| 8200 | PRODUCT_URL | Extended Packaging URL | Variável |
| 90 | AGREEMENT_INTERNAL | Information mutually agreed between trading partners | Variável |
| 91 | COMPANY_INTERNAL_1 | Company internal information | Variável |
| 92 | COMPANY_INTERNAL_2 | Company internal information | Variável |
| 93 | COMPANY_INTERNAL_3 | Company internal information | Variável |
| 94 | COMPANY_INTERNAL_4 | Company internal information | Variável |
| 95 | COMPANY_INTERNAL_5 | Company internal information | Variável |
| 96 | COMPANY_INTERNAL_6 | Company internal information | Variável |
| 97 | COMPANY_INTERNAL_7 | Company internal information | Variável |
| 98 | COMPANY_INTERNAL_8 | Company internal information | Variável |
| 99 | COMPANY_INTERNAL_9 | Company internal information | Variável |
| Variável | Modelo | Descrição |
|---|---|---|
| V{current_date} | (date) | Contains the current date whenever the rule is executed. Example expression: d2:daysBetween(#{symptomDate},V{current_date}) < 0 |
| V{event_date} | (date) | Contém a data do evento da execução do evento atual. Não terá valor no momento em que a regra for executada como parte do formulário de inscrição. |
| V{event_status} | (string) | Contains status of the current event or enrollment. Example expression to check status is: V{event_status} == 'COMPLETED' |
| V{due_date} | (date) | Esta variável conterá a data atual quando a regra é executada. Observação: isso significa que a regra pode produzir resultados diferentes em momentos diferentes, mesmo que nada mais tenha mudado. |
| V{event_count} | (number) | Contém o número total de eventos na inscrição. |
| V{enrollment_date} | (date) | Contém a data de inscrição da inscrição atual. Não terá valor para programas de eventos únicos. |
| V{incident_date} | (date) | Contém a data do incidente da inscrição atual. Não terá valor para programas de eventos únicos. |
| V{enrollment_id} | (string) | Universal identifier string (UID) of the current enrollment. Will not have a value for single event programs. |
| V{enrollment_status} | (string) | Contains status of the current enrollment. It can be ACTIVE, COMPLETED or CANCELLED. Example expression to check status is: V{enrollment_status} == 'COMPLETED' |
| V{event_id} | (string) | Universal identifier string (UID) of the current event context. Will not have a value at the moment the rule is executed as part of the registration form. |
| V{orgunit_code} | (string) | Contains the code of the orgunit that is linked to the current enrollment. For single event programs the code from the current event orgunit will be used instead. Example expression to check whether orgunit code starts with WB_: d2:left(V{orgunit_code},3) == 'WB_' |
| V{environment} | (string) | Contém um código que representa o ambiente de tempo de execução atual para as regras. Os valores possíveis são "WebClient", "AndroidClient" e "Server". Pode ser usado quando uma regra de programa deve ser executada apenas em um ou mais tipos de cliente. |
| V{program_stage_id} | (string) | Contém o ID do estágio atual do programa que acionou as regras. Isso pode ser usado para executar regras em estágios específicos do programa ou evitar a execução em certos estágios. Ao executar as regras no contexto de um formulário de registro TEI, a variável estará vazia. |
| V{program_stage_name} | (string) | Contém o nome do estágio atual do programa que acionou as regras. Isso pode ser usado para executar regras em estágios específicos do programa ou evitar a execução em certos estágios. Ao executar as regras no contexto de um formulário de registro TEI, a variável estará vazia. |
| V{completed_date} | (string) | This variable contains completion date of event which triggered this rule. If event is not yet complete then "completed_date" contains nothing. |
Configurar tipos de relacionamento
Sobre tipos de relacionamento
A relationship represents a link between two entities in the Tracker-model. A relationship is considered data in DHIS2 and is based on a Relationship Type, similar to how a Tracked Entity is based on a Tracked Entity Type.
Relationships always include two entities, and these entities can include Tracked Entities, Enrollments and Events, and any combination of these.
[!NOTE] Note that not all of these combinations are available in the current apps. Currently in the Capture app, you can create: * Tracked Entity to Tracked Entity Relationships * Event in Event Programs to Tracked Entity Relationships (Only from the Event side) * Event in one Program Stage to Event in another Program Stage in the same Program (Related stages - see more information here)
Além disso, os relacionamentos podem ser definidos como unidirecionais ou bidirecionais. A única diferença funcional atualmente é que eles requerem diferentes níveis de acesso para criar. Os relacionamentos unidirecionais requerem que o usuário tenha acesso de gravação de dados para a entidade “de” e acesso de leitura de dados para a entidade “para”, enquanto os relacionamentos bidirecionais requerem acesso de gravação de dados para ambos os lados.
For more information about configuration and the meaning of 'From constraint' and 'To constraint', see Relationship model.
Criar ou editar um tipo de relacionamento
-
Open the Maintenance app and click Program > Relationship type.
-
Clique no botão adicionar.
-
Digite um ** Nome ** do tipo de relacionamento.
-
(Opcional) Atribua um ** Código **.
-
(Opcional) Forneça uma ** Descrição ** do relacionamento.
-
(Opcional) Selecione se o relacionamento deve ser bidirecional
-
Provide Relationship name seen from initiating entity. This is the name of the relationship that will be shown in the Data Entry app at the 'left' side of the relationship. E.g. in a Mother-child relationship this could be 'Mother of'.
-
(Opcional) Forneça ** Nome do relacionamento visto da entidade receptora **. Este é o nome do relacionamento que será mostrado no lado 'direito' do relacionamento no aplicativo de entrada de dados. Por exemplo. em um relacionamento mãe-filho, pode ser 'mãe'.
-
Select a 'From constraint'. This limits what kind of entities can be included in the relationship. Relationship model. After selecting a 'From constraint', you have the option to choose which attributes or data elements should be shown in the relationship widget in Tracker Capture and Capture for the "From constraint". The list will vary based on the constraint:
- When selecting “Tracked Entity Instance”, then a Tracked Entity Type only, choose between the configured Tracked Entity Type Attributes
- When selecting “Tracked Entity Instance”, then a Tracked Entity Type and a Program, choose between the attributes that have been configured for both the Tracked Entity Type and for the Program
- When selecting “Enrollment in program”, choose between the attributes that have been configured for the Program
- When selecting “Event in program or program stage”, choose between the data elements that have been configured for that Event program or Program stage
-
Select a 'To constraint'. This limits what kind of entities that can be included in the relationship. Relationship model. Repeat the selection of attributes or data elements that should be shown in the relationship widget for the "To constraint".
-
Clique em Salvar.
Configurar tipos de entidades rastreadas
Sobre tipos de entidades rastreadas
A tracked entity is a type of entity which can be tracked through the system. It can be anything from persons to commodities, for example a medicine or a person.
A program must have one tracked entity. To enroll a tracked entity instance into a program, the tracked entity type of the entity and the tracked entity type of the program must be the same.
Tracked entity attributes are used to register extra information for a tracked entity. Tracked entity attributes can be shared between programs.
Criar ou editar um atributo de entidade rastreada
-
Open the Maintenance app and click Program > Tracked entity attribute.
-
Clique no botão adicionar.
-
No campo ** Nome **, digite o nome do atributo da entidade rastreada.
-
(Opcional) Digite um ** Nome abreviado **.
-
(Opcional) Digite um ** Nome do formulário **.
-
(Opcional) No campo ** Código **, atribua um código.
-
(Opcional) Digite uma ** Descrição **.
-
(Optional) In the Field mask field, you may type a template that's used to provide hints for correct formatting of the attribute. NOTE: So far only implemented in the DHIS2 Android Capture app, not in the Capture and Tracker Capture web apps. A seguir estão os caracteres especiais que podem ser usados na máscara. Os caracteres especiais correspondem exatamente a um caractere do tipo fornecido.
| Personagem | Match |
|---|---|
| \ d | dígito |
| \ x | letra minúscula |
| \ X | letra maiúscula |
| \ w | qualquer caractere alfanumérico |
For example, the pattern can be used to show hyphens as needed in the input field of the data element. E.g "\d\d\d-\d\d\d-\d\d\d, would show an hyphen for every third digit.
-
Selecione um ** Conjunto de opções **.
-
In the Value type field, select the type of data that the tracked entity attribute will record.
Value types Value type Description Age Dates rendered as calendar widget OR by entering number of years, months and/or days which calculates the date value based on current date. The date will be saved in the backend. Coordinate A point coordinate specified as longitude and latitude in decimal degrees. All coordinate should be specified in the format "-19.23 , 56.42" with a comma separating the longitude and latitude. Date Dates render as calendar widget in data entry. Date & time Is a combination of the DATE and TIME data elements. E-mail Valid email address. File A file resource where you can store external files, for example documents and photos. Image A file resource where you can store photos.
Unlike the FILE data element, the IMAGE data element can display the uploaded image directly in forms.Integer Any whole number (positive and negative), including zero. Letter A single letter. Long text Textual value. Renders as text area with no length constraint in forms. Negative integer Any whole number less than (but not including) zero. Number Any real numeric value with a single decimal point. Thousands separators and scientific notation is not supported. Percentage Whole numbers inclusive between 0 and 100. Phone number Phone number. Positive integer Any whole number greater than (but not including) zero. Positive of zero integer Any positive whole number, including zero. Organisation unit Organisation units rendered as a hierarchy tree widget.
If the user has assigned "search organisation units", these will be displayed instead of the assigned organisation units.Unit interval Any real number greater than or equal to 0 and less than or equal to 1. Text Textual value. The maximum number of allowed characters per value is 50,000. Time Time is stored in HH:mm format.
HH is a number between 0 and 23
mm is a number between 00 and 59Username DHIS2 user. Rendered as a dialog with a list of users and a search field. The user will need the "View User" authority to be able to utilise this data type. Yes/No Boolean values, renders as drop-down lists in data entry. Yes only True values, renders as check-boxes in data entry. -
Selecione um ** Tipo de agregação **.
Table: Aggregation operators
| Aggregation operator | Descrição |
|---|---|
| Média | Average the values in both the period and the organisation unit dimensions. |
| Average (sum in organisation unit hierarchy) | Average of data values in the period dimension, sum in the organisation unit dimensions. |
| Count | Count of data values. |
| Min | Minimum of data values. |
| Max | Maximum of data values. |
| Nenhum | No aggregation is performed in any dimension. |
| Soma | Sum of data values in the period and organisation unit dimension. |
| Standard deviation | Standard deviation (population-based) of data values. |
| Variance | Variance (population-based) of data values. |
| “Registro de Casos de Malária” | |
| 12. Select Unique to specify that the values of the tracked entity | |
| attribute is unique. |
Existem duas opções para a configuração única:

  - **Entire system**: The values of the tracked entity attribute
    can duplicate with values which belong to other tracked entity
    attributes. But the values in this tracked entity attribute must
    not duplicate.

    Select **Automatically generated** to allow automatic generation
    of the tracked entity attribute value. When the generate setting
    is selected on, an optional field for specifying pattern also
    displays. This field should contain a pattern based on the
    TextPattern syntax. When the value is automatically generated,
    it will be unique for this attribute for the entire system. See
    the TextPattern section for more information on how it works.

  - **Organisation unit**: The values of the tracked entity
    attribute must not duplicate in the same organisation unit.
-
Select Inherit to registry a new entity for relationship with an available entity, all inherit entity attribute values of the entity will be pre-filled in the registration form.
-
(Opcional) Selecione ** Confidencial **.
This option is only available if you have configured encryption for the system.
[!WARNING] The Confidential flag does not guarantee encryption of data at rest and is not currently functioning as intended. Currently, values are stored as both encrypted and plain text values in the database.
For implementations requiring encryption of sensitive data, it is recommended to use encryption-at-rest features provided by the underlying operating system at the file system level or the block level. Many operating systems support this functionality, including Windows.
Going forward, the Confidential flag should be understood strictly as a visibility control mechanism at Analytics Output level, and not as an encryption feature.
The DHIS2 Core team therefore discourages use of the Confidential flag for data protection or encryption purposes. Upcoming versions will implement and document consistent functionality and recommendations for security approaches.
-
(Opcional) Selecione ** Exibir na lista sem programa **.
-
(Opcional) Atribua uma ou várias ** Legendas **.
-
Clique em Salvar.
Criar ou editar um tipo de entidade rastreada
-
Open the Maintenance app and click Program > Tracked entity type.
-
Click the add button or an already existing tracked entity type.
-
Digite um ** Nome ** da entidade rastreada.
-
(Optional) select a Color and an Icon that will be used by the data capture apps to identify this tracked entity type.
-
(Opcional) Insira uma ** Descrição ** da entidade rastreada.
-
(Optional) Enter a Minimum number of attributes required to search. This specifies the amount of attributes that need to be filled out in order to be able to search for this tracked entity type in a global search. See Configure Search for more information.
-
(Optional) Enter a Maximum number of tracked entities to return in search. This specifies the number of tracked entities that will be returned in when searching outside capture scope. See Configure Search for more information.
-
(Optional) Add Tracked entity type attributes. This is used to configure search, see Configure Search for more information.
-
(Opcional) Insira um ** Nome alternativo ** da entidade rastreada.
-
Clique em Salvar.
Configurar pesquisa
Users can be given search organisation units, which makes it possible to search for tracked entity instances outside their data capture organisation units.
Searching can be done either in the context of a program, or in the context of a tracked entity type. To give users the option of searching in the context of a program, it is necessary to configure which of the programs tracked entity attributes is searchable. To give users the option of searching in the context of a tracked entity type, you will have to configure which of the tracked entity type attributes is searchable.
Configure a pesquisa para o programa rastreador
To be able to search with a program, you will have to make some of the program attributes searchable. Unique program attributes will always be searchable.
-
Open Maintenance app and click Program
-
Open or create a Tracker program
-
Vá para ** Atributos **
-
Se você não tem atributos, adicione um
-
Defina o atributo pesquisável
Searchable program attributes will be assigned to a search group.
-
Unique group. One group per unique program attribute. Unique attributes cannot be combined with other program attributes in a search. The result from the search can only be 0 or 1 tracked entity instance.
-
Non-unique group. This group contains all non-unique program attributes and makes it possible to combine multiple attributes in a search.
There are two limits that can be set for a program search, as part of the Program details configuration.
- Minimum number of attributes required to search: This property defines how many of the non-unique attributes that must be entered before a search can be performed.
-
Maximum number of tracked entities to return: This property defines how specific a search must be, by limiting the number of matching tracked entities a user is allowed to get for their search criteria. If the number of matching records is larger than this setting, they will not be returned. The user must then provide more specific search criteria, in order to reduce the number of matching records, before they are returned. More on limits here.
NOTE
This maximum limit setting is only applied to search results when searching outside the users capture org unit. Within the capture scope, the user can see any number of results.
Configure a pesquisa para o tipo de entidade rastreada
** Nota **
TET = tipo de entidade rastreada
To be able to search without a program, you will have to make some of the TET attributes searchable. Unique TET attributes will always be searchable.
-
Abra o ** aplicativo de tipo de entidade rastreada **
-
Abra um tipo de entidade rastreada
-
Se o TET não tiver atributos, adicione um
-
Defina o atributo pesquisável
Searchable TET attributes will be assigned to a search group.
-
Unique group. One group per unique TET attribute. Unique attributes cannot be combined with other TET attributes in a search. The result from the search can only be 0 or 1 tracked entity instance.
-
Non-unique group. This group contains all non-unique TET attributes and makes it possible to combine multiple attributes in a search.
Existem dois limites que podem ser definidos para uma pesquisa TET
- Minimum number of attributes required to search: This property defines how many of the non-unique attributes that must be entered before a search can be performed.
-
Maximum number of tracked entity types to return: This property defines how specific a search must be, by limiting the number of matching tracked entity types a user is allowed to get for her search criteria. If the number of matching records is larger than this maximum, they will not be returned. The user must provide more specific search criteria, in order to reduce the number of matching records, before they are returned.
NOTE
This maximum is only applied to search results outside the users capture org unit. Within the capture scope, the user can see any number of results.
Configurar unidades de organização de pesquisa para um usuário
To be able to search in other organisation units than the users data capture organisation units, the user must be assigned with search organisation units. Giving a user a search organisation unit will also give them access to search in all children of that organisation unit.
-
Abra o ** aplicativo Usuários **
-
Clique em um usuário
-
Abrir ** Atribuir unidades de organização de pesquisa **
-
Selecione as unidades de organização
-
Clique em ** Salvar **
Clonar objetos de metadados
Cloning a data element or other objects can save time when you create many similar objects.
-
Open the Maintenance app and find the type of metadata object you want to clone.
-
Na lista de objetos, clique no menu de opções e selecione ** Clonar **.
-
Modifique as opções que você deseja.
-
Clique em Salvar.
Excluir objetos de metadados
Note
You can only delete a data element and other data element objects if no data is associated to the data element itself.
Warning
Any data set that you delete from the system is irrevocably lost. All data entry forms, and section forms which may have been developed will also be removed. Make sure that you have made a backup of your database before deleting any data set in case you need to restore it at some point in time.
-
Open the Maintenance app and find the type of metadata object you want to delete.
-
Na lista de objetos, clique no menu de opções e selecione ** Excluir **.
-
Clique em ** Confirmar **.
Alterar as configurações de compartilhamento para objetos de metadados
You can assign different sharing settings to metadata objects, for example organisation units and tracked entity attributes. These sharing settings control which users and users groups that can view or edit a metadata object.
Some metadata objects also allow you to change the sharing setting of data entry for the object. These additional settings control who can view or enter data in form fields using the metadata.
Note
The default setting is that everyone (Public access) can find, view and edit metadata objects.
-
Open the Maintenance app and find the type of metadata object you want to modify.
-
In the object list, click the context menu and select Sharing settings.
-
(Optional) Add users or user groups: search for a user or a user group and select it. The user or user group is added to the list.
-
Altere as configurações de compartilhamento dos grupos de acesso que você deseja modificar.
-
Can edit and view: The access group can view and edit the object.
-
** Pode visualizar apenas **: O grupo de acesso pode visualizar o objeto.
-
No access (only applicable to Public access): The public won't have access to the object.
-
-
Change data sharing settings for the access groups you want to modify.
-
Can capture data: The access group can view and capture data for the object.
-
Can view data: The access group can view data for the object.
-
No access: The access group won't have access to data for the object.
-
-
Clique em ** Fechar **.
Exibir detalhes de objetos de metadados
-
Open the Maintenance app and find the type of metadata object you want to view.
-
In the object list, click the options menu and select Show details.
Traduzir objetos de metadados
DHIS2 provides functionality for translations of database content, for example data elements, data element groups, indicators, indicator groups or organisation units. You can translate these elements to any number of locales. A locale represents a specific geographical, political, or cultural region.
Tip
To activate a translation, open the System Settings app, click > Appearance and select a language.
-
Open the Maintenance app and find the type of metadata object you want to translate.
-
Na lista de objetos, clique no menu de opções e selecione ** Traduzir **.
Tip
If you want to translate an organisation unit level, click directly on the Translate icon next to each list item.
-
Selecione um local.
-
Digite um ** Nome **, ** Nome curto ** e ** Descrição **.
-
Clique em Salvar.