Usando o aplicativo Capture
Sobre o aplicativo Capture
In the Capture app you register events that occurred at a particular time and place. An event can happen at any given point in time. This stands in contrast to routine data, which is captured for predefined, regular intervals. Events are sometimes called cases or records. In DHIS2, events are linked to a program. The Capture app lets you select the organisation unit and program and specify a date when an event happened, before entering information for the event. Some events are linked to a tracked entity, for example a person, allowing longitudinal follow-up.
Cadastre um evento
-
Abra o aplicativo ** Capture **.
-
Selecione uma unidade organizacional.
-
Select an event program.
You will only see programs associated with the selected organisation unit and programs you have access to, and that are shared with your user group through data level sharing.
-
Se o programa tiver uma combinação de categorias definida, a opção de categoria deverá ser selecionada.
-
Click Create new event.

create new event -
Preencha as informações necessárias. Se o estágio do programa de programas estiver configurado para capturar um local:
-
If the field is a coordinate field you can either enter the coordinates directly or you can click the map icon to the left of the coordinate field. The latter one will open a map where you can search for a location or set on directly by clicking on the map.
-
If the field is a polygon field you can click the map icon to the left of the field. This will open a map where you can search for a location and capture a polygon (button in the upper right corner of the map).
-
-
If desired, you can add a note by clicking the Write note button at the bottom of the form. Be aware that Event notes are attributed to a user and cannot be deleted.
-
If desired you can add a relationship by clicking the Add relationship button at the bottom of the form. See the section about Adding a relationship for more information.
-
Clique em ** Salvar e sair ** ou clique na seta ao lado do botão para selecionar ** Salvar e adicionar outro **.
- Save and add another will save the current event and clear the form. All the events that you have captured will be displayed in a list at the bottom of the page. When you want to finish capturing events you can, if the form is blank, click the finish button or if your form contains data click the arrow next to Save and add another and select Save and exit.
Tip
The data entry form can also be displayed in row view. In this mode the data elements are arranged horizontally. This can be achieved by clicking the Switch to row view button on the top right of the data entry form. If you are currently in row view you can switch to the default form view by clicking the Switch to form view button on the top right of the data entry form.
Register a tracked entity
There are two different ways one can register a tracked entity under an organisation unit. The first way, is to register a tracked entity without enrolling it to a tracker program. The second option, is to register a tracked entity with program and enroll it.
Without a program enrollment
-
Abra o aplicativo ** Capture **.
-
Selecione uma unidade organizacional.
-
Click Create new.

image You'll now be navigated to the registration page. In that page you will see a drop down menu similar to the one in the image below. You can type to filter and select a tracked entity type, eg. Building, Person etc.

image -
Select the tracked entity type which you want to create a new instance for.

image -
The moment you select a tracked entity type, a form will be shown on the screen.
The "Profile" section will be shown. In this section you can add data relevant to the tracked entity. The profile section mainly contains all the tracked entity attributes linked to the tracked entity type.
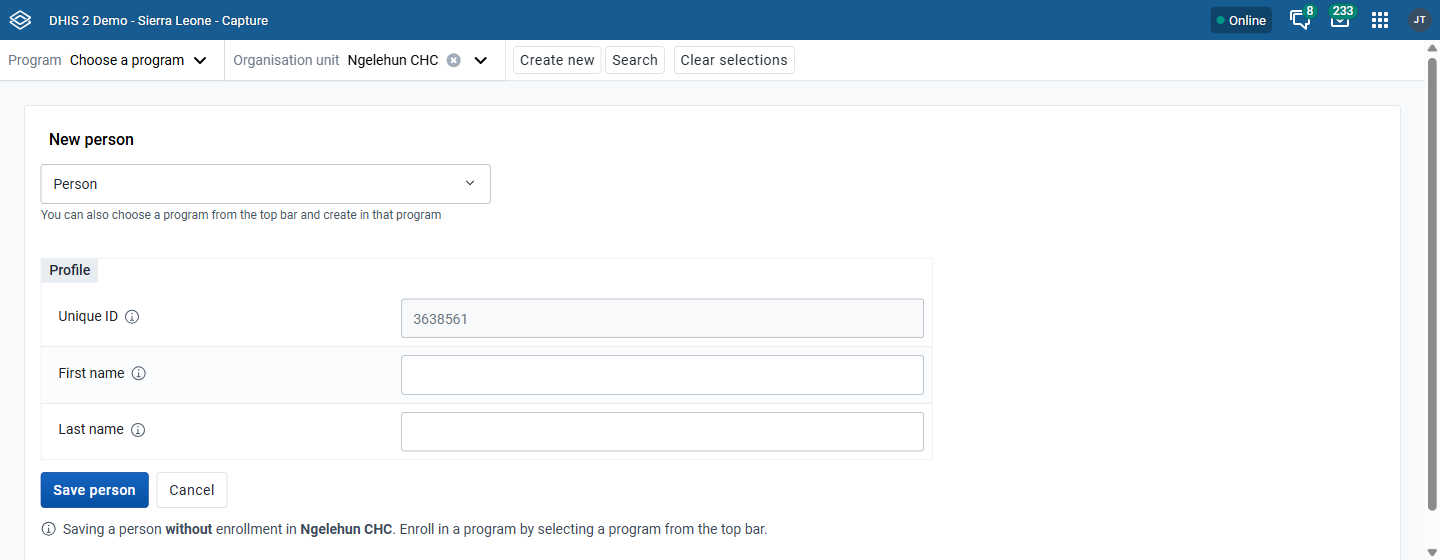
image -
Preencha as informações necessárias.
If the tracked entity type is configured to capture a location:
-
If the field is a coordinate field you can either enter the coordinates directly or you can click the map icon to the left of the coordinate field. The latter one will open a map where you can search for a location or set on directly by clicking on the map.
-
If the field is a polygon field you can click the map icon to the left of the field. This will open a map where you can search for a location and capture a polygon (button in the upper right corner of the map).
-
-
Click the Save person button to register the tracked entity.
-
You will now be prompted to the tracked entity dashboard.
The dashboard will show relevant information about the newly created tracked entity.
With a program enrollment
-
Abra o aplicativo ** Capture **.
-
Selecione uma unidade organizacional.
-
Select a tracker program of your choice.
-
Click Create new person. Note that the label of this button corresponds to the tracked entity type of the program, which could vary, such as "Building," "Person," etc.

create new event -
Now, you will be able to see a form similar to the image below.
The enrollment form has different layouts depending on how the program is customized. The top section has the title "Enrollment", and it holds all the relevant information about the enrollment details. This section will always be present, regardless of layout. Underneath, the different data input fields relevant to the tracked entity will be displayed. These fields will either be displayed within sections or as a completely custom form. The sections, or custom form, mainly contains all the tracked entity attributes linked to the program or tracked entity type.

create new event -
Fill in the required information for the enrollment. If the tracked entity type is configured to capture a location:
-
If the field is a coordinate field you can either enter the coordinates directly or you can click the map icon to the left of the coordinate field. The latter one will open a map where you can search for a location or set on directly by clicking on the map.
-
If the field is a polygon field you can click the map icon to the left of the field. This will open a map where you can search for a location and capture a polygon (button in the upper right corner of the map).
-
-
Click Save person to register the tracked entity. The Save button shows a loading spinner and the Cancel button is disabled while the request is processing.
-
You will now be prompted to the tracked entity dashboard.
The dashboard will show relevant information about the newly created tracked entity.
Tip
The data entry form can also be displayed in row view. In this mode the data elements are arranged horizontally. This can be achieved by clicking the Switch to row view button on the top right of the data entry form. If you are currently in row view you can switch to the default form view by clicking the Switch to form view button on the top right of the data entry form.
Enrollment with auto generated events
Events can automatically be created when enrolling in a program.
To automatically generate events, you can do the necessary configuration in the Metadata Management app. 1. Open the Metadata Management app, go to Programs and select your program. We select Child Programme for this example. 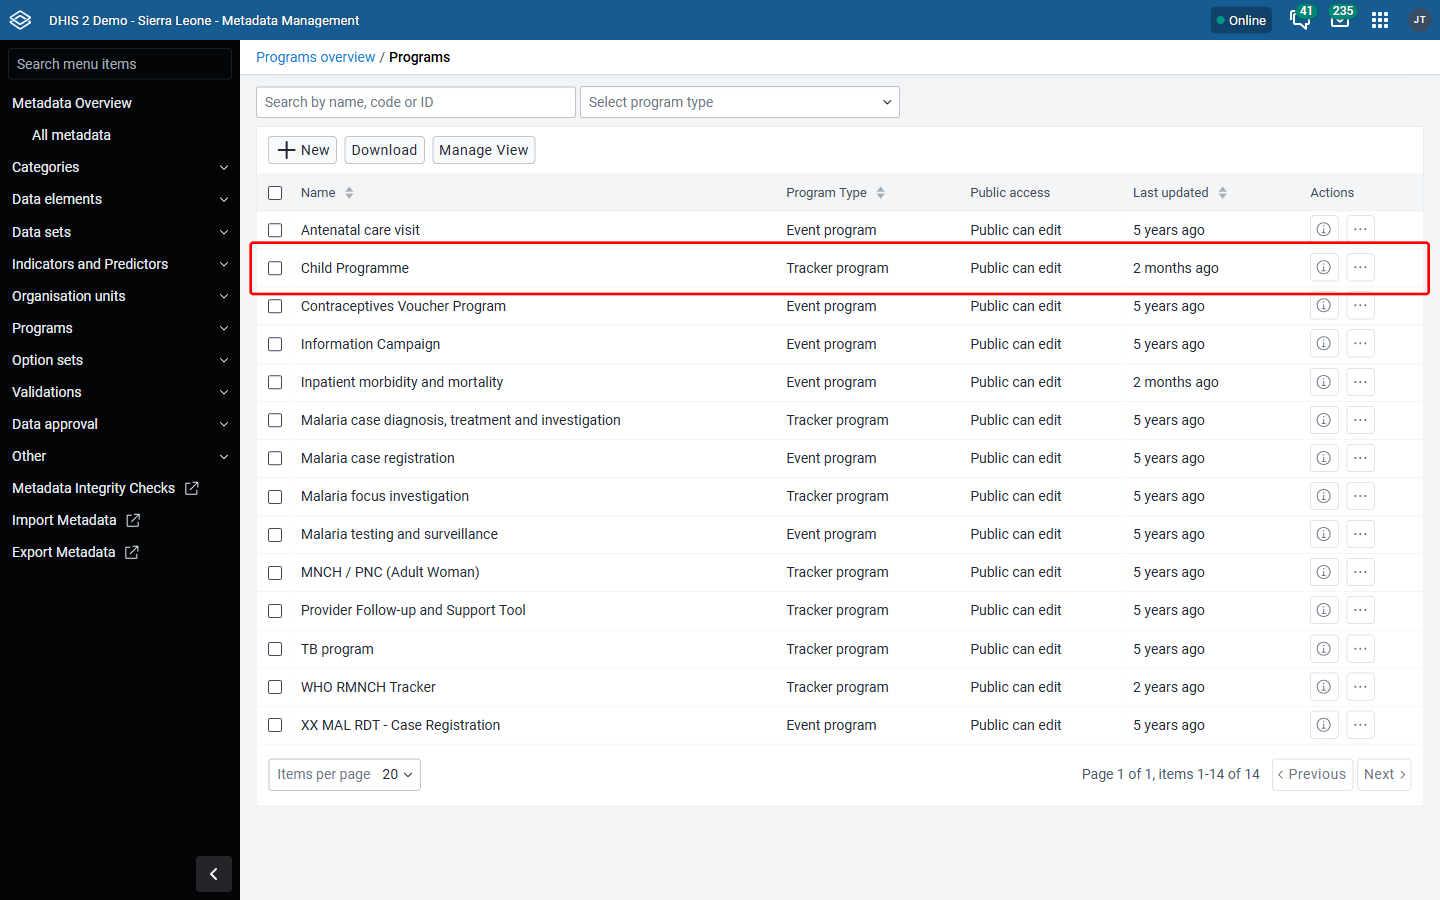
-
Select the Program Stages section and click on the program stage you would like to generate an event for.
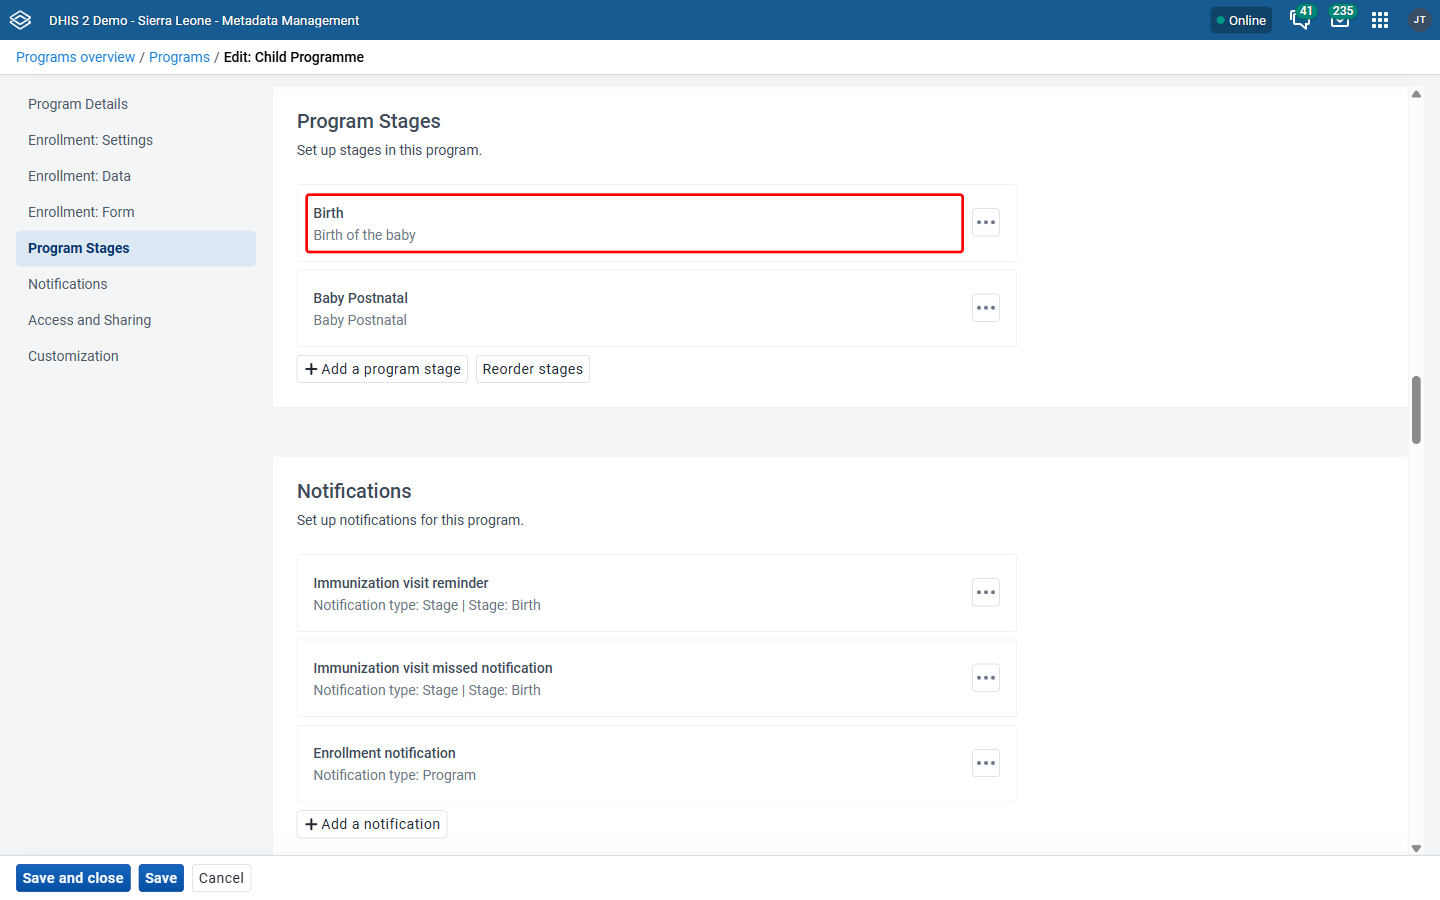
-
In the stage editor, select the Creation and scheduling section and check Create an event in this stage on enrollment.
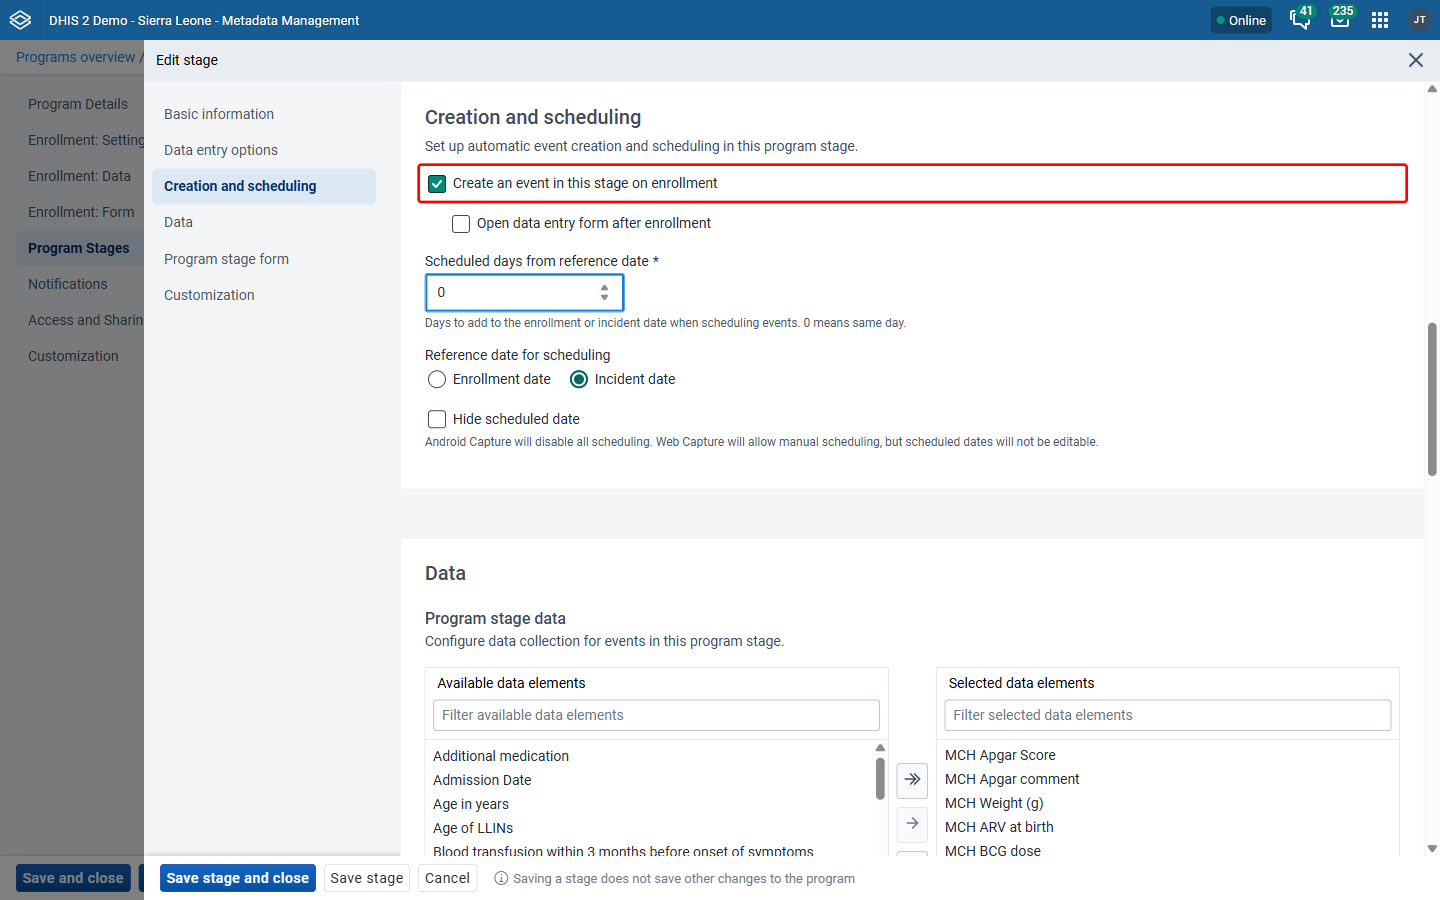
You can set multiple program stages within a program to be auto-generating (this will create an event for each program stage configured this way)
Enrollment with open data entry form
A program can be configured to automatically take the user to register a new event immediately after enrolling a tracked entity. To enable this behavior, the program must have at least one program stage with the "Open data entry form after enrollment" option checked. If more than one program stage has this option enabled, the first stage will be used.
To configure it, you must follow the steps described in the Enrollment with auto generated events section and then check the option "Open data entry form after enrollment".
Enrollment with first stage on registration page
For tracker programs enable the "Show first program stage during enrollment" flag in the Enrollment: Settings section of the program in the Metadata Management app. The enrollment registration page will now display the first program stage the user has access to.

Active type of event
If the stage has "Open data entry form after enrollment" checked, the generated event is opened in the data entry form right after enrollment. Its report date is calculated for the event, in addition to a scheduled date. The generation happens based on either the enrollment date or the incident date. You can choose the reporting date from the "Date to use for created event report date" options. These options are only shown when both Create an event in this stage on enrollment and Open data entry form after enrollment are checked. 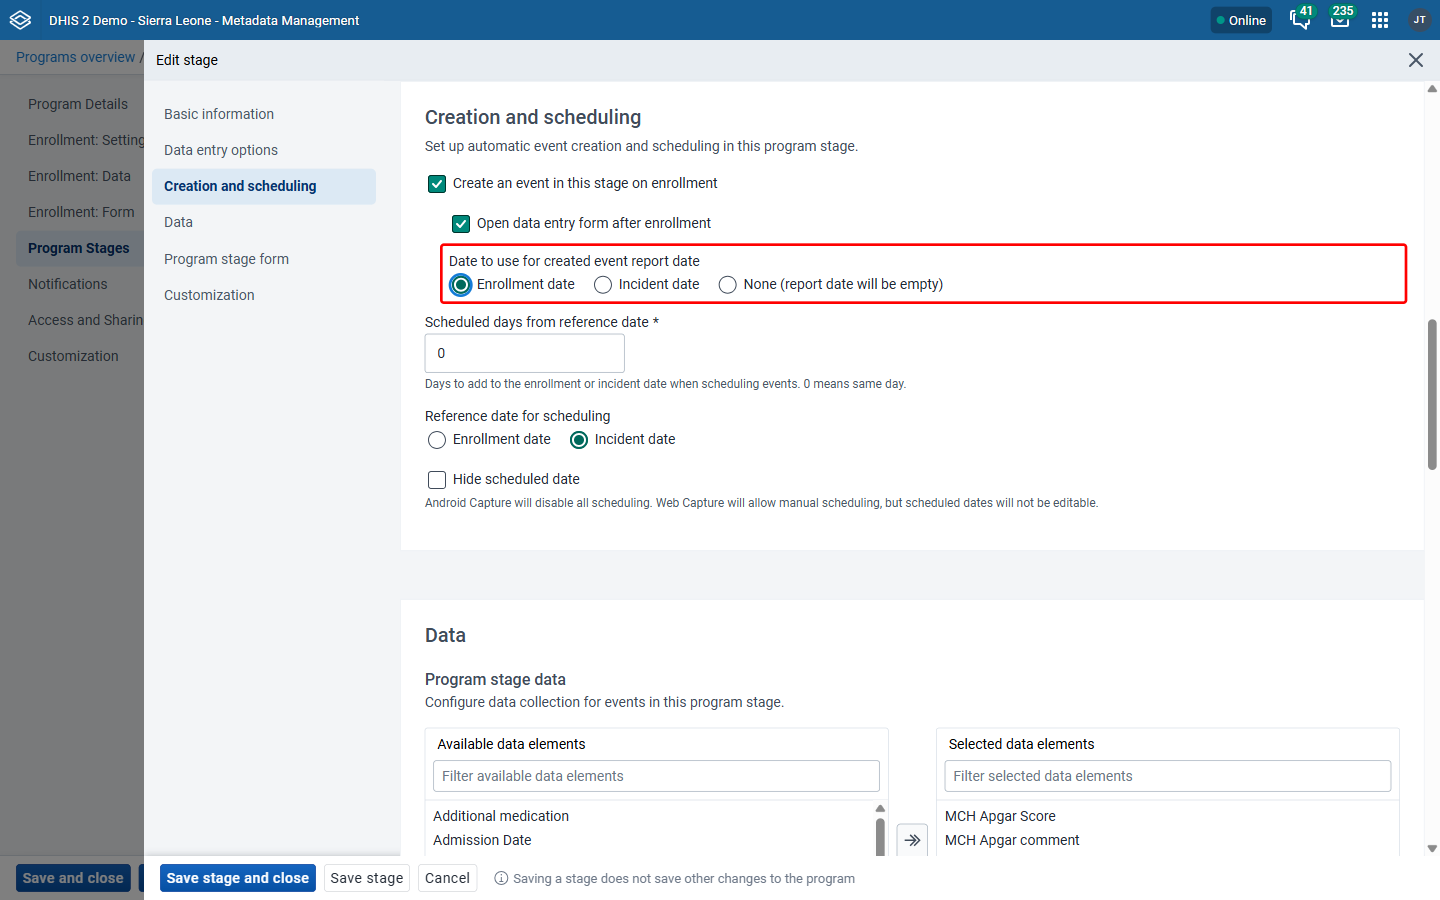
As shown in the image you have three options: Enrollment date, Incident date or None (report date will be empty). Choosing Enrollment date sets the event's report date to the enrollment date. Choosing Incident date sets the report date to the incident date (or the enrollment date, if the program does not have an incident date). Choosing None (report date will be empty) leaves the report date empty, and the user has to fill it in when the event opens. The scheduled date is not affected by this setting; see Schedule type of event below for how it is calculated.
Schedule type of event
When "Open data entry form after enrollment" is not checked, it means that the event generated will be a SCHEDULE event. The scheduled event does not have a report date, but only a scheduled date. The scheduled date for these future events is calculated based on either enrollment date or incident date, as set under "Reference date for scheduling". If "Enrollment date" is selected, the reference date is the enrollment date; if "Incident date" is selected, the incident date is used. 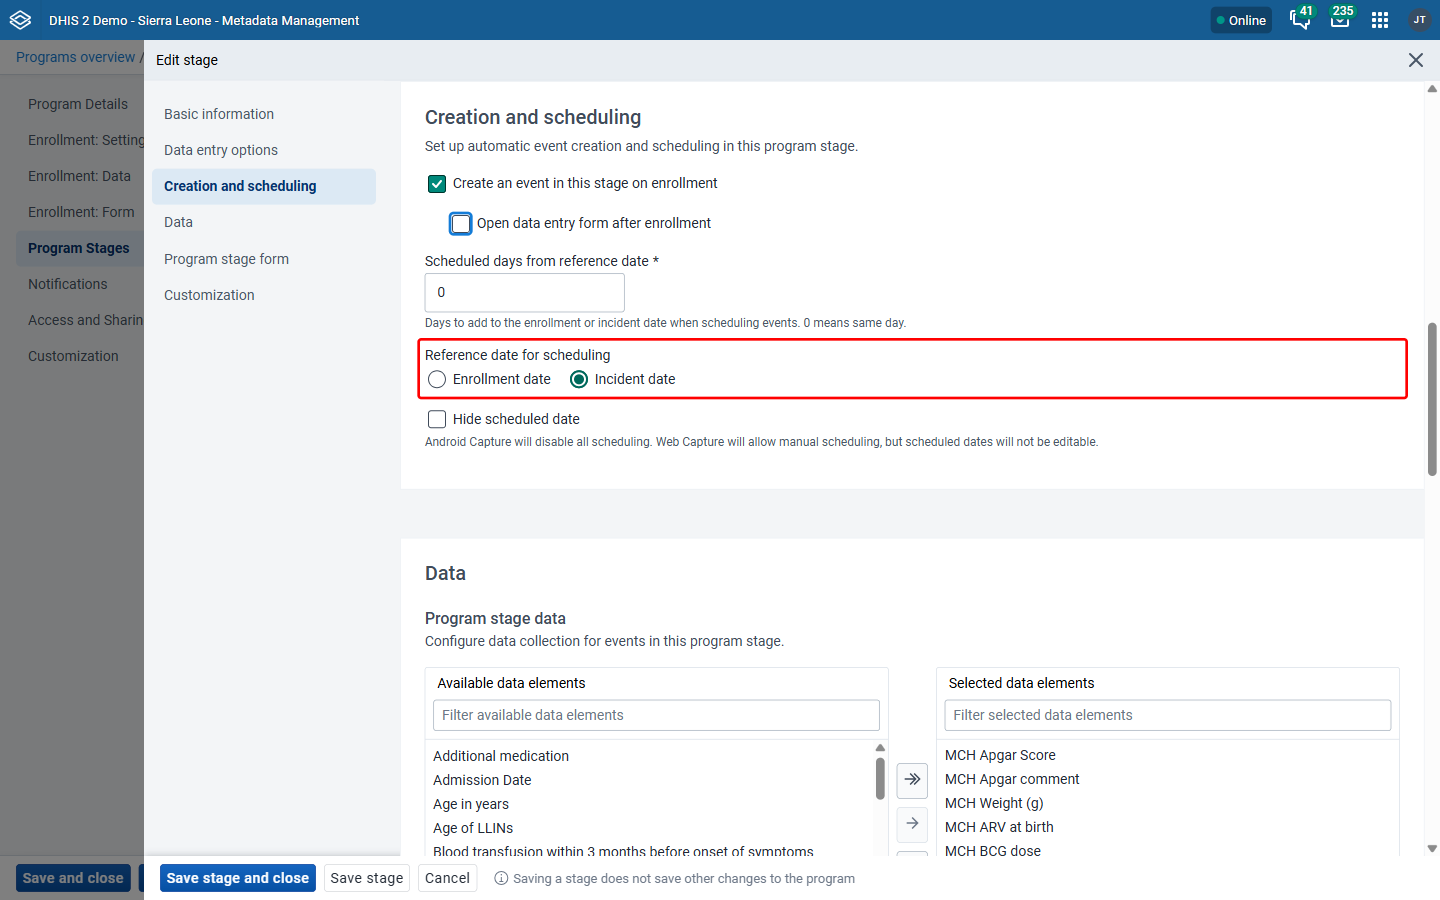
When there is no incident date, the reference date will fall back on the enrollment date regardless of which option is selected above.
On SCHEDULE type of events the user can also configure the "Scheduled days from reference date". Which means if a stage has a number in "Scheduled days from reference date" the reference date will increased by that number. In the example below we increase the scheduled date by 30 days.
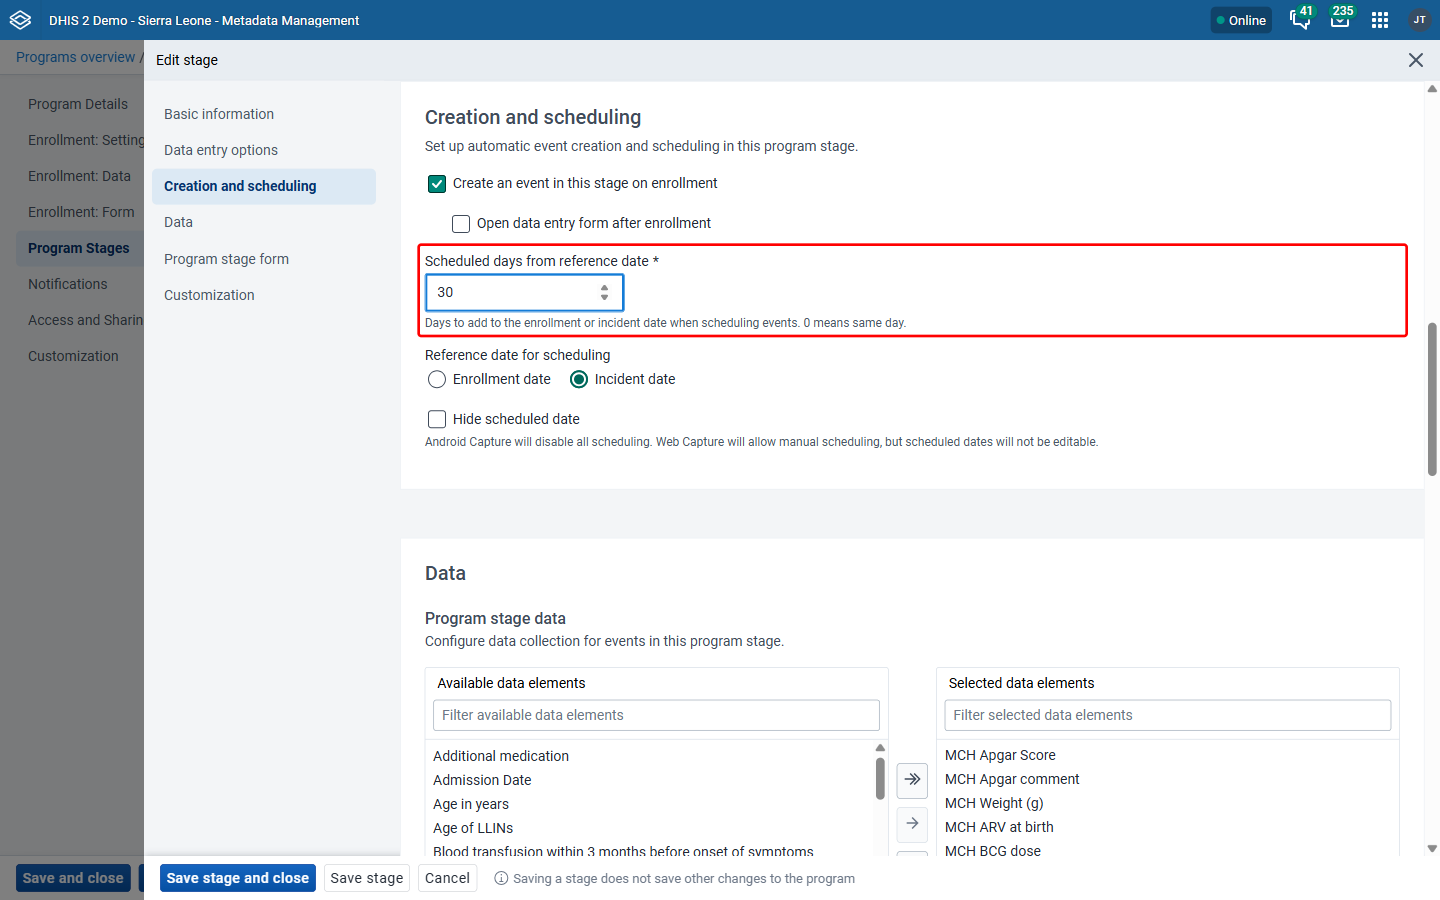
When the "Scheduled days from reference date" contains 0 the reference date is used without adding any days to it.
Possible duplicates detection
In both cases of registering a tracked entity, (with enrollment or without enrollment) the system will start looking for possible duplicates. Note that programs need to be correctly configured through the Metadata Management app for the system to start detecting duplicates when enrolling a new person in a program.
To configure a program through the Metadata Management app you will have to:
-
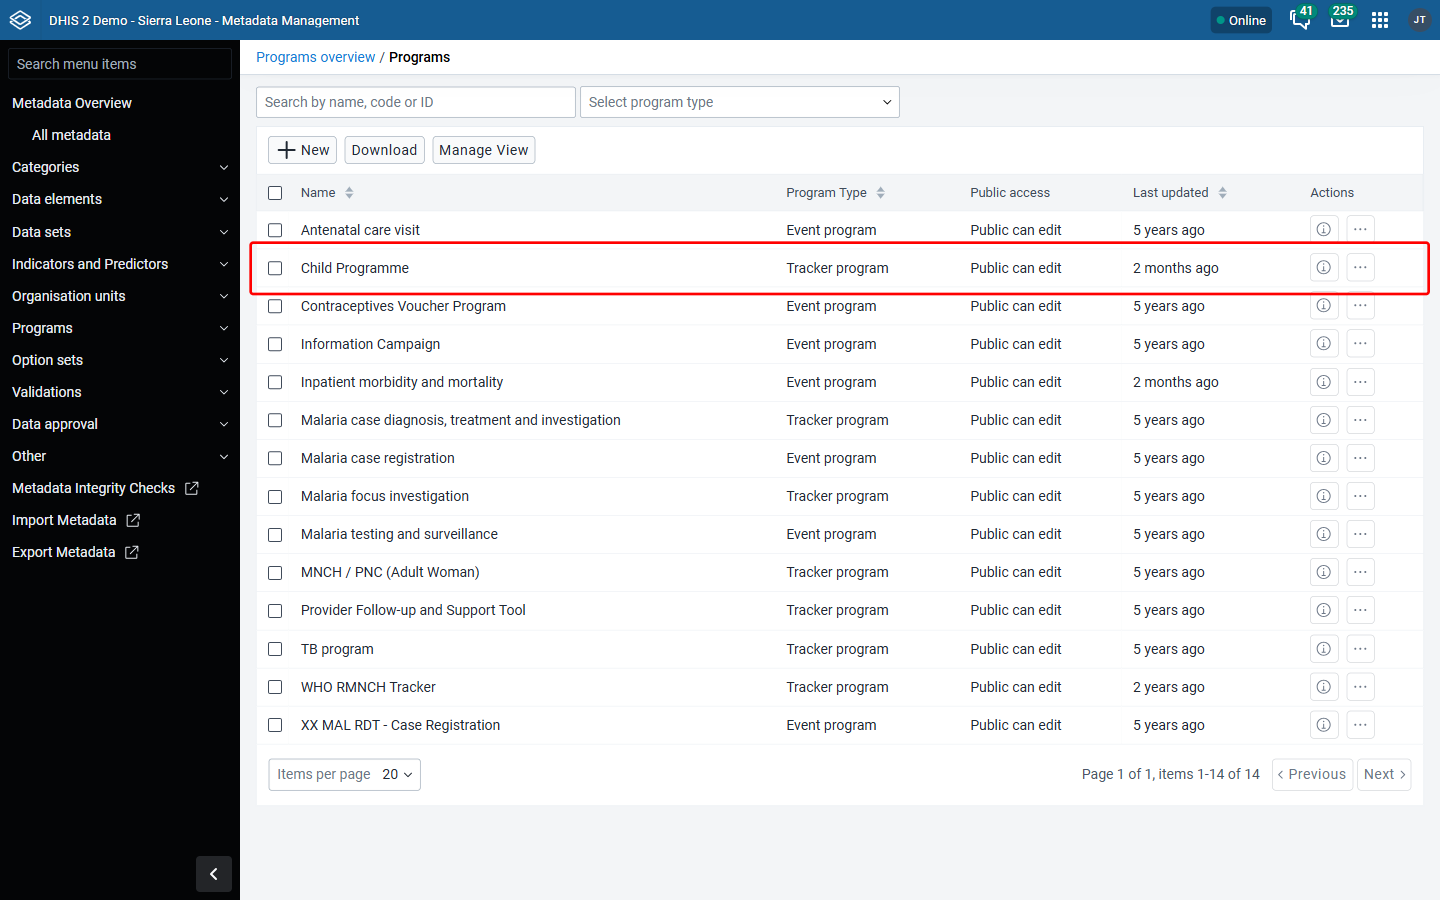
Open the Metadata Management app, go to Programs and select your program. We select Child Programme for this example.
-
Select the Enrollment: Data section and enable duplicates search by checking program attributes as Searchable in the "Manage attributes" table.
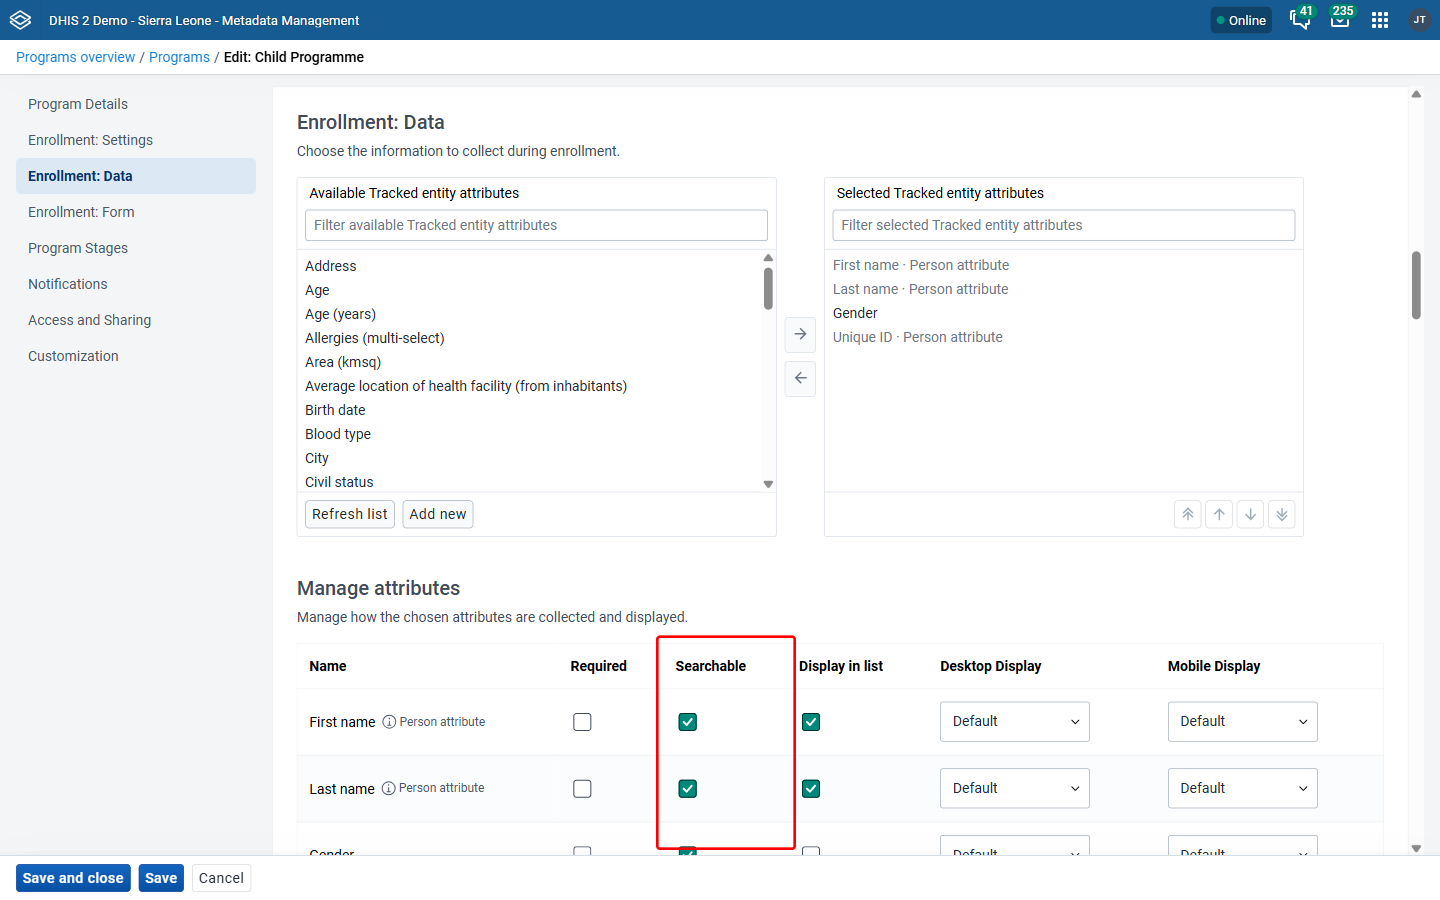
The attributes you have selected as "Searchable" will be the ones which the system will use to detect possible duplicates against.
Let us explain this with an example that demonstrates the detection of possible duplicates while enrolling a child in the Child Programme.
-
Abra o aplicativo ** Capture **.

-
Select your organisation unit and program from the menu on the top.

-
Click Create new person

-
Fill in the first name in the form. Remember, the first name we have checked as "Searchable" in the Metadata Management app. Click Save person. The system will start looking for possible duplicates that match the name Sarah.

-
The system will automatically show a list of possible duplicates if there are any.

-
You can choose to make a new enrollment by clicking Save as new or if you see the right person in the list - you can view the dashboard.

Tip
You can configure duplicates detection for tracked entity types the same way as we did for programs.
Program rules execution
In both cases of registering a tracked entity (with enrollment or without enrollment), the system will run program rules you have configured. Note that rules can be configured in the Metadata Management app.
To see a rule being executed while enrolling a tracked entity you will have to take the following steps.
-
Configure a rule in the Metadata Management app. For the example below we configured a rule that throws a warning when a tracked entity's age is outside the expected range for the program.
-
Abra o aplicativo ** Capture **.
-
Select your organisation unit and program from the menu on the top.

-
Fill in the birth date with a value that falls outside the expected age range. In our case this is 18th of August 2026.

-
You will now be able to see the warning produced by the program rule underneath the birth date field.

Re-enroll an existing tracked entity
When you are on the re-enroll page, the teID will be visible in the URL parameters. The attributes of the tracked entity will be pre-filled with the current values. 
Adicionando um relacionamento
Relationships can be added either during registration, editing or viewing of an event. The Capture App supports several relationship types, including Event to tracked entity and tracked entity to tracked entity (e.g. Sibling, Mother-Child). The relationship types available depend on your program configuration.
-
Durante um evento, clique em ** Adicionar relacionamento **.
-
Selecione o tipo de relacionamento que deseja criar.
You now have two options:
-
Link to an existing [tracked entity type] or
-
Create new.
The Link to an existing button label reflects your program's tracked entity type, for example Link to an existing Person. The Create new button does not.

Link to an existing tracked entity
-
Click Link to an existing [tracked entity type].
-
You will be presented with some options for searching for a tracked entity. You have the option to select a program. If a program is selected the attributes are derived from the selected program. If no program is selected, only the attributes that belong to the tracked entity will be visible.
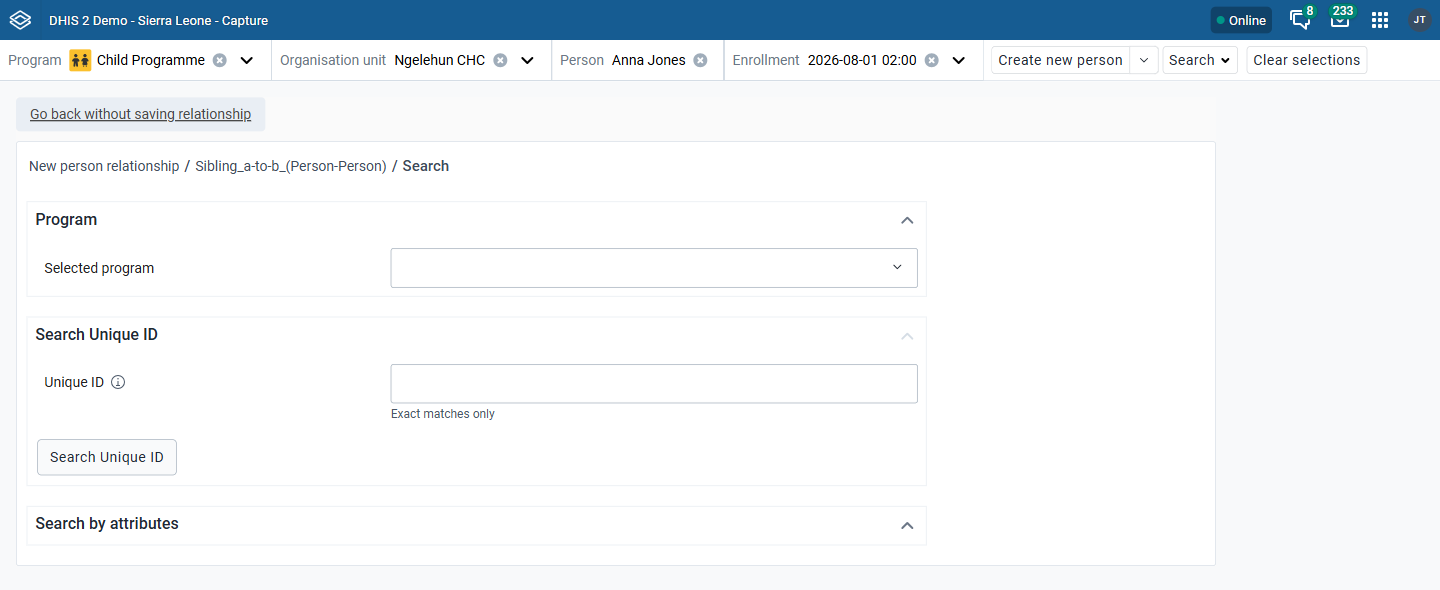
search for tracked entity -
If the tracked entity or program is configured with a unique attribute, this attribute can be used for finding a specific tracked entity or program. This attribute should be presented alone. When the unique attribute field has been filled out, click the Search button located right below the unique attribute field.
-
If the tracked entity or program has attributes these can be used for searching by expanding the Search by attributes box. When all desired attribute fields have been filled out, click the Search by attributes button located at the bottom. You can also limit the search by setting the Organisation unit scope. If set to All accessible you will search for the tracked entity in all organisation units you have access to. If you select Selected, you will be asked to select which organisation units to search within.
-
-
After a successful search you will be presented with a list of tracked entities matching the search criteria. To create a relationship click the Link button on the tracked entity you would like to create a relationship to.
-
If you did not find the tracked entity you were looking for, you can either click the New search or Edit search buttons. New search will take you to new blank search while Edit search will take you back to the search you just performed keeping the search criteria.
Create new tracked entity
-
Click Create new [tracked entity type].
-
You are now presented with a form for registering a new tracked entity. You can choose to either register with or without a program. If a program is selected, the new tracked entity will be enrolled in said program. You can also change the Organisation unit by removing the one that is automatically set and selecting a new one.

-
Preencha os atributos desejados (e possivelmente obrigatórios) e os detalhes de inscrição.
-
Click Save new [tracked entity type] and link.
Note
When filling in data you might face a warning telling you that a possible duplicate has been found. You can click the warning to see these duplicates and if the duplicate is a match you can choose to link that tracked entity by clicking the Link button. If the warning is still present when you click Save new [tracked entity type] and link, a dialog listing the possible duplicates opens automatically instead of saving. If any of these duplicates matches the tracked entity you are trying to create you can click the Link button, if not you can click Save as new [tracked entity type] to register a new tracked entity, or Cancel to go back.
Editar um evento
-
Abra o aplicativo ** Capture **.
-
Selecione um programa.
-
Select an organisation unit, or if none is selected, click the See working list without organisation unit link to view events across all accessible organisation units.
 Todos os eventos registrados no programa selecionado aparecem em uma lista.
 -
Clique no evento que você deseja modificar.
-
Clique no botão ** Editar evento **.
-
Modifique os detalhes do evento e clique em ** Salvar **.
Note
If you cannot edit the event, the Edit event button is replaced by a View only badge explaining why. This happens when:
- You only have view access to the program, program stage(s), or tracked entity type.
- The event's date is outside the program's editing period (expiry days), or the event is completed and outside the program's Completed events expiry days window.
- The event is completed and the program stage has Block data entry after completion enabled.
Users with the Edit expired data authority can still edit events affected by the last two cases.
Reopening a completed event also requires the Uncomplete events authority (
F_UNCOMPLETE_EVENT). Without it, the Complete event checkbox is disabled on completed events and shows the tooltip You do not have access to uncomplete this event.
Excluir um evento
-
Abra o aplicativo ** Capture **.
-
Selecione uma unidade organizacional.
-
Selecione um programa.
Todos os eventos registrados no programa selecionado aparecem em uma lista.
-
Clique no ícone ** ponto triplo ** no evento que deseja excluir.
-
No menu exibido, clique em ** Excluir evento **.

delete event -
A confirmation dialog opens warning that deleting an event is permanent and cannot be undone. Click Yes, delete event to confirm, or No, cancel to back out.

delete event confirmation
Modificar um layout de lista de eventos
You can select which columns to show or hide in an event list. This can be useful for example when you have a long list of data elements assigned to a program stage.
-
Abra o aplicativo ** Capture **.
-
Selecione uma unidade organizacional.
-
Selecione um programa.
Todos os eventos registrados no programa selecionado aparecem em uma lista.
-
Clique no ícone de ** engrenagem ** no canto superior direito da lista de eventos.
-
Selecione as colunas que você deseja exibir e clique em ** Salvar **.

modify event list
Tip
You can reorganize the order of the data elements by dragging and dropping them in the list.
Filtrar uma lista de eventos
-
Abra o aplicativo ** Capture **.
-
Selecione uma unidade organizacional.
-
Selecione um programa.
Todos os eventos registrados no programa selecionado aparecem em uma lista.
Along the top of the event list are buttons with the same names as the column headers in the list.
-
Use the buttons on the top of the list to filter.

filter event
Each filter adapts to the data element's value type, for example, numeric data elements provide a range selector, text data elements a search input, and date data elements a date picker. Filtering is available for all value types except MULTI_TEXT (multi-select option sets).
Filter on empty or non-empty values
Data element filters show two checkboxes at the top:
- Is empty – matches events that have no value for the selected data element.
- Is not empty – matches events that have any value for the selected data element.
Only one option can be active at a time per filter. Selecting Is empty or Is not empty clears any value-based criteria for the filter.
For image, file and coordinate data elements, Is empty and Is not empty are the only available filter options.
Note
The empty / non-empty checkboxes are not shown on the main filters (report date, status, assignee, etc.).
Filtering on empty / non-empty values requires DHIS2 server version 2.42 or higher. On older servers the checkboxes are not shown.
Classifique uma lista de eventos
-
Abra o aplicativo ** Capture **.
-
Selecione uma unidade organizacional.
-
Selecione um programa. Todos os eventos registrados no programa selecionado aparecem em uma lista.
-
Clique em um dos cabeçalhos de coluna para classificar a lista nesse elemento de dados em ordem crescente.
Two arrows (up and down) are displayed next to each sortable column. When sorted ascending, the upward arrow is highlighted. Unsorted columns show both arrows greyed out.
-
Clique no cabeçalho da coluna novamente para classificar a lista nesse elemento de dados em ordem decrescente.
When sorted descending, the downward arrow is highlighted.

sort event
Baixe uma lista de eventos
-
Abra o aplicativo ** Capture **.
-
Selecione uma unidade organizacional.
-
Selecione um programa. Todos os eventos registrados no programa selecionado aparecem em uma lista.
-
Click the three dots icon on the top right of the event list.
-
Click Download data.
-
Selecione o formato que deseja baixar.

download event list
Note
You can download an event list in JSON or CSV formats.
Visualizações de lista predefinidas
Você pode configurar suas próprias visualizações e salvá-las para uso posterior. As visualizações também podem ser compartilhadas com outras pessoas. Uma visualização consiste em filtros, ordem de coluna e ordem de classificação de evento.
Salvando uma nova visualização
-
Selecione uma unidade organizacional e um programa.
-
Defina os filtros usando os botões de filtro acima da lista de eventos (descritos em detalhes [aqui] (# capture_filter_event_list)).

-
Set the column order by clicking the cog icon and then, in the pop-up, specify the layout according to your preference (how to modify the layout is described in detail here).

-
Classifique os eventos clicando em um dos cabeçalhos das colunas (descrito em detalhes [aqui] (# capture_sort_event_list)).

-
Abra o menu mais (ícone de três pontos) à direita e selecione "Salvar visualização atual ..."

-
Preencha um nome para a visualização e clique em salvar.

Carregando uma visualização
-
Selecione uma unidade organizacional e um programa com uma visão predefinida.
-
As visualizações devem estar disponíveis acima da própria lista de eventos. Clique em uma visualização para carregá-la.

-
Um exemplo de visualização carregada.

Atualizando uma vista
-
Carregue a visão que você gostaria de atualizar (veja [carregando uma visão] (# capture_view_load)).
-
Faça suas alterações nos filtros, ordem das colunas e / ou ordem de classificação do evento.
Note
An asterisk(*) is appended to the view name when the view has unsaved changes.
-
Abra o menu mais (ícone de três pontos) à direita e selecione "Atualizar visualização".

Compartilhando uma visão
-
Carregue a visão que você gostaria de compartilhar (veja [carregando uma visão] (# capture_view_load)).
-
Abra o menu mais (ícone de três pontos) à direita e selecione "Compartilhar visualização ..."

-
Faça suas alterações. Você normalmente adicionaria usuários / grupos (1) e / ou alteraria os direitos de acesso de usuários / grupos adicionados anteriormente (2).

Excluindo uma vista
-
Carregue a visualização que você gostaria de excluir (consulte [carregando uma visualização] (# capture_view_load)).
-
Abra o menu mais (ícone de três pontos) à direita e selecione "Excluir visualização".

Event bulk actions
You can perform bulk actions on events in the event list.
-
Select the events you want to perform the action on by clicking the checkbox to the left of the event.
-
You can choose between quickly completing the selected events or deleting them.

User assignment in events programs
Events can be assigned to users. This feature must be enabled per program by checking Allow events to be assigned to users in the Program Settings section of the program in the Metadata Management app.
Assigning user to new events
-
Selecione uma unidade de organização e um programa com atribuição de usuário habilitada.
-
Clique em ** Novo Evento ** no canto superior direito.
-
Você encontrará a seção responsável perto da parte inferior da página de entrada de dados. Pesquise e selecione o usuário ao qual deseja atribuir o evento. O responsável será preservado quando você salvar o evento.
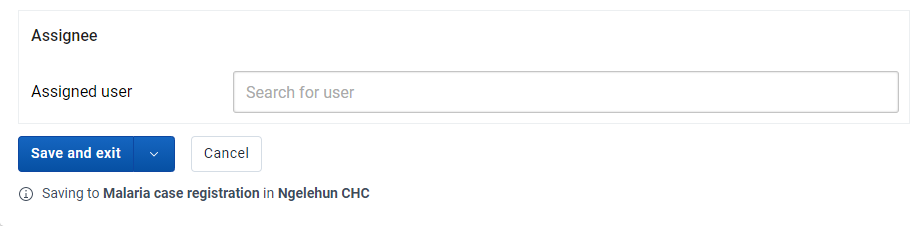

Alterar cessionário
-
Selecione uma unidade de organização e um programa com atribuição de usuário habilitada.
-
Clique em um evento da lista
-
Na coluna certa, você encontrará a seção do responsável.

-
Click the Edit button, or the Assign button if the event is not currently assigned to anyone.


-
Search for and select the user you would like to reassign the event to. Click the Save button.
Assignee in the event list
Na lista de eventos, você poderá ver o responsável por evento. Além disso, você pode classificar e filtrar a lista pelo responsável.
Filtrar por cessionário
-
Clique no filtro ** Atribuído a **.

-
Selecione o filtro de cessionário de sua preferência e clique em atualizar.

Programas rastreadores
The Capture app supports the working lists in tracker programs, and opening a tracked entity takes you to its enrollment dashboard within the Capture app.

Search for tracked entities
In Program scope
-
Abra o aplicativo ** Capture **.
-
Selecione um programa.
You will only see programs associated with the selected organisation unit and programs you have access to, and that are shared with your user group through data level sharing.
-
Click the Search button.
-
From the dropdown menu click the first option.

These steps will take you to the search page. There, based on the configuration of your organisation, will see the different attributes you can search with. An example of how this looks is the following.
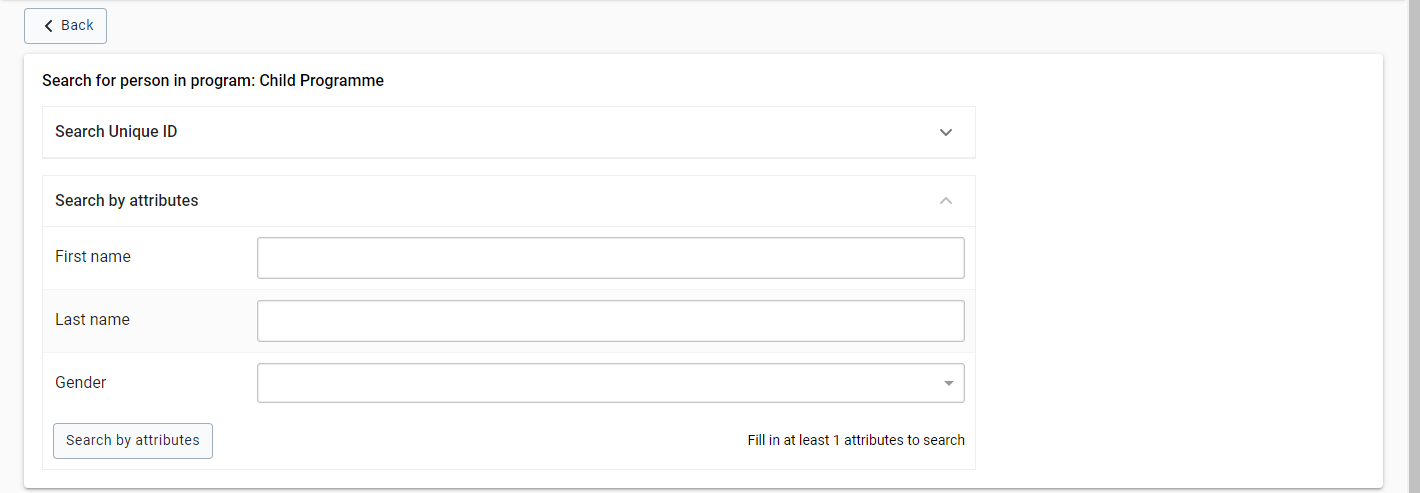
To improve search performance, an administrator can control which operators an attribute is searched with. In the Metadata Management app, open the tracked entity attribute and go to the Search performance section, which requires DHIS2 server version 2.43 or higher. Preferred search operator is the operator the app tries first, and can be set to EQ | Equals, SW | Starts with, EW | Ends with or LIKE | Contains. Blocked search operators are the operators that must not be used, and a search that would use a blocked operator returns no results.
These settings only apply to attributes with the value types text, long text, email and phone number. Attributes with other value types are searched with a fixed operator and ignore the preferred search operator. Unique attributes and attributes with an option set are always matched with equals. If no preferred operator is set, the search uses the first of contains, starts with and equals that is not blocked. Helper text below each attribute search field tells the user how that field will be matched.

The same section has Minimum characters required to search, the number of characters the user must enter before the app searches on that attribute, where 0 means no minimum. The minimum applies to the attribute's filter in working lists as well, which shows Please enter at least N characters to filter until enough characters have been entered.
Set a minimum with care for attributes that are not text. Filters for some value types can only ever hold as many characters as the value type allows - 10 for a date (2026-09-04), 5 for a time (14:30) and 3 for a percentage (100) - so a minimum higher than that can never be reached, and the filter shows Minimum characters to search is too high for this filter instead.
To execute a search now:
-
Fill in the attributes you want to search with.
-
Click the Search by attributes button.
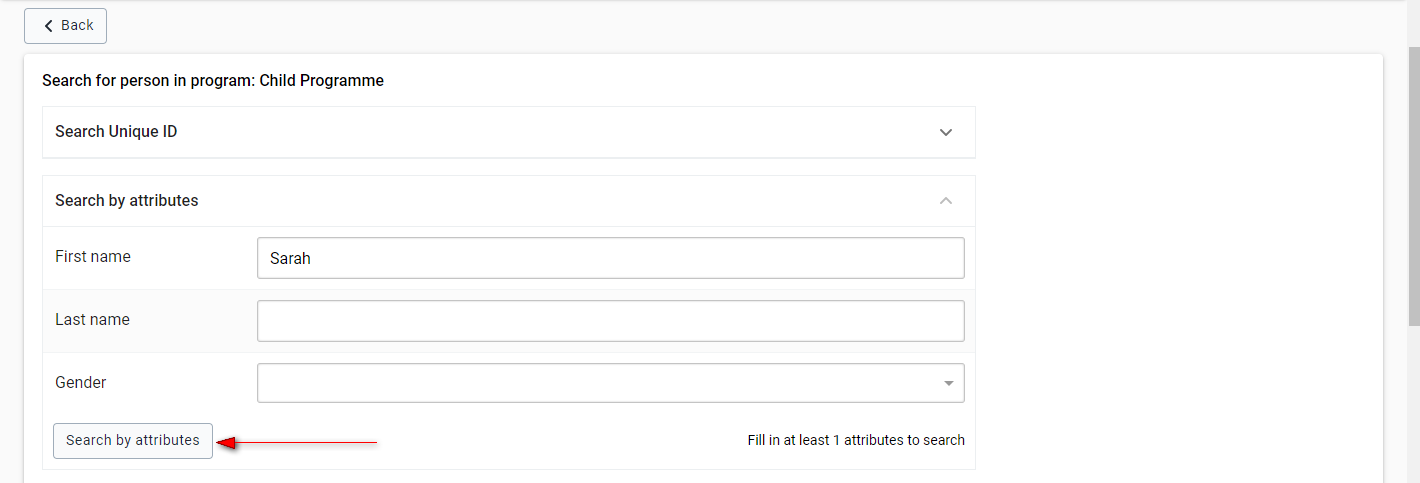
-
The results of the search will be displayed as follows.

In this list you can see the entries that match your search. The actions available for each entry depend on the tracked entity's enrollment status in the program you are searching within. Whether an entry's enrollment actually opens once you click into it depends on who owns it and your access to that organisation unit; see Tracked entity ownership below.
a. View dashboard is always shown as an option. It opens the enrollment dashboard for the tracked entity in the program you are searching within. The enrollment shown is selected automatically: if there is a single enrollment in the program that one is opened, and if there are several, the active enrollment is opened.
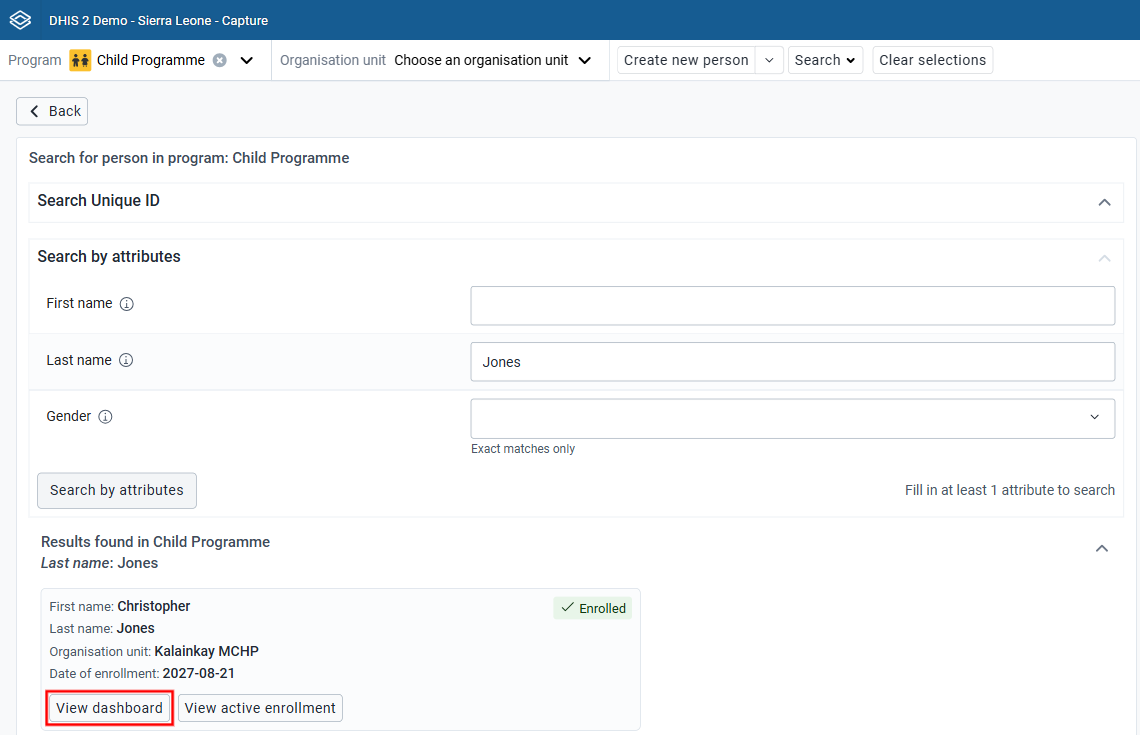
b. View active enrollment is only shown when the tracked entity has an active enrollment in the program you are searching within. It opens the enrollment dashboard for that active enrollment.

c. Re-enroll is shown when the tracked entity's enrollment in the program you are searching within is completed or cancelled. It takes you to the program's enrollment page so you can enroll the tracked entity again. If there is an active enrollment, this option is not shown.

Fallback search
Execute a full search as described above. If the search you have made has results they will be displayed. However, the actual tracked entity you are searching for may be within a different program. In that case, you may want to extend the search to other programs. This is known as a fallback search.
To execute a fallback search, simply press the button on the bottom saying "Search in all programs". You will see the Results in all programs be appended below the search in the current program. These two modules are collapsible to save space.
If the fallback can not be done, you will be presented with a modal to go Back to search so that you can change the search terms.
Note
The fallback search is only possible when searching within a Program.

Create new tracked entity
When none of the results match, you can create a new user by clicking Create new button on the bottom of the search page.
Based on the search domain, you will be navigated to the registration of the selected Tracked entity type, with or without program enrollment preselected. The search terms that you typed in before will be prefilled in the registration form.

In Tracked entity type scope
-
Abra o aplicativo ** Capture **.
-
Click the Search button to open the search page.
-
Click the Search for field. You can type to filter the list of tracked entity types.

-
Make a selection from the list.

Based on the configuration of your organisation you will see the different attributes you can search with. An example of how this looks is the following.

To execute a search now:
-
Fill in the attributes you want to search with.
-
Click the Search by attributes button.

-
The results of the search will be displayed as follows.

In this list you can see the entries that match your search. For each entry you have the option to click the "View dashboard" button to view the dashboard for the tracked entity.
Too many results functionality
The program or tracked entity type you are searching within may be configured with a limit on the number of results that are returned from a search. If your search results exceed this limit you will be shown a warning message like the one below.

Pagination
The results page shows up to five results at a time. You should try to use specific search criteria so that there are not too many matches. However, if there are more than five results, you can see the next results by using the > button at the end of the page.

Tracked entity ownership
Every enrollment of a tracked entity in a program has an owning organisation unit. Ownership starts out as the organisation unit that first enrolled the tracked entity into that program, and changes if the enrollment is later transferred to another organisation unit. Ownership is tracked per tracked entity/program combination: the same tracked entity can be owned by different organisation units for different programs (for example, one facility could own a person's HIV program enrollment, while a different facility owns the same person's MCH program enrollment).
Whether you can open an enrollment you don't own depends on the program's access level, which is configured in the program's Access and Sharing section in the Metadata Management app, together with which organisation units you have been assigned data capture or search access to:
- Open or Audited: you can open the enrollment as long as you have at least search access to the owning organisation unit. (Audited also logs access when you open an enrollment outside your capture scope.)
- Protected: you can open the enrollment if you have data capture access to the owning organisation unit. If you only have search access to it, you'll first have to provide a reason (see Breaking the glass below).
- Closed: you can open the enrollment only if you have data capture access to the owning organisation unit. If you only have search access to it, you cannot open it at all, and there is no option to request access.
In practice, clicking View dashboard or View active enrollment from a search result doesn't always show the enrollment's content. For a Closed program you'll see an access-denied message if you don't have data capture access to the owning organisation unit. For a Protected program you'll see the breaking the glass prompt if you only have search access, or the same access-denied message if you have neither.
Being able to open an enrollment doesn't necessarily mean you can edit it: edit access depends separately on the program's sharing settings, and you may still see a View only label if you don't have write access.
Breaking the glass
If a program is configured with the Protected access level and you open a tracked entity whose enrollment is owned by an organisation unit you only have search access to (not data capture access), you'll be prompted to provide a reason before you can view the enrollment. This is informally known as "breaking the glass."
- Search for and open the tracked entity as normal.
- A Check for enrollments panel appears, explaining that the program is protected and that you must provide a reason to check for enrollments. All activity is logged.
- Enter a reason in the Reason to check for enrollments field. This is required; you cannot submit without one.
- Click Check for enrollments to proceed, or Cancel to go back to search.
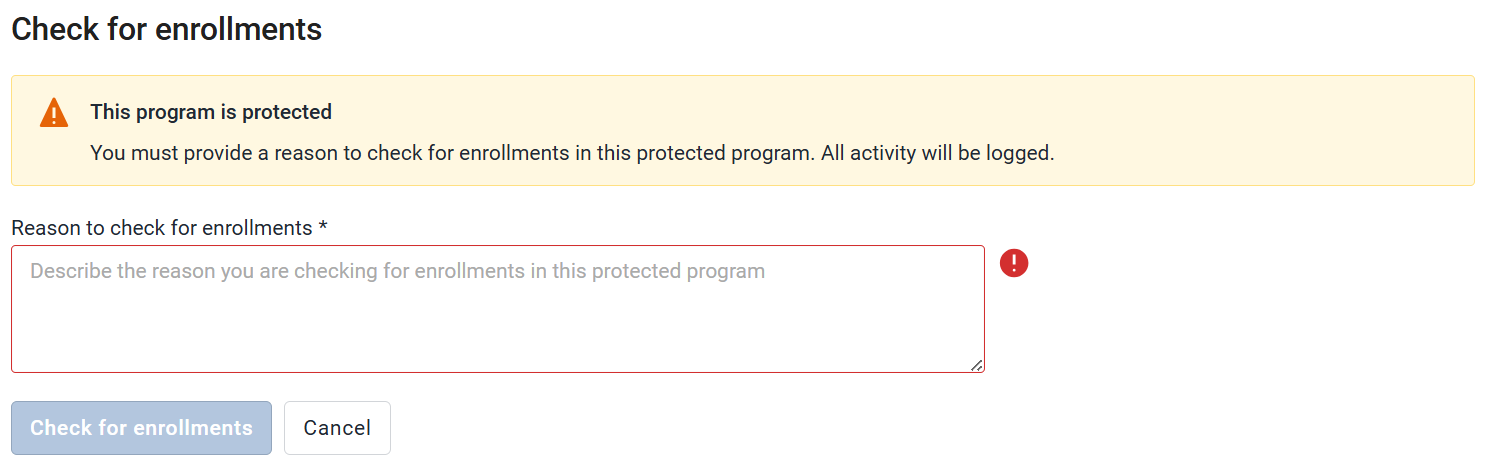
Once submitted, you get access to the enrollment for about 3 hours. This is tied to your user account rather than the organisation unit. So only the user gains access for 3 hours. Once the 3 hours pass, you'll need to provide a reason again. Every request is logged for audit purposes.
Whether you can edit the enrollment once you have access still depends on the program's sharing settings, the same as for any enrollment you own. Breaking the glass only grants visibility, not special edit rights.
List tracked entities enrolled in program
-
Abra o aplicativo ** Capture **.
-
Selecione uma unidade organizacional.
-
Select a tracker program with "Display front page list" set to true.
-
The program can have categories associated with it (implementing partner would be an example of such a category). If this is the case, fill them in.
Custom tracked entity working list for programs with "Display front page list" set to false.
-
Abra o aplicativo ** Capture **.
-
Selecione uma unidade organizacional.
-
Select a tracker program with "Display front page list" set to false.
-
If the program has any custom working list you are able to click and load it.

Filter the list
Use the buttons above the list to filter it.

As an example, you could filter the list to show only tracked entities where the enrollment status is "Completed": Click the "Enrollment status" filter (1), select "Completed" (2) and then "Update" the changes (3).

Each filter adapts to the attribute's value type, for example, numeric attributes provide a range selector, text attributes a search input, and date attributes a date picker. Filtering is available for all value types except MULTI_TEXT (multi-select option sets).
Filter on empty or non-empty values
Data element filters show two checkboxes at the top:
- Is empty – matches events that have no value for the selected data element.
- Is not empty – matches events that have any value for the selected data element.

Only one option can be active at a time per filter. Selecting Is empty or Is not empty clears any value-based criteria for the filter.
For image, file and coordinate data elements, Is empty and Is not empty are the only available filter options.
Note
The empty / non-empty checkboxes are not shown on the main filters (report date, status, assignee, etc.).
Filtering on empty / non-empty values requires DHIS2 server version 2.42 or higher. On older servers the checkboxes are not shown.
Sort the list
Click one of the column headers to sort the list by that column. Two arrows (up and down) are displayed next to each sortable column header. The active sort direction is highlighted, and unsorted columns show both arrows greyed out. Click again to toggle between ascending and descending order.

Modify the list layout
You can select which columns to show in the list and also reorganize the order of the columns.
Click the gear icon in the top right corner of the list. Tick the checkboxes for the columns you would like to display (1) and reorganize the columns by dragging and dropping using the six-dot handle on the left side of each column name (2).

Loading a predefined list view
You will find the predefined list views above the filters for the list. Click to load a view.

Download the tracked entities list
- Abra o aplicativo ** Capture **.
- Selecione uma unidade organizacional.
- Select a tracker program with "Display front page list" set to true.
- Click the three dots icon on the top right of the tracked entities list.
- Click Download data.
- Selecione o formato que deseja baixar.

download tracked entities list Note You can download the tracked entities list in JSON or CSV formats.
Tracked entity bulk actions
You can perform bulk actions on tracked entities and their enrollments in the tracked entity list.

Completing active enrollments
-
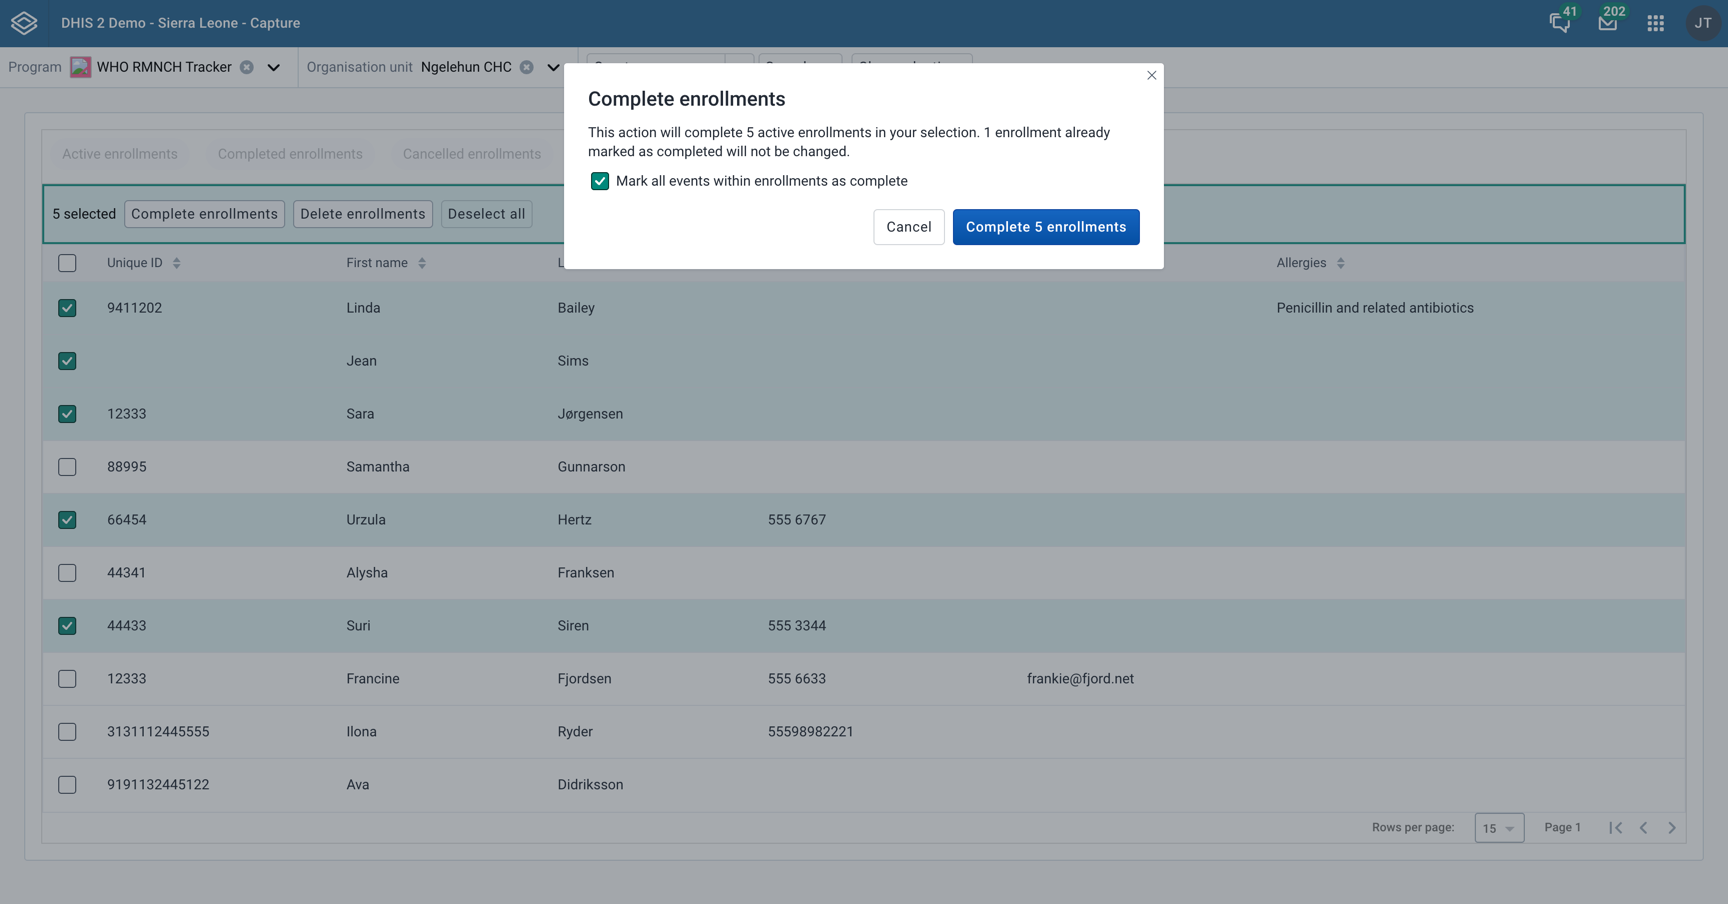
Select the tracked entities you want to perform the action on by clicking the checkbox to the left of the tracked entity.
-
Click the Complete enrollments button.
- You can also choose if you want to complete all active events within the selected enrollments.
-
Confirm the action in the dialog that appears.
Deleting enrollments
-
Select the tracked entities you want to perform the action on by clicking the checkbox to the left of the tracked entity.
-
Click the Delete enrollments button.
-
In the dialog that appears, select what enrollment statuses you want to delete and confirm the action.
-
You can choose any combination of enrollment statuses to delete.
-
Confirm the action in the dialog that appears.

Tracker program stage working list
You can show data elements from a single stage in a working list. Select the "Program stage" option from the "More filters" dropdown, then choose a program stage.


The tracker program stage list can be filtered, sorted, modified, saved, updated, deleted and shared in the same way as other working lists. Additionally, the program stage list can be filtered by assignee, just like an event program list.
Dates and calendars
The Capture app displays and accepts dates in the calendar configured for your DHIS2 server. If the server uses a non-Gregorian calendar, such as the Ethiopian or Nepali calendar, all date fields, date pickers, date ranges, age fields and the dates shown in lists and widgets follow that calendar. The order of day, month and year follows the server's date format setting.
The example below shows the report date picker on a server configured to use the Nepali calendar, with the Nepali month and year and the Nepali weekday names.
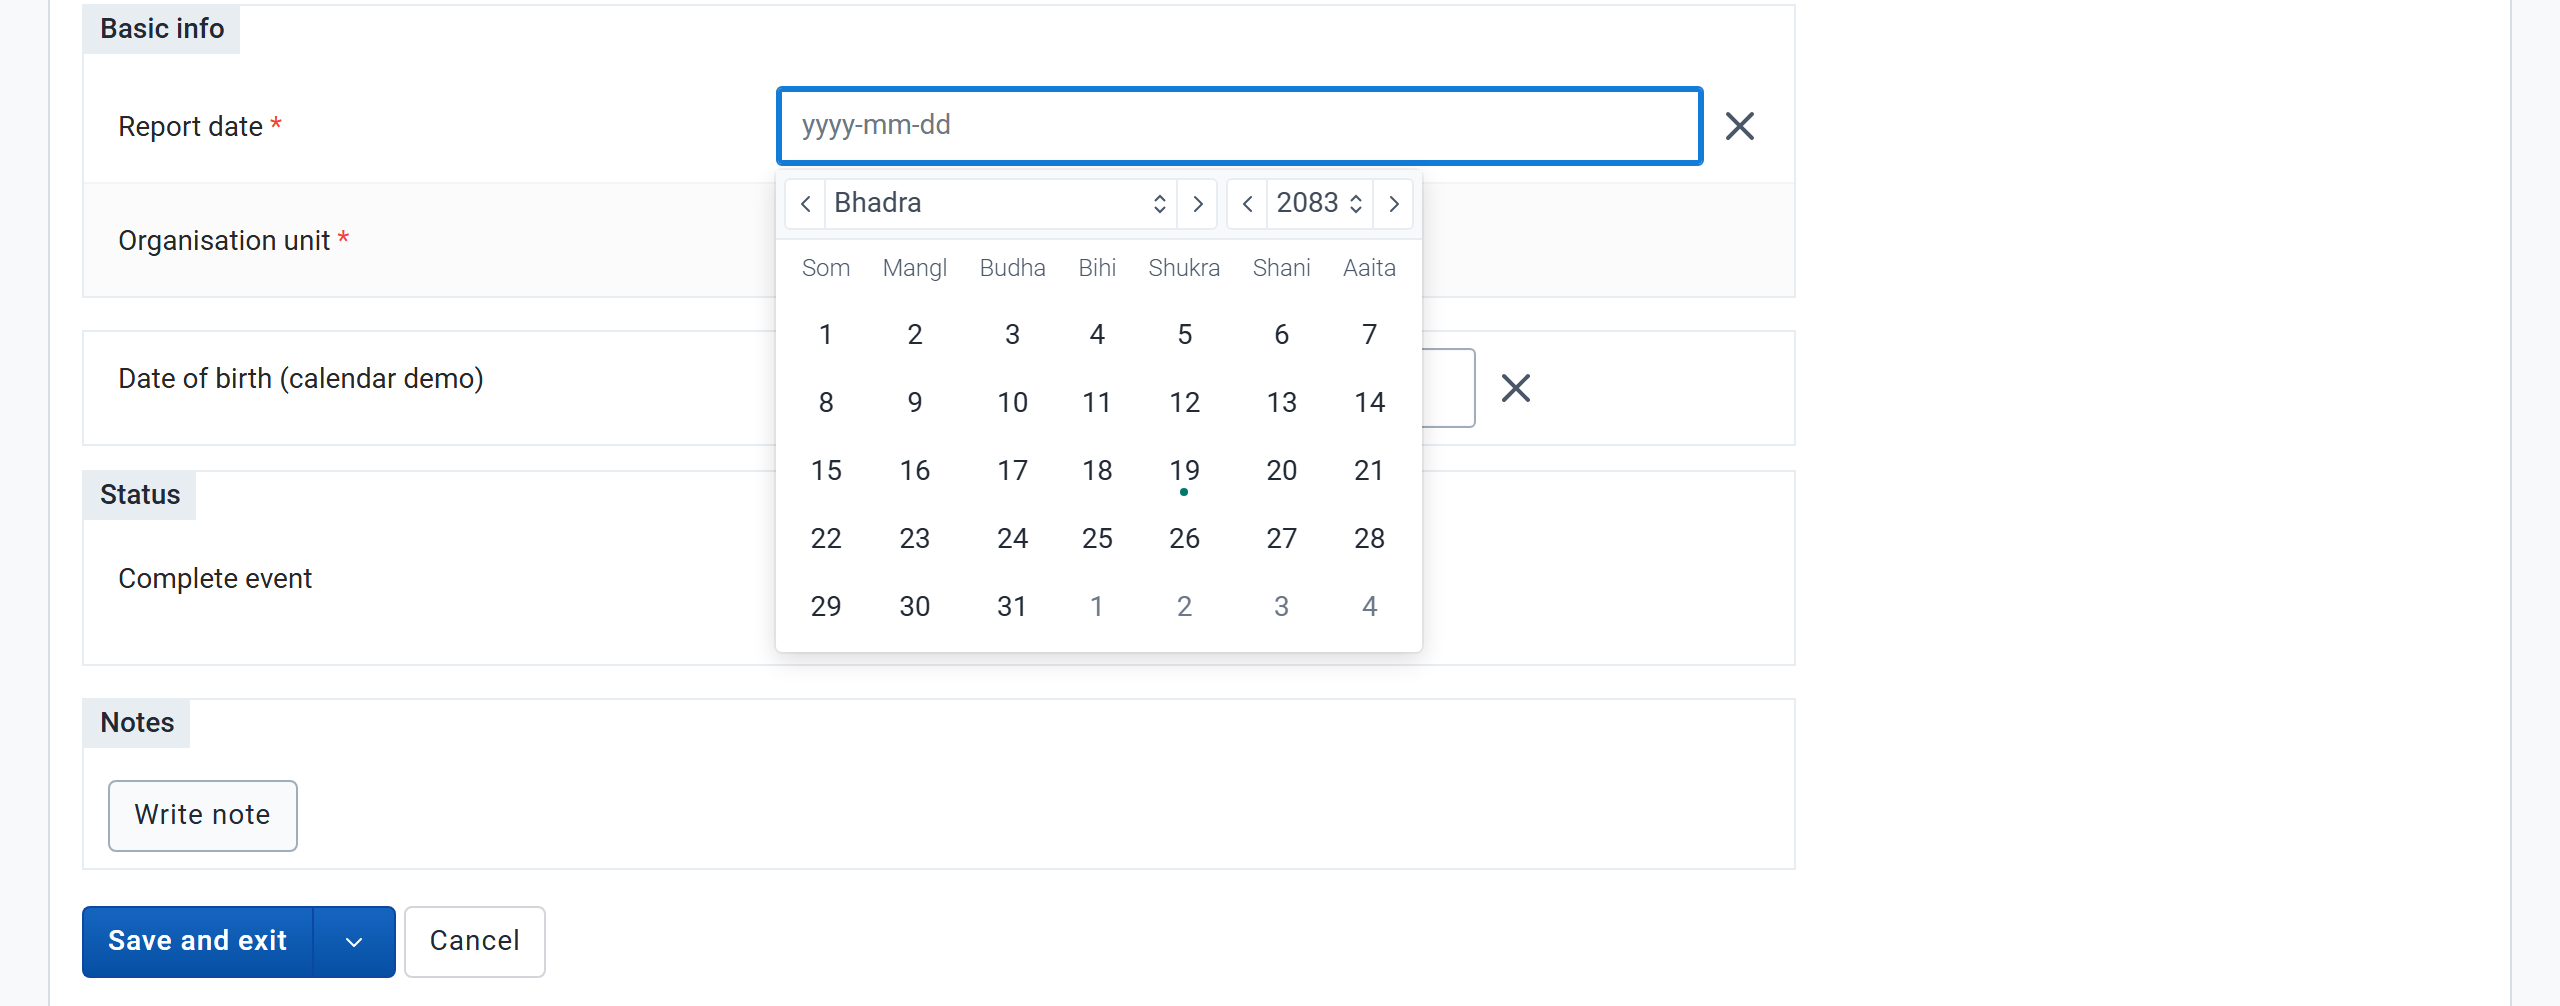
This affects, among others:
- Enrollment, incident, report and scheduled dates in forms and widgets.
- Date and date range filters in working lists, and the dates shown in list columns.
- Age fields, where entering a date of birth calculates the age in the configured calendar, and entering an age calculates the date of birth.
- Validation that depends on dates, such as a program's expiry days and Completed events expiry days.
Dates are always stored on the server in the ISO 8601 (Gregorian) calendar and converted for display. A date entered as 2017-04-13 in the Ethiopian calendar is stored as the corresponding Gregorian date, so downloaded lists, the API and other DHIS2 apps that do not apply the calendar setting may show a different, equivalent date.
The calendar is a server-wide setting and cannot be changed per user or per program. Contact your system administrator if dates appear in an unexpected calendar.
Implementer / administrator info
Metadata caching
For performance reasons the Capture app caches metadata in the client browser. When metadata is updated on the server the changes needs to be propagated to the clients that have already cached the metadata. Depending on the change, this is done in one of three ways:
-
If the change is bound to a program you will need to increase the program version for that particular program. For example, if you change the data elements in a program or a program rule, the version for the bound program needs be increased.
-
If the change is NOT bound to a program you will need to increase ANY program version for the change to be propagated to the clients. Examples here are changes to constants, organisation unit levels or organisation unit groups.
-
The exception to the two rules above is option sets. Option sets have their own version property, i.e. increasing the option set version should ensure the option set metadata are propagated to the clients.
Enrollment dashboard
Reaching the enrollment dashboard via url
You reach the enrollment dashboard either by typing in the address bar of your browser or using the user interface of the capture app. In this section we are focusing on the first use-case, where you type or paste the url you want to access in the Address bar.

One way to reach the enrollment dashboard and view a specific tracked entity's enrollment is by using only the enrollment id. For example the link .../capture#/enrollment?enrollmentId=wBU0RAsYjKE will take you to the dashboard for the enrollment with id wBU0RAsYjKE.
The top of the dashboard defines your context. For example in the image below the context is as follows, the selected program is "Child Programme", the organisation unit is "Ngelehun CHC", the selected person is "Anna Jones" and the selected enrollment is "2017-11-16 11:38".

You can change your context by clicking the "x" button.

What each context box shows
The context selector shows one box for each level of your context, from left to right:
- Program - the selected program. You only see programs that are shared with you and your user group, and if you have selected an organisation unit, that are assigned to that organisation unit.
- Organisation unit - the organisation unit you are working in.
- Tracked entity - this box is titled with the tracked entity type (for example "Person" or "Building"), and its value shows the display name of the specific tracked entity instance (see How the tracked entity display name is built below).
- Enrollment - the selected enrollment, labelled with its enrollment date.
When you open an event from the program stage list, two more boxes are added to the right:
- Stage - the program stage the event belongs to.
- Report date - the event's date, labelled with the stage's date label (for example "Date of discharge").
How the tracked entity display name is built
The name shown for the tracked entity in the top bar is derived from the tracked entity's attribute values, in the following order:
- The values of the first two tracked entity type attributes that are set to Display in list, shown together (for example the "First name" and "Last name" attributes, giving "Anna Jones").
- If that produces no value - either because no attributes are set to Display in list, or because the tracked entity has no value for them - the values of the first two attributes configured on the tracked entity type (in their configured order) are used instead.
- If no attribute value can be shown at all, the tracked entity's unique identifier (UID) is shown as a fallback.
Note for implementers/administrators: If the top bar shows a UID instead of a readable name, it means no suitable attribute value could be shown for the tracked entity. To control which attributes are used for the name, set the relevant tracked entity type attributes to Display in list in the Metadata Management app, and make sure the tracked entity has values for them.
Deselecting the program
When you deselect the program you see the following

Selecting a program with enrollments
When program and enrollment selections are empty, you first have to select a program. Since only one enrollment can be active per program at a time, if the tracked entity (in this case "Anna Jones") already has an active enrollment under the program you select, you will be taken directly to that enrollment's dashboard.
Selecting a program with zero enrollments
If the tracked entity (in this case "Anna Jones") does not have enrollments under the program you select you will see a message explaining that there are no enrollments for that program. You will also be given the option to enroll "Anna Jones" in that program.

Selecting an event program
When you select an event program you will see the following. (Remember event programs do not have enrollments in the system, only tracker programs do).

You will also be given the option to either create a new event for the selected program or view the working lists for the selected program.
Selecting a program with a different tracked entity type
When your selected tracked entity type is a person, as in our example with Anna Jones, and you select a program that is not of type person but for example of a type Malaria case you will see the following.

You are also given the option to enroll a tracked entity in the program you selected.
Deselecting the organisation unit
When you deselect the organisation unit you see the following

Deselecting the tracked entity
When you deselect the tracked entity, in this case "Anna Jones" you are taken to the working lists in that Tracker program.
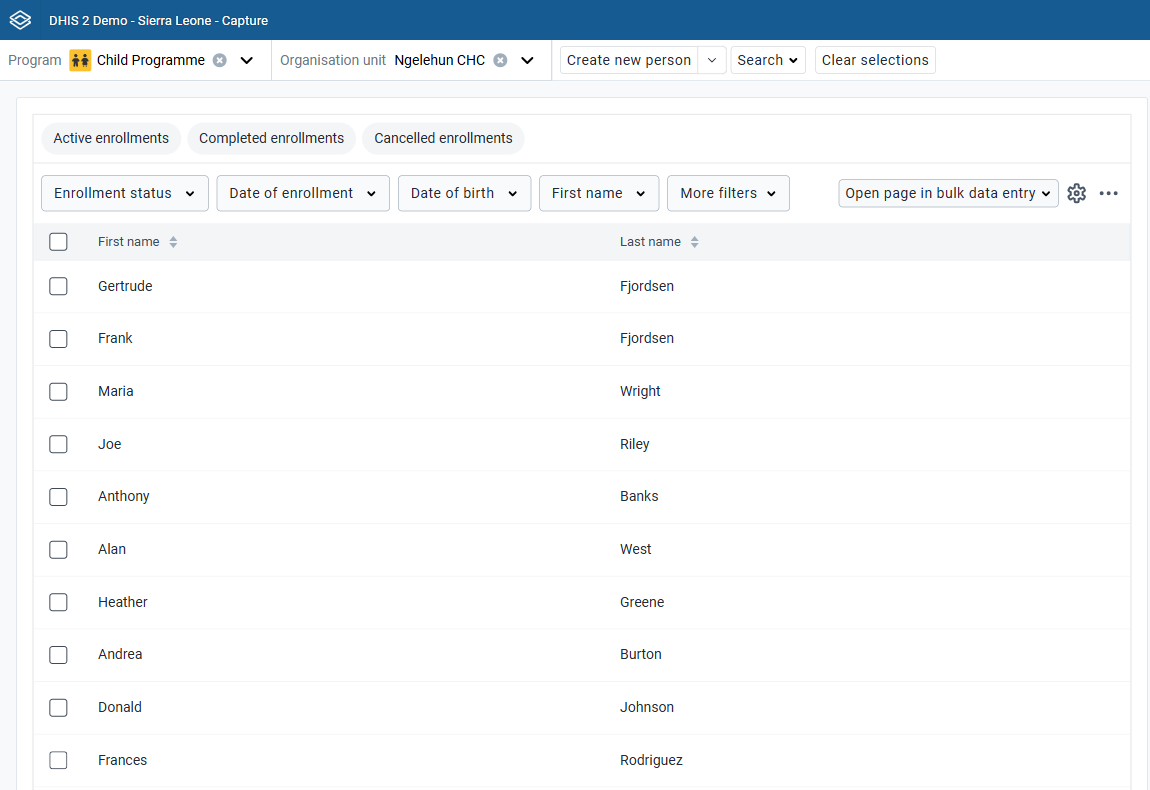
Deselecting the enrollment
When you deselect the enrollment you see the following

Clearing all selections
In addition to deselecting individual boxes, the top bar provides an action to clear all current selections at once. This resets the organisation unit, program, tracked entity and enrollment and returns you to an empty scope. If you have unsaved changes in an open form, you are first asked to confirm before the selections are discarded.
Read-only mode
The enrollment dashboard becomes read-only when you don't have full write access, or when the tracked entity is deactivated. In read-only mode you can still view all data, but actions that would create, edit, delete, or complete data are hidden rather than just disabled.
- If you have no write access at all (to the program, the tracked entity type, and every program stage), a single View only badge is shown next to the context bar at the top of the dashboard, explaining why.

- If you have write access to some parts but not others (for example, write access to some program stages but not others, or to the program but not the tracked entity type), the page-level badge is not shown. Instead, each affected widget shows its own View only badge and hides only the actions it doesn't allow.

In both cases the action buttons in the affected widgets are hidden, while all existing data stays visible.
Quick actions
The quick actions widget offers shortcuts for frequently used actions for the current enrollment.

Program stage list
Stages can be collapsed or expanded to reveal the events inside.

Collapsed stages

In the collapsed state, you can view the summary information about this stage including: - Ícone - Program stage name - Program stage description (on hovering the information icon) - Total number of events - Last updated date Depending on the status of events, there can be additional information regarding: total number of overdue events or total number of scheduled events.
Expanded stages

When you expand the list, you will see the table contains the data of events in the stage. This includes mandatory columns: Status, Report date and Organisation unit, the following columns depend on the data elements that have been selected as Display in list of event.
Events are sorted with most recent on top and other columns are also sortable.

When clicking New {stage event name} button, you will be redirected to the Add new event page for this selected stage.

Expanded stages with more than 5 events
In case there are more than 5 events in the list, only the first 5 are shown. You will be able to view the rest by clicking Show more.

Enrollment widget
On the enrollment page you can see the enrollment widget
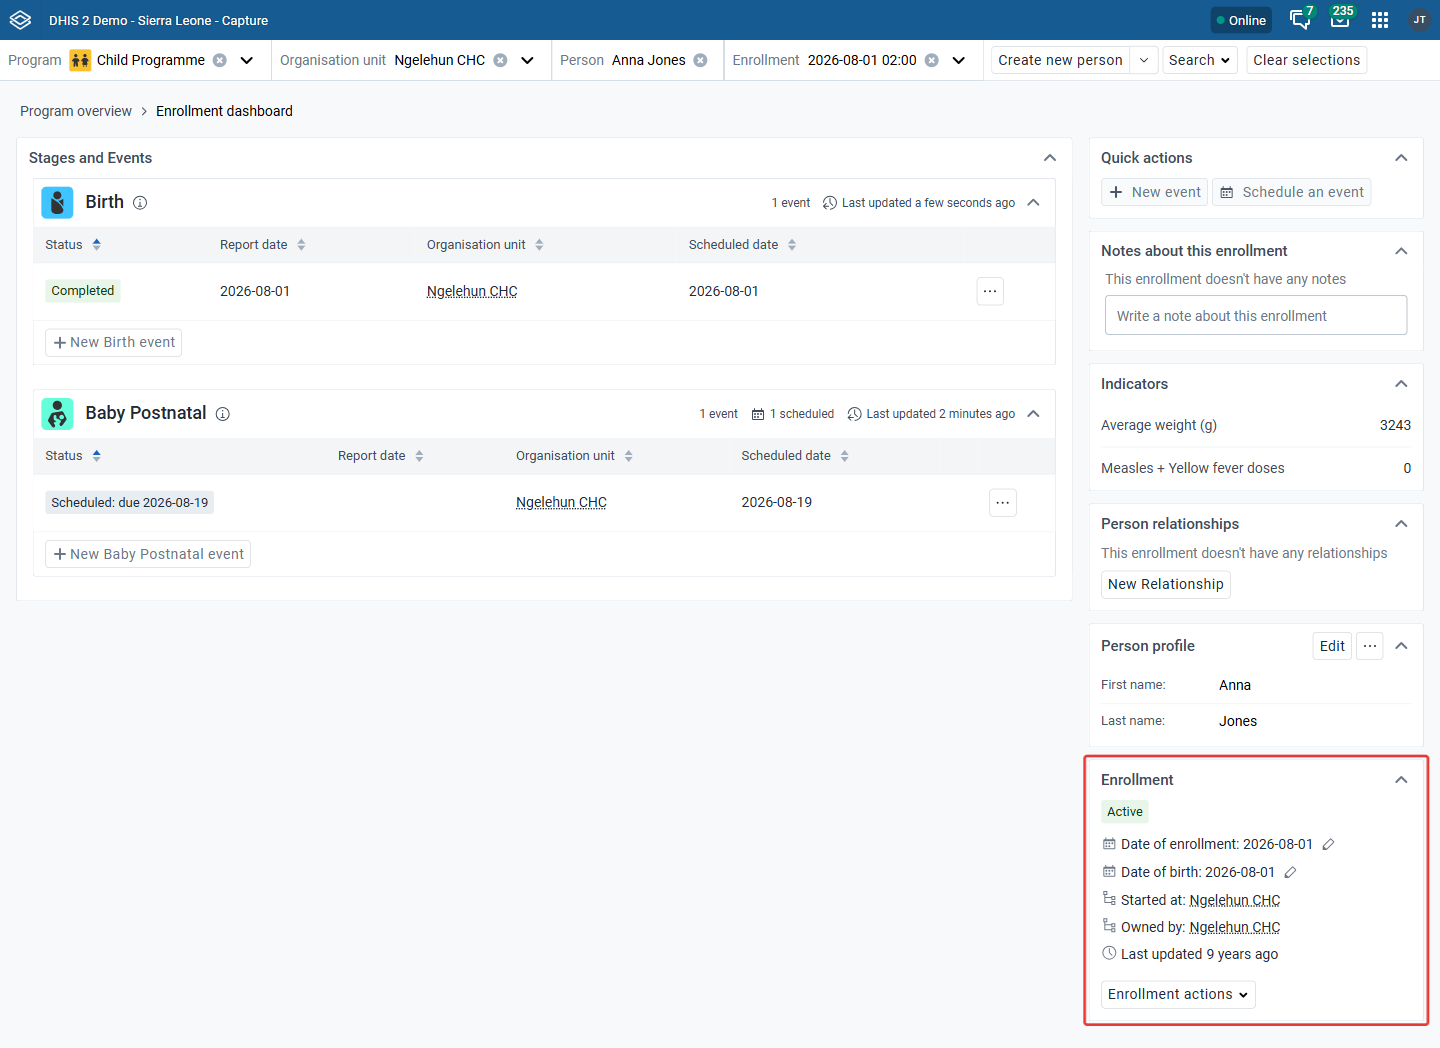
Enrollment actions
When you click on the enrollment actions button, a menu with all the available actions will open. You can:
- Change the enrollment status to Active, Cancelled or Completed using the buttons in the menu.
- Mark or remove the enrollment for a follow-up.
- Transfer the enrollment to another organisation unit
- Delete the enrollment
- Add coordinates to the enrollment

There can only be one active enrollment at a time. If there are no active enrollments, there will be a button Add new to enroll the tracked entity in the program again. If the program only allows one enrollment per tracked entity, the Add new button will be disabled with a tooltip saying Only one enrollment per {TET} is allowed in this program.

Transfer the enrollment to another organisation unit
In the enrollment actions, you could also choose to transfer the enrollment to another organisation unit. Click the transfer button and select the organisation unit you want to transfer the enrollment to.
Transferring changes the owning organisation unit of the enrollment, which affects data visibility and access. After the transfer, the tracked entity will be owned by the new organisation unit, meaning users without access to that organisation unit may no longer be able to view or edit the enrollment. The transfer does not move historical event data; it only changes the ownership going forward. See Tracked entity ownership for how ownership determines who can view and edit an enrollment.

Delete the enrollment
You can delete the enrollment by clicking the delete button and confirming the action in the modal.

Complete the enrollment
You can complete the enrollment by clicking the complete button. When there are active events, you can choose to complete the enrollment along with the events from the confirmation modal.
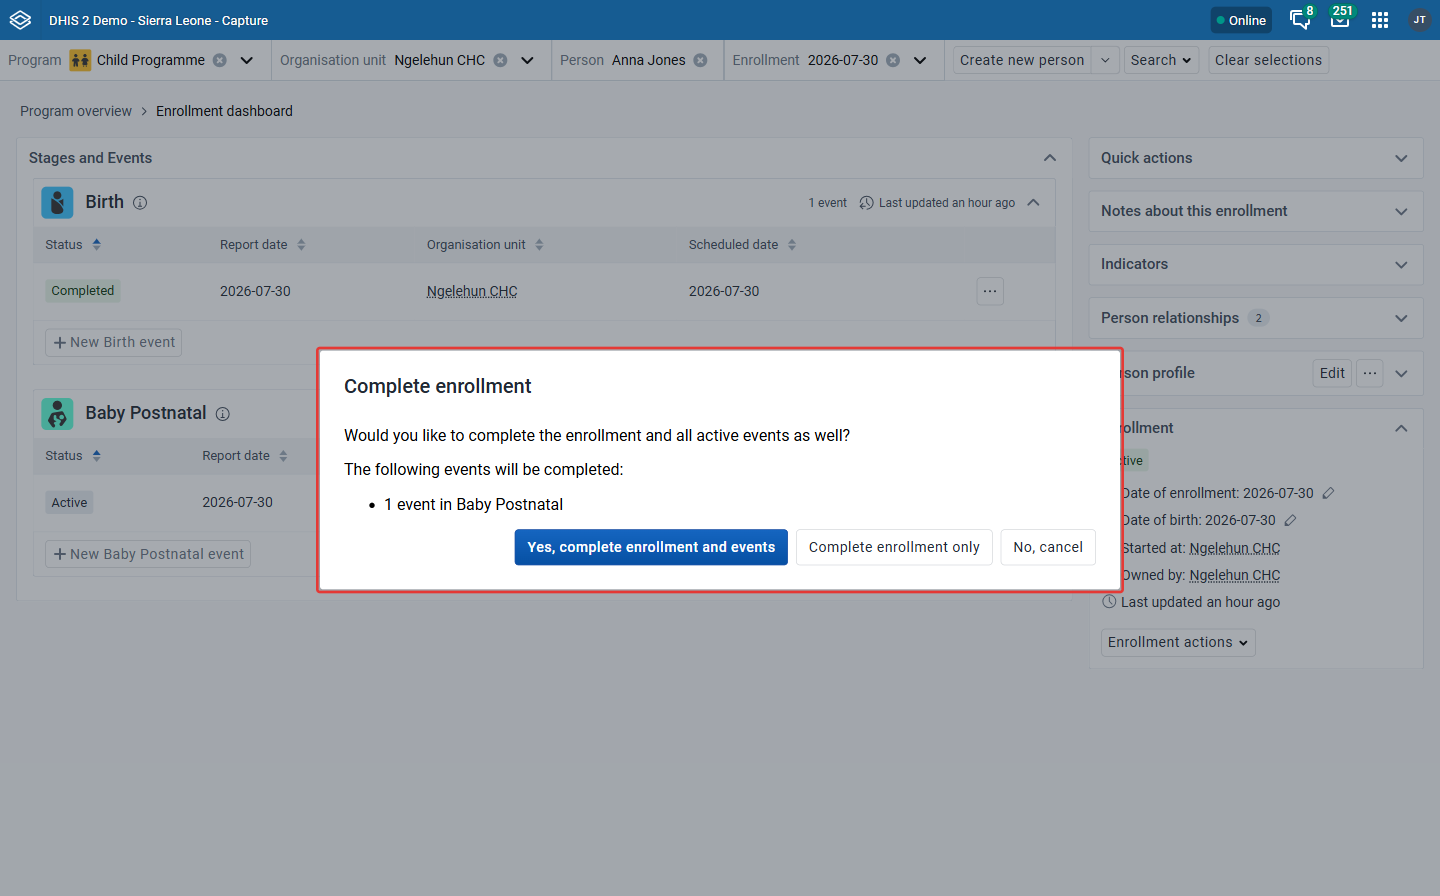
Enrollment note widget
The enrollment note widget displays notes and allows addition of notes, associated with the current enrollment.
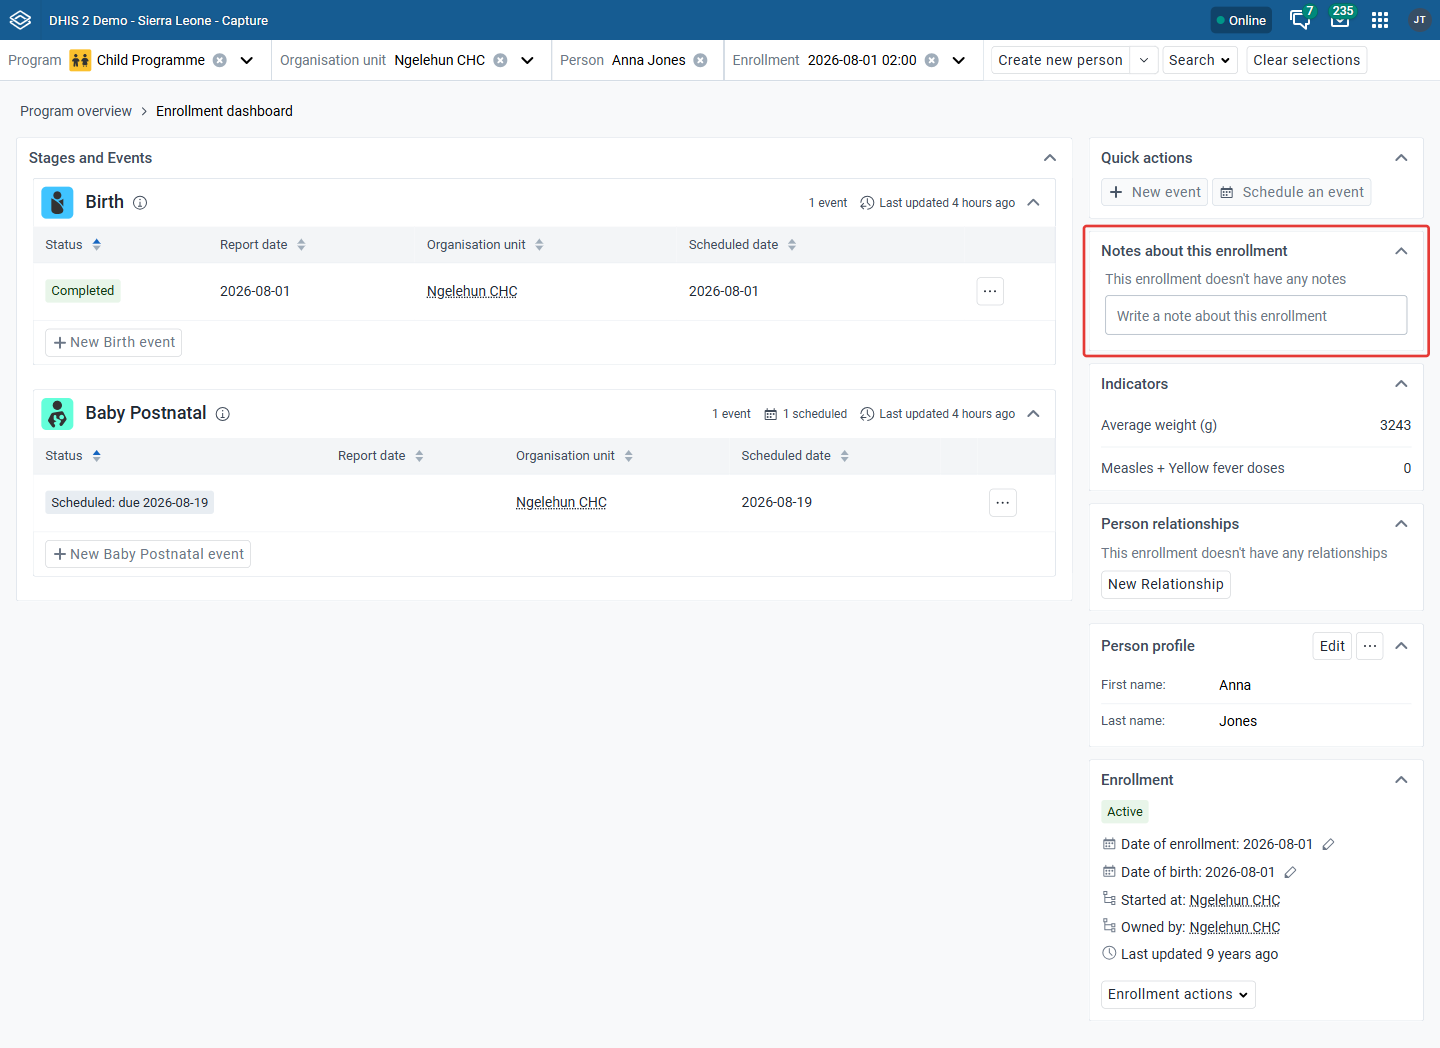
By clicking in the text field, you will be able to enter new text and see action buttons Save note and Cancel. Be aware that Enrollment notes are attributed to a user and cannot be deleted.
Relationship widget
The Relationships widget on the enrollment dashboard is used for viewing the record’s linked relationships to other records. The number next to the title signifies the total number of relationships
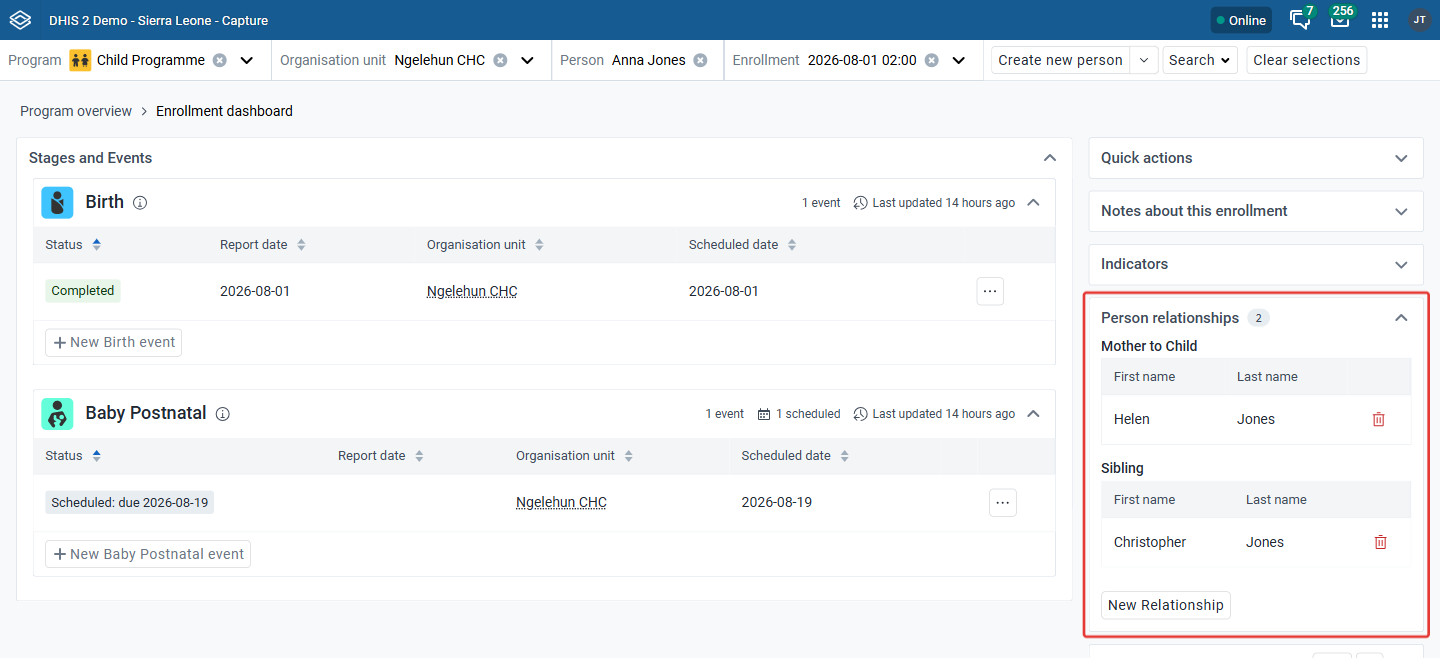
For tracked entity relationships, the key attributes shown in the widget are the tracked entity attributes selected for that side under Relationship sides on the relationship type in the Metadata Management app.
If no attributes are selected, it will just show a row per record with tracked entity type name and relationship creation date.
When clicking a tracked entity you should be taken to the Enrollment Dashboard. If the relationship type includes a program, you should be taken to the latest enrollment for that program. If no program is specified, you should still be sent to the enrollment dashboard, but without a program.
Click the New Relationship button to add a new relationship. Adding a new relationship opens a dialog where you can select the applicable relationship type.

Choose between linking to an existing tracked entity or creating a new one.

Existing tracked entity
Use the search form to find any existing record to link to.

New tracked entity
Use the form to create a new record and link.

tracked entity profile widget
On the enrollment dashboard, you can view the tracked entity profile widget. Inside the profile widget you can view the key attributes values.

Click the Edit button to make changes to the tracked entity profile. Editing the profile opens a dialog where the profile attributes can be changed.

The ⋯ (more) icon next to the Edit button opens an overflow menu with further actions on the tracked entity: View changelog (if enabled for the tracked entity type), Deactivate/Activate, and Delete.
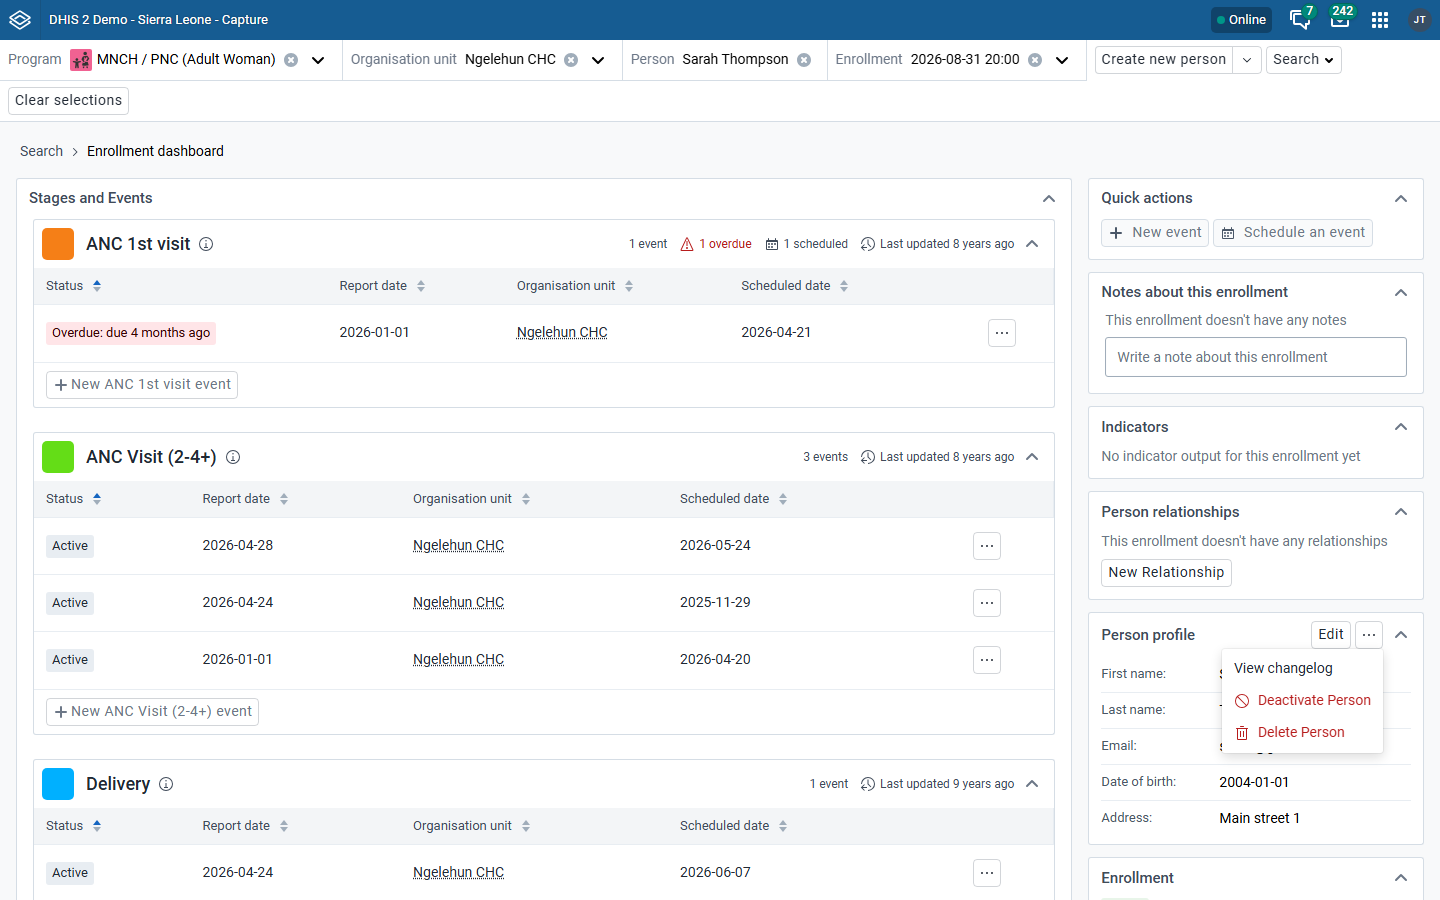
Select Delete [tracked entity type] from the overflow menu to delete the tracked entity. You can confirm the action from the dialog. Once confirmed, the tracked entity and all its associated enrollments and events across all programs will be deleted. To delete a tracked entity that has any enrollments, the user needs the authority Delete tracked entity instance and associated enrollments and events.

Deactivate or activate a tracked entity
Deactivating a tracked entity marks it read-only: its profile can no longer be edited, and no new enrollments or events can be created for it in any program. This is useful for records that should be preserved for historical or reporting purposes but should no longer receive new data, for example a person who is deceased or has permanently left the catchment area.
To deactivate a tracked entity:
- Open the enrollment dashboard for the tracked entity.
- In the tracked entity profile widget, click the ⋯ (more) icon and select Deactivate [tracked entity type].
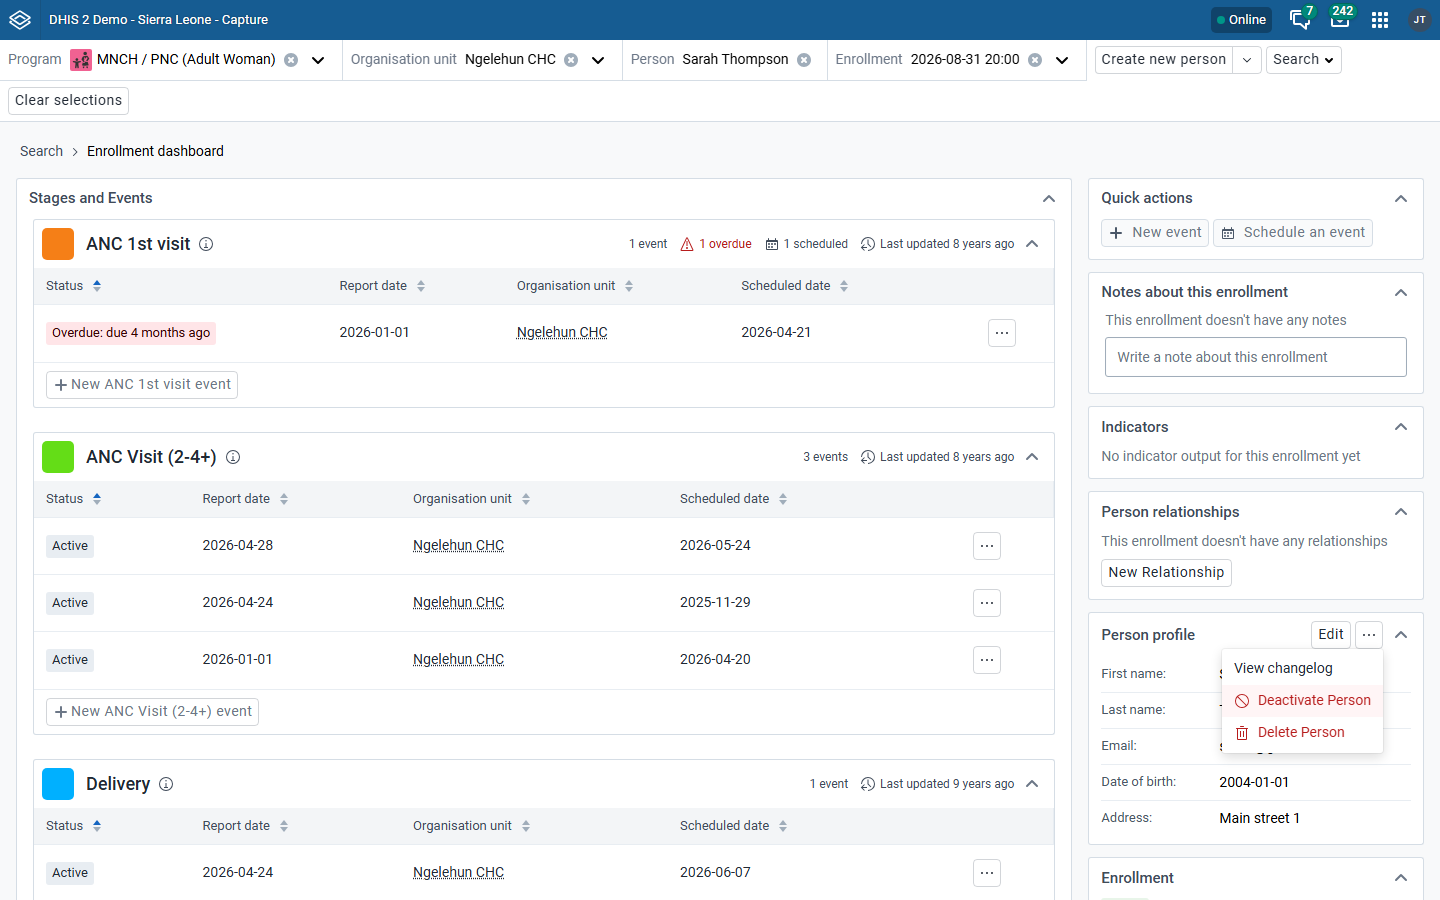
- Confirm by clicking Yes, deactivate [tracked entity type] in the dialog.

This option is only shown to users with write access to the tracked entity type.
Once deactivated, the tracked entity shows a View only badge wherever it's opened, and appears dimmed with its checkbox disabled in tracked entity working lists, so it can't be picked up for bulk actions.

To reverse this, open the overflow menu again and select Activate [tracked entity type], then confirm. This restores normal write access according to the user's existing data access permissions.
Feedback widget

On the enrollment dashboard, the feedback widget displays text and values that are triggered by certain conditions. If the current dashboard triggers some rules set up in the program, the text or values will be automatically displayed.
The displayed text and values support Markdown formatting, including headings, bold/italic text, lists, tables, and legend-colored key/value pairs.
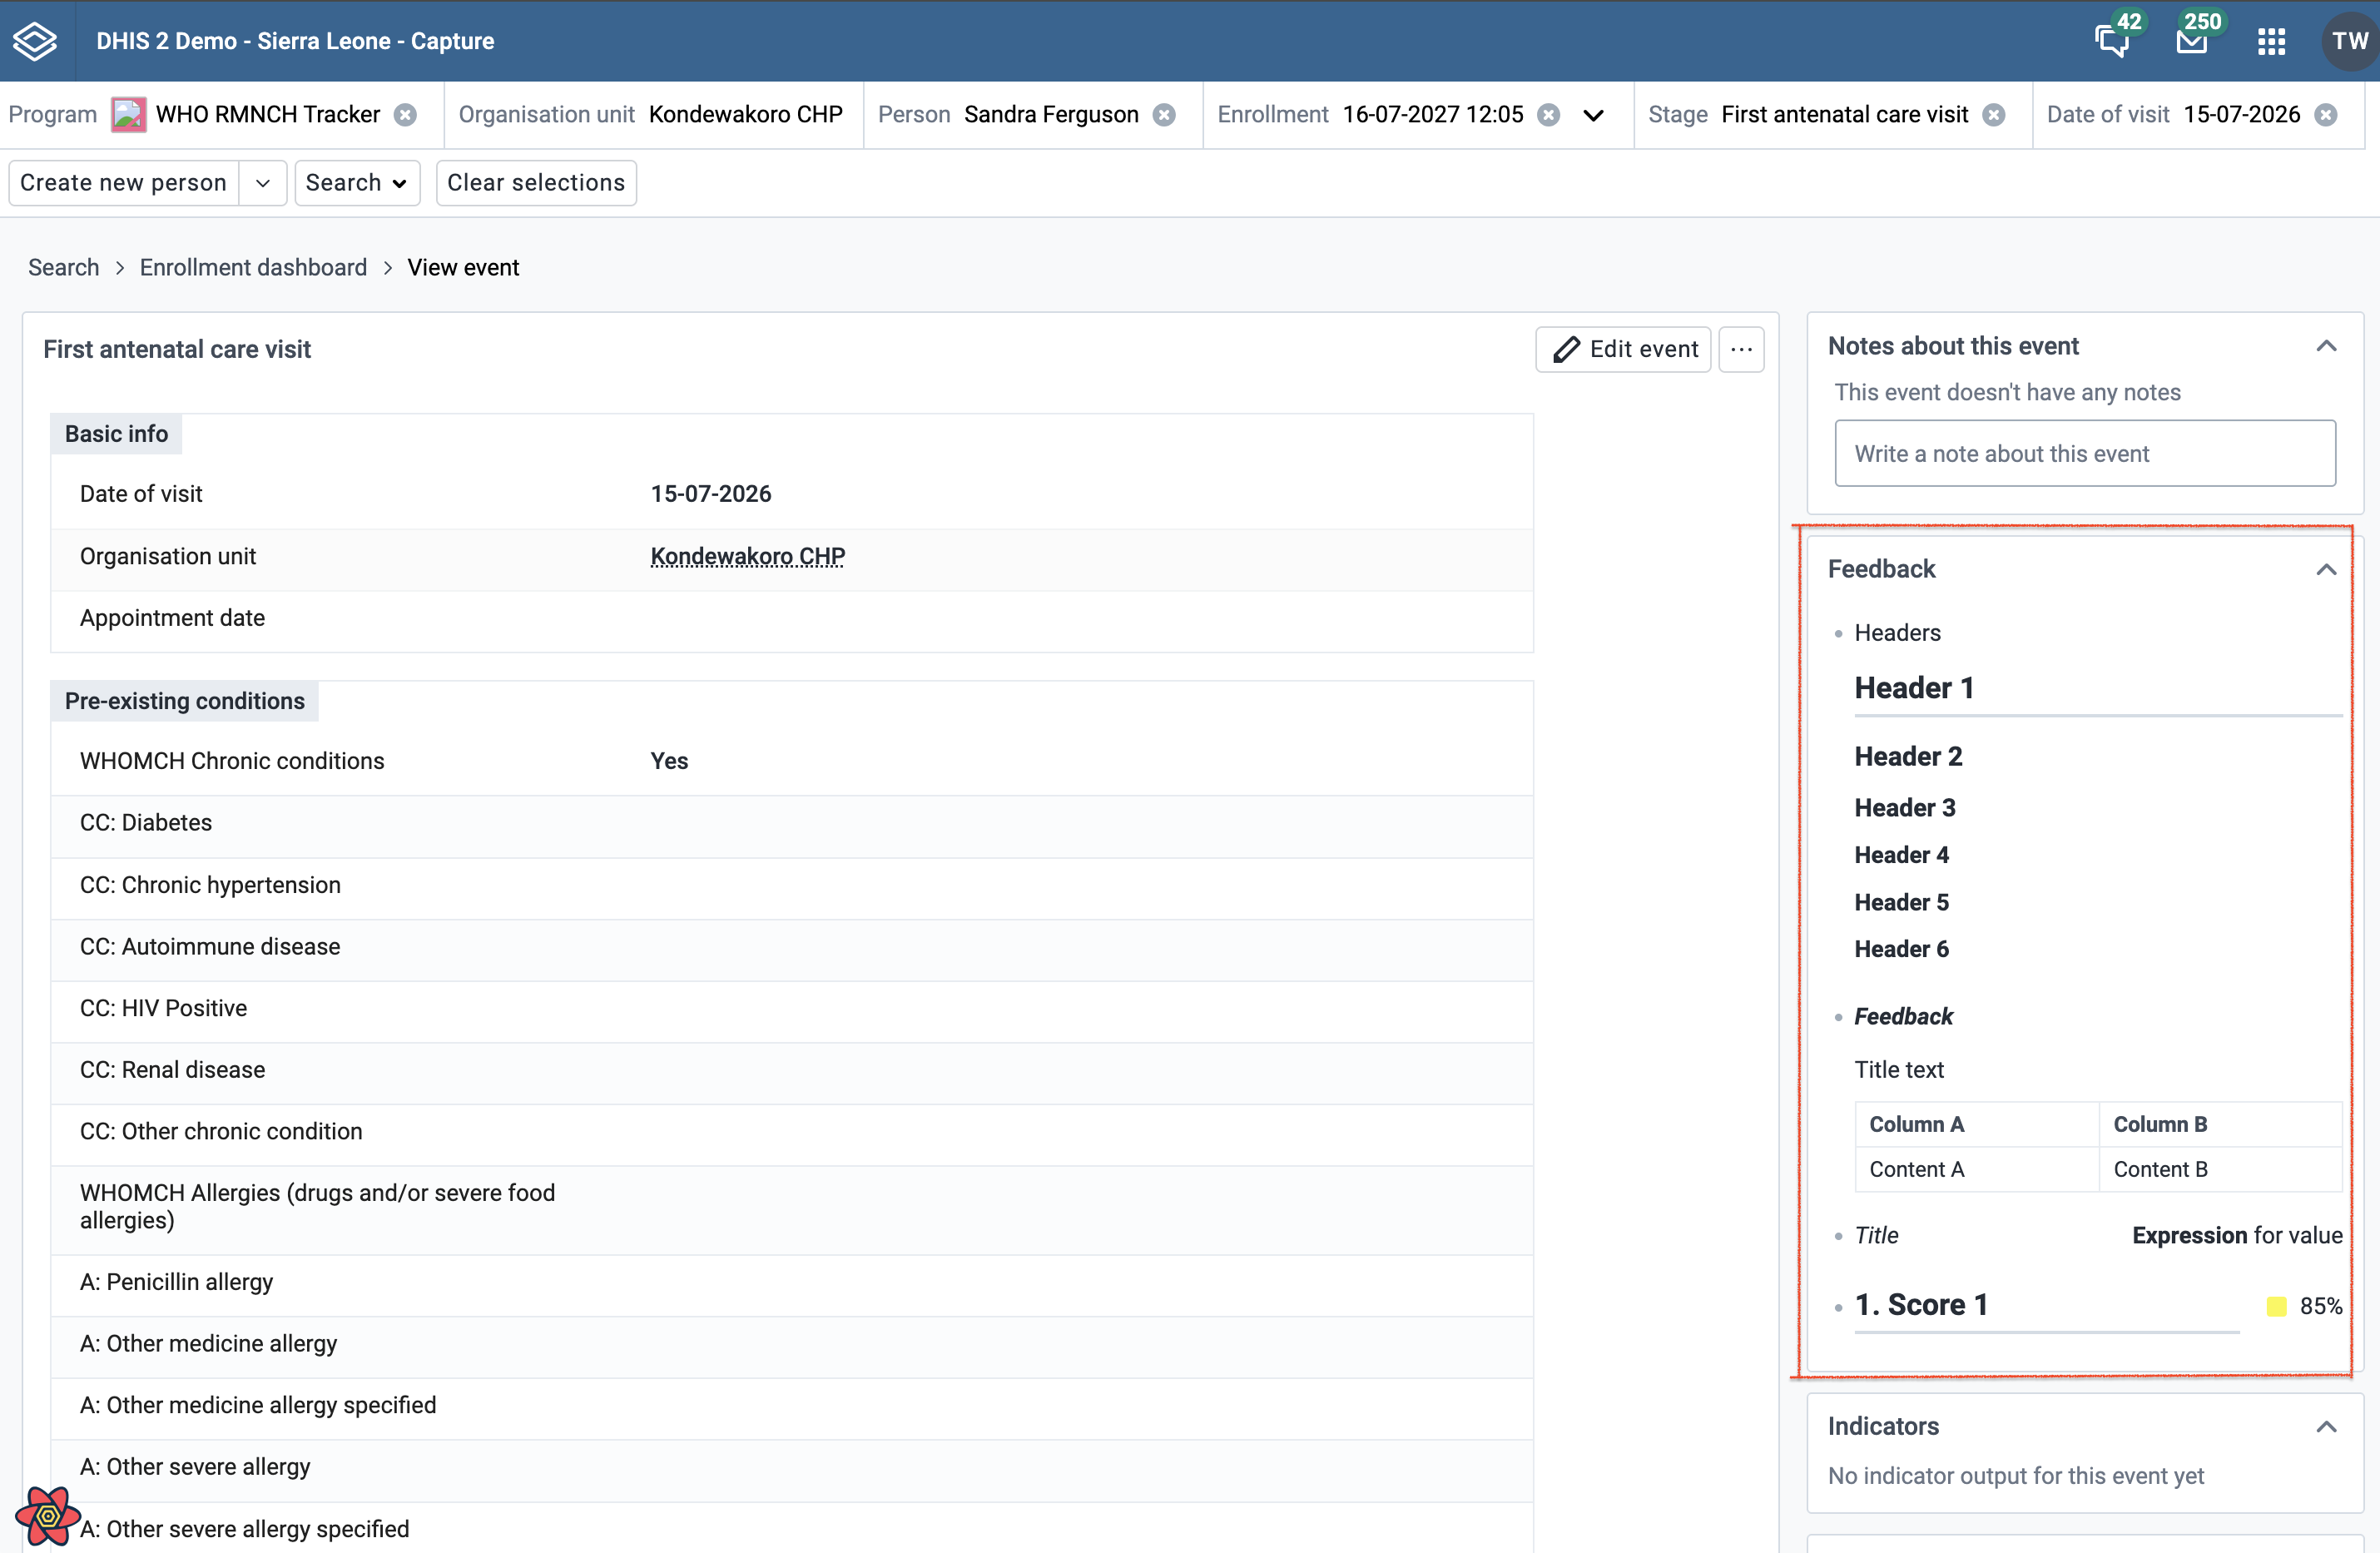
Empty state
If there isn't any feedback for the current dashboard, the widget shows a short empty message. If there aren't any program rules that could show feedback for the current dashboard then the widget is hidden.
Indicator widget
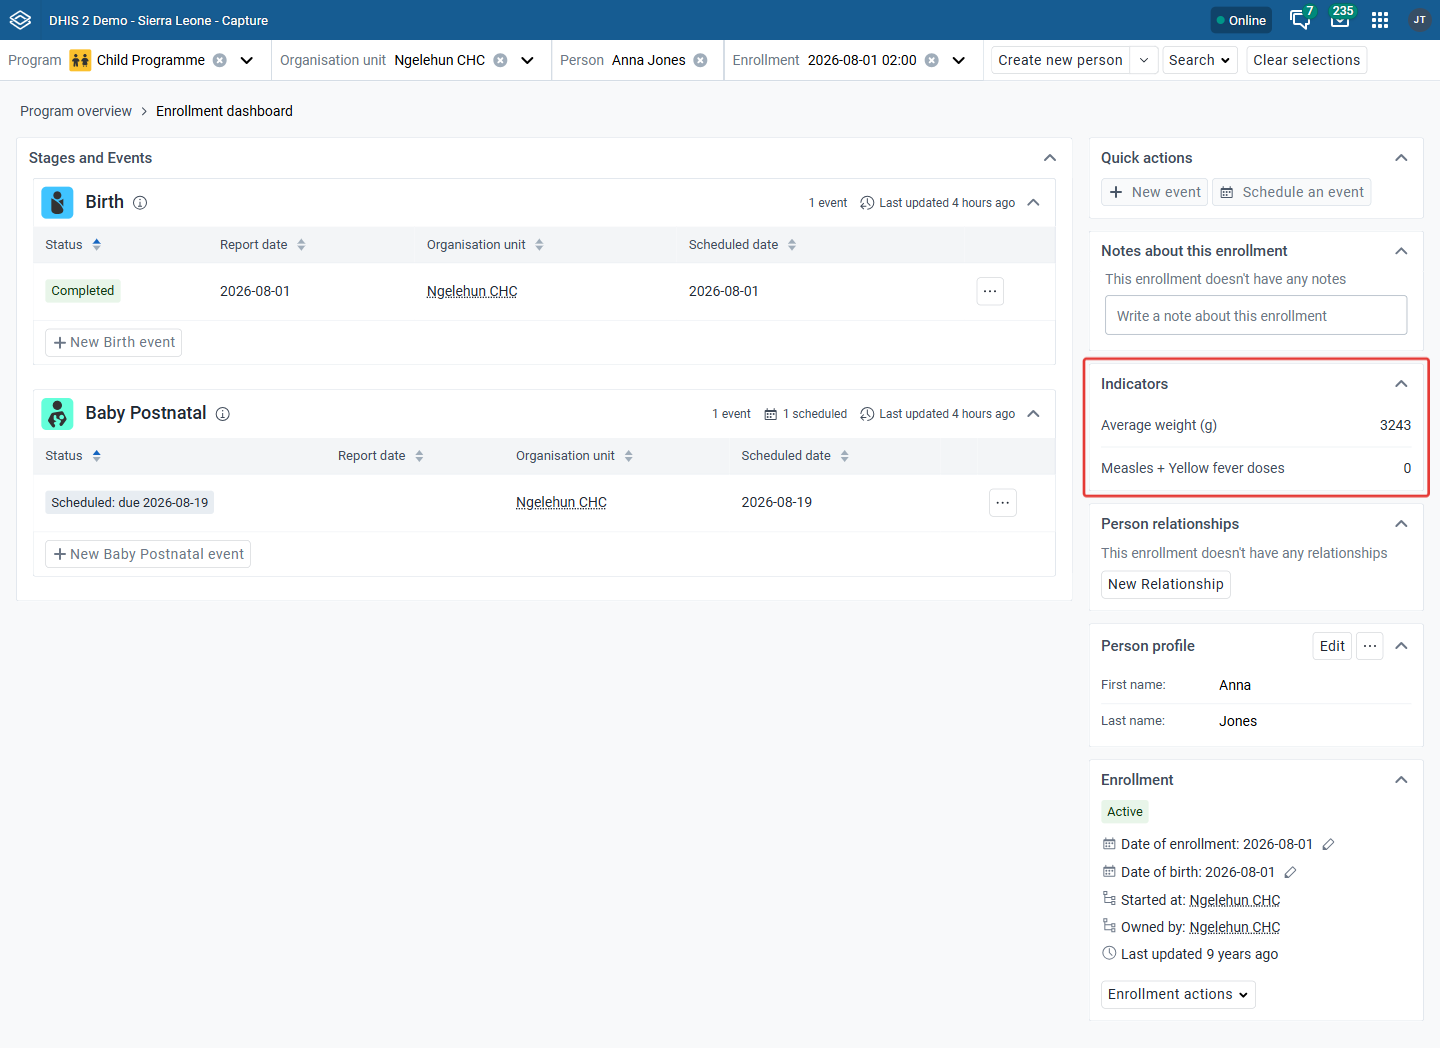
On the enrollment dashboard, the indicator widget displays indicator text and values output related to the current dashboard. The indicators will be sorted alphabetically.
Empty state
If there aren't any related indicators or indicator output for the current dashboard, the widget shows a short empty message. If the current dashboard can't show any indicator output (because it has no related indicators) then the widget is hidden.
Legends
Some indicator values show a colored circle next to the value. The colored circle shows the related legend color for that indicator value. Colored legend circles are only shown for indicator values that have them set up.
Warning widget

On the enrollment dashboard, the warning widget displays warnings related to the current dashboard. The widget shows warnings that are not associated with any specific data item. If there aren't any warnings to show for the current dashboard then the widget is hidden.
Error Widget

On the enrollment dashboard, the errors widget displays errors related to the current dashboard. The widget shows errors that are not associated with any specific data item. If there aren't any errors to show for the current dashboard then the widget is hidden.
Customize the dashboard layout
The widgets described above, and their left/right column order, form the default dashboard layout. Individual users cannot rearrange these widgets from within the Capture app itself.
A user with access to the Datastore Management app or the Tracker Configurator App can instead define a custom layout per tracker program, by adding a configuration entry to the capture datastore namespace. This lets you choose which widgets appear, in which column, and in what order, and even embed custom plugins alongside the built-in widgets. The same mechanism also applies to the Add event and Edit event pages.
See Manual setup (Advanced) for the full configuration reference, including the list of supported widgets and how to embed plugins.
Enrollment event view and edit page
Navigation
You can reach the enrollment event edit page is by clicking any event in the Program stage list from the Enrollment Overview page.
Top bar context
At the top of the page you can see various information related to the current context. You can see the program, the organisation unit, the tracked entity, the enrollment date, the stage and the report date.
To go to the Enrollment Overview page you can: - click Enrollment dashboard in the breadcrumb. - deselect the stage from the top bar. - deselect the event (report date) from the top bar.

View/Edit event form
This is the form where you can see and edit the enrollment event details.
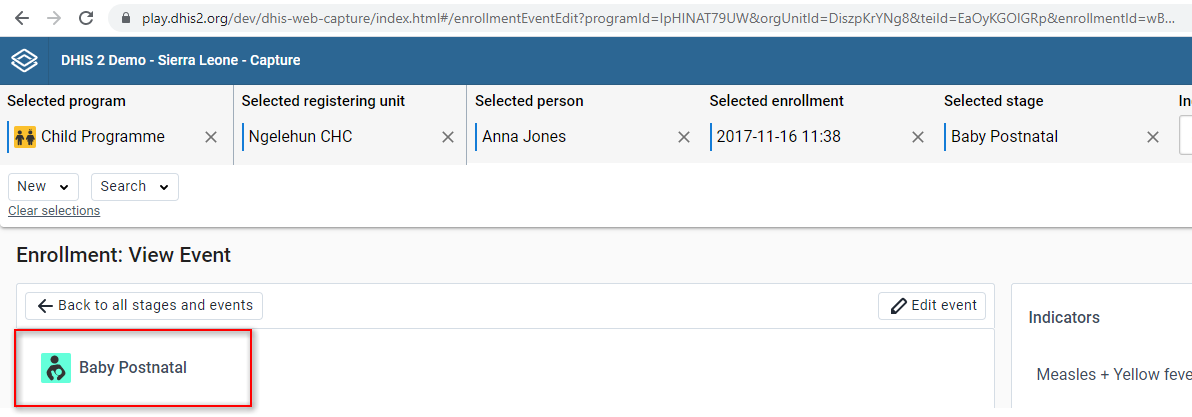
Form header
In the view/edit event form you can see the stage name and icon.
Scheduled date in edit event form
If an event has the status Scheduled or Overdue, you will be able to see the Report and Schedule tab.
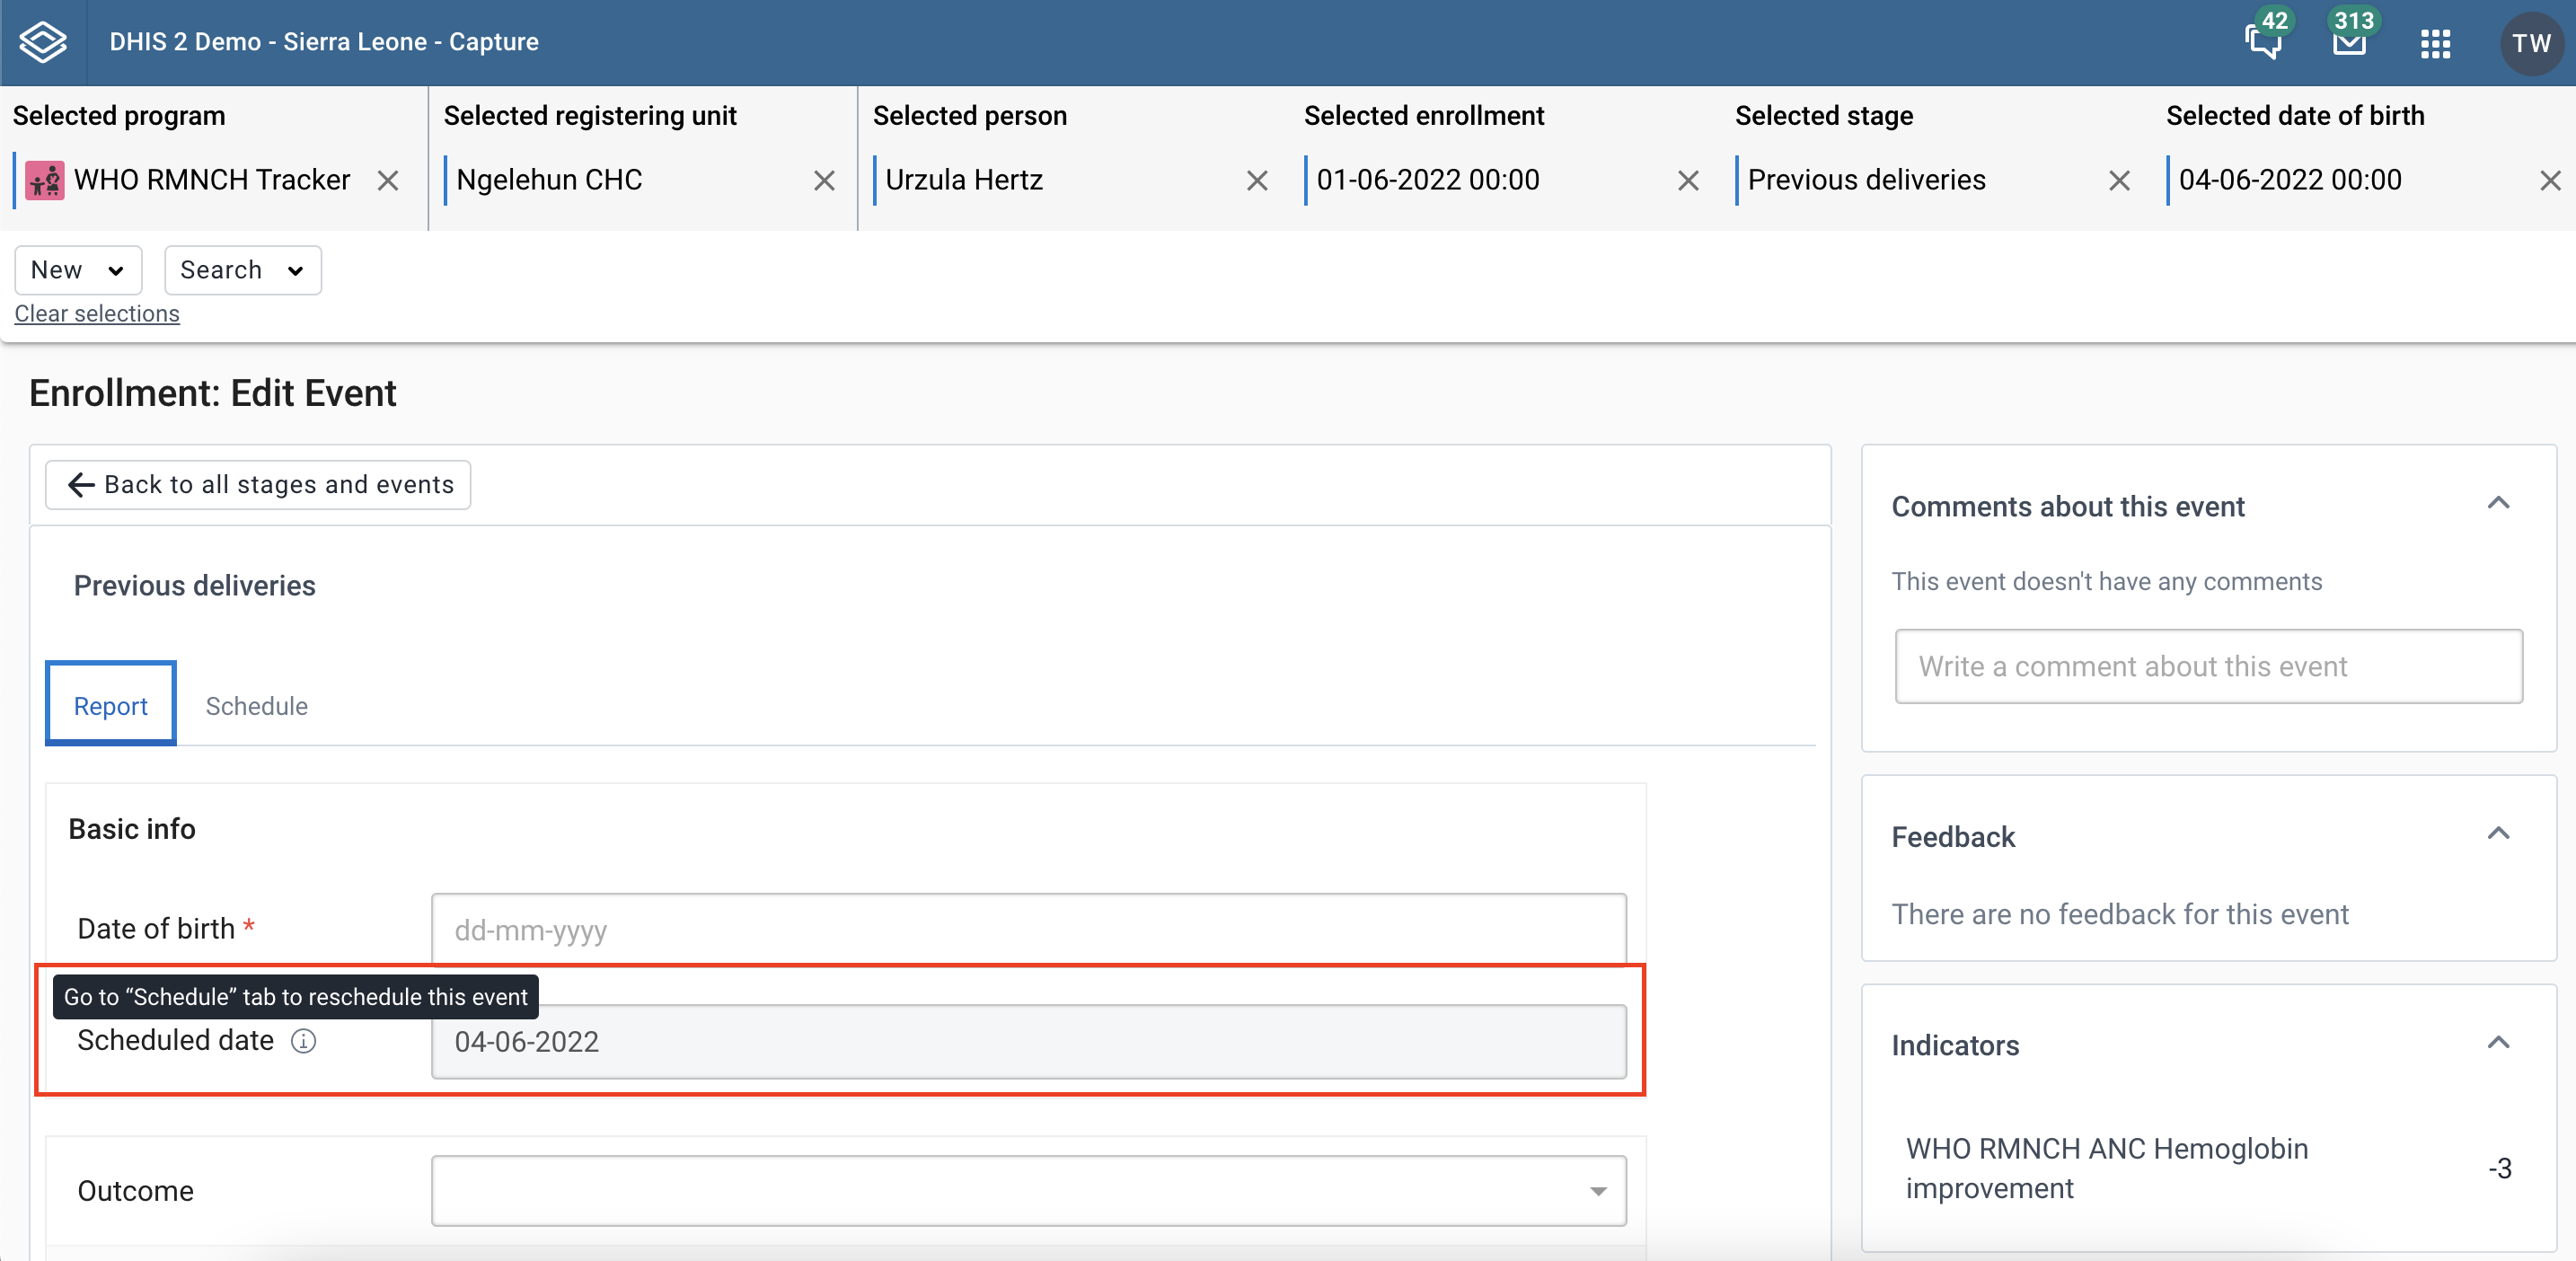
In the Report tab, the scheduled date field will still be shown, but will be greyed out, and there will be an icon next to it with a tooltip saying “Go to Schedule tab to reschedule this event”.
In the Schedule tab, the similar information about scheduling an event as in New event workspace will be shown. You will be able to edit the schedule date and save the change by clicking Schedule button.

If an active event has a scheduled date before becoming active or a completed event has scheduled date, this date should still be shown in the workspace. It’ll be locked with an icon next to it and a tooltip saying “Scheduled date cannot be changed for active/completed events”.
Scheduled date with Hide scheduled date enabled
If Hide scheduled date is checked in the Creation and scheduling section of the program stage in the Metadata Management app, scheduled date will not be shown in the form.
However, you can still schedule an event, but the date is chosen automatically from the program stage's scheduling settings and can not be changed. In the Schedule tab, there will be “Schedule info” saying “Scheduled automatically for xx/xx/xx”, and the user can click Schedule button.
Ask user to complete enrollment after completion
If this flag has been enabled for the stage under Completion options in the Data entry options section in the Metadata Management app, a modal will show up after the user checks the Complete event checkbox and clicks save.

View mode
When the form is in the view mode the top of the page shows a breadcrumb trail: {{first item}} > Enrollment dashboard > View event. The first item depends on where you came from:
- the name of the working list view you had selected in this program, or
Active enrollments,Completed enrollmentsorCancelled enrollmentsif you had selected one of those predefined views; Program overviewif you came from this program's working list without selecting a view, or if the program has "Display front page list" enabled;Searchif you did not come from this program's working list (for example from a search) and the program has "Display front page list" disabled.
Clicking the first item takes you back to the program's front page, and clicking Enrollment dashboard takes you back to the enrollment dashboard. You can see in the page all the information related to the event. Click the Edit event button to switch to the edit mode. This mode is bypassed for events that are scheduled.

Edit mode
When the form is in the edit mode the breadcrumb trail gains a further item: {{first item}} > Enrollment dashboard > View event > Edit event. Clicking View event switches back to the view mode. You can modify the event and click the Save button. Click the Cancel button to switch to the view mode without saving the changes. Scheduled events are are the exception and they are opened in edit mode directly, without the user having to click Edit event. Click the Cancel button to go back to the enrollment dashboard page without saving the changes.

In this form you can also delete the event by clicking Delete button, a modal will appear to confirm if you want to delete this event. You will then be navigated back to Enrollment dashboard page.
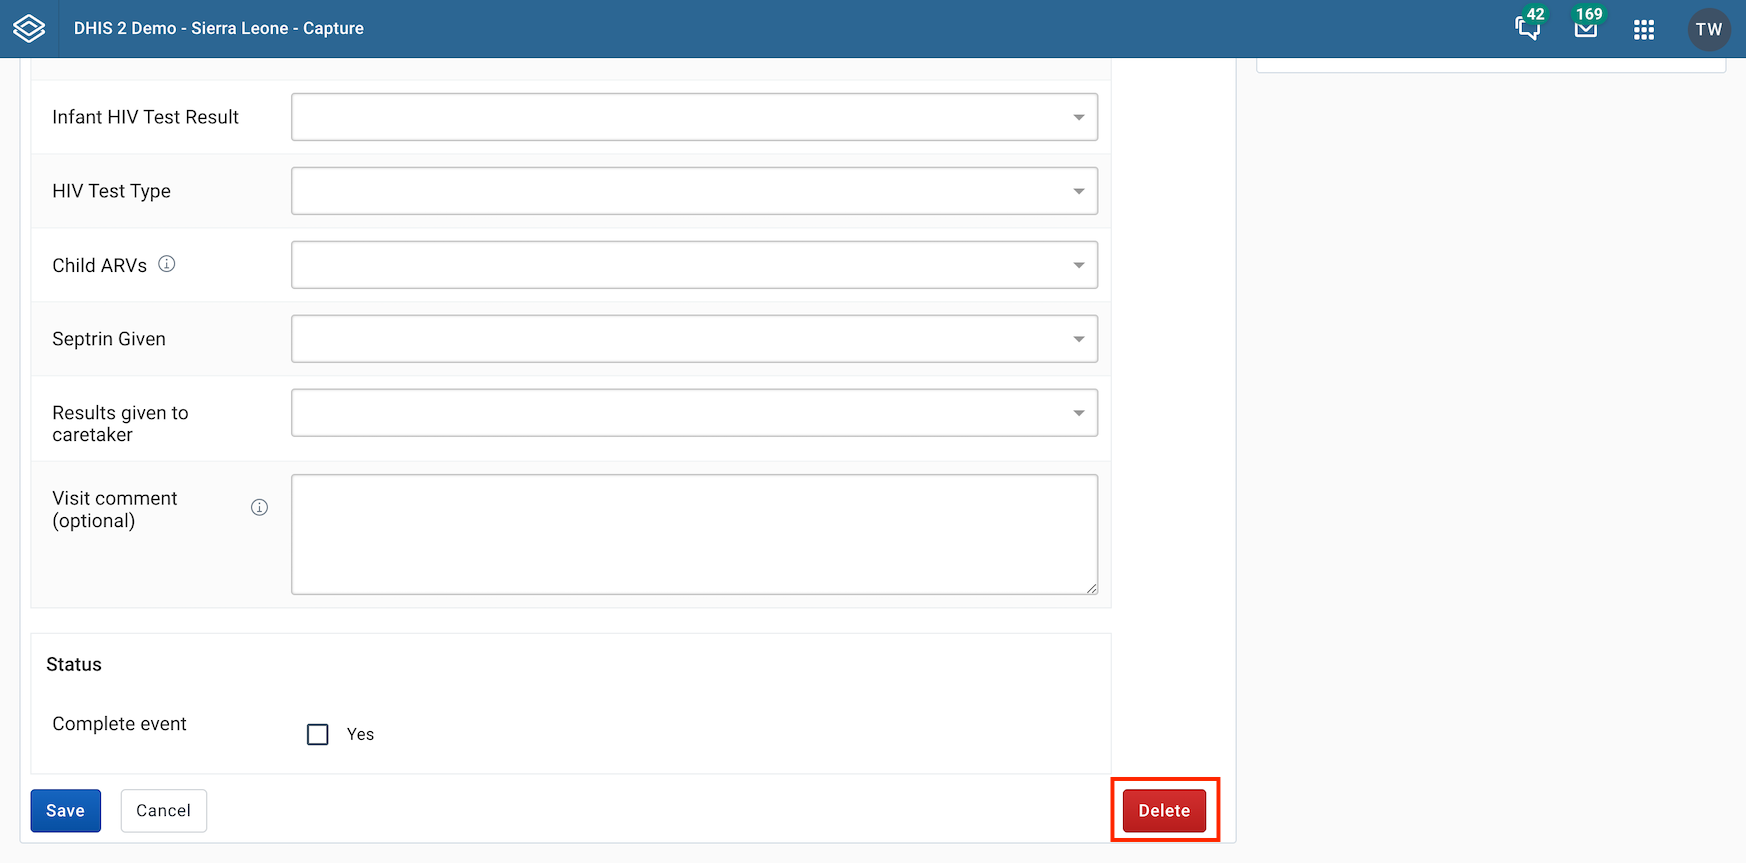
Widgets in View/Edit event page
The widgets seen in the right-hand column will display and function the same way as mentioned in the enrollment dashboard.
Widget assignee
-
In View/Edit enrollment event page
-
In the right column you will find the assignee widget.

-
Click the Edit button, or the Assign button if the event is not currently assigned to anyone.
-
Search for and select the user you would like to reassign the event to. Click the Save button.

Enrollment event new page
You can reach this page add event page by clicking in the New {stage event name} button in the overview page. In this page you can switch between different tabs: Report to add new event and Schedule to schedule an event. If you have unsaved changes in one tab and switch to another tab, there will be a warning displayed.
New event widget form
This is the form where you can modify the event details before saving. In the header you can see the stage name and icon.

New event page without a stage
If you enter the new event page with no stage selected, a list of available stages will be displayed. Select the stage you want to add a new event in by clicking the associated button. To navigate back to the enrollment overview, click the Cancel without saving-button

Ask user to complete enrollment after completion
If this flag has been enabled for the stage under Completion options in the Data entry options section in the Metadata Management app, a modal will show up after the user clicks the Complete button.

Ask user to create a new event after completion
If this flag has been enabled for the stage under Completion options in the Data entry options section in the Metadata Management app, a modal will show up after the user clicks the Complete button or checks the Complete event checkbox and clicks save. The user can choose the button Yes, create new event to navigate to the New Event page or No, cancel to navigate back to the enrollment dashboard. If there is only one possible stage available, the user will be taken directly to the New event workspace for that stage.
Assigning user to new events
When reporting or scheduling an event, you can assign a user to it. This feature must be enabled per program stage in a tracker program by checking Allow events to be assigned to users in the stage's Data entry options section in the Metadata Management app.
Você encontrará a seção responsável perto da parte inferior da página de entrada de dados. Pesquise e selecione o usuário ao qual deseja atribuir o evento. O responsável será preservado quando você salvar o evento.


Schedule event widget form
Instead of reporting an event the user can select to schedule an event for later. The form will open with a suggested scheduled date. This date is determined by a set of rules as explained below.
The suggested date for the first event of a program stage in an enrollment is always based on the enrollment date or the incident date (depending on the program configuration). The program stage configuration setting "scheduled days from reference date" will be added to the base date to compute the suggested date.
1. Default next scheduled date
If a program stage has a default next scheduled date configured, the suggested date is the most recent next scheduled date. Below is an example of how this can work.
- A data element with value type date needs to be created and added to the particular program stage in its Data section, with Allow future dates checked. The name of the data element could for example be: Next suggested follow up date. The program stage is configured to use the data element as default when scheduling a new event by assigning the data element to Default next scheduled date in the stage's Data entry options section. This setting is only shown when Allow multiple events in this stage is checked.
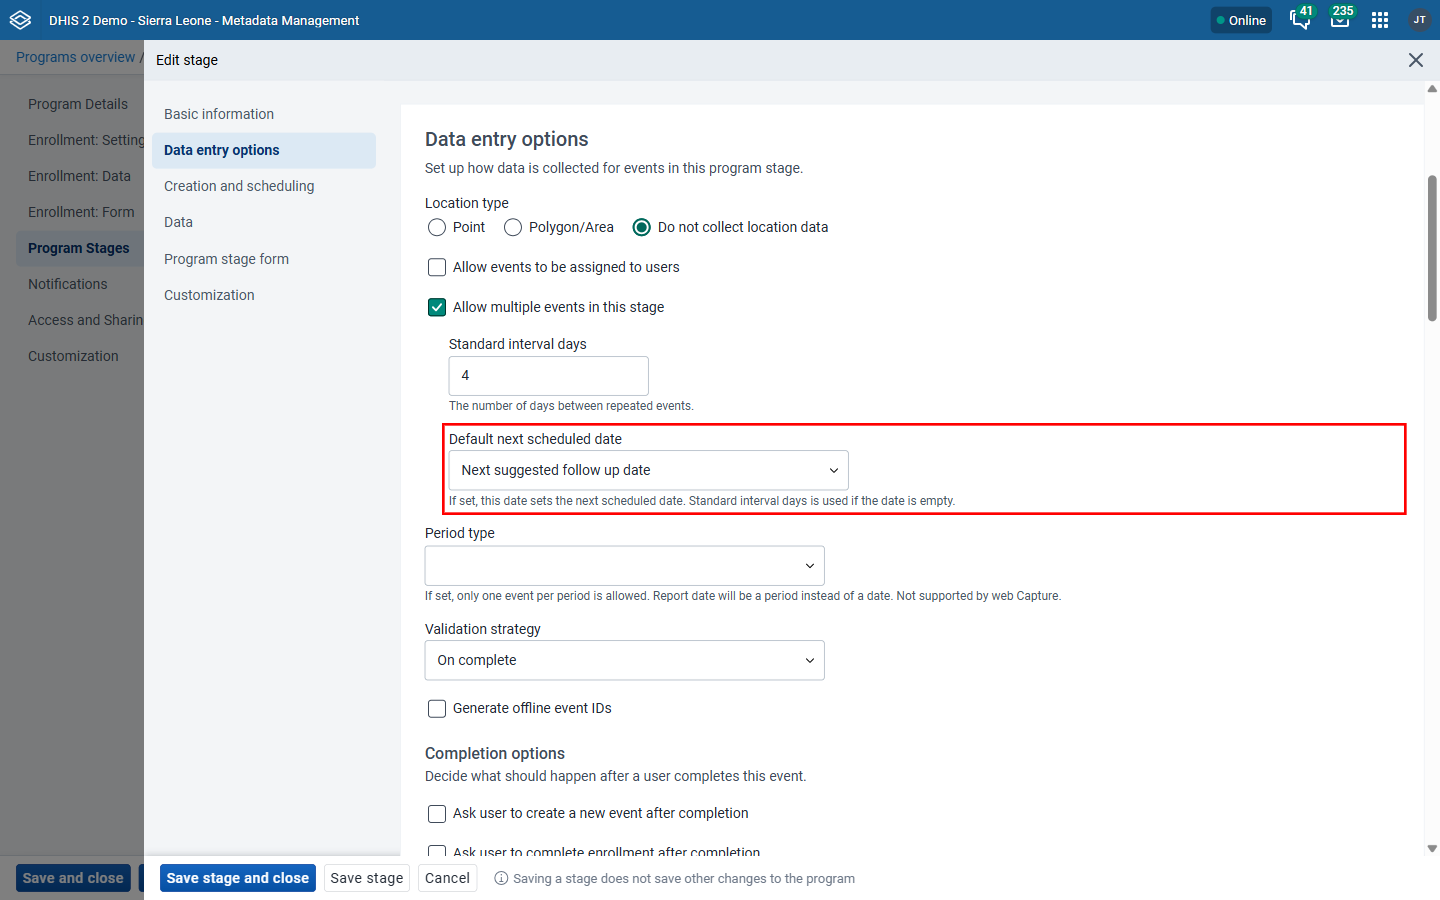
-
A program rule based on the data entered in the program stage, will determine how many days until the next suggested follow up will be. For example: A program rule with the following condition: #{penta_dose} == '1' (The program rule will trigger when the tracked entity has received Penta Dose 1), Assign value to the data element: next suggested follow up date with expression: d2:addDays(V{event_date}, '30') The number suggest how many days from event date the next scheduled event should be.
-
Open the Capture app and create a tracked entity. As long as Penta Dose has value Dose 1, the suggested next scheduled event is 30 days forward from event date. When scheduling a new event, the system will pick up from the data element as long it has value.


Below the scheduled date, an information box compares the selected date with the suggested date. It shows either "The scheduled date matches the suggested date, but can be changed if needed." or "The scheduled date is N days after the suggested date." (or before), followed by the number of events that are already scheduled in this program in the selected organisation unit on that day.
Below the schedule date entry, user can choose to add a note to the scheduled event.
After clicking Schedule button, user will be navigated back to enrollment overview page.
2. Standard interval days
- If the program stage has Standard interval days configured (in the stage's Data entry options section, shown only when Allow multiple events in this stage is checked), and no default next scheduled date gives a value, the suggested date is the date of the most recent event in that program stage in the enrollment, plus the standard interval days.
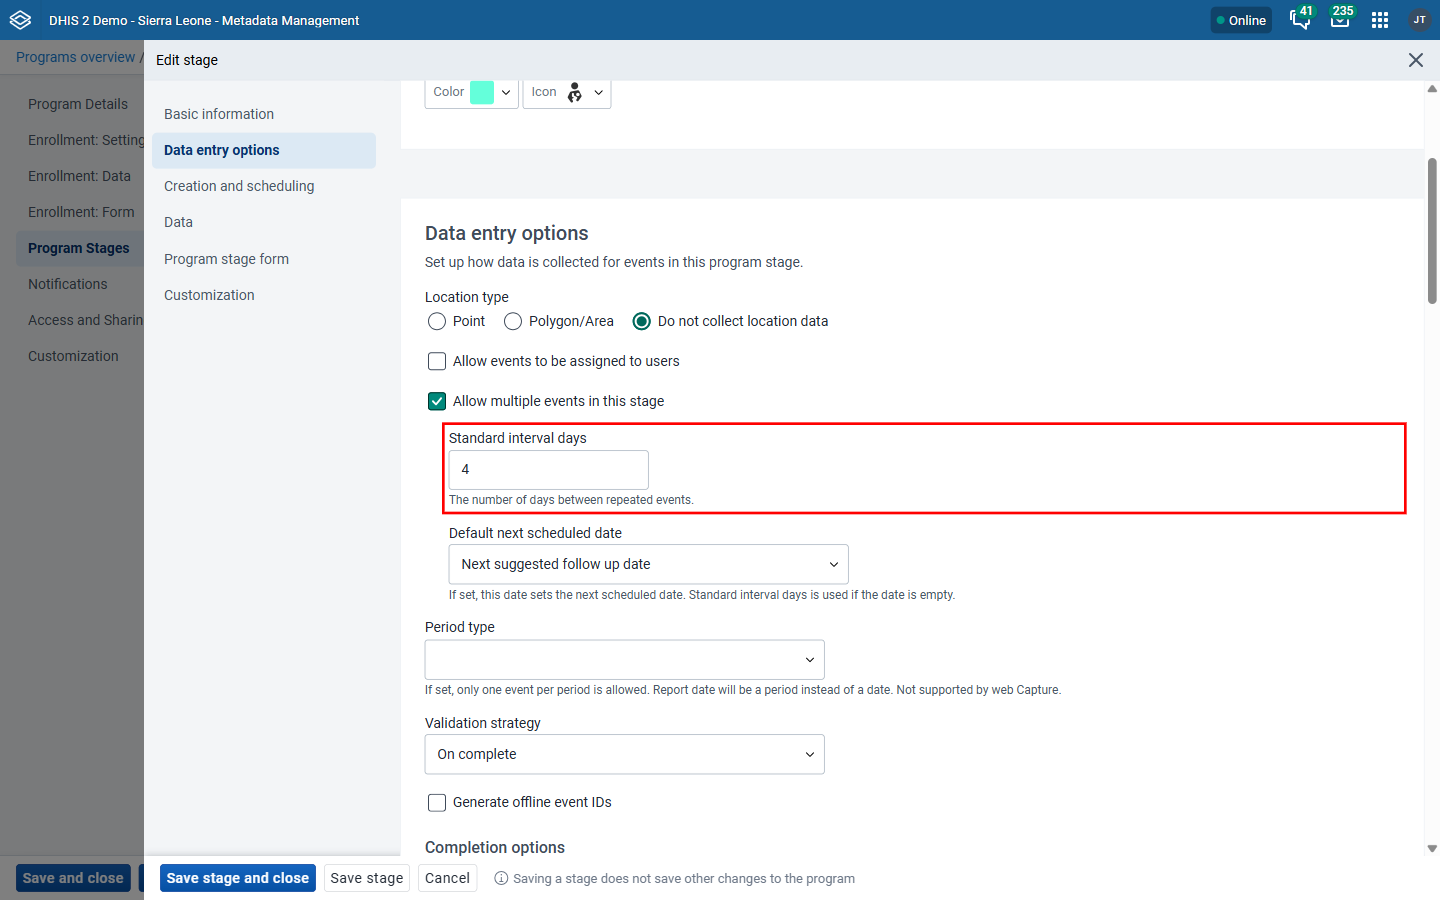
- For each earlier event in the stage, the scheduled date is used if the event has one, otherwise its report date. This means an event that was scheduled and later reported on a different day still counts from its scheduled date, and events that are scheduled but have not happened yet are included. Each new suggestion is therefore one interval after the latest event already planned in the stage. For example, with a standard interval of 14 days and a most recent event on 2026-09-14, the suggested date is 2026-09-28.

- If the stage has no earlier events in the enrollment, the suggested date falls back to the enrollment date or incident date, as described in the next section.
3. If no value is found on either, the suggested date will be defined by enrollment date and incident date.
- In case Enrollment date is selected under Reference date for scheduling in the Metadata Management app, the next suggested event date is calculated by the enrollment date plus the value of scheduled days from reference date.

- In case Incident date is selected under Reference date for scheduling, the next suggested event date is calculated by the incident date plus the value of scheduled days from reference date.

Program stage event list
You can reach the program stage event list by clicking Go to full {stage event name} button in the overview page.
Stage Event list
In this view you can see all events in a stage
Stage Event list header
In the header, you can see the stage name and icon

Attribute option combo for Tracker
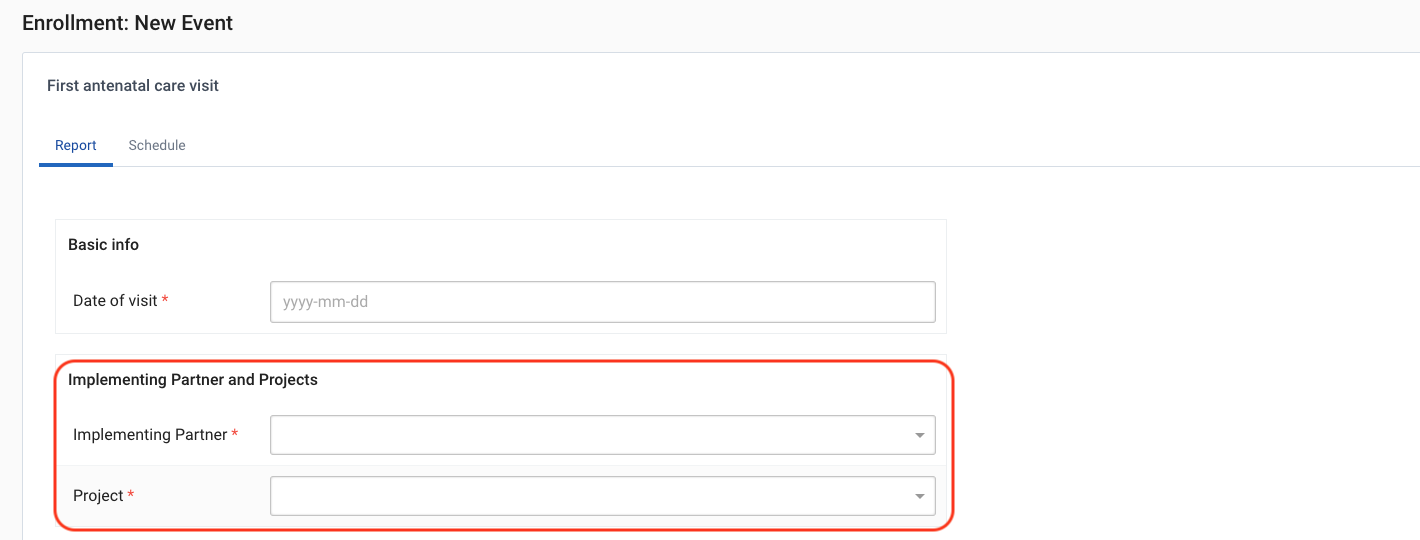
You can add segregation to your Tracker event data using attribute option combos. To get started, add a category combination to your Tracker program configuration.
The attribute option combo selector will be displayed when you are adding or changing/viewing Tracker events. Additionally, the selector will be displayed when enrolling if events are being auto-generated as part of the enrollment process.
Example from new Tracker event:
Changelog
The Changelog feature provides a historical record of changes made to data for both events and Tracked Entities. Every time data is added, modified, or deleted, a record is stored in the changelog.
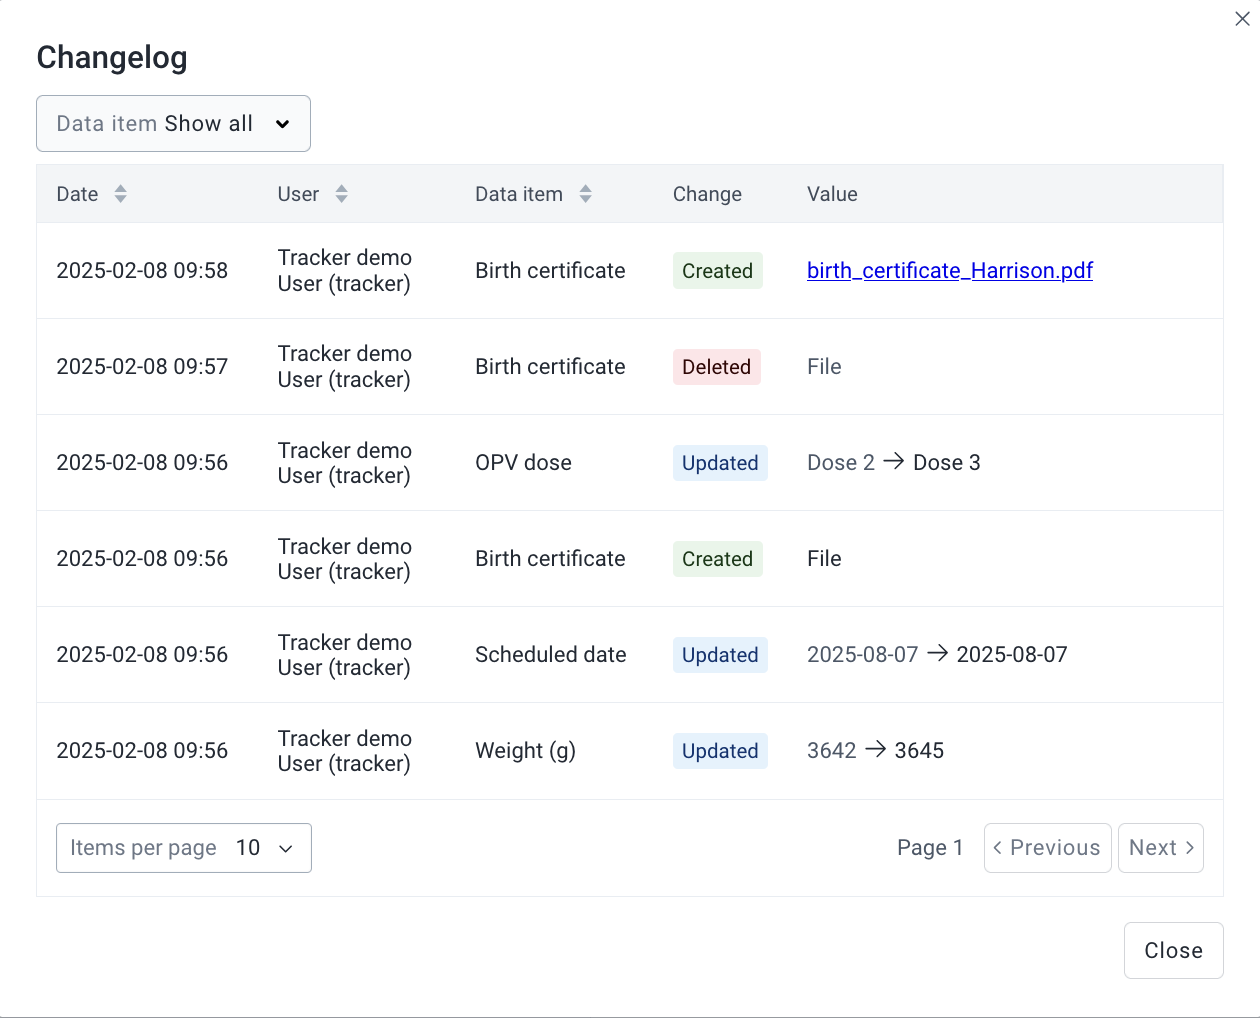
Changelog functionality
Sorting: Clicking the sorting icon next to a column header toggles between default, ascending, and descending order. By default, records are sorted by date (newest first). Sorting by user or data item is also available, but you can only apply one sorting option at a time.
Filtering: You can filter by a specific data item. You can only apply one filter at a time.
Note:
All data items are displayed in the filter dropdown, regardless of whether they have a changelog record.
Pagination: Displays 10 records per page by default, with options to adjust the number of records shown, up to 100 per page.
Event changelog
The Event Changelog tracks changes to data items within an event. These data items include event properties (e.g., report date, scheduled date, and geometry) and data elements.
How to open the event changelog
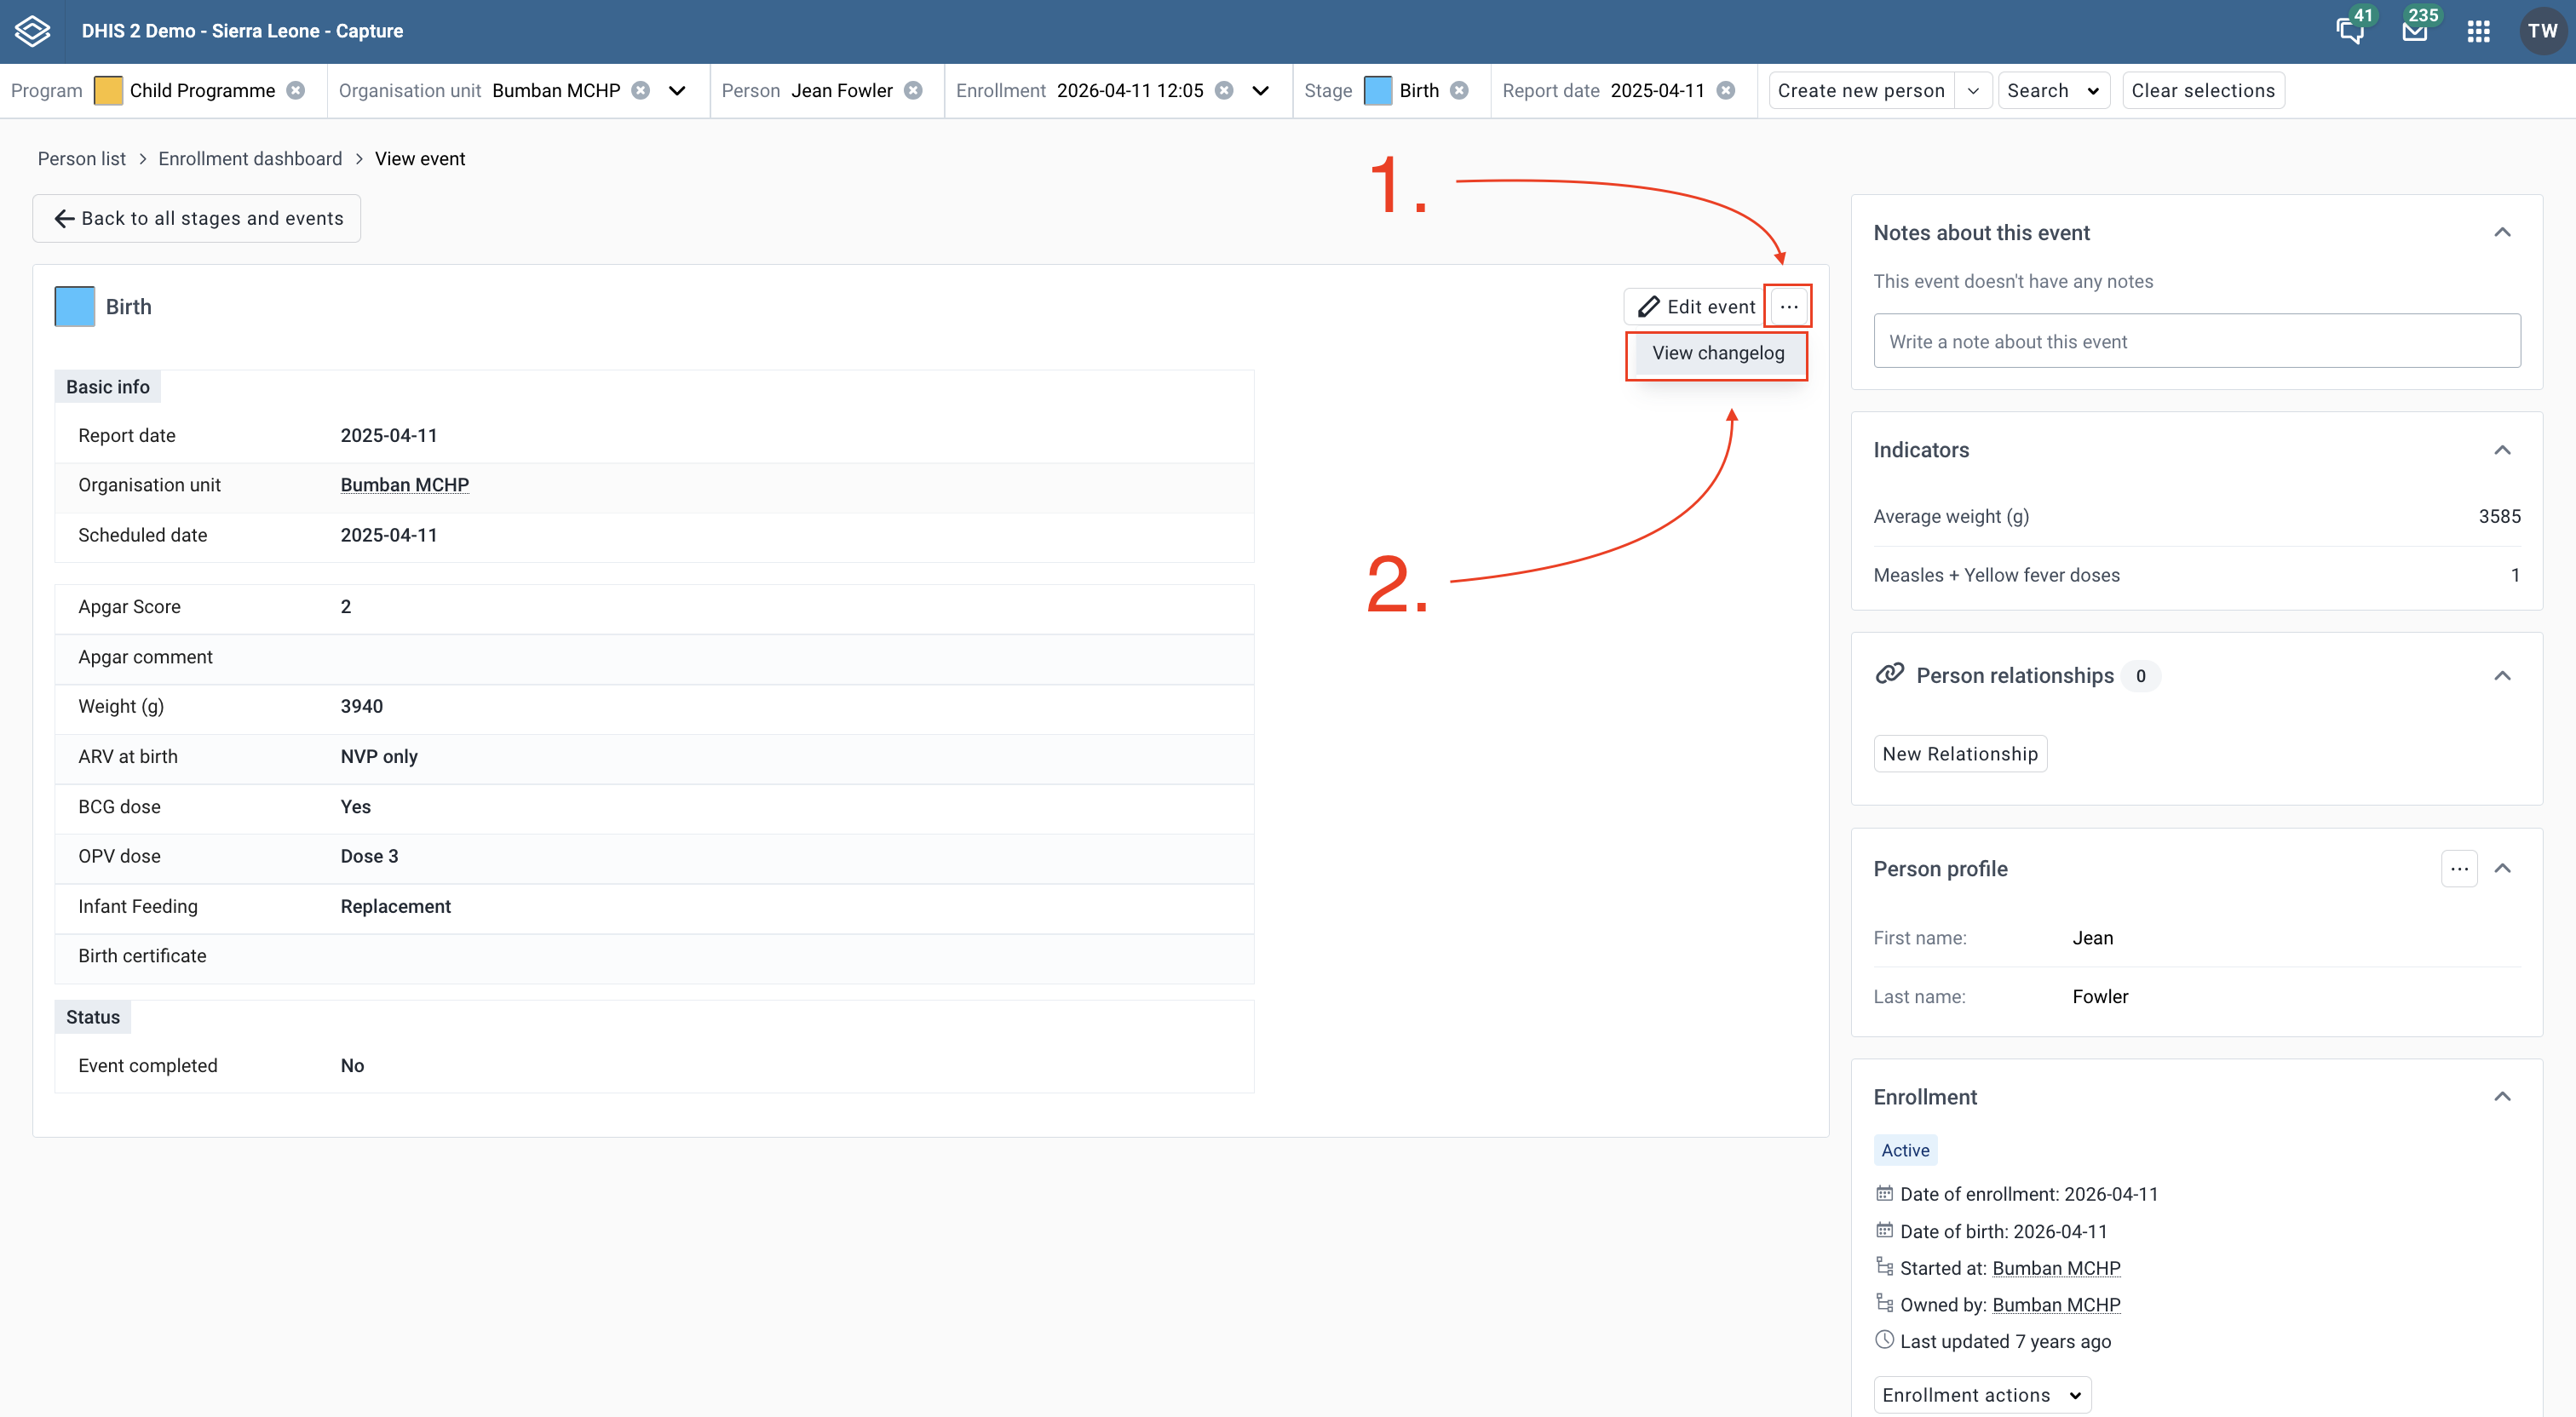
- Navigate to the "View event" page of an event in the Capture app.
- Click View Changelog to open the changelog.
Tracked entity changelog
The tracked entity changelog tracks changes to attributes of a tracked entity within an enrollment.
How to open the tracked entity changelog
-
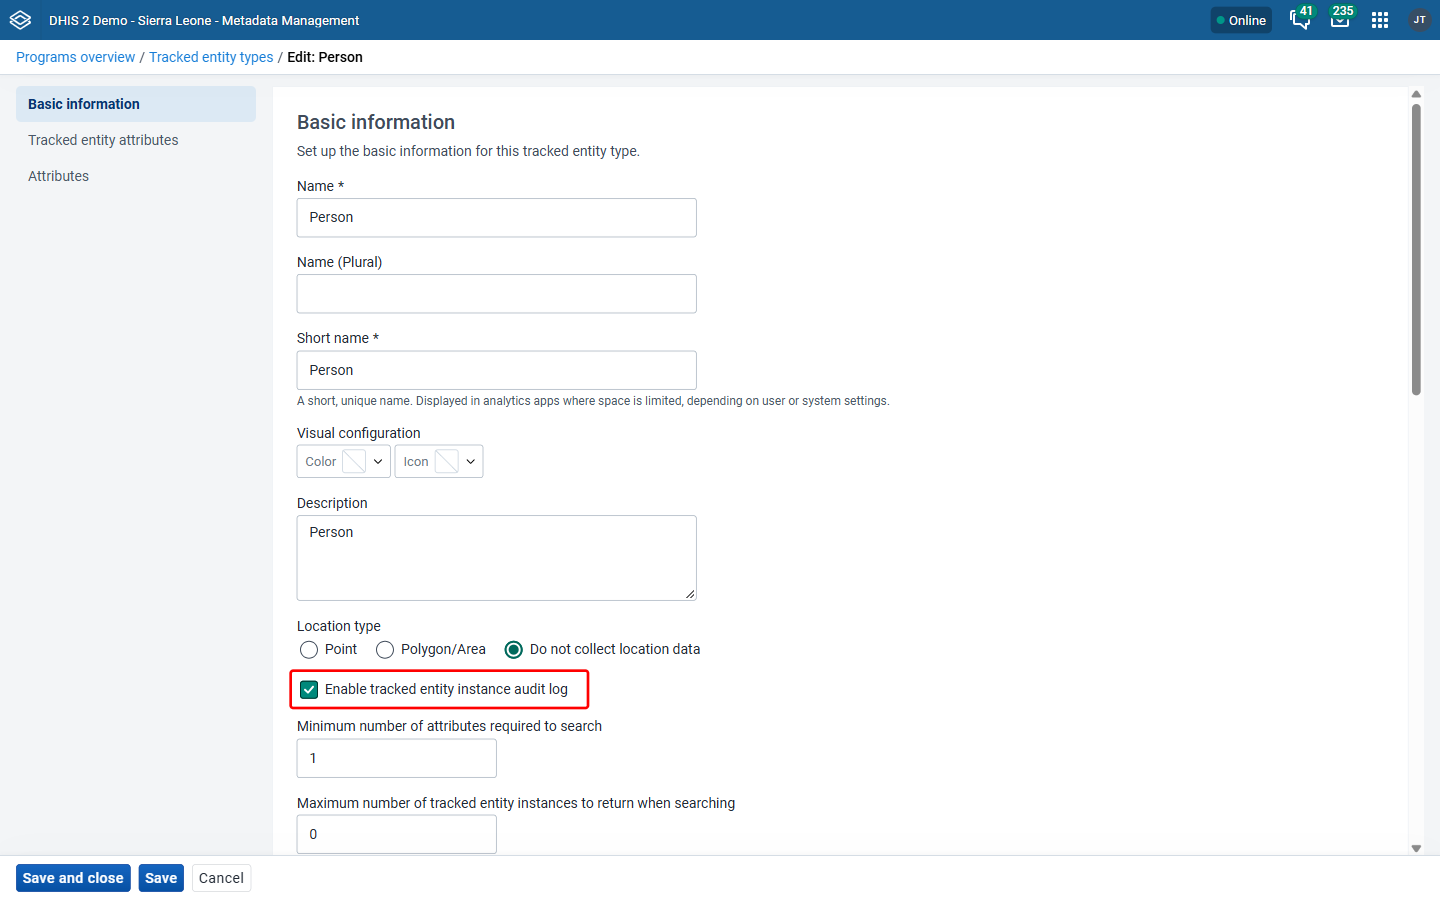
Go to the Metadata Management app, open the relevant Tracked entity type and enable the Enable tracked entity instance audit log checkbox.
-
Open the enrollment dashboard in the Capture app.
-
Click View Changelog in the Tracked Entity Profile widget to open the changelog.

Related stages and linked events for Tracker programs
You can connect any two program stages via a relationship. This is useful for workflows where completing one stage should trigger or be linked to another, for example linking a lab request stage to a lab result stage, or linking a referral stage to a follow-up consultation stage. To enable this feature, you can set up two program stages in the same program and link them with an event-event relationship in the Metadata Management app, choosing the relevant program stage on both the initiating and receiving side. 
Adding a new tracker event
When opening the new event form, a widget called Actions - ${Relationship type name} will appear at the bottom of the page. From this widget, users can: 1. Schedule a new event by selecting a scheduled date and an organisation unit 2. Enter data for the linked event directly 3. Link to an already existing event.
When clicking Complete or Save without completing, the Capture app will create the current event, schedule the linked event and make sure that there is a relationship between them in the correct context. 
Editing a tracker event
When there isn't a linked event
If the event is eligible for related stages but isn’t linked yet, a widget called Linked event will appear at the bottom of the page. From this widget, users can: 1. Schedule a new event by selecting a scheduled date and an organisation unit 2. Enter data for the linked event directly 3. Link to an already existing event.
The label of the action button will change based on the user's selections. When clicking Complete or Save without completing, the Capture app will create the current event, schedule the linked event and make sure that there is a relationship between them in the correct context. 
When there is a linked event
If the event is already linked, a Linked event widget will appear at the top of the page. This widget allows users to view details of the linked event. 
Additionally, by clicking the Menu in the top-right corner, users can: 1. Unlink the linked event. 2. Unlink and delete the linked event. 
Enrolling a tracked entity
Enable the "Show first program stage during enrollment" flag in the Enrollment: Settings section of the Tracker program in the Metadata Management app. When opening the form to enroll a new tracked entity, a widget called Actions - ${Relationship type name} will appear at the bottom of the page. From this widget, users can: 1. Schedule a new event by selecting a scheduled date and an organisation unit 2. Enter data for the linked event directly
When clicking Save, the Capture app will enroll the tracked entity, create the event in the first stage, schedule the linked event and make sure that there is a relationship between them in the correct context. 