Gerenciar usuários, funções e grupos de usuários
Sobre gerenciamento de usuários
Multiple users can access DHIS2 simultaneously and each user can have different authorities. You can fine-tune these authorities so that certain users can only enter data, while others can only generate reports.
-
You can create as many users, user roles and user groups as you need.
-
You can assign specific authorities to user groups or individual users via user roles.
-
Você pode criar várias funções de usuário, cada uma com suas próprias autoridades.
-
You can assign user roles to users to grant the users the corresponding authorities.
-
You can assign each user to organisation units. Then the user can enter data for the assigned organisation units.
-
You can set an expiration date to individual users
| Term | Definition | Exemplo |
|---|---|---|
| Autoridade | A permission to perform one or several specific tasks | Create a new data element Update an organisation unit View a report |
| Do utilizador | A person's DHIS2 user account | admin traore guest |
| User role | A group of authorities | Data entry clerk System administrator Antenatal care program access |
| User group | A group of users | Kenya staff Feedback message recipients HIV program coordinators |
Você gerencia usuários, funções de usuário e grupos de usuários no aplicativo ** Usuários **.
| Object type | Available functions |
|---|---|
| Do utilizador | Create, edit, invite, clone, disable, display by organisation unit, delete, show details and reset password |
| User role | Create, edit, share, delete and show details |
| User group | Create, edit, join, leave, share, delete and show details |
Sobre usuários
Each user in DHIS2 must have a user account which is identified by a user name. You should register a first and last name for each user as well as contact information, for example an email address and a phone number.
It is important that you register the correct contact information. DHIS2 uses this information to contact users directly, for example sending emails to notify users about important events. You can also use the contact information to share for example dashboards and pivot tables.
A user in DHIS2 is associated with an organisation unit. You should assign the organisation unit where the user works.
When you create a user account for a district record officer, you should assign the district where he/she works as the organisation unit.
A unidade de organização atribuída afeta como o usuário pode usar DHIS2:
-
In the Data Entry app, a user can only enter data for the organisation unit she is associated with and the organisation units below that in the hierarchy. For instance, a district records officer will be able to register data for her district and the facilities below that district only.
-
In the Users app, a user can only create new users for the organisation unit she is associated with in addition to the organisation units below that in the hierarchy.
-
In the Reports app, a user can only view reports for her organisation unit and those below. (This is something we consider to open up to allow for comparison reports.)
An important part of user management is to control which users are allowed to create new users with which authorities. In DHIS2, you can control which users are allowed to perform this task. The key principle is that a user can only grant authorities and access to data sets that the user itself has access to. The number of users at national, province and district level are often relatively few and can be created and managed by the system administrators. If a large proportion of the facilities are entering data directly into the system, the number of users might become unwieldy. It is recommended to delegate and decentralize this task to the district officers, it will make the process more efficient and support the facility users better.
Sobre funções de usuário
A user role in DHIS2 is a group of authorities. An authority means the permission to perform one or more specific tasks.
A user role can contain authorities to create a new data element, update an organisation unit or view a report.
A user can have multiple user roles. If so, the user's authorities will be the sum of all authorities and data sets in the user roles. This means that you can mix and match user roles for special purposes instead of only creating new ones.
A user role is associated with a collection of data sets. This affects the Data Entry app: a user can only enter data for the data sets registered for his/her user role. This can be useful when, for example, you want to allow officers from health programs to enter data only for their relevant data entry forms.
Recomendações:
-
Crie uma função de usuário para cada posição na organização.
-
Create the user roles in parallel with defining which user is doing which tasks in the system.
-
Only give the user roles the exact authorities they need to perform their job, not more. Only those who are supposed to perform a task should have the authorities to perform it.
Sobre grupos de usuários
A user group is a group of users. You use user groups when you set up sharing of metadata objects or notifications for example for reports or programs.
Veja também:
Fluxo de Trabalho
-
Define the positions you need for your project and identify which tasks the different positions will perform.
-
Crie aproximadamente uma função de usuário para cada posição.
-
Crie usuários.
-
Atribuir funções de usuário aos usuários.
-
Atribua os usuários a unidades de organização.
-
(Opcional) Agrupe usuários em grupos de usuários.
-
Share datasets with users or user-groups via the Sharing Dialog in Data set management section of the Maintenance app
Tip
For users to be able to enter data, you must add them to an organisational unit level and share a dataset with them.
Gerenciar usuários
Criar um usuário

-
Abra o aplicativo ** Usuários ** e clique em ** + ** no cartão ** Usuários **.
-
Select whether you want to fill in all the personal user information, or invite the user by email to complete the rest of the user information:
-
Create account with user details
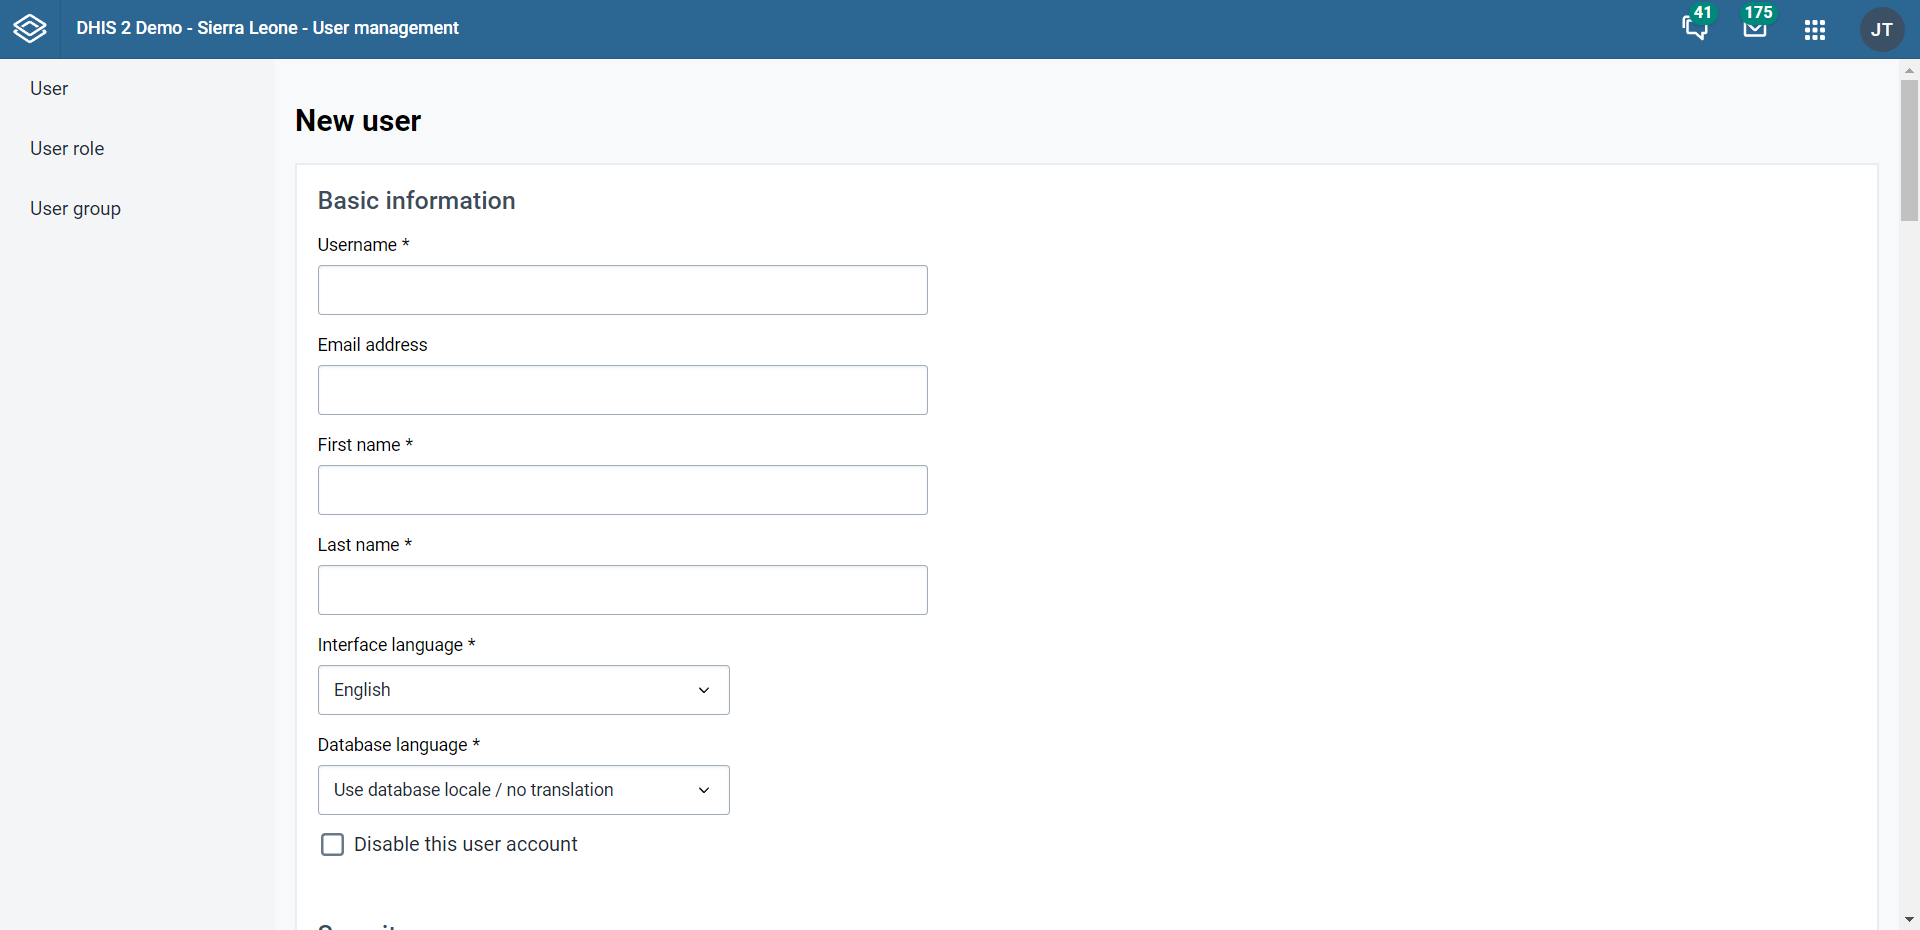 Choose this option if you would like to enter all the login details of the new user such as username, password, etc. Under these conditions, the fields username, password, surname, first name, and roles are mandatory.
After you've created the user, the account is ready for the user to use with the user name and password that you provide.Username requirements
The following rules apply when you create a new username. The username must:
-
Contain at least 4 characters.
-
Not contain more than 255 characters.
-
Contain lowercase and UPPERCASE latin characters and numbers (
a-z,A-Z,0-9). -
These characters are also allowed
. _ @and#, but these may only be used as a separator, and not as a leading or trailing character, and should not be repeated (i.e.user@@nameis not allowed).
-
-
Email invitation to create account
 Choose this option if you want to send an invitation by email to the user. Then she/he must return to DHIS2 and finish setting up their user account. The account that the user finishes setting up will be limited according to how you configure the account.
Note
In order to use this feature the system should have a valid email configuration in SystemSettings -> Email
Enter the email address to which the invitation should be sent. If you want to, you may also enter the user name that the account will have. If you leave the user name empty, then the user may choose their own user name when they respond to the invitation (as long as it is not taken already for another user.)
After you've created the user, the system sends an email to the address you provided. It contains a unique web link by which the user can return to the system and activate their account by entering the rest of their user information. The user must finish setting up the account within 4 days, after that the invitation becomes invalid.
-
(Optional) Provide values for the fields OIDC mapping claim, LDAP identifier, Mobile phone number, WhatsApp, Facebook messenger, Skype, Telegram and Twitter.
-
Select an Interface language.
You can select a language into which fixed elements of the DHIS2 user interface have been translated. -
Select a Database language.
You can select a language into which implementation-supplied items have been translated in the database, for example data element names or organisation unit level names. -
Na seção ** Funções disponíveis **, clique duas vezes nas funções de usuário que deseja atribuir ao usuário.
-
Select Data capture and maintenance organisation units.

The data capture and maintenance organisation units control for which organisation units the user can do data entry. You must assign at least one data capture and maintenance organisation unit to each user.
Users will have access to all sub-organisation units of the assigned organisation units. For example, if you've assigned a user to a district which has several facilities contained in the district, the user would have access to the district's data, as well as all of the facilities contained within the district. -
(Optional) Select Data output and analysis organisation units.
The data output and analysis organisation units controls for which organisation units the user can view aggregated data in the analytics apps, for example the Pivot Table and GIS apps. You can assign any number of data output and analysis organisation units to a user.
Users will have access to all sub-organisation units of the assigned organisation units. You shouldn't select the descendants of an organisation unit which you have already selected. For example, if you've assigned the user to a district, you shouldn't select the facilities within that district.
Note
Assigning data output and analysis organisation units organisation units is optional. If you don't specify any organisation unit, the user will have access to the full organisation unit hierarchy for viewing aggregated data. As with the data capture organisation units, you should not select descendant organisation units of a unit which you have already selected.
In several places in the analytics apps, you can select "user organisation unit" for the organisation unit dimension. This mechanism will first attempt to use the data view organisation units linked to the current user. If not found, it will use the data capture and maintenance organisation units. If the user has been assigned to multiple organisation units, the use of "user organisation unit" may result in unpredictable behaviour.
-
Click Show more options and an additional three fields will show. (Optional)
-
In the Search organisation units select the organisation units you want the user to be able to search in.
-
(Optional) In the Available user groups section, double-click the user groups you want to assign to the user.
-
(Optional) In the Available dimension restrictions for data analytics section, double-click the dimensions you want to assign to the user.
You can restrict the values the user sees in data analytics apps by selecting dimensions that will restrict the user's view.
Example
Let's say you have defined Implementing Partner as a category option group set, and you have shared with this user only one or more specific implementing partners (category option groups). If you want to make sure that the user does not see totals in analytics that include values from other groups, assign Implementing Partner to the user.
This insures that any data visible to the user through the analytics apps will be filtered to select only the Implementing Partner category option group(s) which are visible to the user.
- Clique em ** Salvar **.
Edit user
-
Open the Users app and find the user you want to edit.
-
In the user list, directly click the relevant user, or click the menu icon and select Edit.
-
Modifique as opções que você deseja.
-
Clique em Salvar.
Set account expiration date
In case a user account should expire on a specific date, you can set an account expiration date for a user
-
Abra o aplicativo ** Usuários ** e clique em ** Usuário **.
-
Select the user whose account should have an expiration date
-
Use the "Account expiration date" input to define the date
-
Save the updates by submitting the form
Disable user
You can disable a user. This means that the user's account is not deleted, but the user can't log in or use DHIS2.
-
Abra o aplicativo ** Usuários ** e clique em ** Usuário **.
-
In the list, click the menu icon of relevant user record and select Disable.
-
Clique em ** OK ** para confirmar.
Warning
If you are using the Android Capture App disabling a user (in DHIS2 versions previous to 2.30 and after 2.38) will cause the Android application to delete the local data stored on the phone next time the user attemps an on-line login. Please make sure that when you use the disable user function all the data has been synced with the server. Or that you are using this funcionality to ensure data deletion in case of a device being lost.
Display user profile
-
Abra o aplicativo ** Usuários ** e clique em ** Usuário **.
-
In the list, click the menu icon of the relevant user and select Profile.
Filtrar usuários por unidade organizacional
You can view all users that have been assigned to a particular organisation unit.
-
Abra o aplicativo ** Usuários ** e clique em ** Usuários **.
-
Above the user list, click on the Organisation Unit filter input.
-
A pop-up will appear in which you can select the organisation units you would like to filter by.
The list of users will be filtered to only include users which have been assigned to the selected organisation units.
Clone user
-
Abra o aplicativo ** Usuários ** e clique em ** Usuário **.
-
In the user list, click the menu icon of the relevant user and select Replicate.
-
Insira um novo nome de usuário e senha para a conta de usuário clonada.
-
Clique em ** Replicar **.
-
In the user list, click the user you just created and click Edit.
-
Modifique as opções que você deseja.
-
Clique em Salvar.
Alterar senha de usuário
Para alterar a senha de um usuário:
-
Abra o aplicativo ** Usuários ** e clique em ** Usuário **.
-
In the user list, click the menu icon of the relevant user and select Edit.
-
Insira uma nova senha e digite-a novamente.
-
Clique em Salvar.
Requisitos de senha
As regras a seguir se aplicam quando você cria uma nova senha. A senha deve:
-
Contain at least 8 characters. Note that this number is configurable through the system setting "Minimum characters in password", which can be up to 14 characters.
-
Not contain more than 34 characters.
-
Conter pelo menos um caractere especial (caractere não alfanumérico).
-
Contain at least one UPPERCASE character.
-
Contain at least one lowercase character.
-
Conter pelo menos um dígito (número).
Reset user password by email
To reset the password of a user by email:
- Abra o aplicativo ** Usuários ** e clique em ** Usuário **.
- In the user list, click the menu icon of the relevant user and select "Reset password".
- Clique em ** Confirmar **.
The person owning the user account will receive an email with instructions for how to reset the password. The email is sent to the address specified for the user account.
Delete user
-
Open the Users app and find the type of user you want to delete.
-
In the user list, click the menu icon of the relevant user and select Remove.
-
Clique em ** Confirmar **.
Display details of user
-
Open the Users app and find user you want to view.
-
In the user list, click the menu icon of the relevant user and select Show details.
Disable Two Factor Authentication for a user
If a user has enabled Two Factor Authentication and then loses access to his/her authentication device (e.g. smartphone gets lost or broken), this user will not be able to log into the system any more. To solve this issue, a user manager can disable Two Factor Authentication for the affected user, so that the user is able to access the system again using just a password.
-
Abra o aplicativo ** Usuários ** e clique em ** Usuários **.
-
In the user list, click the menu icon of the relevant user and select Disable Two Factor Authentication.
-
Clique em ** OK ** para confirmar
Note
The option to disable Two Factor Authentication will only be available for users that have set up Two Factor Authentication via the user-profile-app.
Gerenciar funções de usuário
Criar uma função de usuário
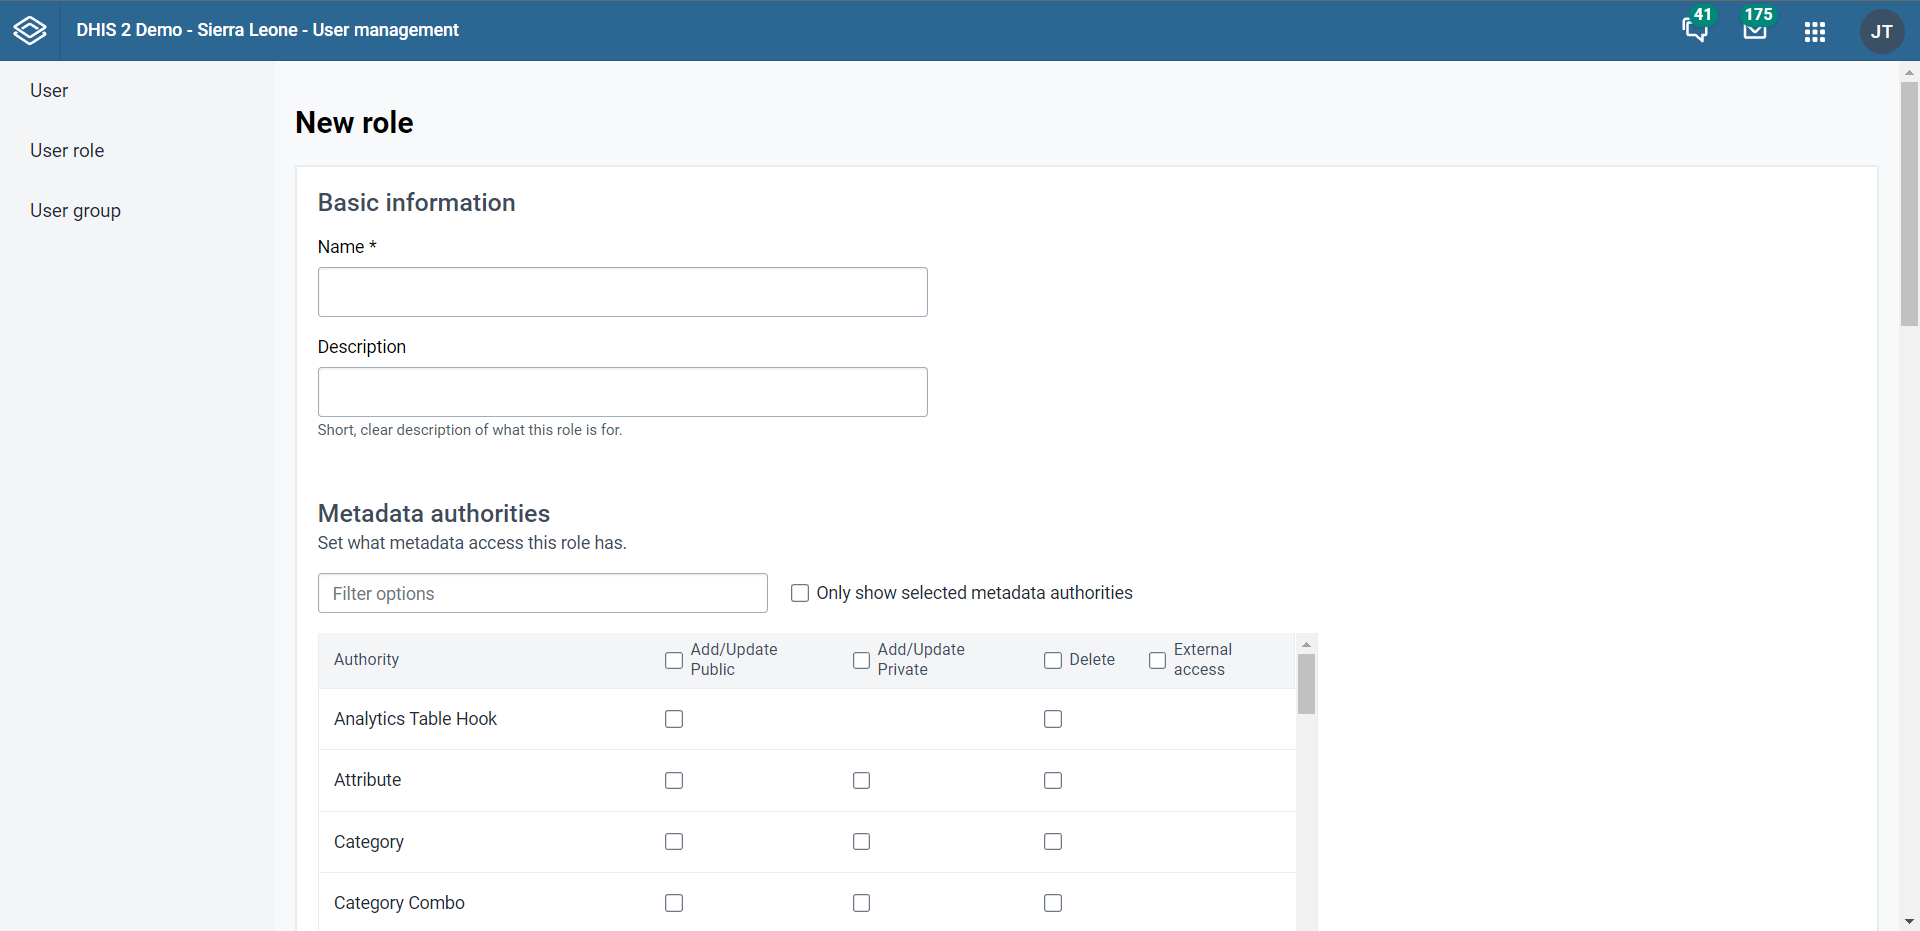
-
Abra o aplicativo ** Usuários ** e clique em ** Função do usuário **.
-
Clique em ** Adicionar novo **.
-
Insira um ** Nome **, por exemplo "Superusuário" ou "Usuário administrador".
-
Insira uma ** Descrição **.
-
In the Authorities section, select the authorities you want to give to the user role. You can also use the filter inputs above the authority section to search for a specific authority.
-
Clique em ** Adicionar **.
Edit user role
-
Open the Users app and find the type of user role you want to edit.
-
In the user list, directly click the relevant user role, or click the menu icon and select Edit.
-
Modifique as opções que você deseja.
-
Clique em Salvar.
Delete user role
-
Open the Users app and find the user role you want to delete.
-
In the user role list, click the menu icon of the relevant user and select Remove.
-
Clique em ** Confirmar **.
Display details of user role
-
Open the Users app and find the user role you want to view.
-
In the user list, click the menu icon of the relevant user role and select Show details.
Change sharing settings for user role
-
Open the Users app and find the user role you want to modify.
-
In the user list, click the relevant user role and select Sharing settings.
-
(Optional) Search for a user group and select it, then click the plus icon. The user group is added to the list.
-
(Opcional) Selecione ** Acesso externo (sem login) **.
Note that this only gives access when no user is logged in. To give access also to logged in users, you must also allow Public access.
-
Altere as configurações dos grupos de usuários que deseja modificar.
- Nenhum
- ** Pode visualizar **: todos no grupo de usuários podem visualizar o objeto
-
** Pode editar e visualizar **: todos no grupo de usuários podem visualizar e editar o objeto
-
Clique em Salvar.
Gerenciar grupos de usuários
Crie um grupo de usuários
-
Abra o aplicativo ** Usuários ** e clique em ** Grupo de usuários **.
-
Clique em ** Adicionar novo **.
-
No campo ** Nome **, digite o nome do grupo de usuários.
-
In the Available users section, double-click the users you want to add to the user group.
-
In the Available user groups section, double-click the user groups you want to add to the user group.
-
Clique em ** Adicionar **.
Participar de grupos de usuários
-
Abra o aplicativo ** Usuários ** e clique em ** Grupo de usuários **.
-
In the list, click the relevant user group and select Join group.
Sair dos grupos de usuários
-
Abra o aplicativo ** Usuários ** e clique em ** Grupo de usuários **.
-
In the list, click the relevant user group and select Leave group.
Edit user group
-
Open the Users app and find the type of user group you want to edit.
-
In the user group list, directly click the relevant user group, or click the menu icon and select Edit.
-
Modifique as opções que você deseja.
-
Clique em Salvar.
Delete user group
-
Open the Users app and find the type of user group you want to delete.
-
In the user group list, click the menu icon of the relevant user group and select Remove.
-
Clique em ** OK ** para confirmar.
Display details of user group
-
Open the Users app and find the user group you want to view.
-
In the object list, click the menu icon of the relevant user group and select Show details.
Change sharing settings for user group
-
Open the Users app and find user you want to modify.
-
In the user group list, click the relevant user group and select Sharing settings.
-
(Optional) Search for a user group and select it, then click the plus icon. The user group is added to the list.
-
(Opcional) Selecione ** Acesso externo (sem login) **.
Note that this only gives access when no user is logged in. To give access also to logged in users, you must also allow Public access.
-
Altere as configurações dos grupos de usuários que deseja modificar.
- Nenhum
- ** Pode visualizar **: todos no grupo de usuários podem visualizar o objeto
-
** Pode editar e visualizar **: todos no grupo de usuários podem visualizar e editar o objeto
-
Clique em Salvar.
Descentralize o gerenciamento de usuários
DHIS2 supports a concept for user management referred to as managed users which allows to explicitly define which users should be allowed to manage or modify which users. To "manage a user" implies that you can see and modify that user. The basic concept for user management is that you can see and modify users which you have been granted all of the authorities; in other words you can modify users which have a subset of your own authorities. The managed users concept gives you greater control over this.
The managed users concept allows you to define which users should be able to manage which users. This is configured through user groups and memberships within such groups. A user group can be configured to be allowed to manage other user groups from the standard add and update user interface. The effect is that a specific user can manage all users which are members of user groups which can be managed by a user group that the user is member of. In other words, users can be managed by all members of user groups which are managing user groups they are member of.
To enable this concept you should grant users the authority to "Add/update users within managed groups", and not grant access to the standard "Add/update users" authority. An implication of the managed users concept is that when creating a user with the "Add/update users within managed groups" only, the user must be made a member of at least one user group that the current user can manage. If not, the current user would lose access to the user being created immediately. This is validated by the system.
When granted the "Add/update users within managed groups" authority, the system lets a user add members to user groups for which she has read-only access to. The purpose of this is to allow for decentralized user management. You may define a range of user groups where other users may add or remove members, but not remove or change the name of the group.
Exemplo: gestão de usuários em um sistema de saúde
In a health system, users are logically grouped with respect to the task they perform and the position they occupy.
-
Define which users should have the role as system administrators. They are often part of the national HIS division and should have full authority in the system.
-
Crie aproximadamente uma função de usuário para cada posição.
Exemplos de posições comuns são:
| Position | Typical tasks | Recommended authorities | Comente |
|---|---|---|---|
| System administrators | Set up the basic structure (metadata) of the system. | Add, update and delete the core elements of the system, for example data elements, indicators and data sets. | Only system administrators should modify metadata. If you allow users outside the system administrators team to modify the metadata, it might lead to problems with coordination. Updates to the system should only be performed by the administrators of the system. |
| National health managers Province health managers | Monitor and analyse data | Access to the reports module, the GIS, Data Quality apps and the dashboard. | Don't need access to enter data, modify data elements or data sets. |
| National health information system division officers (HISO) District health records and information officers (DHRIO) Facility health records and information officers (HRIO) | Enter data that comes from facilities which are not able to do so directly Monitor, evaluate and analyse data | Access to all the analysis and validation apps Access to the Data Entry app. | - |
| Data entry clerks | - | - | - |