Usando o aplicativo Tracker Capture
Sobre o aplicativo Tracker Capture

The Tracker Capture app is an advanced version of the Event Capture app.
-
Event Capture: handles single events without registration
-
Tracker Capture: handles multiple events (including single event) with registration.
-
You capture event data for a registered tracked entity instance (TEI).
-
You only see programs associated with the organisation unit you've selected and programs you've access to view through your user role.
-
The options you see in the search and register functions depend on the program you've selected. The program attributes control these options. The attributes also decide the columns names in the TEI list.
Se você não selecionar um programa, o sistema escolherá os atributos padrão.
-
Both skip-logic and validation error/warning messages are supported during registration.
-
When you close an organisation unit, you can't register or edit events to this organisation unit in the Tracker Capture app. You can still search for TEIs and filter the search results. You can also view the dashboard of a particular TEI.
Sobre painéis de instância de entidade rastreada (TEI)
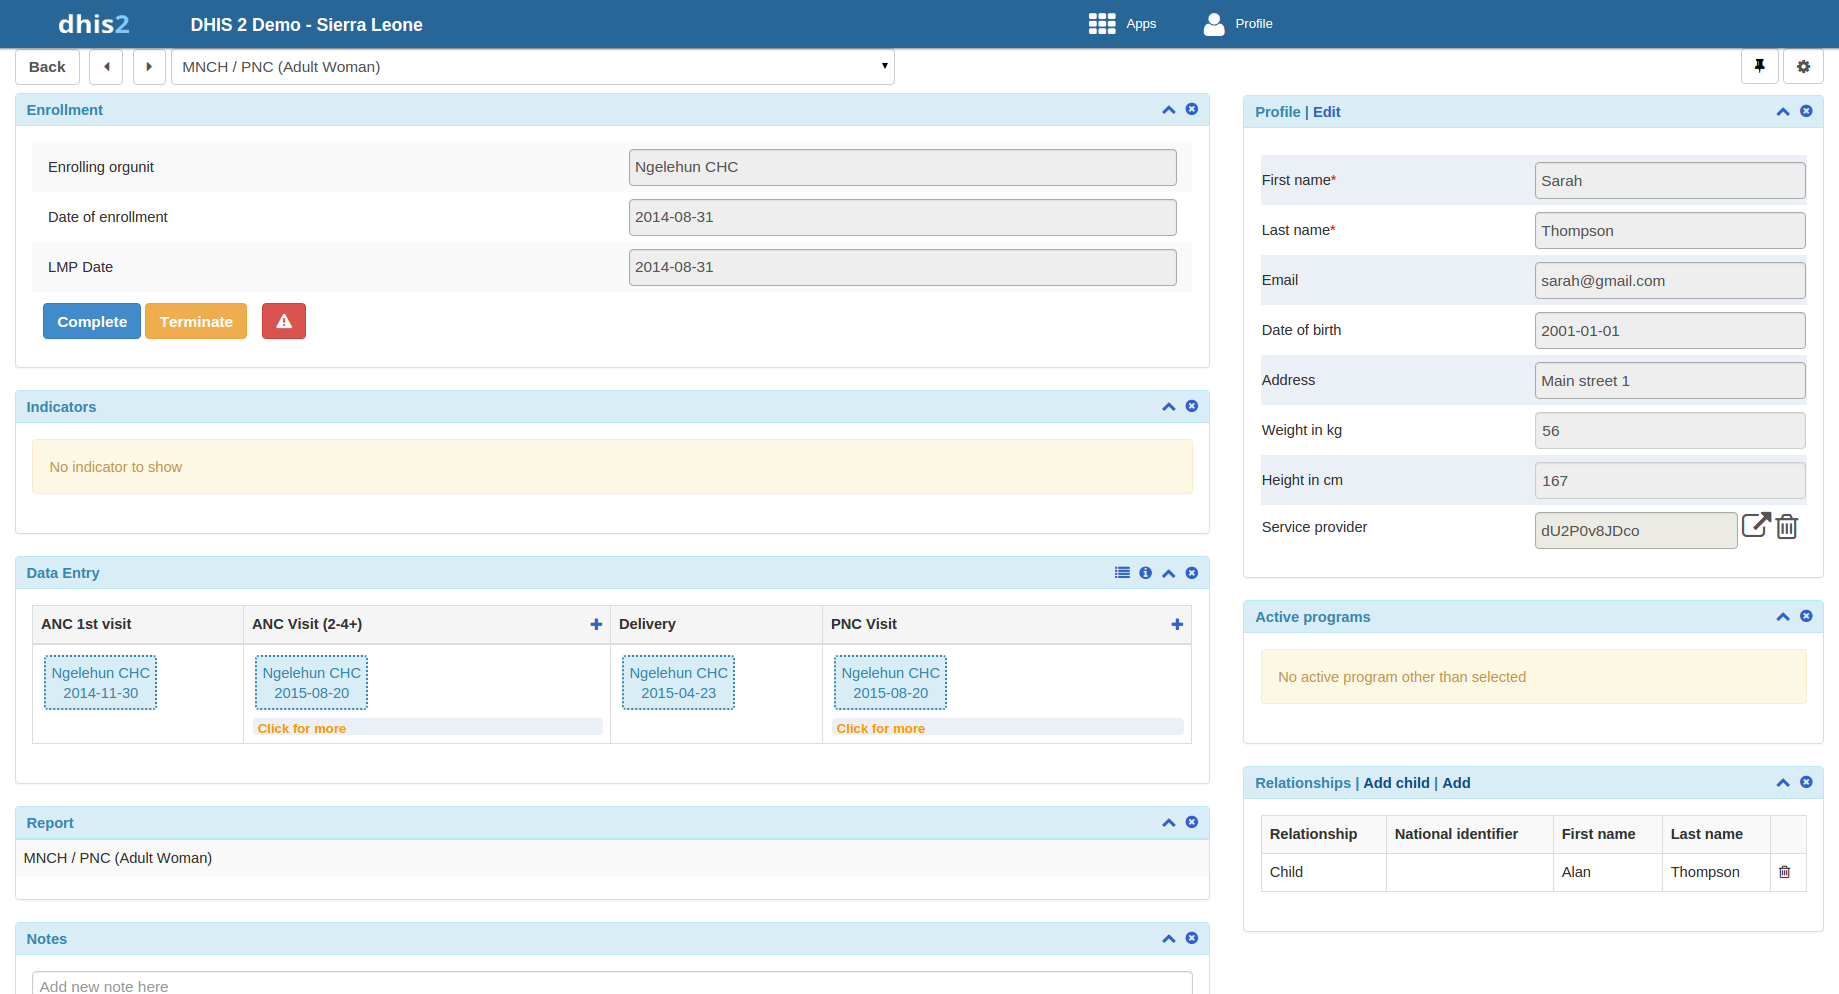
Você gerencia um TEI a partir do painel do TEI no aplicativo ** Tracker Capture **.
-
The dashboard consist of widgets. Drag and drop the widgets to place them in the order and in the position you want.
-
Click the pin icon to stick the right column of widgets to a fix position. This is useful especially during data entry.
If you have many data elements or big form to fill in, stick the right widget column. Then all the widgets you've placed in the right column remain visible while you scroll in the data entry part.
-
Any indicator defined for the program you've selected will have its value calculated and displayed in the Indicators widget.
-
Navegação:
-
** Voltar **: leva você de volta à página de pesquisa e registro
-
Previous and next buttons: takes you to the previous or next TEI dashboard in the TEI search results list
- Other programs field: if the TEI is enrolled in other programs, they're listed here. Click a program to change the program for which you enter data for the selected TEI. When you change programs, the content in the widgets change too.
-
Fluxo de Trabalho
Working process of Mother and child health program

-
Crie um novo ou encontre um TEI existente.
Você pode pesquisar em atributos definidos, por exemplo nome ou endereço.
-
Inscreva o TEI em um programa.
-
Based on the services of the program by the time, the app creates an activity plan for the TEI.
-
The TEI is provided with various services depending on the program. All services are recorded.
-
Use informações sobre os casos individuais para criar relatórios.
Vinculando ao aplicativo Tracker Capture
Link para um programa específico na "tela inicial"
Você pode compartilhar uma seleção de programa na "tela inicial.
-
Abra o aplicativo ** Tracker Capture **.
-
Select the program you want to link to.
-
Copie o URL.
- Certifique-se de que o URL contém o parâmetro "programa".
-
Paste the URL in the sharing method of your choice, for example an e-mail or a message within DHIS2.
Note: If the program does not exist in the selected organisation unit (that is stored in the local cache) the system will instead select the first available program for that organisation unit. If the local cache is empty/clean and the root organisation unit of the current user does not have the specified program, the system will also here select the first available program for the root organisation unit.
Vinculando ao painel TEI
Você pode compartilhar um painel TEI por meio de seu endereço da web.
-
Abra o aplicativo ** Tracker Capture **.
-
Abra o painel que você deseja compartilhar.
-
Copie o URL.
Make sure that the URL contains "tei", "program" and "ou" (organisation unit) parameters.
-
Paste the URL in the sharing method of your choice, for example an e-mail or a message within DHIS2.
If you're not logged in to DHIS2 when you click the link, you'll be asked to do so and then taken to the dashboard.
Crie um TEI e inscreva-o em um programa
Você pode criar um TEI e inscrever esse TEI em um programa em uma operação:
-
Abra o aplicativo ** Tracker Capture **.
-
In the organisation unit tree in the left hand pane, select an organisation unit.
-
Selecione um programa.
-
Clique em ** Registrar **.
-
Preencha as informações necessárias.
Both tracked entity type and program can be configured to use a feature type. This makes it possible to capture geometry for either the TEI or the enrollment. Supported feature type is Point and Polygon. Please see How to use geometry.
-
If the selected program is configured to display first stage during registration, all mandatory fields in the stage will have to be filled in. At the end of the stage you will also be asked if you want to complete the stage that you have entered data for. If you select Yes, the stage will have the status completed once saved. If you select No, the stage will have the status active.
-
If searching for program is configured, a background search will be performed on searchable fields to help you prevent registering duplicates. If there is any matching TEIs, a blue box will be displayed on the right side of the form with the possibility to view these matching TEIs.

If there is any matching TEIs, click Continue to review possible duplicates before registering a new one.
If there is no matching TEIs, click Save and continue or Save and add new
-
Save and continue: completes the registration and opens the registered TEI's dashboard
-
Save and add new: completes the registration but stays on the same page. Use this option when you want to register and enroll one TEI after another without enter data.
Note: All mandatory attributes have to be filled in to be able to save. Mandatory attributes are marked with a red star next to the attribute label. If the user has the authority called "Ignore validation of required fields in Tracker and Event Capture" you will not be required to fill in the mandatory attributes and will not see the red star next to the attribute label. Note that super user that have the "ALL" authority automatically have this authority.
Abra um painel TEI existente
There are multiple ways to find a TEI: Using the "Lists" which is predefined lists in the current selection, or "Search" for global lookup.
Listas
Lists is used to find and display TEIs in the selected organisation unit and program.
-
Abra o aplicativo de captura rastreada
-
In the organisation unit tree in the left hand pane, select an organisation unit
-
Selecione um programa
-
Clique no botão "Listas" se ainda não estiver selecionado
Se não for configurado, um conjunto de listas predefinidas estará disponível:
-
Qualquer TEI com qualquer status de inscrição
-
TEIs com uma inscrição ativa do programa atual
-
TEIs com inscrição concluída no programa atual
-
TEIs com inscrição cancelada do programa atual

You can select which columns to show or hide in the lists for each program. This will be saved in your user settings.
-
Clique no botão do ícone ** grade **
-
Verifique as colunas que deseja incluir
-
Clique em ** Salvar **
There is also an option to create a custom working list with own filters. This can be used to create custom lists on the fly.

As listas também podem ser baixadas ou impressas.

Listas predefinidas personalizadas
If the program has any custom tracked entity filters associated with it, these will take the place of the four predefined lists mentioned above. The predefined lists will when well configured be an effective way to find or work with the data relevant for the user in that program.
Working lists can be defined with a wide variety of options, here are some examples:
- Display all TEIs with at least one event in a given program stage that has a due date on the current date.
- Display all TEIs that has at least one event that is assigned to the logged in user.
- Exibe todos os TEIs ativos, mas não atribuídos a nenhum usuário.

See the API documentation for a full list of functionality supported for these predefined tracked entity instance filters.
Procurar
Search is used to search for TEIs in the organisation units the user has search access to. This can be used if you want to find a TEI, but you don't know which organisation unit or program the TEI was enrolled in. There are two ways of doing this: With and without a program context. Searchable fields needs to be configured. For configuring searching with program context, this is done individually for each program in the program maintenance app. For configuring searching without a program context, this is done individually for each tracked entity type in the tracked entity type maintenance app.
** Pesquisando sem um contexto de programa: **
-
Abra o ** aplicativo Tracker Capture **
-
Clique no botão ** Pesquisar **
-
Searchable fields will be displayed in groups. Unique attributes is only individually searchable. Non-unique attributes can be combined.
-
Preencha os critérios de pesquisa e clique no botão do ícone ** pesquisar **.
** Pesquisando com um contexto de programa: **
-
Abra o ** aplicativo Tracker Capture **
-
Select an organisation unit which has the program you wish to search in
-
Selecione o programa
-
Clique no botão ** Pesquisar **
-
Searchable fields will be displayed in groups. Unique attributes is only individually searchable. Non-unique attributes can be combined.
-
Preencha os critérios de pesquisa e clique no botão do ícone ** pesquisar **

After the search has been done, you will be presented with the search result. Whats displayed depends on the outcome of the search.
Para pesquisa de atributo exclusivo:
-
If no matching TEI found, you will get the possibility to open the registration form.
-
If the TEI was found in the selected organisation unit, the TEI dashboard will automatically open.
-
If the TEI was found in outside the selected organisation unit, you will get the possibility to open the TEI.
Para pesquisa de atributos não exclusivos:
-
If no matching TEI's found, you will get the possibility to open the registration form.
-
If matching TEI's found, you can either click on any TEI in the result list, or open the registration form.
-
If a too large number of matches was found, you will be prompted to refine your search criteria

The search results have functionality for flagging tracked entity instances as possible duplicates, see next chapter.
When choosing to open the registration form, the search values will automatically be filled into the registration form.
Sinalizando instância de entidade rastreada como possível duplicata
When searching for tracked entity instances in the tracker capture app, the user will sometimes suspect that one or more of the search hits are duplicates of other tracked entity instances. The user has the option of clicking on the flag possible duplicate link in the rightmost column of the search result grid.
Tracked entity instances flagged in this way will be marked as "possible duplicate" in the DHIS2 database. The flag indicates that the tracked entity instance is/has a duplicate. The presence of such a flag is visible to the user in two places. One is the result list itself (in this example Mark Robinson is already flagged as a potential duplicate):
O outro lugar é dentro do painel da instância da entidade rastreada:

In addition to informing users about the tracked entity instance potentially being a duplicate, the flag will be used by the underlying system for finding and merging duplicates in coming versions of DHIS2.
Quebrando o vidro
If the program is configured with access level protected, and the user searches and finds tracked entity instances that is owned by organisation unit that the user does not have data capture authority for, the user is presented with the option of breaking the glass. The user will give a reason for breaking the glass, then gain temporary ownership of the tracked entity instance.
Inscreva-se em um TEI existente em um programa
-
Abra o aplicativo ** Tracker Capture **.
-
Abra um painel TEI existente.
-
Selecione um programa.
-
No widget ** Enrollment **, clique em ** Add new **.
-
Preencha as informações necessárias e clique em ** Inscrever-se **.
Insira os dados do evento para um TEI
Widgets para entrada de dados

In a TEI dashboard, you enter event data in the Timeline Data entry or Tabular data entry widgets.
| Widget name | Descrição |
|---|---|
| Timeline Data entry | For data entry using either default or custom forms. Depending on program definition, in particular program stages, events will be displayed in a timely fashion. Clicking on any of them displays the corresponding data entry. If a stage needs new event, a plus icon is displayed for new event creation. To proceed with data entry, it is mandatory to have event date. Once an event date is specified it is not possible to change due date. The assumption is that by specifying event date, the event has already taken place. If the event hasn't occurred yet, it is possible to change due date - this is effectively doing nothing but rescheduling. The buttons at the bottom help to change the status of a selected event. Another key feature from this widget is addition of multiple notes for an event. Normally data recording is through data elements, however there are cases where it is necessary to record additional information or comments. This is where the notes section comes handy. However it is not possible to delete a note. The idea is notes are more like log books. Both skip-logic and validation error/warning messages are supported during data entry. Also included in the Timeline Data entry is the option to compare your data entry to previous entries. This can be enabled by clicking the "Switch to compare form" button (Two sheets of paper) in the top right corner of the Timeline Data entry widget. |
| Tabular data entry | For tabular-style data entry. The widget displays the list of program stages as left-hand side labels. Events will be listed in table for repeatable program stage, and allows for in-line edits of event data values. |
Criação de um evento
Você pode criar um evento para um TEI:
-
Abra o aplicativo ** Tracker Capture **.
-
Abra um painel TEI existente.
-
In the Timeline Data entry or Tabular data entry widget, click the +-button.
-
Select a Program stage and set a Report date.
Program stages can be configured to use a feature type. This makes it possible to capture geometry for an event. Supported feature type is Point and Polygon. Please see How to use geometry.
-
Clique em Salvar.
Agende um evento
You can schedule an event for a future date by:
-
Abra o aplicativo ** Tracker Capture **.
-
Abra um painel TEI existente.
-
In the Timeline Data entry or Tabular data entry widget, click the Calendar icon.
-
Select a Program stage and set a Schedule date.
-
Clique em Salvar.
Indique um evento
Sometimes it might be necessary to refer a patient to a different Organisation unit. To refer a TEI:
-
Abra o aplicativo ** Tracker Capture **.
-
Abra um painel TEI existente.
-
In the Timeline Data entry or Tabular data entry widget, click the Arrow icon.
-
Select a Program stage, Organisation unit and set a ****Report date****.
-
Click either One-time referral which will only refer TEI for one single event or Move permanently which will move TEI ownership to the selected Organisation Unit. Further access to the TEI will be based on the ownership organisation unit.
Elementos de dados obrigatórios em eventos
Some data elements in an event might be mandatory (marked with a red star next to the data element label). What this means is that all mandatory data elements must be filled in before the user is allowed to complete the event. The exception to this is if the user has the authority called "Ignore validation of required fields in Tracker and Event Capture". If the user has this authority, the mandatory data elements will not be required to be filled in before saving and the red star will not be displayed next to the data element label. Note that super user that have the "ALL" authority automatically have this authority.
Como usar geometria
Tracked entity type, program and program stage can be configured to use a feature type. This makes it possible to capture geometry for a TEI, program or event. Supported feature types are Point and Polygon.
Capturar coordenadas
** Opção 1: ** Preencha a latitude e longitude no campo.
Opção 2: 1. Clique no ** ícone do mapa ** 2. Find the location you want by either searching or locating it on the map 3. Clique com o botão direito no local desejado e escolha ** Definir coordenada ** 4. Clique em ** Capturar ** na parte inferior
Capturar polígono
- Clique no ** ícone do mapa **
- Find the location you want by either searching or locating it on the map
- No canto superior esquerdo do mapa, clique no ** ícone do polígono **
- Draw a polygon on the map. To finish, connect the last point with the first point
- Clique em ** Capturar ** na parte inferior

Os polígonos também podem ser excluídos 1. Clique no ** ícone do mapa ** 2. Click the trash can icon at the left side of the map, and select Clear all
Como atribuir um usuário a um evento
In the Maintenance App a program stage can be configured to allow user assignment. If user assignment is enabled, you will be able to assign a user to an event.
- Clique no campo ** Usuário atribuído **.
- Role ou pesquise um usuário.
- Clique no usuário.
Gerenciar as inscrições de um TEI
The Enrollment widget gives access to information and functionality for the enrollment in the selected program.
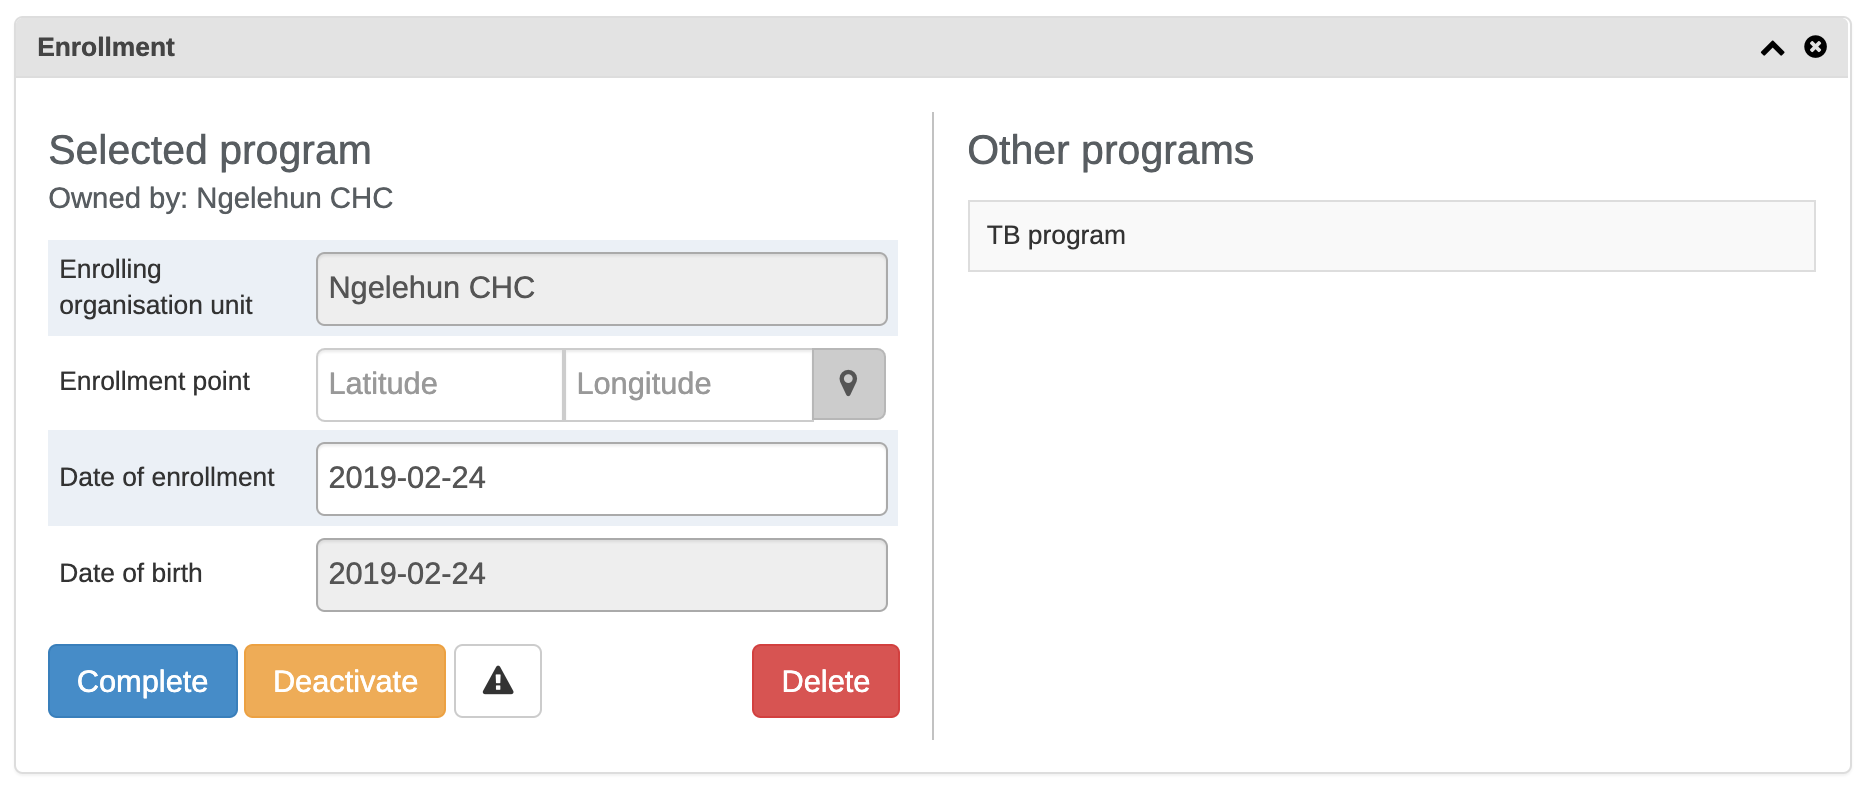
TEI ownership
The current ownership of all enrollments in the selected program is displayed in the "Owned by" part of the enrollment widget. The ownership will always start out as the organisation unit that first enrolled the TEI into the given program.
Ownership can be different for a TEIS different programs, for example one clinic can follow up a patient in HIV, while another clinic follows up the same patient in MCH.
To update the ownership for a TEI/program combination, the user has to utilize the referral functionality and select the "Move permanently" option while referring.
A user that has capture access to the organisation unit that is the current owner of the TEI/Program will have write access to all enrollments for that TEI/Program combination. A user that has search access to the organisation unit that is the current owner will have access to search and find the TEI/Program combination.
Desative a inscrição de um TEI
If you deactivate a TEI dashboard, the TEI becomes 'read-only'. You can't enter data, enroll the TEI or edit the TEI's profile.
-
Abra o aplicativo ** Tracker Capture **.
-
Abra um painel TEI existente.
-
No widget ** Enrollment **, clique em ** Desativar **.
-
Clique em ** Sim ** para confirmar.
Ative a inscrição de um TEI
-
Abra o aplicativo ** Tracker Capture **.
-
Abra um painel TEI existente.
-
No widget ** Enrollment **, clique em ** Activate **.
-
Click Yes to confirm.
Marque a inscrição do TEI como completa
-
Abra o aplicativo ** Tracker Capture **.
-
Abra um painel TEI existente.
-
No widget ** Enrollment **, clique em ** Complete **.
-
Click Yes to confirm.
Reabrir inscrição concluída
-
Abra o aplicativo ** Tracker Capture **.
-
Abra um painel TEI existente.
-
No widget ** Enrollment **, clique em ** Reaopen **.
-
Click Yes to confirm.
Exibir histórico de inscrição do TEI
-
Abra o aplicativo ** Tracker Capture **.
-
Abra um painel TEI existente.
-
No widget ** Perfil **, clique no ícone ** Histórico de auditoria **.
Crie uma nota de inscrição TEI
An enrollment note is useful to record information about for example why an enrollment was cancelled.
-
Abra o aplicativo ** Tracker Capture **.
-
Abra um painel TEI existente.
-
No widget ** Notes **, digite sua nota e clique em ** Add **.
Envie uma mensagem para um TEI
-
Abra o aplicativo ** Tracker Capture **.
-
Abra um painel TEI existente.
-
No widget ** Mensagens ** e selecione ** SMS ** ou ** E-mail **.
-
Insira as informações de contato necessárias.
If the TEI's profile contains an e-mail address or a phone number, these fields are filled in automatically.
-
Digite uma mensagem.
-
Clique em ** Enviar **.
Marque um TEI para acompanhamento
You can use mark a TEI's enrollment for follow-up and then use this status as a filter when you create Upcoming events and Overdue events reports. This can be useful for example to monitor high-risk cases during a pregnancy program.
-
Abra o aplicativo ** Tracker Capture **.
-
Abra um painel TEI existente.
-
No widget ** Enrollment **, clique no ícone ** Mark for follow-up **.
Editar o perfil de um TEI
You edit a TEI's profile or tracked entity attributes in the Profile widget.
-
Abra o aplicativo ** Tracker Capture **.
-
Abra um painel TEI existente.
-
No widget ** Perfil **, clique em ** Editar **.
-
Modifique o perfil e clique em ** Salvar **.
Adicionar um relacionamento a um TEI
You can create a relationship from one TEI to another, for example linking a mother and a child together or a husband and a wife. Depending on how the relationship type is configured, the relative can inherit attributes.
Assume there are two programs: Antenatal care for the mother and Immunization for the child. If first name, last name and address attributes are required for both programs, it is possible to configure last name and address attributes as inheritable. Then during child registration, there is no need to enter these inheritable attributes. You can add them automatically based on the mother's value. If you want to have a different value for the child, you can override the automatically generated value.
-
Abra o aplicativo ** Tracker Capture **.
-
Abra um painel TEI existente.
-
No widget ** Relacionamentos ** e clique em ** Adicionar **.
-
Selecione um tipo de relacionamento.
-
Pesquise o parente e selecione-o. A pesquisa segue o mesmo padrão de busca por instâncias de entidades rastreadas na página inicial do rastreador. As pesquisas cobrem, por padrão, o escopo de pesquisa dos usuários.
-
Selecione a instância da entidade rastreada que corresponde aos critérios de pesquisa no pop-up.
-
Clique em Salvar.
Note: If the relationship is a bi-directional relationship, the relationship will be displayed in the TEI that the relationship was created in and in the TEI that the relationship was linked to. Also, if the relationship is bi-directional, each end of the relationship will have a unique name that will be displayed in the relationship widget under the "Relationship" column.
Compartilhe um painel TEI
Você pode compartilhar um painel TEI por meio de seu endereço da web.
-
Abra o aplicativo ** Tracker Capture **.
-
Abra o painel que você deseja compartilhar.
-
Copie o URL.
Make sure that the URL contains "tei", "program" and "ou" (organisation unit) parameters.
-
Paste the URL in the sharing method of your choice, for example an e-mail or a message within DHIS2.
If you're not logged in to DHIS2 when you click the link, you'll be asked to do so and then taken to the dashboard.
Desativar um TEI
If you deactivate a TEI, the TEI becomes 'read-only'. Data associated with the TEI is not deleted.
-
Abra o aplicativo ** Tracker Capture **.
-
Abra um painel TEI existente.
-
In the top right corner, click the
 button > Deactivate.
 -
Clique em ** Sim ** para confirmar.
Ative um TEI
-
Abra o aplicativo ** Tracker Capture **.
-
Abra um painel TEI existente.
-
In the upper top corner, click the
button > Activate. -
Clique em ** Sim ** para confirmar.
Excluir um TEI
** Aviso **
Ao excluir um TEI, você exclui todos os dados associados ao TEI.
-
Abra o aplicativo ** Tracker Capture **.
-
Abra um painel TEI existente.
-
In the top right corner, click the
button > Delete. -
Click Yes to confirm.
Configure o painel TEI
Mostrar ou ocultar widgets
-
Abra o aplicativo ** Tracker Capture **.
-
Abra um painel TEI existente.
-
Clique no ícone ** Configurações ** e selecione ** Mostrar / ocultar widgets **.
-
Selecione os widgets que você deseja mostrar ou ocultar.
-
Clique em ** Fechar **.
Salve o layout do painel como padrão
Você pode salvar o layout do painel como padrão para um programa.
-
Abra o aplicativo ** Tracker Capture **.
-
Abra um painel TEI existente.
-
Click the Settings icon, and select Save dashboard layout as default.
Layout do painel de bloqueio
If you are the administrator you have the option of locking the layout of the dashboard for all users.
-
Abra o aplicativo ** Tracker Capture **.
-
Abra um painel TEI existente.
-
Organize the widgets to the desired layout and save it as default (see section above).
-
Click the Settings icon, and select Lock layout for all users.
Users will still be able to reorganize the widgets temporarily, but the layout will be reset to the admin's saved layout after page refresh. The remove widget buttons will be hidden when the dashboard layout is locked.
Barra superior
The top bar can be a helpful tool to see important data in a quick and easy way. To start using the top bar:
-
Abra o aplicativo ** Tracker Capture **.
-
Abra um painel TEI existente.
-
Clique no ícone ** Configurações ** e selecione ** Configurações da barra superior **.
-
Click Activate top bar and click the data you would like to display in the top bar.

Alterar o modo de exibição da tabela para o widget ** Timeline Data Entry **
The Timeline Data Entry widget has 5 different table display modes that can be selected. The different options are: - Default form - Shows all data elements vertically.
-
Compare form previous - Shows the previous (repeatable) program stage next to the current selected program stage.
-
Compare form all - Shows all previous (repeatable) program stages next to the current selected program stage.
-
Grid form - Shows the data elements horizontally.
-
** Formulário POP-over ** - O mesmo que ** Formulário de grade **, mas quando clicado, os elementos de dados são exibidos em um pop-up.
Para alterar o modo de exibição atual, clique no segundo ícone na barra superior dos widgets (veja a imagem abaixo):
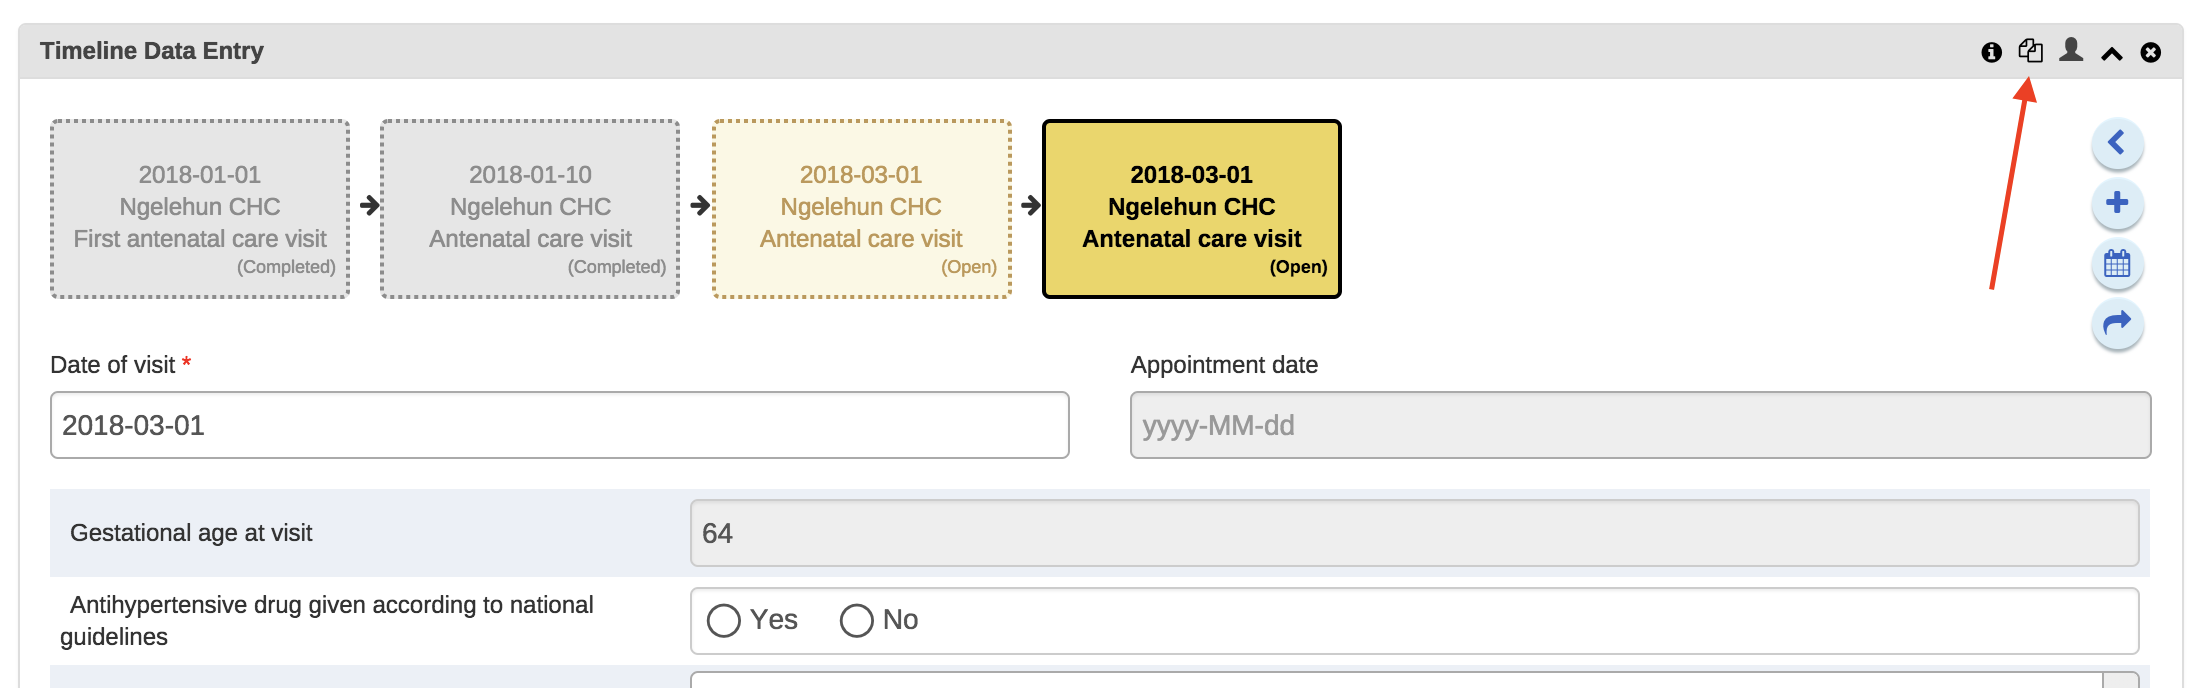
Once an option is selected the selection is stored for that specific program stage. This mean that you can have different table modes for the different program stages in a program.
Notes: 1. The Compare form options will function best if you have multiple repeatable events (of the same program stage) present. 2. The Grid form and POP-over form options are not selectable if the program stage has more than 10 data elements. 3. The icon in the widgets bar will change depending on the option you have selected.
Crie relatórios
-
Abra o aplicativo ** Tracker Capture **.
-
Clique em ** Relatórios **.
-
Selecione um tipo de relatório.
Report types in the Tracker Capture app Report type Description Program summary A summary report for a particular program, organisation unit and time frame. The report consist of a list of TEIs and their records organised based on program stages. Program statistics A statistics report for a particular program. The report provides for example an overview of drop-outs or completion rates in a given time frame at a particular organisation unit. Upcoming events A tabular report showing tracked entity instances and their upcoming events for a selected program and time. You can sort the columns and search the values. Show/hide operations are possible on the columns. You can also export the table to Microsoft Excel. Overdue events A list of events for a selected program. The report displays a list of TEIs and their events that are not completed on time. You can sort the columns and search the values You can also export the table to Microsoft Excel.

The summary report displays a list of TEIs and their records for "MNCH/PNC (Adult Woman)" program. The records are organized in the form of tabs where each tab is a program stage. The columns in the table are data elements which are configured to be displayed in reports under program stage definition.