Configure metadata synchronizing
About data and metadata synchronization
You can synchronize data and metadata between different DHIS2 instances. Given two instances in a central-local deployment strategy, metadata created at the central system can be synchronized with the local system and the data created at local system can be synchronized with the central system. This can be useful when you've multiple stand-alone instances of DHIS2 and global metadata needs to be created at all the local instances.
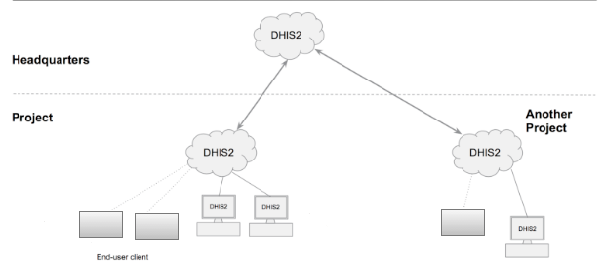
If metadata creation and update take place at the central system and if the metadata synchronisation task is enabled, the metadata gets synchronized down to all the local instances which are bound to the central instance. These local instances will in turn push data values and complete data registration sets to the central instance. Enabling or disabling versioning of metadata synchronization at local instance, will not hinder the metadata synchronization process. This is because the metadata synchronization interacts with versioning end points of the central instance and not with end points of the local instance.
Each snapshot of metadata export generated is referred to a metadata version. A new metadata version contains only the changes between the previous version and the current version, that is it's an export between two timestamps. All metadata versions are maintained in the DHIS2 database and are available to all local instances that connect to it. You can schedule each of the local instances to download new metadata versions. It is recommended to keep the metadata versions' sizes small and logical.
Warning
Each instance of DHIS2, whether central or local, can create metadata versions. The local instance is meant to synchronize metadata from a central system and not create metadata on its own.
If a new metadata version is created on the local instance, this instance can't receive new metadata versions from the central instance, since the content of the metadata versions will be out of synchronization.
If you've created metadata versions on a local instance, you must manually deleted these versions from the database before you can synchronize with the central instance.
Assume the central and local DHIS2 instances have identical metadata snapshots until version 10. Then the local instance creates a new snapshot called version 11. After that, the central instance creates a new snapshot called version 11. When the local instance attempts to synchronize metadata, version 11 is not downloaded. However, the content of version 11 on the local instance is not identical to the content of version 11 on the central instance.
Note
You can also use the Import-Export app to synchronize metadata manually.
Workflow
-
On the central instance, configure metadata versioning. You should do this once the central instance contains metadata.
-
Connect local instance(s) to the central instance.
-
On local instance(s), configure automatic synchronization.
Configure metadata versioning on central instance
Note
To synchronize metadata, the user account of the central system must have the following authority:
F_METADATA_MANAGE
Only users with this authority will then be able to create and download metadata. This is to ensure security of the central system where the metadata is created. Instead of giving the credentials of user having ALL authority to the field instances, you need to create a user having this specific authority only.
-
On the central instance, open the System Settings app and click Synchronization.
-
Go to the Metadata versioning section and select Enable versioning for metadata sync.

-
(Optional) Select Don't sync metadata if DHIS2 versions differ.
-
Select a type of metadata version: Best effort or Atomic.
-
Best effort means that if the metadata import encounters missing references (for example missing data elements on a data element group import) it ignores the errors and continues the import.
-
Atomic means all or nothing - the metadata import will fail if any of the references do not exist.
Note
Each metadata entity is associated with a "User" object. If this "User" reference is missing while importing metadata version of type ATOMIC, the import will fail at the validation phase itself. This means that the user who creates metadata also needs to synchronize down to local instances to successfully import the metadata version of type ATOMIC.
-
-
Click Create new version. The new version is added to the versioning table.
Connect local instance to central instance
To enable metadata synchronization, you must configure the connection between the local instance and the central instance.
-
On the local instance, open the System Settings app and click Synchronization.
-
Add the central DHIS2 instance's details to the local instance:
-
Remote server URL
-
Remote server user name
-
Remote server password
-
-
Go to the Metadata versioning section and select Enable versioning for metadata sync.
-
(Optional) Select Don't sync metadata if DHIS2 versions differ.
The metadata schema changes between versions of DHIS2 which could make different metadata versions incompatible.
When enabled, this option will not allow metadata synchronization to occur if the central and local instance(s) have different DHIS2 versions. This apply to metadata synchronization done both via the user interface and the API.
The only time it might be valuable to disable this option is when synchronizing basic entities, for example data elements, that have not changed across DHIS2 versions.
-
(Optional) Configure email notifications to notify users about successful or unsuccessful metadata synchronization:
-
Open the System Settings app and click Email.
-
Enter Host name, Port, User name, Password and Email sender.
-
Click Server and enter a System notifications email address.
This email address will receive notifications about the metadata synchronization status.
Tip
When you receive email notification about a metadata synchronization failure, check which metadata version that causes the error and resolve it. Then you avoid future errors when the system downloads new metadata versions.
-
Configure automatic metadata synchronization on local instance
Once you have configured automatic metadata synchronization (scheduling) on local instance(s), the scheduler will run at that specific time and synchronize (download and import) the metadata from the central instance. No manual intervention is required from the users at the local instance(s).
After the scheduler has completed the metadata synchronization, the local instance will have the metadata exactly as created on the central system.
Note
Passwords of users are not synchronized. They are nullified for security reasons. After metadata synchronization, the Admin user must reset these passwords.
-
On the local instance, open the Data Administration app and click Scheduling.
-
In the Metadata Synchronization section, select Enabled.
-
Select a time period: Daily, Weekly, Monthly or Yearly.

-
Click Start.
Create a new metadata version manually on central or local instance
-
Open the System Settings app and click Synchronization.
-
Go to the Metadata versioning section and select Enable versioning for metadata sync.
-
(Optional) Select Don't sync metadata if DHIS2 versions differ.
-
Select Best effort or Atomic.
-
Click Create new version. The new version is added to the versioning table.
When the system is a central instance, you'll see three columns in the versioning table:
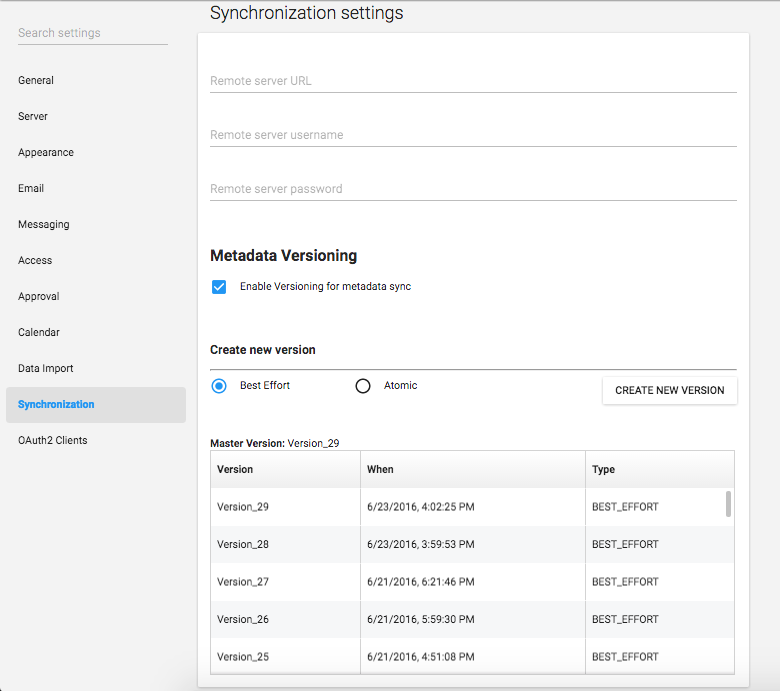
| Object | Description |
|---|---|
| Master version | The latest version in the system. |
| Version | Name of the version. The name is automatically generated by system. |
| When | The timestamp of the metadata version creation at the central instance. |
| Type | Type of metadata version. |
When system is a local instance, you'll see four columns in the versioning table:

| Object | Description |
|---|---|
| Master version | The latest version of the central instance. Note The master version information is the central instance's latest version. This is important to look at the difference between the versions of metadata that exist at central and at local. |
| Last sync attempt | If the last sync attempt is a failure, this will be displayed. |
| Version | Name of the version. The name is automatically generated by system. |
| When | The timestamp of the metadata version creation at the central instance. |
| Type | Type of metadata version. |
| Last sync | Timestamp of when the last sync happened for this version in this system. |
Reference information: metadata synchronization configuration parameters
The process which performs metadata synchronization is called Metadata Sync Task. This task performs a series of steps before syncing of metadata:
-
Push data (aggregate data and anonymous events data) from local instance to central instance.
-
Gets the current metadata version of the local instance. Then uses this version information as a baseline to fetch the list of metadata versions created after the baseline.
-
If there are new versions created at central instance, it performs the synchronization of metadata versions one after the other. A mail will be sent to the configured user (if any) after each successful synchronization of metadata version at the local instance.
Once the Metadata Sync Task has run at the scheduled time, the task can retry (if any of the steps fail) based on the configuration of the following parameters defined in dhis.conf file:
| Parameter | Default value |
|---|---|
metadata.sync.retry | 3 |
metadata.sync.retry.time.frequency.millisec | 30000 |
Each retry will be made after the time (in millisecond) as specified. If the steps still fail even after all the retries, then the scheduler stops its execution and then a mail will be sent to the configured user (if any). If no values are specified then the default values will be used.
metadata.sync.retry = 5
metadata.sync.retry.time.frequency.millisec = 10000