Configure OpenID Connect with Okta
OpenId Connect (OIDC) is an identity and authentication layer built on top of the OAuth2 authorization framework. This guide explains how to set up OIDC with Okta as identity platform for DHIS 2.
OIDC is useful for Single Sign-On across multiple applications and systems, where a user can sign in once and then access many DHIS 2 instances and other type of systems. For sysadmins, OIDC allows for maintaining usernames, passwords and user deactivation in a single place.
OIDC is supported by DHIS 2 and can be configured in the dhis.conf configuration file. Dedicated configuration syntax is available for specific identity providers including Google, Azure and WSO2. In this guide, the generic provider will be used to configure Okta.
Okta is a popular identity and access management platform which supports the OIDC protocol. This tutorial will explain how to set up OIDC with Okta for DHIS 2. Refer to the DHIS 2 OIDC installation guide for details.
This guide assumes a DHIS 2 instance running at http://localhost:8080. The guide refers to a provider key which in this case is okta.
Sign up for an Okta developer account
In this step we will sign up for the Okta free developer trial.
- Navigate to Okta developer trial signup: https://developer.okta.com/signup/
- Enter your work email, first name, last name and country. Note that the email you enter will become the Okta username.
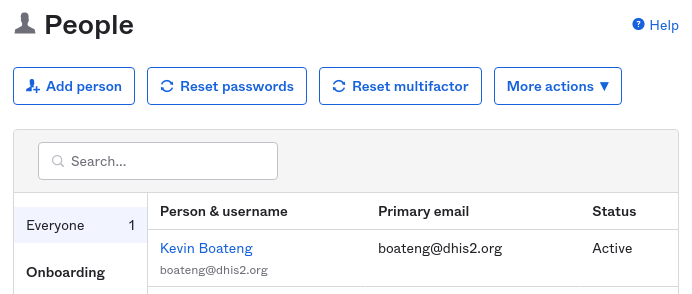
- After signing in, navigate to Directory > People and observe that a person (user) exists for the name and email you used when signing up. The email will later be used to map to a DHIS 2 user. You can create additional users later.
Create Okta application integration
In this step we will create an Okta web app integration.

- Navigate to Applications > Applications.
- Click Create app integration.
- For Sign-in Method, select OIDC - OpenID Connect.
- For Application type, select Web application, and click Next.
- For App integration name, enter a descriptive name like the name of your DHIS 2 instance, such as DHIS 2 HMIS.
- For Grant type > Client acting on behalf of itself, enable Client Credentials.
- For Client acting on behalf of a user, do nothing and make sure Authorization Code is enabled and other options are disabled.
- For Sign-in redirect URIs, enter
http://localhost:8080/oauth2/code/okta. The pattern is{dhis2-base-URL}/oauth2/code/{provider-key}. The DHIS 2 base URL ishttp://localhost:8080and the provider key isokta. - Leave Trusted Origins blank.
- For Assignments, select Allow everyone in your organization to access.
- Click Save.
- In the Assignments tab in the application overview, ensure that the relevant people are assigned.
Take note of Okta settings
In this step we will take note of the relevant Okta settings and credentials.

- Navigate to General tab in the application overview screen.
- Take note of the following settings by clicking the Copy to clipboard buttons. These settings will be used in the DHIS 2 configuration file later. The settings should be considered secrets and stored in a secure way.
- Client ID
- Client secret
- Okta domain
- Log out of the Okta portal, to allow logging back in later.
Create DHIS 2 user
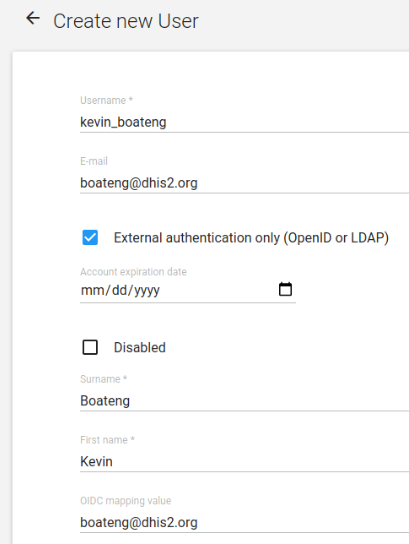
To be able to log in to DHIS 2, a DHIS 2 user must be created for each Okta person. The DHIS 2 user is mapped to the Okta person through the DHIS 2 user OIDC mapping value field. User roles, user groups and organisation units can be granted to the DHIS 2 user as usual.
- Log in to DHIS 2 using a regular, local user with authority to create users.
- Navigate to Apps > Users > Users.
- Create a new DHIS 2 user, or update an existing user.
- The username can be any username. For new DHIS 2 users, it is recommended (but not required) to use the Okta username.
- Enable External authentication only (OpenID or LDAP).
- Enter the Surname and First name of the user.
- For OIDC mapping value, enter the Okta username (email). This value is used to map the DHIS 2 user to the Okta user.
- Select appropriate user roles and organisation units.
- Click Save.
Configure DHIS 2
In this step we will configure the DHIS 2 instance to authenticate with Okta through the dhis.conf DHIS 2 configuration file.
- Look up the Okta settings noted previously. Note that
oktain the property keys refers to the provider key specified in the Okta application integration. - Locate the
dhis.confconfiguration file for the DHIS 2 instance. - Enter the properties described below. Replace the following three variables (enclosed in brackets) with the real values for your environment.
- Client ID /
{client_id}. Example:0kh6yTgRg45191j97H6y. - Client secret /
{client_secret}. Example:xJh6ybgh5yajTku7qE35F5h8hj8km7yG-Hj61j49. - Client domain /
{client_domain}. Example:dev-123.okta.com.
- Client ID /
# Enable OIDC
oidc.oauth2.login.enabled = on

# Okta OIDC settings
oidc.provider.okta.client_id = {client_id}
oidc.provider.okta.client_secret = {client_secret}
oidc.provider.okta.mapping_claim = email
oidc.provider.okta.display_alias = Sign in with Okta
oidc.provider.okta.enable_logout = on
oidc.provider.okta.scopes = email
oidc.provider.okta.authorization_uri = https://{client_domain}/oauth2/v1/authorize
oidc.provider.okta.token_uri = https://{client_domain}/oauth2/v1/token
oidc.provider.okta.user_info_uri = https://{client_domain}/oauth2/v1/userinfo
oidc.provider.okta.jwk_uri = https://{client_domain}/oauth2/v1/keys
oidc.provider.okta.end_session_endpoint = https://{client_domain}/oauth2/v1/logout
- Note that when logging out of DHIS 2, the above configuration will also log the user out of Okta. To ensure that the user is only logged out of DHIS 2, use the property and value described below instead.
oidc.provider.okta.end_session_endpoint = /dhis-web-commons-security/logout.action
- Restart the DHIS 2 instance for the changes to take effect.
- Tip: These values can be retrieved from Okta with the URL path
/.well-known/openid-configuration, e.g.https://dev-123-admin.okta.com/.well-known/openid-configuration.
Sign in to DHIS 2 with Okta
In this step we will test the setup and log in to DHIS 2 using Okta.

- Navigate to the DHIS 2 login page. A button labelled Sign in with Okta should appear on the login page.
- Click the Sign in with Okta button. You should be redirected to the Okta sign in page. Note that if you are still logged in to Okta, you will be automatically logged in to DHIS 2.
- Enter the Okta username and password for the account created previously, and click Sign In. You should be redirected to the DHIS 2 instance and be automatically logged in as the DHIS 2 user created previously.
- Tip: For IdP-initiated SSO, that is, logging in to Okta and navigating to the DHIS 2 landing page without going through the DHIS 2 login page, you can use the following web URL for DHIS 2:
http://localhost:8080/oauth2/authorization/okta.
Summary
At this point you should be automatically logged into DHIS 2 through Okta, without having entered any DHIS 2 credentials.
This guide has explained how to set up an Okta application and user, set up a DHIS 2 user mapped to the Okta user, how to configure DHIS 2 for Okta OIDC and how to log in using Okta. You can repeat the DHIS 2 user and configuration steps for additional DHIS 2 instances in order to include them in the Single Sign-On setup.