DHIS 2 manual for the Action Tracker App
Use
DHIS2 Documentation Team

Copyright © 2008-2023 DHIS2 Team
source.revision.date: 2021-09-09
Warranty: THIS DOCUMENT IS PROVIDED BY THE AUTHORS ‘’AS IS’’ AND ANY EXPRESS OR IMPLIED WARRANTIES, INCLUDING, BUT NOT LIMITED TO, THE IMPLIED WARRANTIES OF MERCHANTABILITY AND FITNESS FOR A PARTICULAR PURPOSE ARE DISCLAIMED. IN NO EVENT SHALL THE AUTHORS OR CONTRIBUTORS BE LIABLE FOR ANY DIRECT, INDIRECT, INCIDENTAL, SPECIAL, EXEMPLARY, OR CONSEQUENTIAL DAMAGES (INCLUDING, BUT NOT LIMITED TO, PROCUREMENT OF SUBSTITUTE GOODS OR SERVICES; LOSS OF USE, DATA, OR PROFITS; OR BUSINESS INTERRUPTION) HOWEVER CAUSED AND ON ANY THEORY OF LIABILITY, WHETHER IN CONTRACT, STRICT LIABILITY, OR TORT (INCLUDING NEGLIGENCE OR OTHERWISE) ARISING IN ANY WAY OUT OF THE USE OF THIS MANUAL AND PRODUCTS MENTIONED HEREIN, EVEN IF ADVISED OF THE POSSIBILITY OF SUCH DAMAGE.
License: Permission is granted to copy, distribute and/or modify this document under the terms of the GNU Free Documentation License, Version 1.3 or any later version published by the Free Software Foundation; with no Invariant Sections, no Front-Cover Texts, and no Back-Cover Texts. A copy of the license is included in the source of this documentation, and is available here online: http://www.gnu.org/licenses/fdl.html
This guide is meant to assist all users of the action tracker app to plan and implement the application within the existing HIS framework of either Ministry of Health or individual organisations.
This guide is also tailored for the LINKED Action Tracker app that is fully DEPENDENT on the Bottleneck analysis and the Scorecard applications.
While the guide strives to be complete, there may be certain functionalities topics which have been omitted or which have yet to be documented. This section explains some of the conventions which are used throughout the document.
The Action Tracker App is a browser-based application. In many cases, screenshots have been included for enhanced clarity. Shortcuts to various functionalities are displayed such as Data element ">" Data element group. The ">" symbol indicates that you should click Data element and then click Data element group in the user interface.
Different styles of text have been used to highlight important parts of the text or particular types of text, such as source code. Each of the conventions used in the document are explained below.
Note
A note contains additional information which should be considered or a reference to more information which may be helpful.
Tip
A tip can be a useful piece of advice, such as how to perform a particular task more efficiently.
Important
Important information should not be ignored, and usually indicates something which is required by the application.
Caution
Information contained in these sections should be carefully considered, and if not heeded, could result in unexpected results in analysis, performance, or functionality.
Warning
Information contained in these sections, if not heeded, could result in permanent data loss or affect the overall usability of the system.
Program listings usually contain some type of computer code. They will be displayed with a shaded background and a different font.
Commands will be displayed in bold text, and represent a command which would need to be executed on the operating system or database.
Links to external web sites or cross references will be displayed in blue text, and underlined like this..
Action Tracker is part of the bottleneck and scorecard cascade that utilizes DHIS2 analytical features to assess national and sub-national level performance of key priority interventions aimed at improving health service delivery and health outcomes. It is a tool that helps improve effective coverage of priority interventions at sub-national level by tracking actions taken to address the root causes of key bottlenecks in the health interventions.
The Action Tracker App is developed and maintained by the HISP Community (University of Oslo (UiO), HISP-Tanzania and HISP Uganda) in collaboration with UNICEF. The Action Tracker v1.0.0.rc.0 is available for download on the Dhis app store. It is currently compatible with DHIS2 2.28 and above.

The Action Tracker App helps track the status of key steps taken to address the root causes of key bottlenecks in priority interventions. It is built within DHIS2 along side the BNA, Scorecard and Root Cause analysis Apps allowing systematic analysis, status update and follow up of actions taken to address possible solutions to key bottlenecks in health service delivery.
The Linked Action Tracker enables health managers track progress on implementation of actions for proposed solutions and allows for review and follow up of these actions. Following the design of BNA, Scorecard and Root Cause Analysis Apps in DHIS2, it was paramount to design the Action Tracker within DHIS2 to complete the cascade of Bottle Neck Analysis.
NOTE Linked Action Tracker App is dependent on BNA app implementation. All actions to be listed on Action Tracker App must be referencing bottlenecks identified using BNA app. You cannot implement Action Tracker App without a BNA app.
This user guide is documented using the Linked Action Tracker App which is available on the DHIS2 demo server. The Action Tracker is set up in the DHIS2 Demo server and with linkages to the BNA, Scorecard and Root Cause Analysis Apps. The current demo server can be accessed on: https://scorecard-dev.dhis2.org/demo/ with the username and password provided on the login page.
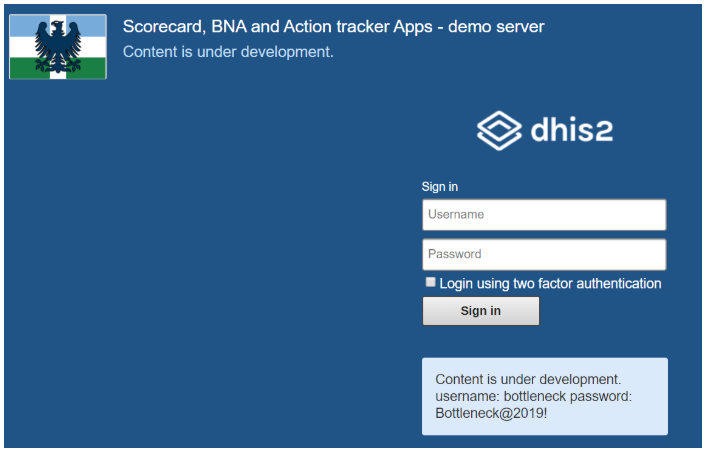
The server is hosted in the cloud and can be accessed on the internet via a browser from anywhere as long as there is availability of internet.
To browse the action tracker app, access the DHIS2 demo server with the login credentials provided on the page. Once logged in, search for Action Tracker on the Search bar.

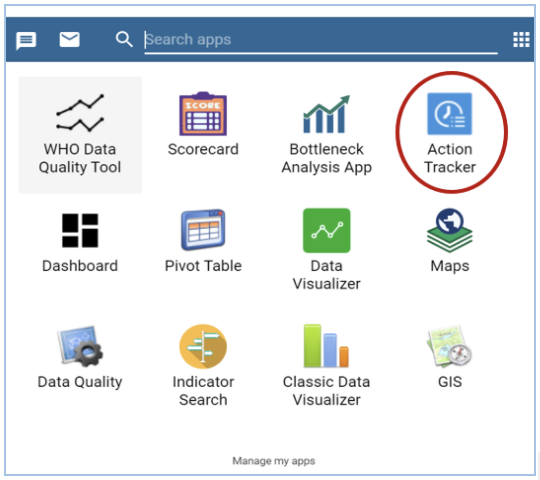
Click on the Action Tracker to load the Action Tracker App and once loaded, the user can select the intervention, period, organization unit or modify legend accordingly;
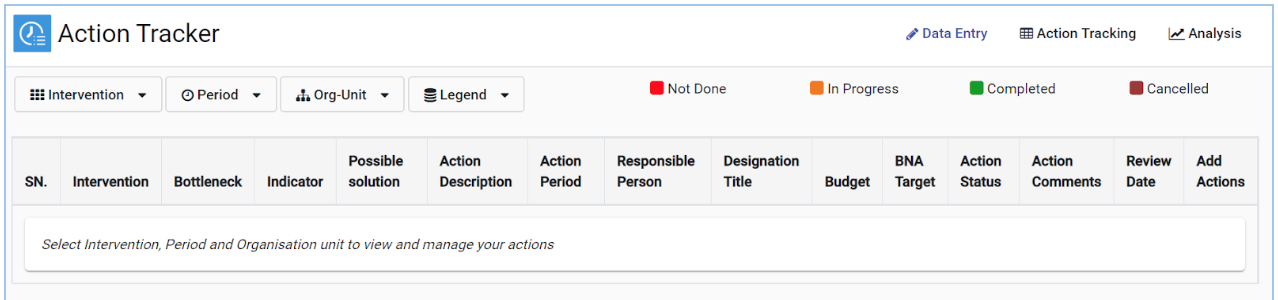
The user needs to select the intervention on which bottleneck analysis and root cause analysis were performed and would now like to track actions to improve that particular intervention.
Click on the intervention tab to display a list of all available interventions. 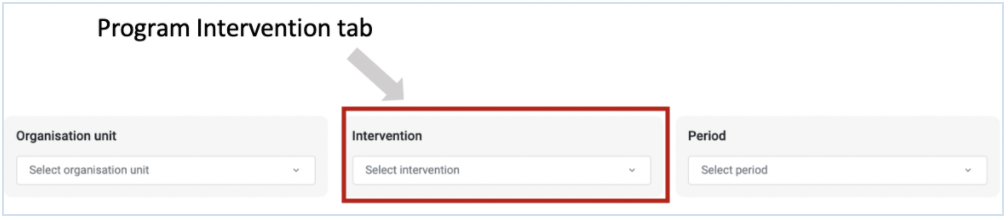
Click on the intervention for which a bottleneck was identified. This intervention will be selected and displayed to the right.
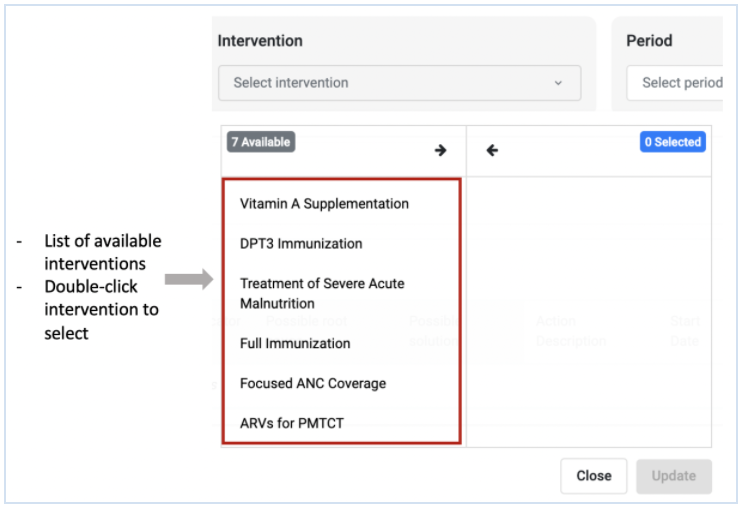
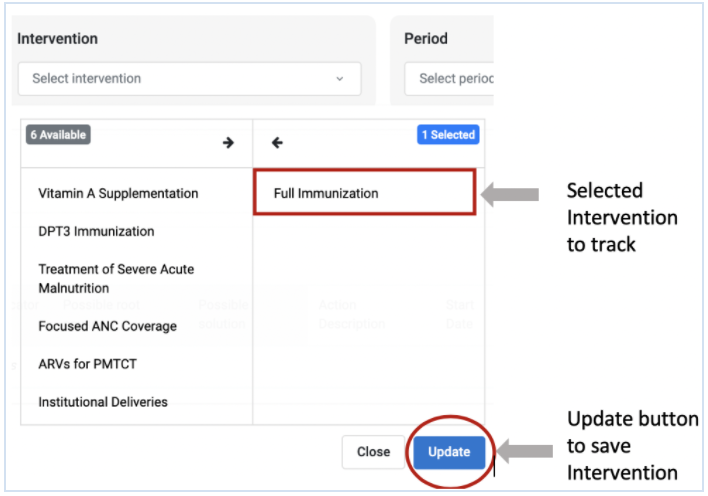
NOTE Selection of the wrong intervention will not display the Root Cause Analysis data on the Action Tracker.
The Action Tracker allows you to make period selections for fixed periods, relative periods and extended relative periods. All period selections types begin with clicking the period tab.
Click on the period tab to display the options 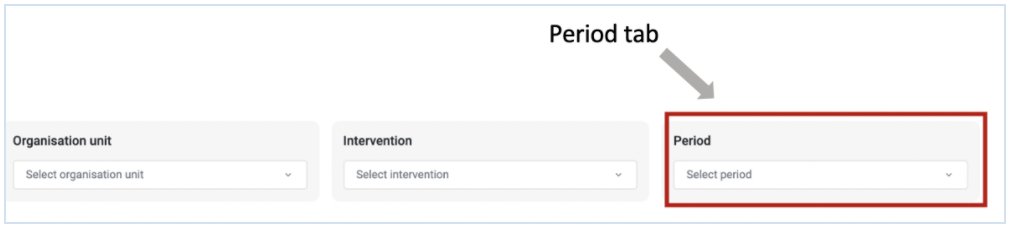
Click on the period type to select the desired type of period; either fixed periods or relative periods
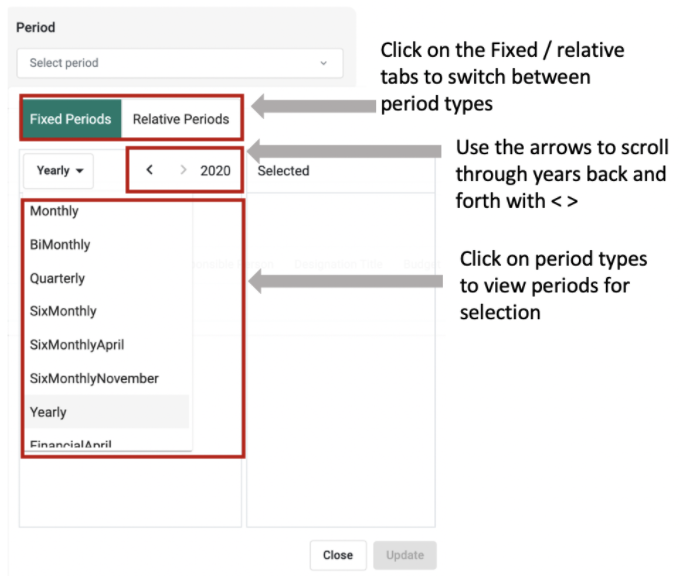
Select the desired period. This will appear to the right 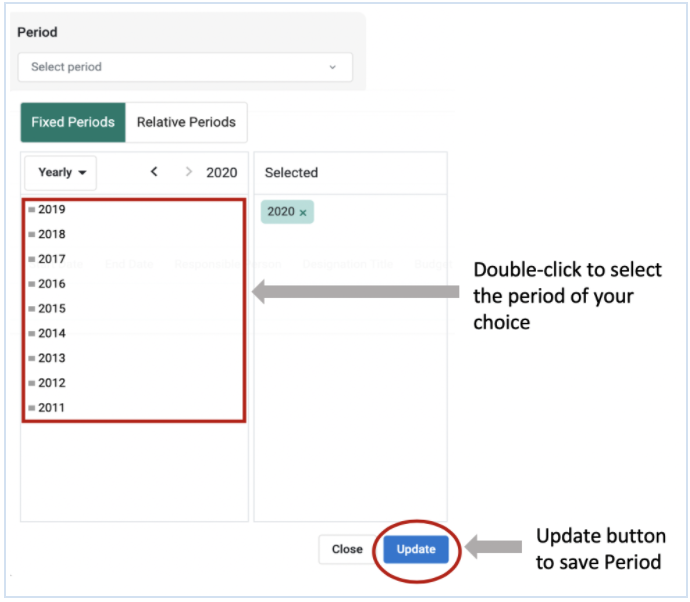
The orgunit selection allows you to select the org unit level for which actions will be tracked. This is the same level for which the root cause analysis was done.
Click on the Org unit tab to access organization unit selection options

Select the desired Orgunit level
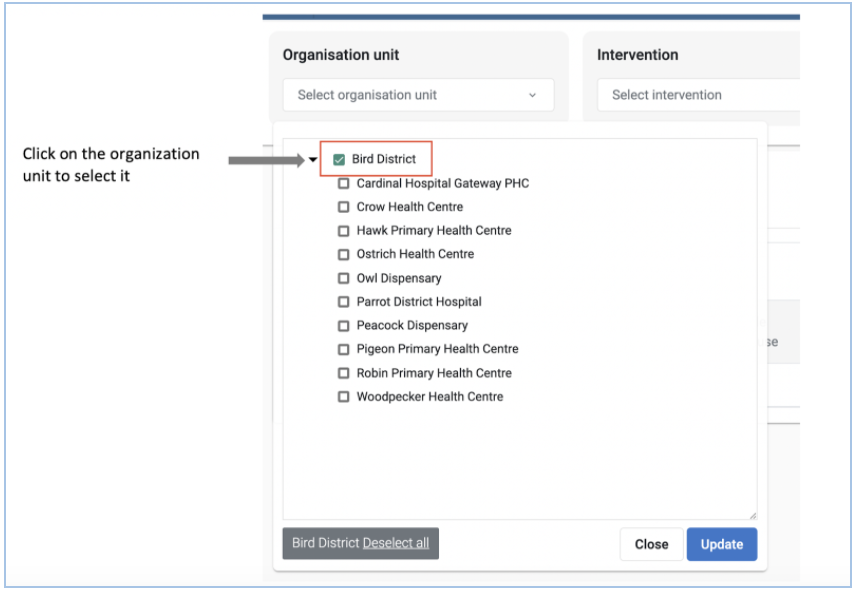
Click update to save the selected Orgunit level
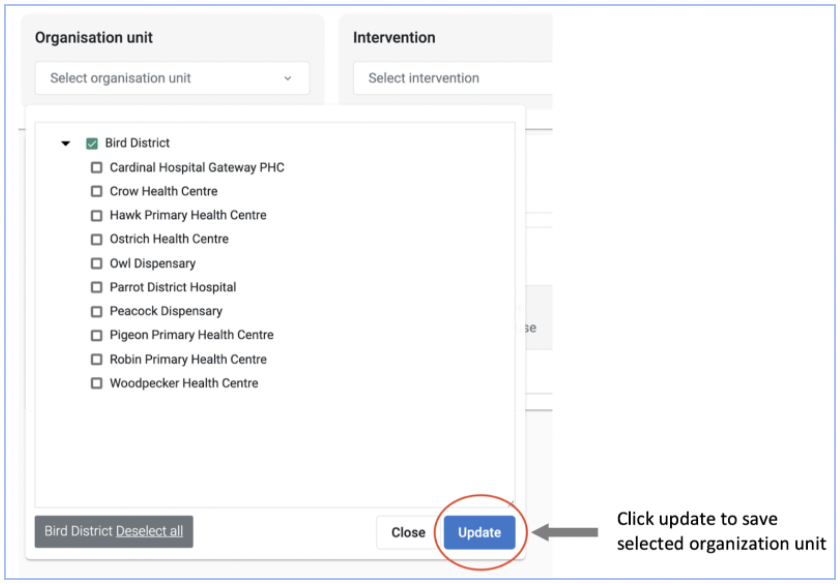
NOTE Selection of the wrong organization unit level will not display the Root Cause Analysis data on the Action Tracker
Once the organization unit is selected and saved, data from the root cause analysis table is retrieved and the data entry module activated to allow entry and editing of the action tracker.
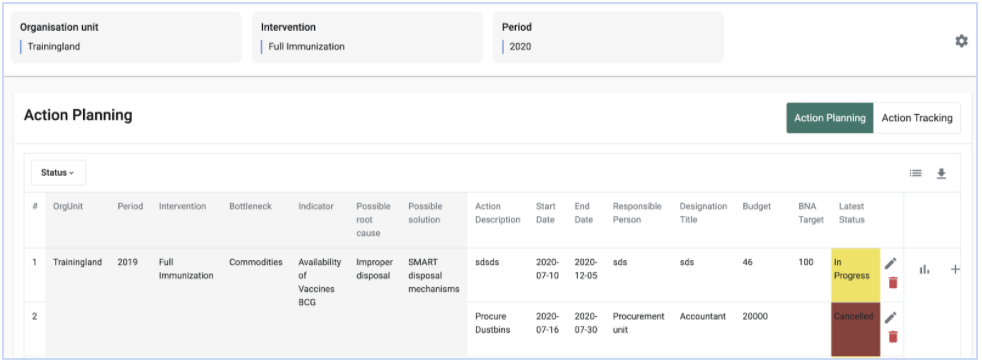
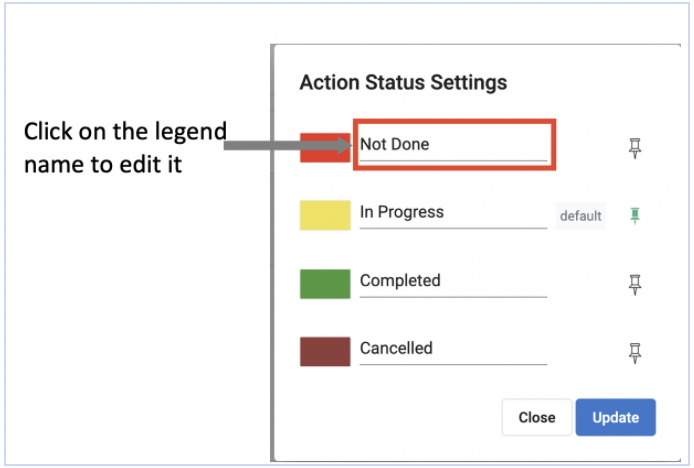
The user can modify the legend based on the number of stages for tracking the action status. Currently the Action Tracker has 4 colour codes which indicate the levels through which the actions are tracked; Maroon indicates “Cancelled”, Yellow indicates “In Progress”, Green indicated “Completed”, Red indicates the action was “Not Done.”
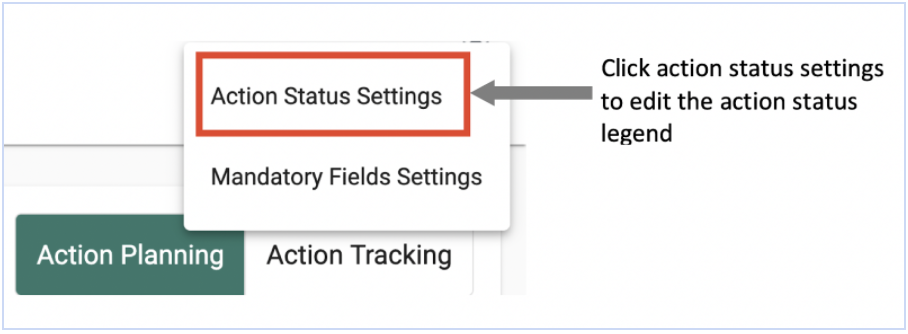
Click on the settings icon in the right upper corner to edit the action status settings 
Click on the colour tabs to edit the colours
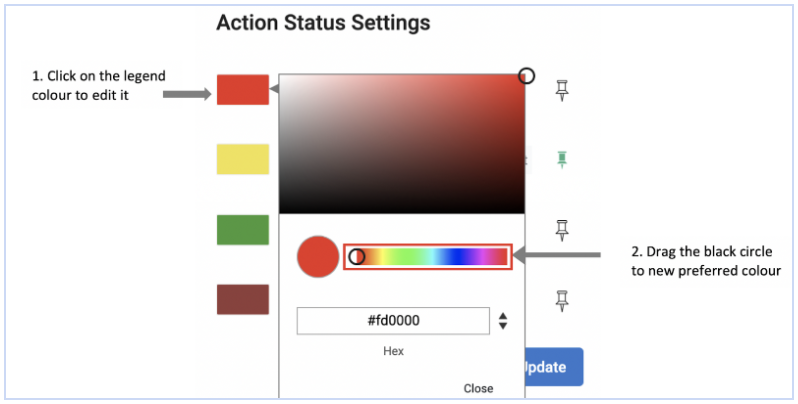
Edit the legend to the desired legend name.
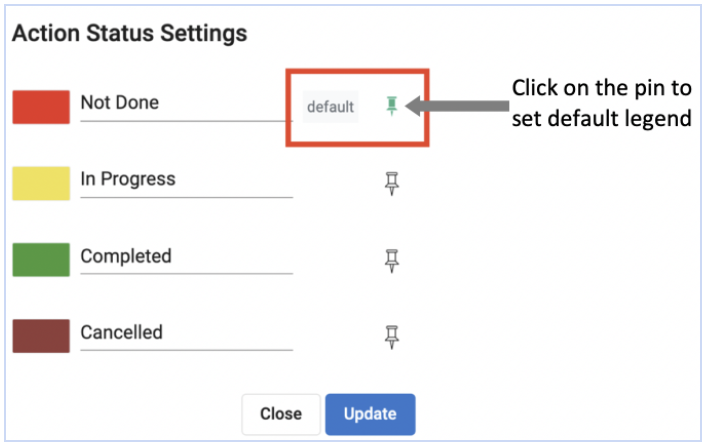
Set default legend by clicking on the pin. The pin will turn green. This will be the legend that appears once you start action tracking
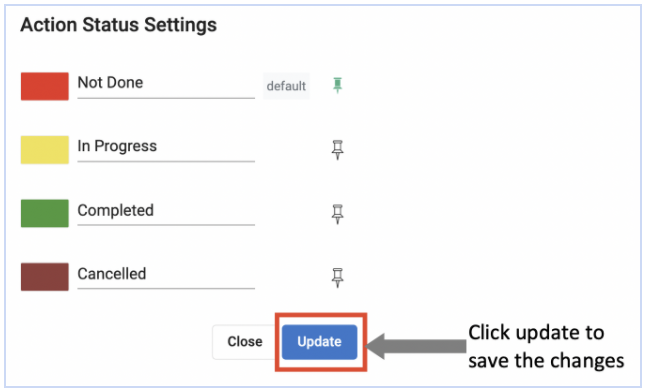
Click update to save the changes made to the legend
Note:
Access to configuration of legends depends on user’s access roles
Click on the settings icon in the right upper corner to edit the Mandatory Fields settings
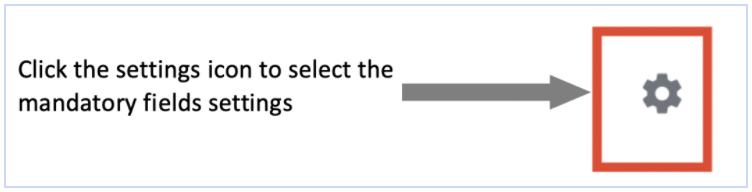
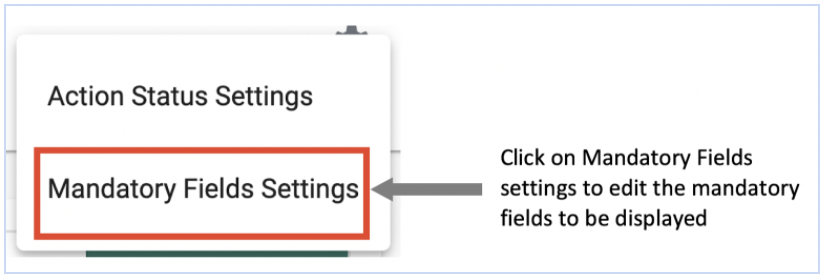
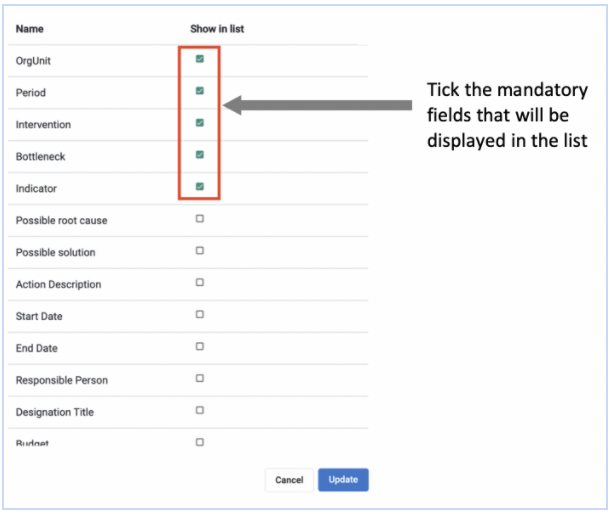
Select the mandatory fields that should be displayed on the list during Action tracking.
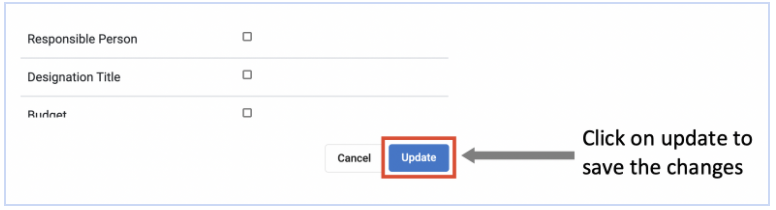
Note:
Access to configuration of Mandatory Field Settings depends on user’s access roles.
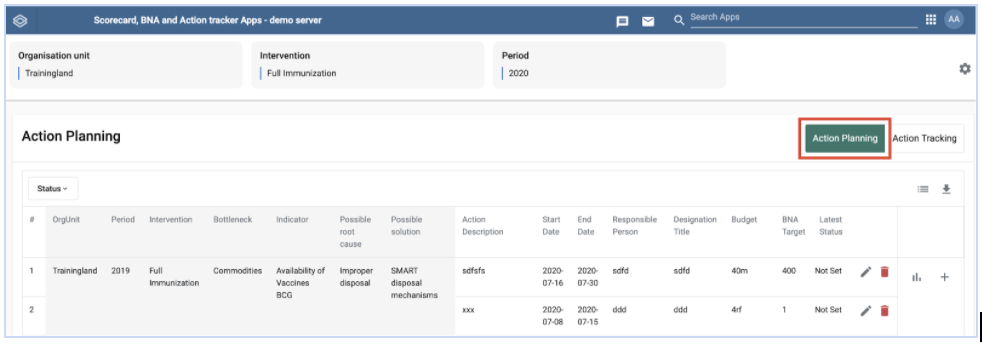
The action planning section allows you to record actions aimed at addressing the root causes of bottlenecks in the different determinants of health coverage. It provides a description of the actions required to address a specific problem, states the period within which this action should be done, responsible person, status of completion, review date and provides for any review notes.
To access Action Planning option click on Action Planning tab 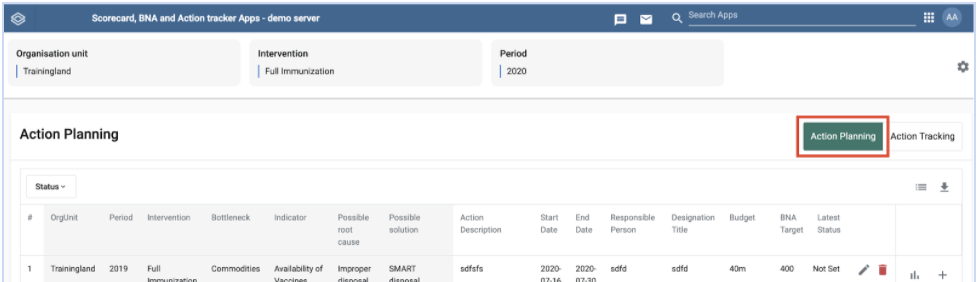
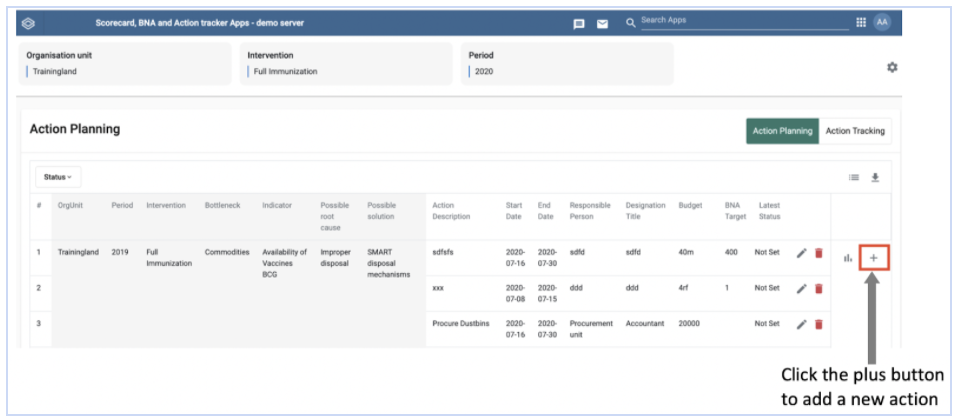
To access option for adding new action, right click on the intervention on Add Actions column
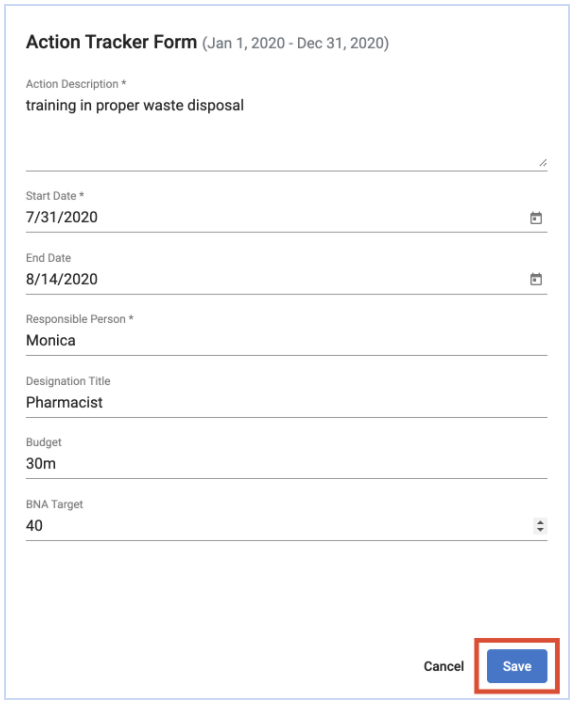
This field (see Figure 2.1-C above) allows you to describe in detail the specific actions that will be taken to arrive at the proposed solution. The action recorded should be clear and specific. Only one action should be recorded and in case the proposed solution requires more than one, then another action is recorded as indicated in 2.1.B above.
These fields (see Figure 2.1-C above) are for the period over which it is anticipated that the action will be performed.
These fields ((see Figure 2.1-C above) allow you to record the person who will be responsible for this action and their designation. This is important for follow up and progress of execution of the action.
This field allows you to record the amount of money that has been allocated to execute the action.
This field allows you to record the desired value to be attained by this indicator over a given period. This should not be an arbitrary figure, however, it should be derived from approved program targets that were set by the respective program.
Once all the fields on Figure 2.1-C above have been filled, click on “update” to save the information in the action tracker.
In cases where the possible solution requires more than one action, additional actions can be added using the add button in the last column to the right (See Figure 2.1-B above). Click the 
To Edit or Delete an entry, right click on any cell for a given intervention and edit or delete an entry accordingly.
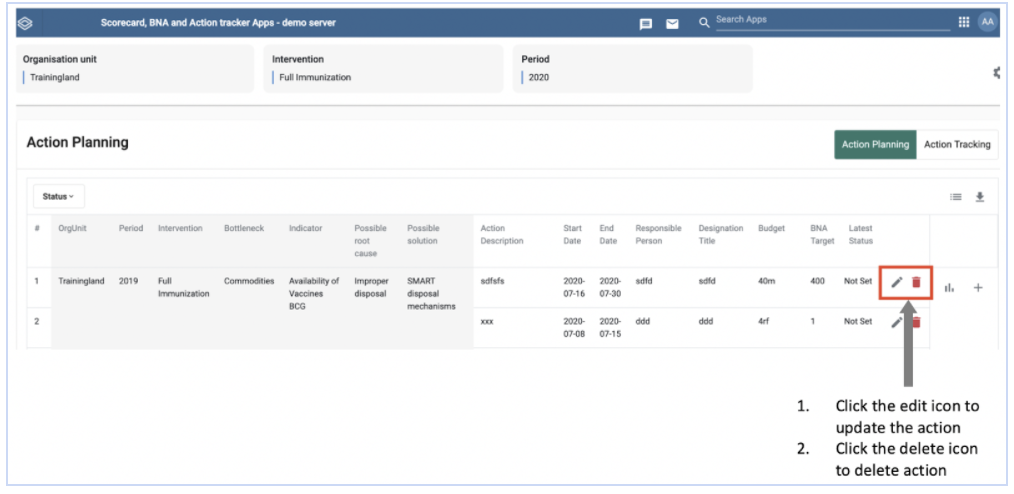
To edit the action, after clicking edit (Figure 2.1.2-A), update the data entry field where you want to make changes then click save (see Figure 2.1-D above)
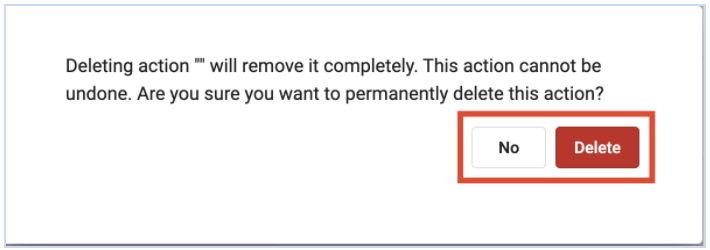
To delete the action, after clicking the delete icon (Figure 2.1.2-A), click Yes if you are sure you want to delete action or click No if you don’t want to delete the action (Figure 2.1.2-B)
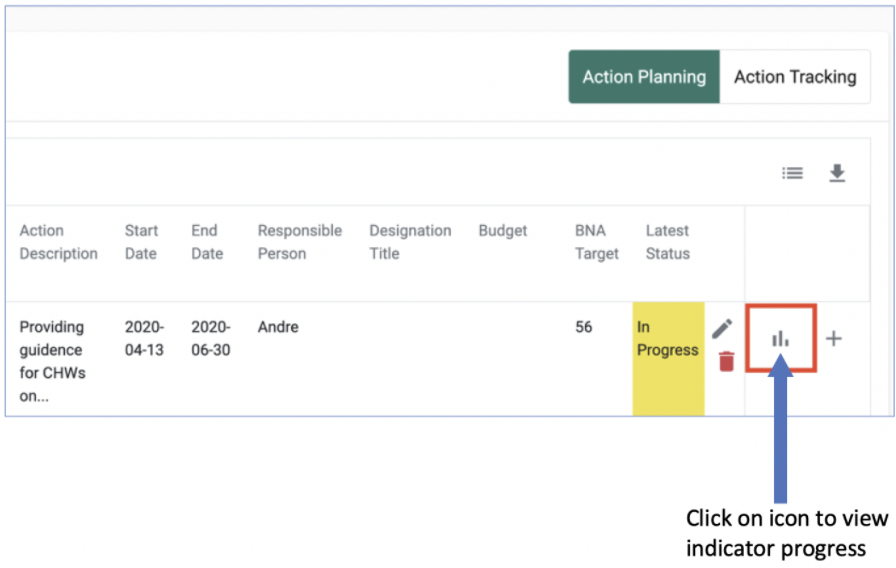
To view the performance of the indicator over a period of time. Click on the chart icon.
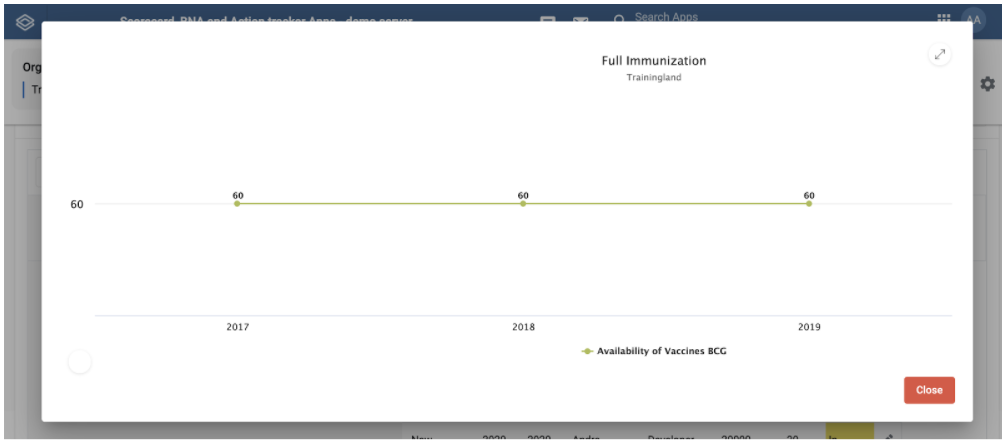
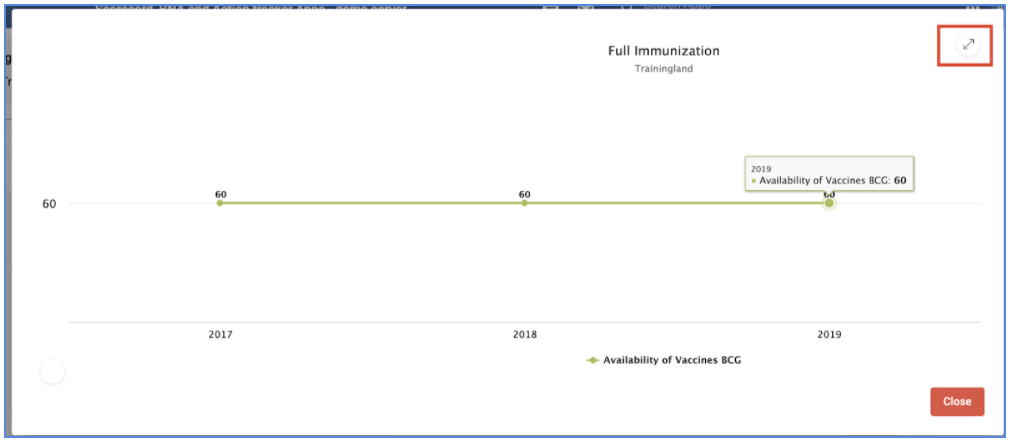
Hover over the graph points to view more details about the indicator.
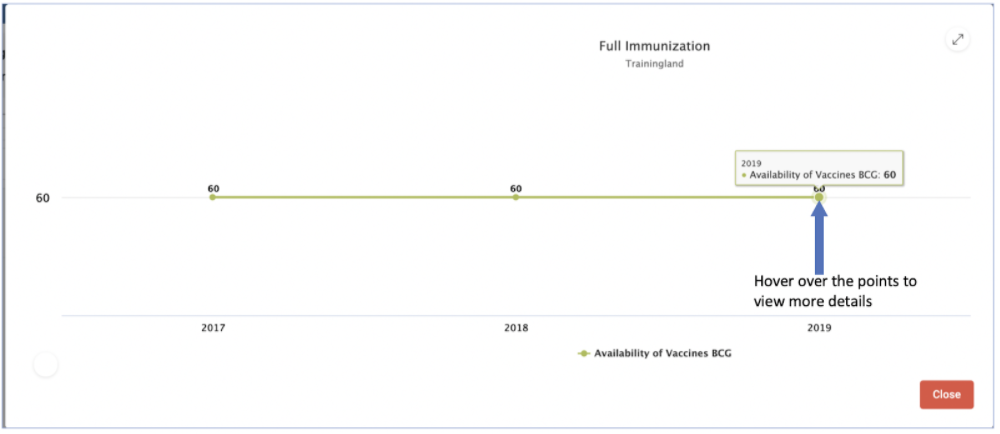
Click on the resize button to view the graph in full screen or to exit the full screen
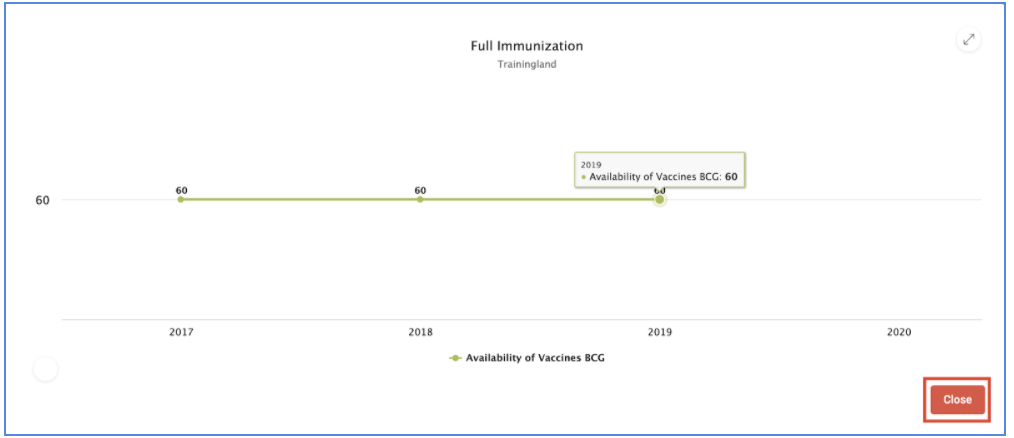
Click on the close tab to close the graph
The action tracking section allows you to track progress of implementation of the actions and allows users to update the implementation status of the and review. It provides updates of the status of actions; whether they are not done, in progress, completed or cancelled. It allows for comments on selected status and selection of a period when the action will be next reviewed.
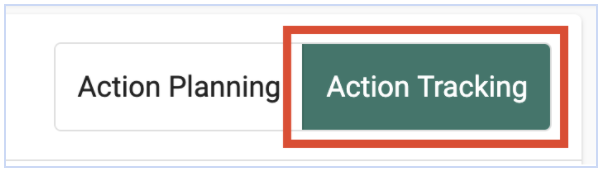
To access the action tracking options, click on the Action Tracking tab.
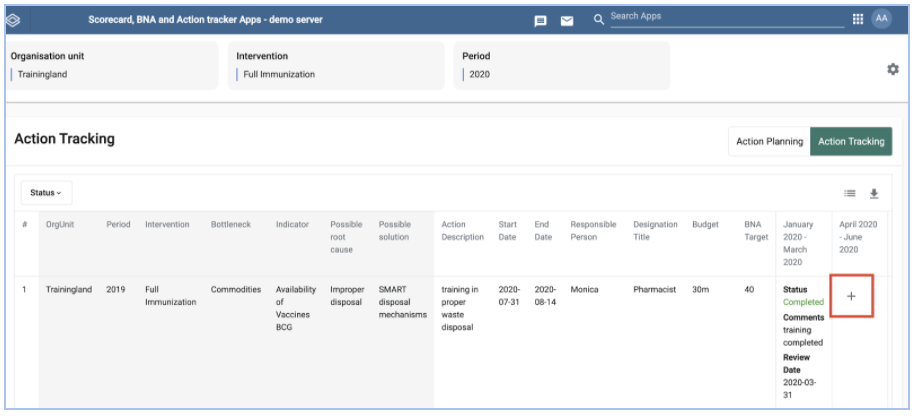
To update progress on implementation of an action, click on the add button in the reporting period
To select the action status, click on the drop down arrow to the extreme right under action status to select the current status of the action
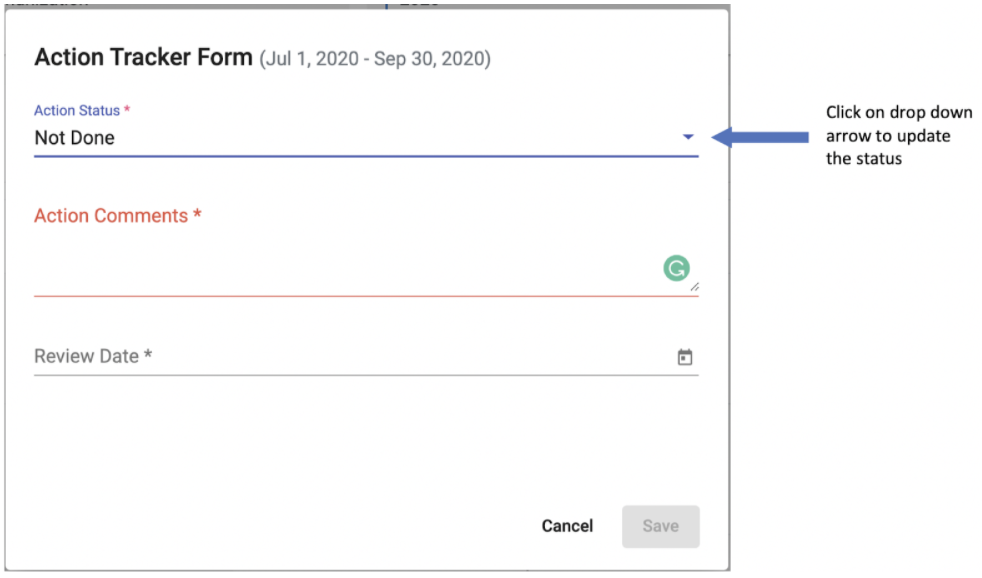
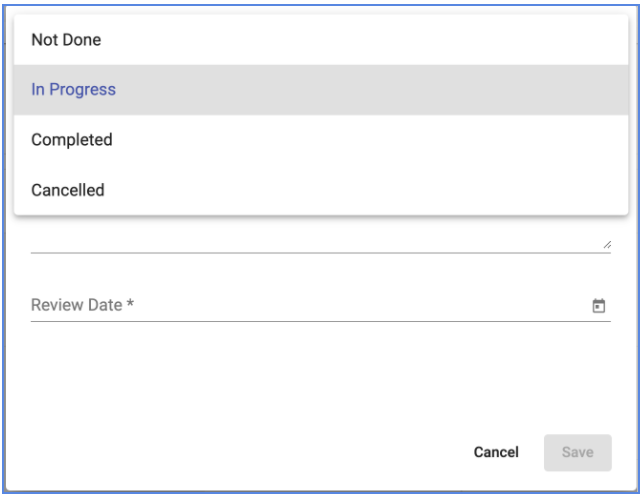
Select the current status of the action from the drop down list
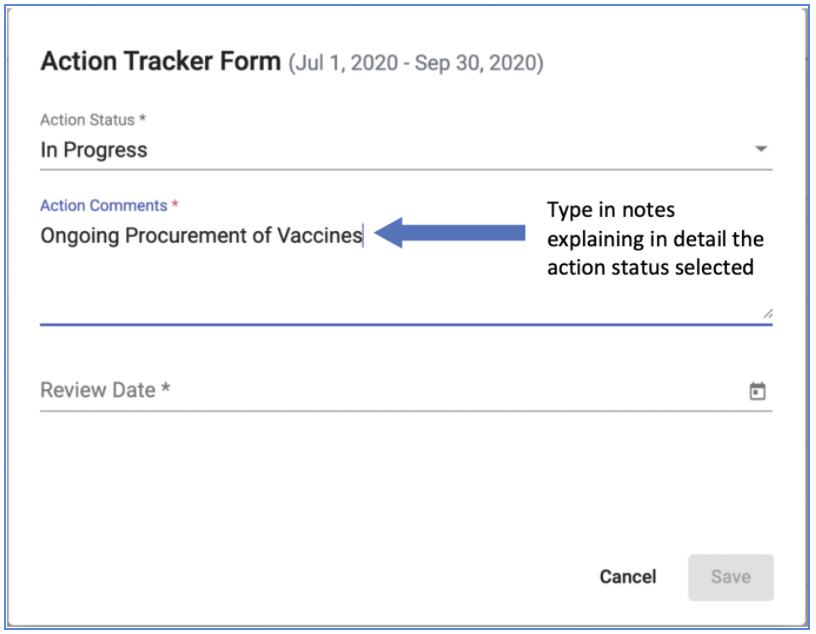
Type in the Action comments section to provide more description of the selected status.
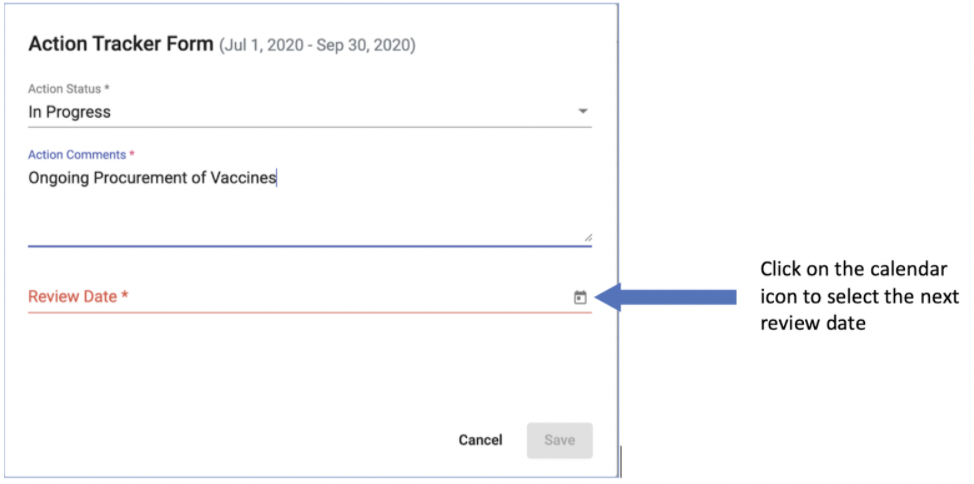
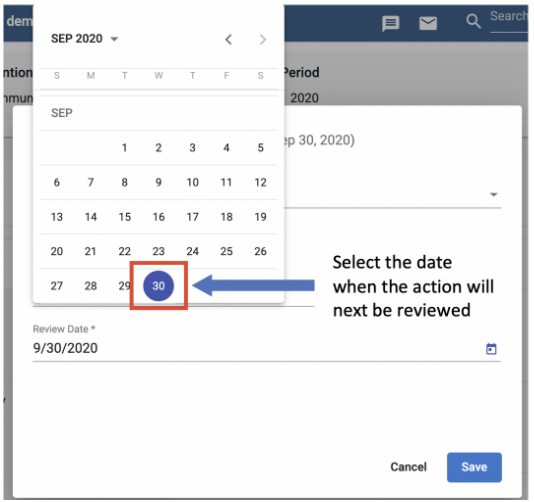
Select the date within the quarter when the action will next be reviewed.
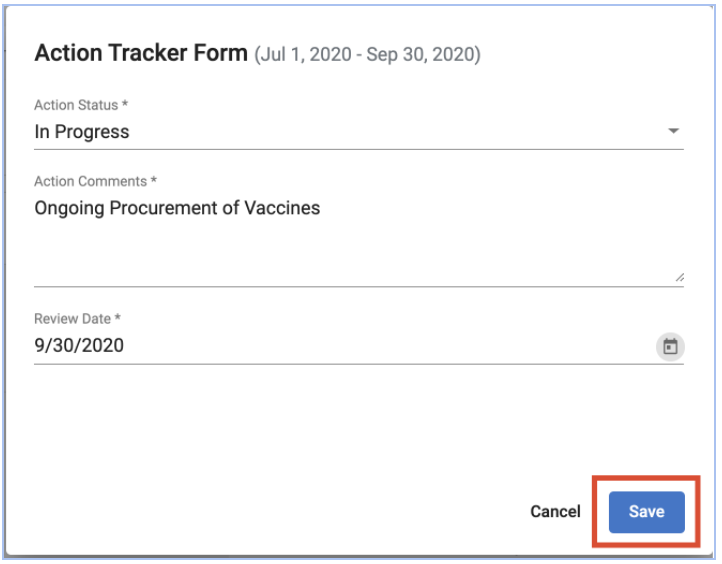
To save the updated action status. Click on the save button.
Note:
The Save button is only activated when all the fields have been filled.
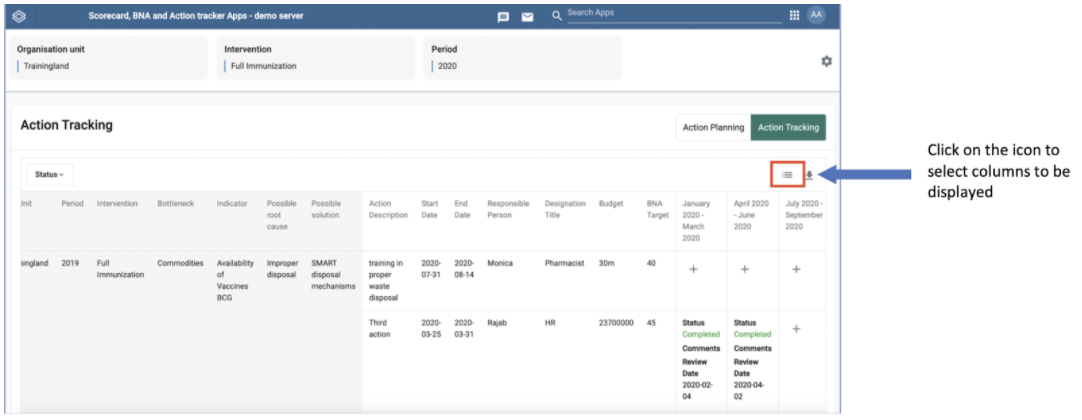
To select columns to be displayed on the action tracking table, click on the list icon in the right corner above the table.
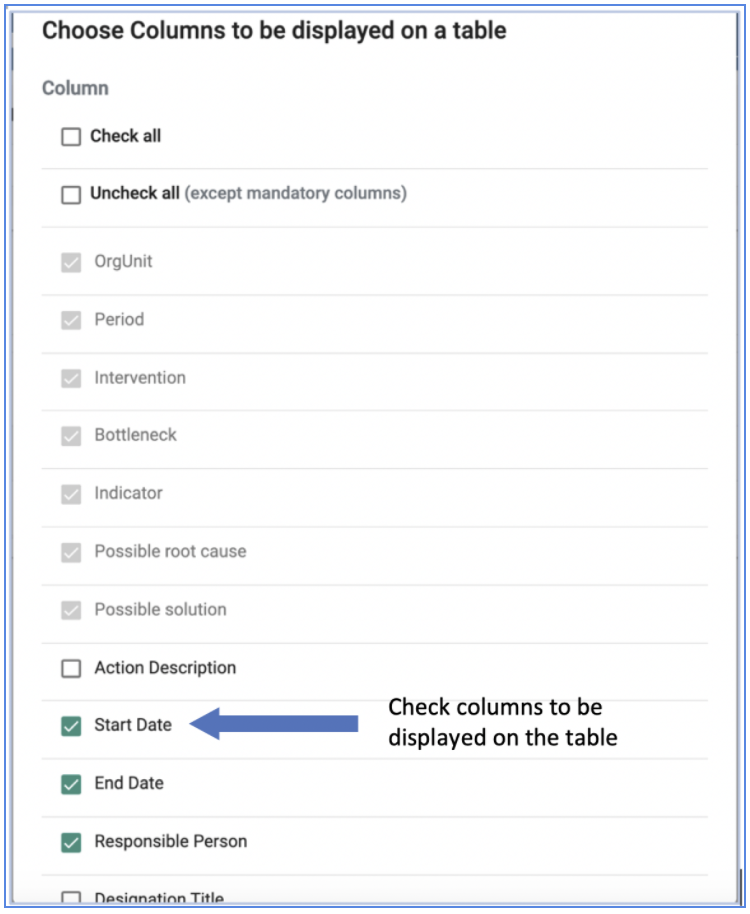
Check the boxes for the columns to be displayed on the table.
Note:
Mandatory columns cannot be unchecked and will always be displayed on the table.
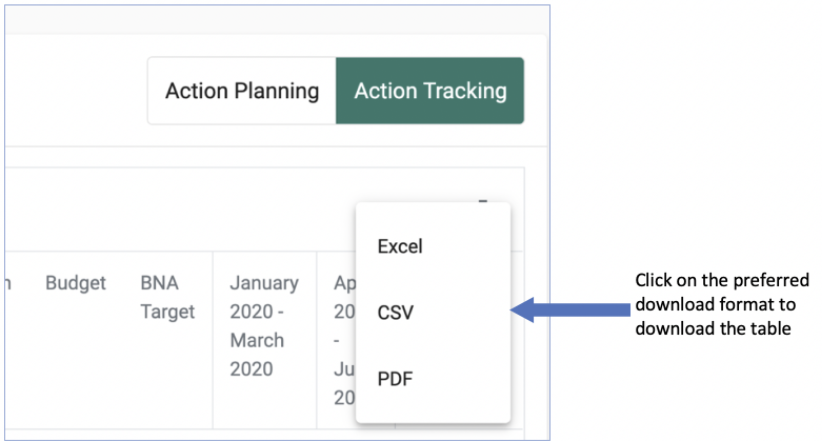
To download list of actions tracked click on the export icon to get options of formats to download
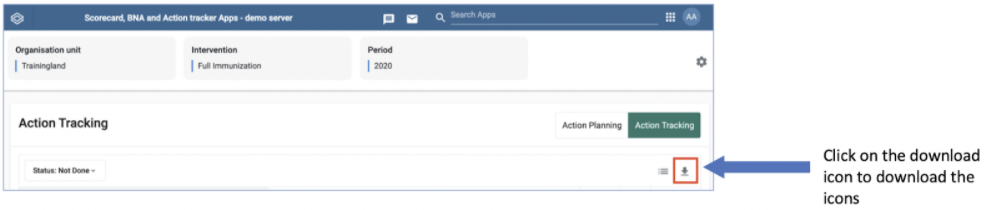
Select the preferred file format to download and follow steps on your browser for saving downloaded files. Available formats for download include CVS, Excel and PDF
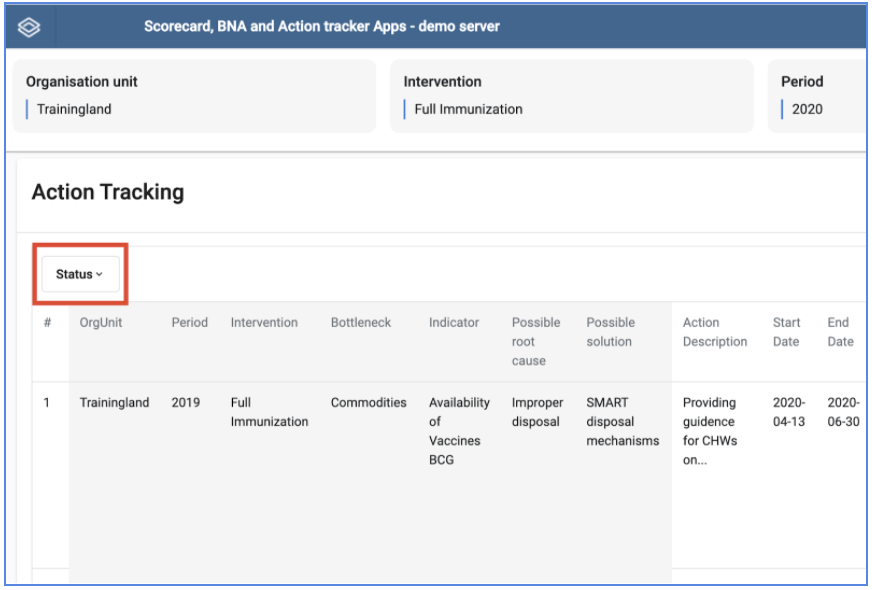
This allows one to select and display only actions of a particular status; not done, in progress, completed or cancelled in the table. To filter Actions to display in the table. Click on the status tab at the left upper side of the table.
Select the preferred status; not done, in progress, completed or cancelled from the drop down list. This will only display actions of the selected status 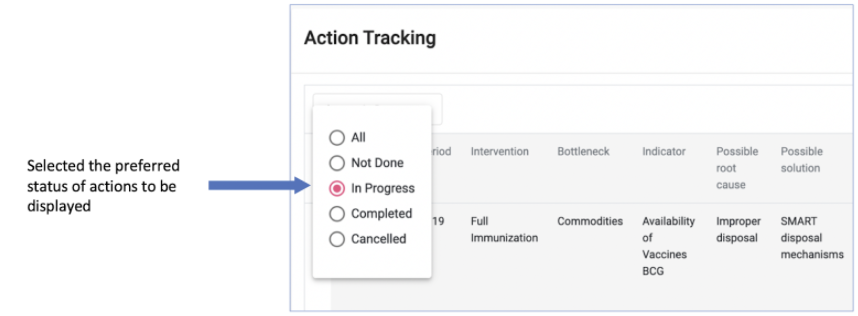
If the Action Tracker application is taking too long to load, and you’re not on a slow network, make sure you have cleared your browser cache.
Action Tracker Application makes good use of cached files for better offline experience, as a result, when installing higher version, Action Tracker Application may use older version of cached files and thus break down while loading.
Approaches to clear application cache and browser interface vary from browser to browser; for example for Mozilla Firefox the keyboard shortcut is “CTRL+SHIFT+DELETE” while for Google chrome the keyboard shortcut is “CTRL+SHIFT+J”.
Accessing interface for clearing browser cache can be done via the following approaches:
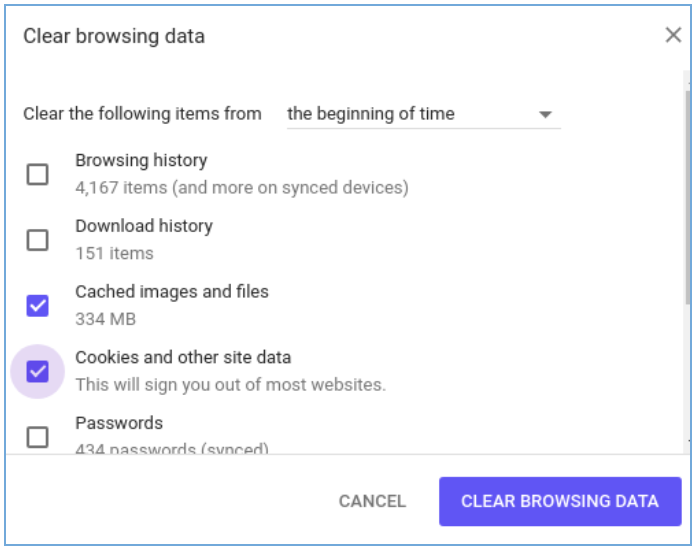
• Google chrome: Go to the menu icon on the top right corner, and click it to open, go to more tools menu, and choose “Clear browsing data”. Once the interface is open, Make sure, “Clear the following items from” is set to “The beginning of time”.
• Mozilla Firefox: Go to the menu icon on the top right corner, and click it to open, go to ->Library, and go to History, and choose “Clear recent history”. Once the interface is open, Make sure “Time range to clear” is set to “Everything”, and “Details” option is expanded to show all details options. Once on the clear browsing data or recent history, tick “Cache”, “Cookies”, “Hosted app data” or “Offline Website data”. To clear all cached files, cookies and locally stored data by bottleneck .
Note:
These will also clear all cache information and cookies from other websites you visited in your browser.