Nakonfigurujte metadata
O aplikaci Údržba
V aplikaci Údržba konfigurujete všechny objekty metadat, které potřebujete ke shromažďování a analýze dat:
-
Kategorie
-
Datové prvky
-
Datové sady a formuláře pro zadávání údajů
-
Indikátory
-
Organizační jednotky
-
Pravidla ověřování
-
Atributy
-
Konstanty
-
Sady možností
-
Legendy
-
Prediktory
-
Nabízené zprávy
-
Externí mapové vrstvy
-
Zobrazení SQL
-
Národní prostředí
-
Hooks analytické tabulky
Poznámka
Funkce, ke kterým máte přístup, závisí na přístupu vaší uživatelské role a oprávnění.
Navigace v objektech metadat
Objekty metadat jsou uvedeny v seznamu s předdefinovanými sloupci, které jsou relevantní pro každý objekt. Můžete upravit, které sloupce se zobrazí v seznamu pro aktuální objekt. Tyto úpravy se vztahují na uživatele, a proto nebudou mít vliv na ostatní uživatele. Všimněte si, že tyto změny nezmění žádná metadata, pouze způsob prezentace seznamu.
Správa viditelných sloupců

- Klepněte na ikonu
 v pravém horním rohu seznamu objektů, které chcete konfigurovat.
 - Zobrazí se rozbalovací nabídka a vyberte možnost Spravovat sloupce.
- Zobrazí se dialogové okno s vybranými výchozími sloupci.
- Kliknutím na název libovolného sloupce v seznamu Dostupné sloupce je přidáte do seznamu vybraných sloupců.
- Pořadí vybraných sloupců můžete změnit přetažením ikony
 .
. - Libovolný sloupec můžete ze zobrazení také odebrat kliknutím na ikonu X vedle názvu.
- Click Save once you are satisfied with your changes.
Výchozí hodnoty můžete snadno obnovit kliknutím na tlačítko Obnovit výchozí.
Stáhnout metadata
Můžete si stáhnout metadata pro objekt, který si právě prohlížíte. Stahování metadat bude respektovat všechny filtry, které máte pro seznam aktivní.
- Klepněte na ikonu v pravém horním rohu seznamu objektů, které chcete konfigurovat.
- Zobrazí se rozbalovací nabídka a vyberte možnost Stáhnout.
- Zobrazí se dialogové okno, kde můžete vybrat požadovaný formát a kompresi.
- Se sdílením lze vybrat, aby zahrnovala data sdílení pro metadata.
Spravujte kategorie
O kategoriích
Kategorie jsou obvykle pojem, například „Pohlaví“, „Věk“ nebo „Stav nemoci“. Datové prvky, jako je „Počet případů potvrzené malárie“, jsou často rozděleny na menší části, aby se určil například počet potvrzených případů malárie u konkrétních věkových skupin.
Pomocí kategorií rozdělíte datové prvky na jednotlivé komponenty. Můžete také použít kategorie k přiřazení atributů metadat ke všem údajům zaznamenaným v konkrétní datové sadě, například „Implementující partner“ nebo „Financující agentura“.
Vytvořte tři kategorie: „Méně než 1“, „1-5“ a „Více než 5“. Přiřaďte je jako kategorie k datovému prvku. Tím se vytvoří tři samostatná pole pro tato data ve formulářích pro zadávání dat:
-
Počet potvrzených případů malárie (pod 1)
-
Počet potvrzených případů malárie (1-5)
-
Počet potvrzených případů malárie (více než 5)
Bez kategorií byste museli každý z výše uvedených datových prvků vytvořit samostatně.
V aplikaci Údržba spravujete následující a kategorie objekty:
Tabulka: Objekty kategorie v aplikaci Údržba
| Typ objektu | Dostupné funkce |
|---|---|
| Možnost kategorie | Vytvářejte, upravujte, klonujte, sdílejte, odstraňujte, zobrazujte podrobnosti a překládejte |
| Kategorie | Vytvářejte, upravujte, klonujte, sdílejte, odstraňujte, zobrazujte podrobnosti a překládejte |
| Kombinace kategorií | Vytvářejte, upravujte, klonujte, sdílejte, odstraňujte, zobrazujte podrobnosti a překládejte |
| Kombinace možností kategorie | Upravit a zobrazit podrobnosti |
| Skupina možností kategorie | Vytvářejte, upravujte, klonujte, sdílejte, odstraňujte, zobrazujte podrobnosti a překládejte |
| Sada skupin možností kategorie | Vytvářejte, upravujte, klonujte, sdílejte, odstraňujte, zobrazujte podrobnosti a překládejte |
Pracovní postup
-
Vytvořte všechny možnosti kategorií.
-
Vytvářejte kategorie složené z několika možností kategorií, které máte vytvořeny.
-
Vytvářejte kombinace kategorií složené z jedné nebo více kategorií.
-
Vytvořte datové prvky a přiřaďte je ke kombinaci kategorií.
Vytvořte nebo upravte možnost kategorie
Pokud je to možné, recyklujte možnosti kategorií. Mohou například existovat dvě kategorie, které mohou sdílet možnost konkrétní kategorie (například \<1 rok věku). Při vytváření kategorií lze tuto možnost kategorie znovu použít. To je důležité, pokud je třeba analyzovat konkrétní možnosti kategorie (nebo kombinace možností kategorie), které je třeba analyzovat společně.
-
Otevřete aplikaci Údržba a klikněte na Kategorie > Možnosti kategorie.
-
Klikněte na tlačítko Přidat.
-
Vyplňte formulář:
-
Název
-
Krátký název (volitelně)
-
Kód (volitelně)
-
Form name (optional) Category options can have a form name. These will be displayed in the data entry app as a column header instead of the display name for the respective category option.
-
Popis
-
Datum zahájení (volitelně)
-
Datum ukončení (volitelně)
-
-
Vyberte organizační jednotky a přiřaďte je.
Tip
You can automatically select all organisation units that belong to an organisation unit level or organisation unit group, for example "Chiefdom" or "Urban". To do this:
Select an Organisation unit level or Organisation unit group and click Select.
-
Klikněte Uložit.
Vytvořte nebo upravte kategorii
Když jste pro konkrétní kategorii vytvořili všechny možnosti kategorií, můžete tuto kategorii vytvořit.
-
Otevřete aplikaci Údržba a klikněte na Kategorie > Kategorie.
-
Klikněte na tlačítko Přidat.
-
Vyplňte formulář:
-
Název
-
Krátký název
-
Kód
-
Popis
-
Typ datové dimenze
A category can either be of type "Disaggregation" or "Attribute". Pro rozčlenění datových prvků vyberete Rozčlenění. Typ datové dimenze „Atribut“ umožňuje kategorie, která se má použít k přiřazení kombinace kategorií a data zaznamenaná prostřednictvím datové sady.
-
Datová dimenze
If you select Data dimension, the category will be available to the analytics as another dimension, in addition to the standard dimensions of "Period" and "Organisation unit".
-
-
Vyberte možnosti kategorií a přiřaďte je.
-
Klikněte Uložit.
Vytvořte nebo upravte kombinaci kategorií
Category combinations let you combine multiple categories into a related set.
You can disaggregate the data element "Number of new HIV infections" into the following categories:
-
Služba HIV: „Jiné“, „PMTCT“, „TB“
-
Pohlaví "muž", "žena"
In this example, there are two levels of disaggregation that consist of two separate data element categories. Each data element category consists of several data element category options.
V DHIS2 jsou různé datové prvky rozděleny podle společného souboru kategorií. Spojením těchto různých kategorií do kombinace kategorií a přiřazením těchto kombinací datovým prvkům můžete rychle použít příslušné úrovně členění na velké množství datových prvků.
-
Otevřete aplikaci Údržba a klikněte na Kategorie > Možnosti kombinace.
-
Klikněte na tlačítko Přidat.
-
Vyplňte formulář:
-
Název
-
Kód
-
Typ datové dimenze
-
Přeskočit kategorie celkem v přehledech
-
-
Vyberte kategorie a přiřaďte je.
-
Klikněte Uložit.
Vytvořte nebo upravte skupinu možností kategorie
Možnosti kategorií můžete seskupit a klasifikovat pomocí skupin možností kategorií. Hlavním účelem sady skupin možností kategorií je přidat do vašich zachycených dat pro analýzu další dimenzi, například v aplikacích Kontingenční tabulka nebo Datový Visualizer.
Consider a system where data is collected by "projects", and projects are modelled as category options. The system must be able to analyse data based on which donor supports the project. In this case, create a category option group set called "Donor". Each donor can be created as a category option group, where each category option / project is put in the appropriate group. In the data analysis applications, the "Donor" group set will appear as a data dimension, while each donor appears as a dimension item, ready to be included in reports.
Vytvoření skupiny možností kategorie:
-
Otevřete aplikaci Údržba a klikněte na Kategorie > Možnosti option group.
-
Klikněte na tlačítko Přidat.
-
Vyplňte formulář:
-
Název
-
Krátký název: Definujte krátký název pro datový prvek.
-
Kód
-
Popis
-
Typ datové dimenze
-
-
Vyberte Možnosti kategorie a přiřaďte je.
-
Klikněte Uložit.
Vytvořte nebo upravte sadu skupin možností kategorií
Skupiny možností kategorií můžete seskupovat do sad skupin možností kategorií. Hlavním účelem sady skupin možností kategorií je přidat zachyceným datům více dimenzí pro analýzu například v aplikacích Kontingenční tabulka nebo Visualizer dat.
-
Otevřete aplikaci Údržba a klikněte na Kategorie > Možnosti option group set.
-
Klikněte na tlačítko Přidat.
-
Vyplňte formulář:
-
Název
-
Krátký název
-
Popis
-
Datová dimenze
-
Typ datové dimenze
-
-
Vyberte Skupiny možností kategorie a přiřaďte je.
-
Klikněte Uložit.
Pro datové sady použijte kombinace kategorií
When categories and category combinations have the data dimension type "Attribute", they can apply a common set of attributes to a related set of data values contained in a data set. When category combinations are used as an attribute, they serve as another dimension (similar to "Period" and "Organisation unit") which you can use in your analysis.
Suppose that an NGO is providing ART services in a given facility. They would need to report each month on the "ART monthly summary", which would contain a number of data elements. The NGO and project could potentially change over time. In order to attribute data to a given NGO and project at any point in time, you need to record this information with each data value at the time of data entry.
-
Create two categories with the data dimension type "Attribute": "Implementing partner" and "Projects".
-
Create a category combination with the data dimension type "Attribute": "Implementing partners and projects".
-
Přiřaďte vytvořené kategorie ke kombinaci kategorií.
-
Create a data set called "ART monthly summary" and select the "Implementing partners and projects" category combination.
When you enter data in the Data entry app, you can select an "Implementing partner" and a "Project". Each recorded data value is assigned a specific combination of these categories as an attribute. These attributes (when specified as a dimension) can be used in the analysis applications similar to other dimensions, for example the period and organisation unit.

Přiřaďte kód kombinaci možností kategorie
Kombinaci možností kategorie můžete přiřadit kód. To usnadňuje výměnu dat mezi DHIS2 a externími systémy. Systém vytváří kombinace možností kategorií automaticky.
-
Otevřete aplikaci Údržba a klikněte na Kategorie > Možnosti option combination.
-
V seznamu najděte objekt, který chcete upravit.
-
Klikněte na nabídku možností a vyberte Upravit.
-
Zadejte kód.
-
Klikněte Uložit.
Clone metadata objects
Klonování datového prvku nebo jiných objektů může ušetřit čas při vytváření mnoha podobných objektů.
-
Otevřete aplikaci Údržba a najděte typ objektu metadat který chcete klonovat.
-
V seznamu objektů klikněte na nabídku možností a vyberte Klonovat.
-
Upravte požadované možnosti.
-
Klikněte Uložit.
Změňte nastavení sdílení pro objekty metadat
Objektům metadat můžete přiřadit různá nastavení sdílení, například organizační jednotky a atributy sledovaných entit. Tato nastavení sdílení určují, kteří uživatelé a skupiny uživatelů mohou zobrazit nebo upravit objekt metadat.
Some metadata objects also allow you to change the sharing setting of data entry for the object. These additional settings control who can view or enter data in form fields using the metadata.
Poznámka
Výchozí nastavení je, že každý (Veřejný přístup) může najít, prohlížet a upravovat objekty metadat.
-
Otevřete aplikaci Údržba a najděte typ objektu metadat chcete upravit.
-
In the object list, click the context menu and select Sharing settings.
-
(Optional) Add users or user groups: search for a user or a user group and select it. The user or user group is added to the list.
-
Změňte nastavení sdílení pro skupiny přístupu, které chcete upravit.
-
Can edit and view: The access group can view and edit the object.
-
Může pouze zobrazit: Přístupová skupina může zobrazit objekt.
-
No access (only applicable to Public access): The public won't have access to the object.
-
-
Change data sharing settings for the access groups you want to modify.
-
Can capture data: The access group can view and capture data for the object.
-
Can view data: The access group can view data for the object.
-
No access: The access group won't have access to data for the object.
-
-
Klikněte na Zavřít.
Odstraňte objekty metadat
Poznámka
Datový prvek a další objekty datových prvků můžete odstranit, pouze pokud k samotnému datovému prvku nejsou přidružena žádná data.
Varování
Jakákoli sada dat, kterou ze systému odstraníte, je nenávratně ztracena. Odebrány budou také všechny formuláře pro zadávání údajů a formuláře oddílů, které mohly být vyvinuty. Před odstraněním jakékoli datové sady se ujistěte, že jste vytvořili zálohu své databáze, pro případ, že byste ji v určitém okamžiku potřebovali obnovit.
-
Otevřete aplikaci Údržba a najděte typ objektu metadat které chcete smazat.
-
V seznamu objektů klikněte na nabídku možností a vyberte Odstranit.
-
Klikněte na Potvrdit.
Zobrazit podrobnosti o objektech metadat
-
Otevřete aplikaci Údržba a najděte typ objektu metadat které chcete zobrazit.
-
In the object list, click the options menu and select Show details.
Přeložte objekty metadat
DHIS2 poskytuje funkce pro překlady obsahu databáze, například datových prvků, skupin datových prvků, indikátorů, skupin indikátorů nebo organizačních jednotek. Tyto prvky můžete přeložit na libovolný počet národních prostředí. Národní prostředí představuje konkrétní geografickou, politickou nebo kulturní oblast.
Tip
Chcete-li aktivovat překlad, otevřete aplikaci Nastavení systému a klikněte na > Vzhled a vyberte jazyk.
-
Otevřete aplikaci Údržba a najděte typ objektu metadat you want to translate.
-
V seznamu objektů klikněte na nabídku možností a vyberte Přeložit.
Tip
If you want to translate an organisation unit level, click directly on the Translate icon next to each list item.
-
Vyberte národní prostředí.
-
Zadejte Název, Zkrácený název a Popis.
-
Klikněte Uložit.
Správa datových prvků
O datových prvcích
Základem DHIS2 jsou datové prvky. Datové prvky definují, co se v systému skutečně zaznamenává, například počet očkování nebo počet případů malárie.
Datové prvky, jako je "Počet potvrzených případů malárie", jsou často rozděleny na menší části, aby bylo možné určit například počet potvrzených případů malárie v určitých věkových skupinách.
V aplikaci Údržba spravujete následující objekty datových prvků:
Tabulka: Objekty datových prvků v aplikaci Údržba
| Typ objektu | Dostupné funkce |
|---|---|
| Datový prvek | Vytvářejte, upravujte, klonujte, sdílejte, odstraňujte, zobrazujte podrobnosti a překládejte |
| Skupina datových prvků | Vytvářejte, upravujte, klonujte, sdílejte, odstraňujte, zobrazujte podrobnosti a překládejte |
| Sada skupin datových prvků | Vytvářejte, upravujte, klonujte, sdílejte, odstraňujte, zobrazujte podrobnosti a překládejte |
Pracovní postup
-
Vytvořte všechny možnosti kategorií.
-
Vytvářejte kategorie složené z několika možností kategorií, které máte vytvořeny.
-
Vytvářejte kombinace kategorií složené z jedné nebo více kategorií.
-
Vytvořte datové prvky a přiřaďte je ke kombinaci kategorií.
Vytvořte nebo upravte datový prvek
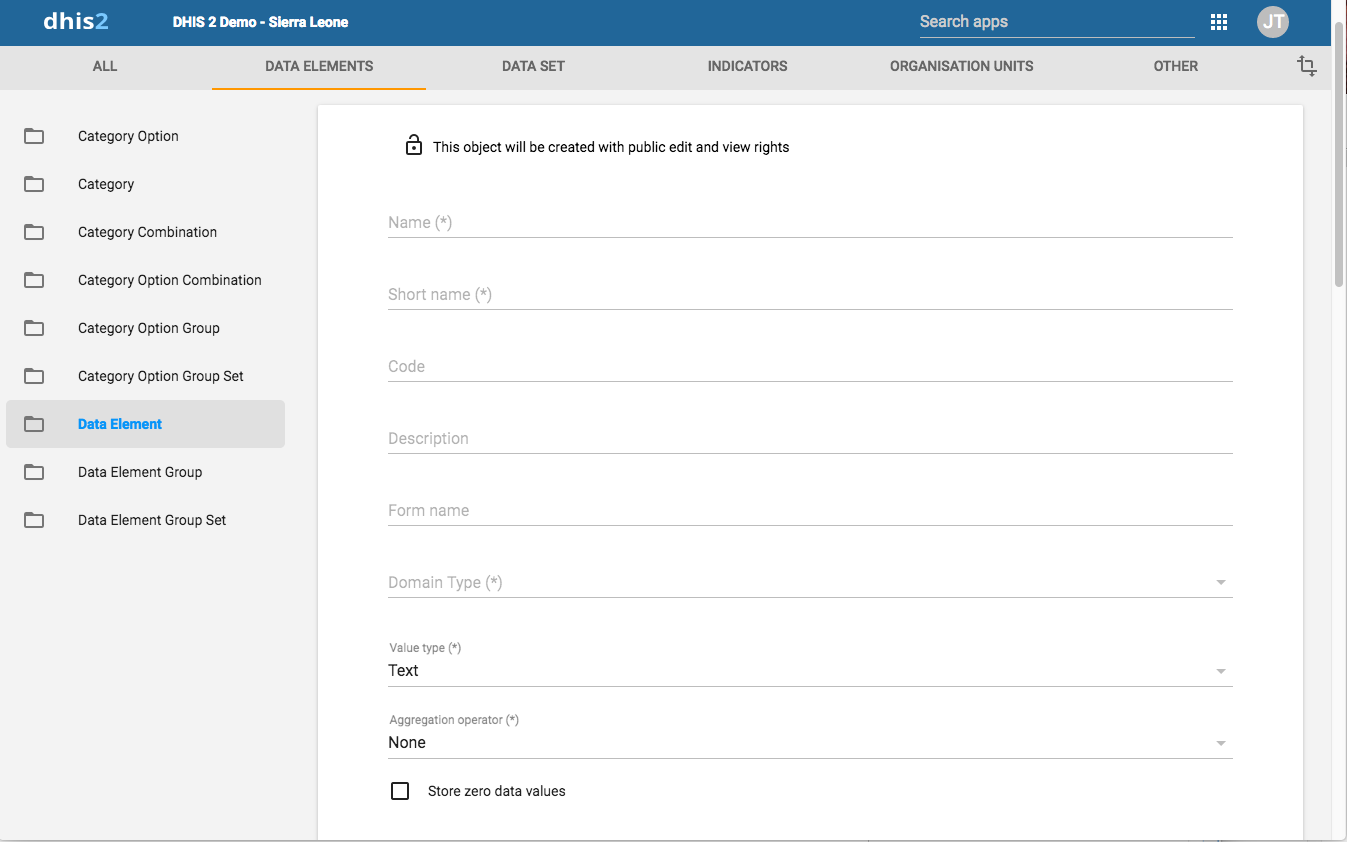
-
Open the Maintenance app and click Data elements > Data element.
-
Klikněte na tlačítko Přidat.
-
V poli Název definujte přesný název datového prvku.
Každý datový prvek musí mít jedinečný název.
-
In the Short name field, define a short name for the data element.
Typically, the short name is an abbreviation of the full data element name. This attribute is often used in reports to display the name of the data element, where space is limited.
-
(Volitelné) V poli Kód přiřaďte kód.
V mnoha zemích je datovým prvkům přiřazen kód.
-
(Optional) In the Color field, assign a color which will be used for this data element in the data capture apps.
-
(Optional) In the Icon field, assign an icon which will be used for this data element in the data capture apps.
-
In the Description field, type a description of the data element. Be as precise as possible and include complete information about how the data element is measured and what its purpose is.
-
(Optional) In the Field mask field, you may type a template that's used to provide hints for correct formatting of the data element.
NOTE
So far this is only implemented in the DHIS2 Android Capture app; not in the Capture and Tracker Capture web apps.
Následují speciální znaky, které lze v masce použít. Speciální znaky odpovídají přesně jednomu znaku daného typu.
| Znak | Odpovídá |
|---|---|
| \d | číslice |
| \x | malé písmeno |
| \X | velké písmeno |
| \ w | jakýkoli alfanumerický znak |
For example, the pattern can be used to show hyphens as needed in the input field of the data element. E.g "\d\d\d-\d\d\d-\d\d\d, would show a hyphen for every third digit.
-
In the Form name field, type an alternative name of the data element. This name can be used in either section or automatic data entry forms. The form name is applied automatically.
-
In the Domain type field, select whether the data element is an aggregate or tracker type of data element.
-
In the Value type field, select the type of data that the data element will record.
Value types Value type Description Age Dates rendered as calendar widget OR by entering number of years, months and/or days which calculates the date value based on current date. The date will be saved in the backend. Coordinate A point coordinate specified as longitude and latitude in decimal degrees. All coordinate should be specified in the format [-19.23 , 56.42] with brackets and a comma separating the longitude and latitude. Date Dates rendered as calendar widget in data entry. Date & time Is a combination of the DATE and TIME data elements. Email Email. File A file resource where you can store external files, for example documents and photos. Image A file resource where you can store photos.
Unlike the FILE data element, the IMAGE data element can display the uploaded image directly in forms.Integer Any whole number (positive and negative), including zero. Letter A single letter. Long text Textual value. Renders as text area with no length constraint in forms. Negative integer Any whole number less than (but not including) zero. Number Any real numeric value with a single decimal point. Thousands separators and scientific notation is not supported. Percentage Whole numbers inclusive between 0 and 100. Phone number Phone number. Positive integer Any whole number greater than (but not including) zero. Positive or zero integer Any positive whole number, including zero. Organisation unit Organisation units rendered as a hierarchy tree widget.
If the user has assigned "search organisation units", these will be displayed instead of the assigned organisation units.Unit interval Any real number greater than or equal to 0 and less than or equal to 1. Text Textual value. The maximum number of allowed characters per value is 50,000. Time Time is stored in HH:mm format.
HH is a number between 0 and 23
mm is a number between 00 and 59Username DHIS2 user. Rendered as a dialog with a list of users and a search field. The user will need the "View User" authority to be able to utilise this data type Yes/No Boolean values, renders as drop-down lists in data entry. Yes only True values, renders as check-boxes in data entry. -
In the Aggregation type field, select the default aggregation operation that will be used on the data element.
Most data elements should have the Sum operator. This includes all data elements which should be added together. Other data elements, such as staffing levels, should be set to use the Average operator, when values along the time dimension should not be added together, but rather averaged.
Aggregation operators Aggregation operator Description Average Average the values in both the period as and the organisation unit dimensions. Average (sum in organisation unit hierarchy) Average of data values in the period dimension, sum in the organisation unit dimensions. Count Count of data values. Min Minimum of data values. Max Maximum of data values. None No aggregation is performed in any dimension. Sum Sum of data values in the period and organisation unit dimension. Standard deviation Standard deviation (population-based) of data values. Variance Variance (population-based) of data values. -
If you want to save zeros for a particular reason, select Store zero data values. By default, DHIS2 does not store zeros entered in the data entry module.
-
In the URL field, enter a link to an in-depth description of the data element.
For example a link to a metadata repository or registry that contains detailed technical information about the definition and measurement of the data element.
-
In the Category combination field, define which category combination the data element should have. This is also known as the "disaggregation".
-
Vyberte sadu možností.
Option sets are predefined lists of options which can be used in zadávání dat.
-
Vyberte možnost nastavenou pro komentáře.
Option sets for comments are predefined lists of options which can be used to specify standardized comments for data values in data entry.
-
Přiřaďte jednu nebo více legend.
Legends are used in for example the Maps app to display certain data elements with certain icons.
-
Set the Aggregation levels to allow the data element to be aggregated at one or more levels:
-
In the left pane, select the levels you want to assign to the data element.
-
Kliknutím na šipku doprava přiřadíte úrovně agregace.
By default, the aggregation will start at the lowest assigned organisation unit. If you for example select "Chiefdom", it means that "Chiefdom", "District", and "National" aggregates use "Chiefdom" (the highest aggregation level available) as the data source, and PHU data will not be included. PHU data will still be available for the PHU level, but not included in aggregations to the levels above.
If you select both "District" and "Chiefdom", it means that the "District" and "National" level aggregates use District data as their source, "Chiefdom" will use Chiefdom, and "PHU" will use PHU.
-
-
If applicable, enter custom attributes values, for example Classification or Collection method.
Note
You create custom attributes in the Maintenance app: Other > Attributes.
-
If applicable, select compulsory data element group sets, for example Main data element group or Tracker-based data.
Note
You'll only see data element group sets in this form if you've created them and set them to Compulsory.
You create data element group sets in the Maintenance app: Data element > Date element group set.
-
Klikněte Uložit.
Vytvořte nebo upravte skupinu datových prvků
Data element groups lets you classify related data elements into a common theme. For example, two data elements "Measles immunisation" and "BCG Immunisation" might be grouped together into a data element group "Childhood immunisation".
Vytvoření skupiny datových prvků:
-
Open the Maintenance app and click Data elements > Data element group.
-
Klikněte na tlačítko Přidat.
-
Vyplňte formulář:
-
Název
-
Krátký název
-
Kód
-
-
Vyberte datové prvky a přiřaďte je.
-
Klikněte Uložit.
Vytvořte nebo upravte sadu skupin datových prvků
Sady skupin datových prvků umožňují kategorizovat více skupin datových prvků do sady. Systém používá skupiny skupin datových prvků během analýzy a vytváření sestav ke kombinování podobných skupin datových prvků do společného tématu. Skupina datových prvků může být součástí několika sad skupin datových prvků.
-
Open the Maintenance app and click Data elements > Data element group set.
-
Klikněte na tlačítko Přidat.
-
Vyplňte formulář:
- Název
- Krátký název
- Kód
- Popis
- Povinný
- Datová dimenze
-
Vyberte skupiny datových prvků a přiřaďte je.
Available data element groups are displayed in the left panel. Data element groups that are currently members of the data element group set are displayed in the right hand panel.
-
Klikněte Uložit.
Clone metadata objects
Klonování datového prvku nebo jiných objektů může ušetřit čas při vytváření mnoha podobných objektů.
-
Otevřete aplikaci Údržba a najděte typ objektu metadat který chcete klonovat.
-
V seznamu objektů klikněte na nabídku možností a vyberte Klonovat.
-
Upravte požadované možnosti.
-
Klikněte Uložit.
Změňte nastavení sdílení pro objekty metadat
You can assign different sharing settings to metadata objects, for example organisation units and tracked entity attributes. These sharing settings control which users and user groups can view or edit a metadata object.
Některé objekty metadat také umožňují změnit nastavení sdílení zadávání dat pro objekt. Tato další nastavení určují, kdo může pomocí metadat zobrazit nebo zadat data do polí formuláře.
Poznámka
Výchozí nastavení je, že každý (Veřejný přístup) může najít, prohlížet a upravovat objekty metadat.
-
Otevřete aplikaci Údržba a najděte typ objektu metadat chcete upravit.
-
In the object list, click the context menu and select Sharing settings.
-
(Optional) Add users or user groups: search for a user or a user group and select it. The user or user group is added to the list.
-
Změňte nastavení sdílení pro skupiny přístupu, které chcete upravit.
-
Can edit and view: The access group can view and edit the object.
-
Může pouze zobrazit: Přístupová skupina může zobrazit objekt.
-
No access (only applicable to Public access): The public won't have access to the object.
-
-
Change data sharing settings for the access groups you want to modify.
-
Can capture data: The access group can view and capture data for the object.
-
Can view data: The access group can view data for the object.
-
No access: The access group won't have access to data for the object.
-
-
Klikněte na Zavřít.
Odstraňte objekty metadat
Poznámka
Datový prvek a další objekty datových prvků můžete odstranit, pouze pokud k samotnému datovému prvku nejsou přidružena žádná data.
Varování
Jakákoli sada dat, kterou ze systému odstraníte, je nenávratně ztracena. Odebrány budou také všechny formuláře pro zadávání údajů a formuláře oddílů, které mohly být vyvinuty. Před odstraněním jakékoli datové sady se ujistěte, že jste vytvořili zálohu své databáze, pro případ, že byste ji v určitém okamžiku potřebovali obnovit.
-
Otevřete aplikaci Údržba a najděte typ objektu metadat které chcete smazat.
-
V seznamu objektů klikněte na nabídku možností a vyberte Odstranit.
-
Klikněte na Potvrdit.
Zobrazit podrobnosti o objektech metadat
-
Otevřete aplikaci Údržba a najděte typ objektu metadat které chcete zobrazit.
-
In the object list, click the options menu and select Show details.
Přeložte objekty metadat
DHIS2 poskytuje funkce pro překlady obsahu databáze, například datových prvků, skupin datových prvků, indikátorů, skupin indikátorů nebo organizačních jednotek. Tyto prvky můžete přeložit na libovolný počet národních prostředí. Národní prostředí představuje konkrétní geografickou, politickou nebo kulturní oblast.
Tip
Chcete-li aktivovat překlad, otevřete aplikaci Nastavení systému a klikněte na > Vzhled a vyberte jazyk.
-
Otevřete aplikaci Údržba a najděte typ objektu metadat you want to translate.
-
V seznamu objektů klikněte na nabídku možností a vyberte Přeložit.
Tip
If you want to translate an organisation unit level, click directly on the Translate icon next to each list item.
-
Vyberte národní prostředí.
-
Zadejte Název, Zkrácený název a Popis.
-
Klikněte Uložit.
Spravujte datové sady a formuláře pro zadávání dat
O datových sadách a formulářích pro zadávání dat
All data entry in DHIS2 is organised in data sets. A data set is a collection of data elements grouped together for data entry and data export between instances of DHIS2. To use a data set to collect data for a specific organisation unit, you must assign the organisation unit to the data set. Once you have assigned the data set to an organisation unit, that data set is available in the Data entry app. Only the organisation units that you have assigned the data set to can use the data set for data entry.
A category combination can link to both data elements and data sets. If you use a category combination for a data set, the category combinations is applicable for the whole form. This means that you can use categories to capture information which is common to an entire form, for example the name of the a project or grant. When a data set is linked to a category combination, those categories will be displayed as drop-down boxes in the Data entry app. Data captured in the form will then be linked to the selected category options from those drop-down boxes. For information about how to create categories and category combinations, see section "Manage data elements and categories". Make sure that you set the type of categories and category combinations to "Attribute".
A scenario for when categories are useful is when you need to capture a data entry form for an implementing partner organisation and a project. In that case:
-
Create category options and categories for all partner organisations and projects and link them in a new category combination.
-
Assign the category combination to the data set (form) for which you need to capture this information.
When opening this data set in data entry module, the partner organisation and project categories will automatically be rendered as drop-down boxes, allowing you to select a specific implementing partner organisation and project before continuing to do data entry.
You create and edit data sets in the Maintenance app. Here you define, for example, which data elements you want to include in the data set and the data collection frequency.
You enter data in the Data entry app. The Data entry app uses data entry forms to display the data sets. There are three types of data entry forms:
Tabulka: Typy formulářů pro zadávání dat
| Typ formuláře pro zadávání dat | Popis |
|---|---|
| Výchozí formulář | Once you have assigned a data set to an organisation unit, a default form is created automatically. The default form is then available in the Data entry app for the organisation units you have assigned it to. A default form consists of a list of the data elements belonging to the data set together with a column for inputting the values. If your data set contains data elements with a non-default category combination, for example age groups or gender, additional columns are automatically created in the default form based on the different categories. If you use more than one category combination you get multiple columns in the default form with different column headings for the options. |
| Formulář Sekce | Pokud výchozí formulář nesplňuje vaše potřeby, můžete jej upravit a vytvořit formulář oddílu. Sekční formuláře vám poskytnou větší flexibilitu, pokud jde o používání tabulkových formulářů. Ve formě sekce můžete například vytvořit více tabulek s podnadpisy a zakázat (zašednout) buňky v tabulce. Když jste do sady dat přidali formulář oddílu, formulář oddílu je k dispozici v aplikaci Zadávání dat. |
| Vlastní formulář | If the form you want to design is too complicated for default or section forms, you can create a custom form. A custom form takes more time to create than a section form, but you have full control over the design. You can, for example, mimic an existing paper aggregation form with a custom form. This makes data entry easier, and should reduce the number of incorrectly entered data elements. When you have added a custom form to a data set, the custom form is available in the Data entry app. |
Poznámka
Pokud má datová sada formulář sekce i vlastní formulář, zobrazí systém během > zadávání dat vlastní formulář. Uživatelé, kteří zadávají data, si nemohou vybrat, > jaký formulář chtějí použít. Při zadávání dat z webu je pořadí preferencí zobrazení:
Vlastní formulář (pokud existuje)
Formulář sekce (pokud existuje)
Výchozí formulář
Mobilní zařízení nepodporují vlastní formuláře. Při zadávání dat na mobilních zařízeních je pořadí preferencí zobrazení:
Formulář sekce (pokud existuje)
Výchozí formulář
V aplikaci Údržba spravujete následující objekty sady dat:
Tabulka: Objekty datové sady v aplikaci Údržba
| Typ objektu | Dostupné funkce |
|---|---|
| Datová sada | Vytvářejte, přiřazujte organizačním jednotkám, upravujte, sdílejte, odstraňujte, zobrazujte detaily a překládejte Úprava povinných datových prvků Přidávání a odebírání více datových sad organizačním jednotkám najednou |
| Formulář Sekce | Vytvářejte, upravujte a spravujte šedá pole |
| Sekce | Změnit pořadí zobrazení, odstranit a přeložit |
| Vlastní formulář | Vytvářejte, upravujte a skriptujte |
Pracovní postup
Abyste mohli vytvářet datové sady a formuláře pro zadávání dat, musíte mít datové prvky a kategorie.
-
Vytvořte datovou sadu.
-
Přiřaďte datovou sadu organizačním jednotkám.
Výchozí formulář se vytvoří automaticky.
-
Vytvořte formulář sekce nebo vlastní formulář.
Nyní můžete data zaregistrovat v aplikaci Zadávání dat.
Vytvořte nebo upravte datovou sadu
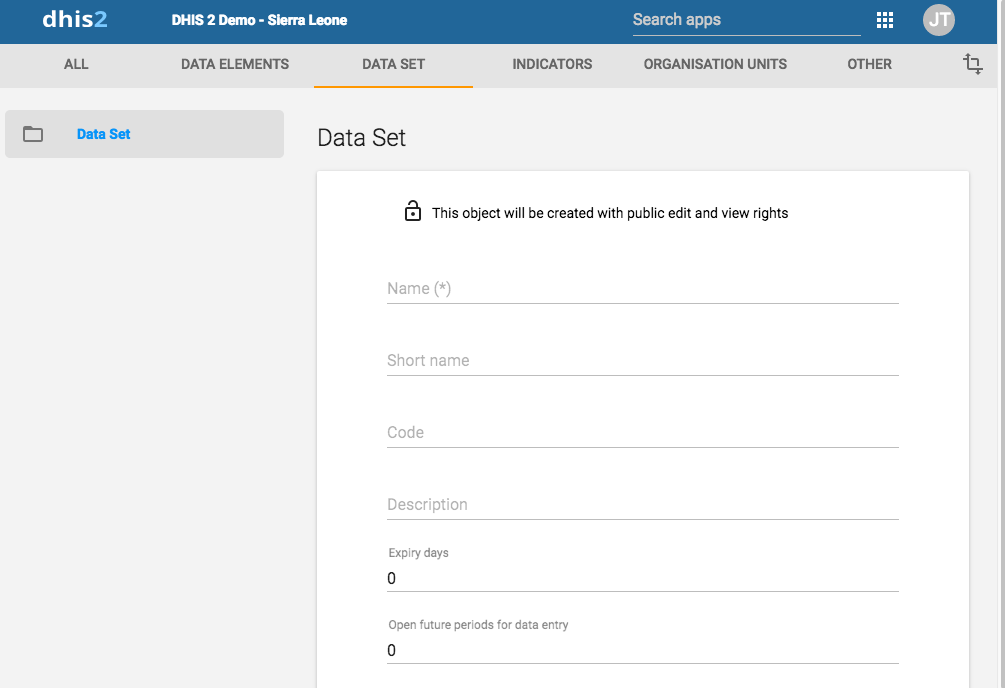
-
Otevřete aplikaci Údržba a klikněte na Datová Sada > Datová Sada.
-
Klikněte na tlačítko Přidat.
-
Do pole Název zadejte přesný název datové sady.
-
V poli Krátký název definujte krátký název datové sady.
Krátký název je obvykle zkratkou názvu celého datového souboru Tento atribut se často používá k zobrazení názvu datového souboru, kde je omezený prostor.
-
(Volitelné) V poli Kód přiřaďte kód.
-
Do pole Popis zadejte popis datové sady.
-
Zadejte číslo Dnů platnosti.
Počet dnů platnosti určuje, jak dlouho by mělo být možné pro tuto sadu dat zadat data v aplikaci Zadávání dat. Dny vypršení platnosti se vztahují k počtu dní po datu ukončení vybraného období pro zadávání údajů, ve kterém by měl být formulář pro zadávání údajů otevřen pro zadávání. Po uplynutí počtu dnů bude datová sada uzamčena pro další záznamy.
K tomu můžete nastavit ruční výjimky pomocí funkce výjimky zámku v aplikaci Správa dat.
Note
To allow data entry into all possible historical time periods, set the number of expiry days to zero.
-
Pokud chcete, aby bylo možné zadávat data pro budoucí období, zadejte počet období Otevřená budoucí období pro zadávání dat v poli formuláře.
Hodnota je počet budoucích období, která jsou k dispozici pro zadávání dat.
U měsíčního souboru dat vám hodnota 2 umožňuje zadat data pro 2 měsíce předem. To je užitečné například pro populaci, cílové a plánovací údaje.
-
In the Days after period to qualify for timely submission field, type the number of days in which data can be entered to be considered reported on time.
To verify the number of timely reports submitted, go to Reports > Reporting rate summary.
-
Vyberte Typ období.
The period type defines the frequency of reporting for the particular data set. The frequency can for example be daily, quarterly or yearly.
-
Vyberte kombinaci kategorií a přiřaďte ji k datové sadě.
Tip
Click Add new to create category combinations that you're missing. In the form that opens, create the category combinations you need. When you're done, click Refresh values.
-
If you selected a category combination other than None, you may enter zero or a positive number for Open periods after category option end date. This lets you enter data in this data set for a category option up to the specified number of periods after that category option's end date.
-
In the Complete notification recipients list, select a user group that should receive a message when the data set is marked as complete in the Data Entry app.
Zpráva je doručena prostřednictvím systému doručování zpráv DHIS2.
-
If you want the user who entered the data to receive a message when the data set is marked as complete in the Data entry app, select Send notification to completing user.
Zpráva je doručena prostřednictvím systému doručování zpráv DHIS2.
-
Je-li to možné, vyberte pracovní postup schválení dat.
-
If you want it to be possible to use the data set within the Java mobile DHIS2 application, select Enable for Java mobile client.
-
If you want it to be mandatory to fill all values for a data element in data entry if one or more values have been filled, select All fields for data elements required.
This means that if you enter one data value for a data element in an entry field (that is for a category option combination), then you must enter data for all fields belonging to that data element (that is all category option combinations).
-
If you want it to be possible to mark a data entry form as complete only if the validation of that form is successful, select Complete allowed only if validation passes.
If you select this option, you can't mark the form as complete if validation fails.
-
If you want it to be mandatory that any missing values require a comment to justify their absence, select Missing values requires comment on complete.
-
(Volitelné) Přiřaďte jednu nebo více legend.
-
Pokud je to možné, vyberte Přeskočit offline.
This option controls whether this data entry form should be downloaded and saved in the user's web browser. Normally you shouldn't select Skip offline. This is the default setting. If you have big forms which are rarely used you can consider selecting this option to speed up initial loading in the data entry module.
-
Pokud je to možné, vyberte Dekorace datového prvku
If you select this option, descriptions of data elements render in call-outs in downloaded data sets in offline mode in the Data entry app.
-
Pokud je to možné, vyberte Vykreslit sekce jako karty.
This option is only applicable for section forms. The option allows you to render each section as a tab above the data set. You can choose whether to render the tabs horizontally or vertically. This is useful for long data sets as it allows appropriate sections to be selected quickly without going through the entire form.
-
If applicable, select Add custom title/subtitle.
This option allows you to add a title and/or subtitle to the dataset. You can choose whether to display the title and subtitle in the center, at line start or at line end. For security reasons, only basic styling and HTML link elements are allowed, specifically these tags:
afor adding a link,ufor underlining a text, andb,strongoremfor styling text in bold format. -
Pokud je to možné, vyberte Vykreslit svisle.
This option is only applicable for section forms that are multi-organisation unit forms.
-
Vyberte datové prvky a přiřaďte je.
You can override the category combination for each selected data set by clicking on the gear icon above the list of selected data elements. This allows you to utilize a specific category combination (disaggregation) within the current data set instead of the category combination associated directly with the data element itself.
-
Vyberte indikátory a přiřaďte je.
-
In the organisation unit tree, select the organisation units you want to assign the data set to.
Tip
-
Click Organisation unit level to select all organisation units that belong to a certain organisation level.
-
Click Organisation unit group to select all organisation units that belong to a certain organisation unit group.
-
-
Klikněte Uložit.
You can now use the data set in the Data Entry app for the organisation units that you have assigned to and for periods according to the selected frequency (period type).
Vytvořit nebo upravit oznámení sady dat
-
Open the Maintenance app and click Data set > Data set notification.
-
Klikněte na tlačítko Přidat.
Co poslat?

-
In the Name field, type the precise name of the data set notification.
-
(Volitelné) V poli Kód přiřaďte kód.
-
Zadejte datové sady.
These data sets will be associated to this notification. In case any of them is completed for a certain period and organisation unit, notification will be generated by the system.
Note
Nothing will happen if no data set is selected
-
V části Šablona zprávy jsou dva parametry.
-
Subject template subject of the notification sent in notification. It can have values from the list of variables available on the right side.
-
Message template actual message sent in notification. It can have values from the list of variables available on the right side.
Note
Subject is only relevant in case of Email and internal DHIS2 messages. It is ignored in case of SMS.
-
Kdy poslat?

-
Data set notification trigger field determine when to send notification.
-
Data Set Completion will trigger notification as soon as data set is completed.
-
Schedule Days will schedule notification based on number days relative to scheduled date. Schedule date will be decided by Period associated with Data set.
-
Send notification as provides two different types of notifications
-
Celkové shrnutí Odeslat oznámení v celkové náladě
-
Single notification sends notification in single mood
-
-
Note
Send notification as option is only available in case of scheduled notification. This option is set to default which is Single notification in case of completion notification
-
Komu poslat?

-
Notification recipient field determine recipients of the notification.
-
Organisation Unit contact will send notification to contact assigned to organisation unit which the data has been collected from.
-
UserGroup will send notification to all the member of the selected UserGroup.
Note
An internal DHIS2 message will be sent in case if recipient is UserGroup. Moreover user will also receive SMS/EMAIL if phone number and email address exist for that user and SMS/EMAIL notifications are enabled in SystemSettings
-
Přepsat kombinace kategorií datových prvků v datové sadě
You can override which category combination to use for a data element within the context of a data set. This means that a data element can use different category combinations within different data sets. This is useful when you want to reuse a data element since you don't have to replicate the data element to allow multiple category combinations.
If different regions within your organisation unit hierarchy use different disaggregations, or if the disaggregations change over time, you can represent this by creating different data sets with the appropriate category combinations.
-
Otevřete aplikaci Údržba a klikněte na Datová Sada > Datová Sada.
-
V seznamu vyhledejte datovou sadu, kterou chcete upravit.
-
Klikněte na nabídku možností a vyberte Upravit.
-
Přejděte do části datové prvky a klikněte na ikonu klíče.
-
Vyberte nové kombinace kategorií a klikněte na Zavřít.
-
Klikněte Uložit.
Upravte povinné datové prvky v datové sadě
You can add or remove data elements which will be marked as compulsory during data entry.
-
Otevřete aplikaci Údržba a klikněte na Datová Sada > Datová Sada.
-
V seznamu vyhledejte datovou sadu, kterou chcete upravit.
-
Klikněte na nabídku možností a vyberte Upravit povinné datové prvky.
-
Přiřaďte povinné datové prvky.
-
Klikněte Uložit.
Stáhněte si výchozí datové formuláře ve formátu PDF
You can download a default data from in PDF format for offline data entry.
-
Otevřete aplikaci Údržba a klikněte na Datová Sada > Datová Sada.
-
V seznamu vyhledejte objekt, který chcete stáhnout.
-
Klikněte na nabídku možností a vyberte Získat PDF pro zadávání dat.
Spravovat formuláře sekcí
Vytvořte formulář sekce
Section forms are separated automatically by data element category combinations, which produce a spreadsheet like data entry form for each section.
-
Otevřete aplikaci Údržba a klikněte na Datová Sada > Datová Sada.
-
In the list, find the data set you want to create a section form for.
-
Klikněte na nabídku možností a vyberte Spravovat sekce.
-
Klikněte na tlačítko Přidat.
-
(Volitelné) Do pole Název zadejte název sekce.
-
(Optional) In the Description field, type a description of the section.
-
(Optional) To display totals for rows in the section form during data entry, select Show row totals.
-
(Optional) To display totals for columns in the section form during data entry, select Show column totals.
-
(Optional) To prevent automatic grouping of data of data elements with the same category combo, select Disable automatic grouping of data elements. This is useful if you want the order of the data elements to be respected regardless of differing category combos.
-
Přiřaďte datové prvky do sekce:
-
(Volitelné) Vyberte kombinovaný filtr kategorie.
Note
You can only use one category combination per section.
Option Description None Displays all data elements that don't have a category combination. <No filter> Displays all data elements. -
Select data elements and assign them.
-
-
(Optional) Sort the data elements within the section by using the up and down arrows to the left of the assigned data elements field.
-
Klikněte Uložit.
-
Repeat add section steps for each section you want to have in your section form.
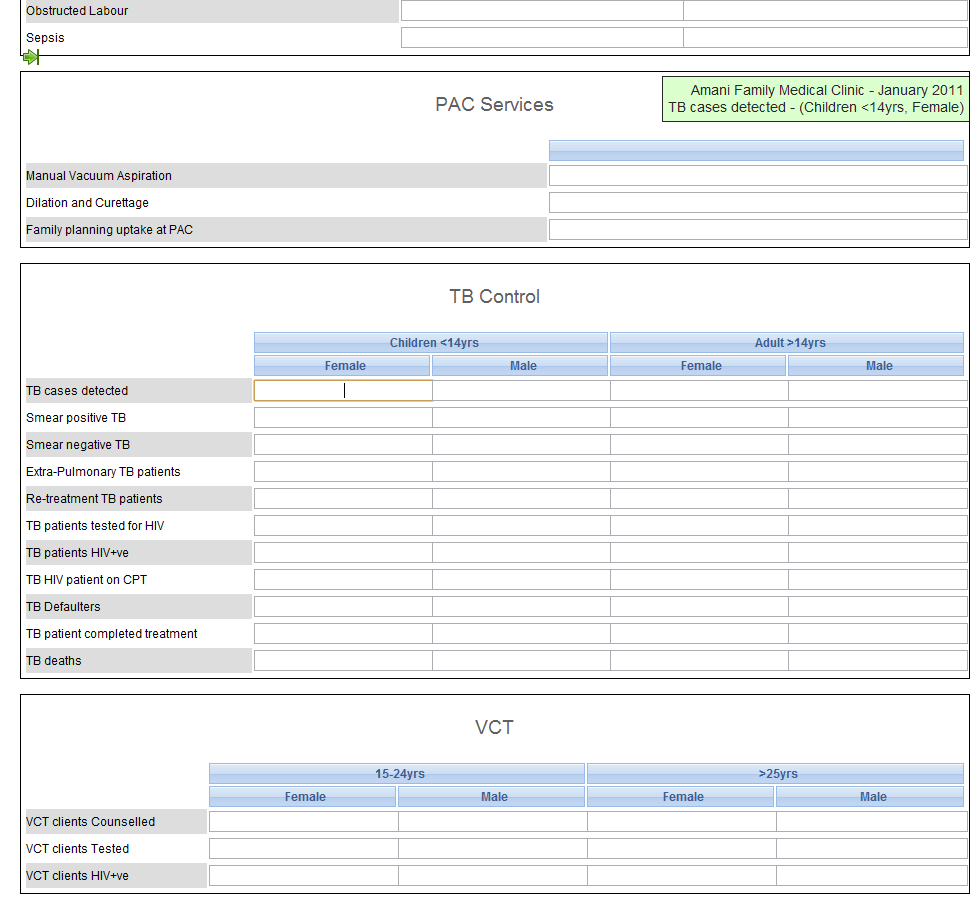
In the Data Entry app you can now use the section form. The section form appears automatically when sections are available for the selected data set. Data sets which have section forms will automatically display the section form.
Všimněte si, jak byla každá kategorie datových prvků rozdělena do samostatné sekce a systém automaticky vygeneroval tabulku zadávání dat. Použití formulářů oddílů v kombinaci s kategoriemi datových prvků může drasticky zkrátit dobu potřebnou k vytvoření formulářů pro zadávání dat pro datové sady.
Upravte formulář sekce
-
Otevřete aplikaci Údržba a klikněte na Datová Sada > Datová Sada.
-
In the list, find the data set you want to edit the section form for.
-
Klikněte na nabídku možností a vyberte Spravovat sekce.
-
V seznamu vyhledejte část, kterou chcete upravit.
-
Klikněte na nabídku možností a vyberte Upravit.
-
Upravte sekci a klikněte na Uložit.
-
Opakujte kroky úprav sekce pro každou sekci, kterou chcete upravit.
Spravujte šedá pole ve formuláři sekce
You can disable data elements and category options for data entry. That means it won't be possible to enter data into these fields during data entry.

-
Otevřete aplikaci Údržba a klikněte na Datová Sada > Datová Sada.
-
In the list, find the data set you want to edit the section form for.
-
Klikněte na nabídku možností a vyberte Spravovat sekce.
-
V seznamu vyhledejte část, kterou chcete upravit.
-
Klikněte na nabídku možností a vyberte Správa šedých polí.
-
Vyberte pole, která chcete deaktivovat.
Note
If you've sections that contain data elements assigned to multiple category combinations, switch between the category combinations to view all fields.
-
Klikněte Uložit.
Změňte pořadí zobrazení sekcí ve formuláři sekce
Můžete určit, ve kterém pořadí sekcí se zobrazí ve formuláři sekce.
-
Otevřete aplikaci Údržba a klikněte na Datová Sada > Datová Sada.
-
In the list, find the data set you want to edit the section form for.
-
Klikněte na nabídku možností a vyberte Spravovat sekce.
-
V seznamu vyhledejte část, kterou chcete přesunout.
-
Klikněte na nabídku možností a vyberte Posunout nahoru nebo Posunout dolů.
If the section you want to move is the first or last section in the list, you'll only see one of the move options.
Odstraňte sekci ve formuláři sekce
-
Otevřete aplikaci Údržba a klikněte na Datová Sada > Datová Sada.
-
In the list, find the data set you want to edit the section form for.
-
Klikněte na nabídku možností a vyberte Spravovat sekce.
-
V seznamu vyhledejte část, kterou chcete odstranit.
-
Klikněte na nabídku možností a vyberte Odstranit.
Přeložit sekci ve formuláři sekce
-
Otevřete aplikaci Údržba a klikněte na Datová Sada > Datová Sada.
-
In the list, find the data set you want to edit the section form for.
-
Klikněte na nabídku možností a vyberte Přeložit.
-
Vyberte národní prostředí.
-
Zadejte požadované informace.
-
Klikněte na Zavřít.
Form Configuration options
In version 41, we have added extra form configuration options that change how a section form is displayed in the new Data Entry App (beta). These options allow users to apply functionality that was not possible before without custom forms. We will be adding more options in the future releases.

The options available in v41 are:
Transpose (pivot) functionality
Users are able to choose to transpose (pivot) a form when displayed in the new Data Entry (beta) app. They are able to either fully transpose the form, i.e. move categories to be displayed as rows and data elements as columns, or move a certain category to be displayed as rows. The default display mode is for data elements to be displayed as rows and categories as columns.
Content before and after a section
Users are able to display custom text before and/or after a section. This is helpful for adding help text, for example. For security reasons, only basic styling and HTML link elements are allowed, specifically these tags: a for adding a link, u for underlining a text, b, strong for styling text in bold format, or em to style it in italic.
Spravujte vlastní formuláře
Vytvořte vlastní formulář
You design custom forms in a built-in WYSIWYG HTML editor. If you select Source, you can paste HTML code directly in the editing area. For a complete guide on how to use the editor, refer to http://docs.ckeditor.com/.
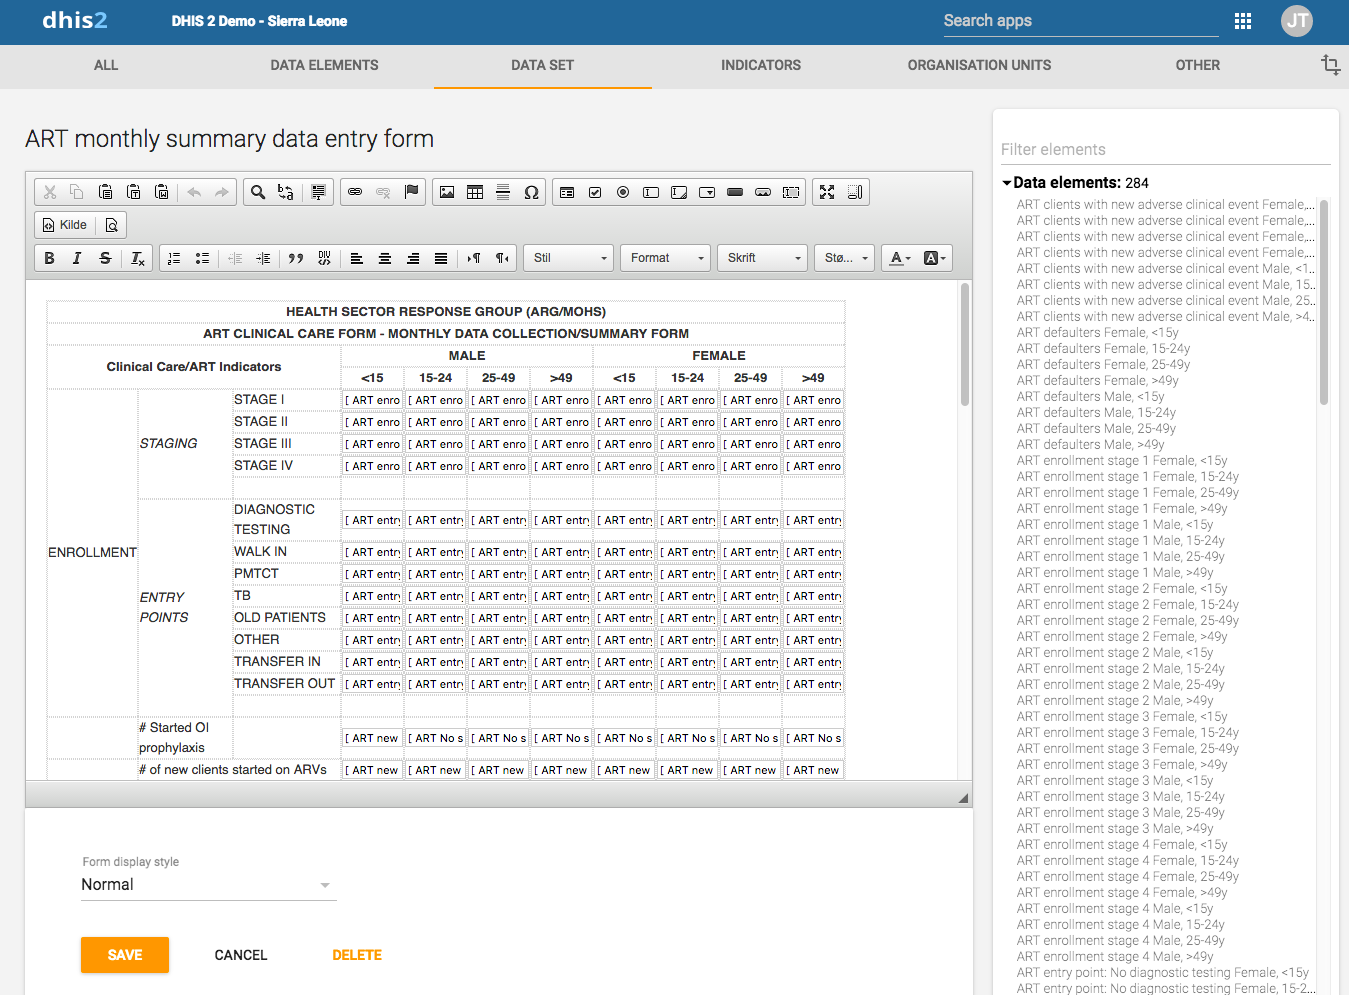
Vytvoření vlastního formuláře:
-
Otevřete aplikaci Údržba a klikněte na Datová Sada.
-
V seznamu vyhledejte datovou sadu, do které chcete přidat vlastní formulář.
-
Klikněte na nabídku možností a vyberte Návrh formuláře pro zadání dat.
-
V editační oblasti vytvořte vlastní formulář.
-
Double-click on a object in the left-hand list to insert it in the form.
-
If you already have the HTML code for your form, click Source and paste the code.
-
-
Vyberte styl zobrazení formuláře.
-
Klikněte Uložit.
Skriptování ve vlastních formulářích
In custom data entry form you can use JavaScript to create dynamic behaviour and customizations. As an example, you can hide form sections based on specific user input for data elements, or show specific information when a form loads.
Události
The DHIS2 data entry module provides a range of events which you can register for and use to perform actions at certain times. The events are registered on the document element. The jQuery event object and the data set identifier are always the first two arguments provided to the callback functions. The table below provides an overview of the events and when they are triggered.
Tabulka: zadávání dat Události
| Klíč | Popis | Argumenty |
|---|---|---|
| dhis2.de.event.formLoaded | Spustí se po vykreslení formuláře pro zadávání dat, ale před nastavením hodnot dat ve vstupních polích. | Událost | ID sady dat |
| dhis2.de.event.dataValuesLoaded | Spustí se po nastavení hodnot dat do vstupních polí. | Událost | ID sady dat |
| dhis2.de.event.formReady | Spustí se, když je formulář pro zadávání dat zcela vykreslen a načten se všemi prvky. | Událost | ID sady dat |
| dhis2.de.event.dataValueSaved | Spustí se, když je hodnota dat úspěšně uložena. | Událost | ID sady dat | Objekt hodnoty dat |
| dhis2.de.event.completed | Spustí se, když je sada dat úspěšně označena jako dokončená. | Událost | ID sady dat | Dokončete registrační objekt |
| dhis2.de.event.validationSuccess | Spustí se, když je ověření dokončeno a nedošlo k žádnému porušení. | Událost | ID sady dat |
Registrace na akci:
<script type="text/javascript">

dhis2.util.on( 'dhis2.de.event.formReady', function( event, ds ) {
  console.log( 'The form with id: ' + ds + ' is loaded!' );
} );

dhis2.util.on( 'dhis2.de.event.dataValueSaved', function( event, ds, dv ) {
  console.log( 'Data value: ' + dv.value + ' was saved with data element: ' + dv.de );
} );

dhis2.util.on( 'dhis2.de.event.completed', function( event, ds, cr ) {
  console.log( 'Form was completed for org unit: ' + cr.ou );
} );

</script>
Note
Be careful to only use "namespaced" events like the ones in the example above and not general ones like "click" as the dhis2.util.on method will deregister the event first.
If your function only applies to certain data sets you can use the supplied data set identifier and shortcut your function for unwanted data sets like this:
dhis2.de.on( 'dhis2.de.event.validationSuccess', function( event, ds ) {
  if ( $.inArray( ds, ['utXOiGbEj14', 'Re7qzHEThSC'] ) == -1 ) {
    return false;
  }
  console.log( 'Form with id: ' + ds + ' validated successfully!' );
} );
Identifikátory vstupních polí ve formuláři pro zadávání údajů jsou ve formátu popsaném níže. Tento formát lze použít k výběru vstupních polí ve skriptu a provádění akcí s nimi:
<dataelementid>-<optioncomboid>-val
Since the data set identifier is provided for all events a feasible alternative is to utilize the "files" Web API resource and keep your callback functions in a single file, where you let the JavaScript code take action based on which data set is currently loaded.
Funkce
The DHIS2 data entry module contains JavaScript API functions which can be accessed from custom data entry forms.
dhis2.de.api.getSelections: This function returns a JavaScript object which contains properties for all dimensions with corresponding values for the identifiers of the selected options. It contains properties for "ds" (data set), "pe" (period), "ou" (organisation unit) and identifiers for all data set categories.
Příklad odpovědi vypadá takto:
{
 +  ds: "lyLU2wR22tC",
 +  pe: "201605",
 +  ou: "g8upMTyEZGZ",
 +  LFsZ8v5v7rq: "CW81uF03hvV",
 +  yY2bQYqNt0o: "yMj2MnmNI8L"
 +}
Příklad použití této funkce pomocí JavaScriptu:
var sel = dhis2.de.api.getSelections();
 +var orgUnit = sel["ou"];
 +var partner = sel["LFsZ8v5v7rq"];
Změňte nastavení sdílení pro objekty metadat
Objektům metadat můžete přiřadit různá nastavení sdílení, například organizační jednotky a atributy sledovaných entit. Tato nastavení sdílení určují, kteří uživatelé a skupiny uživatelů mohou zobrazit nebo upravit objekt metadat.
Některé objekty metadat také umožňují změnit nastavení sdílení zadávání dat pro objekt. Tato další nastavení určují, kdo může pomocí metadat zobrazit nebo zadat data do polí formuláře.
Poznámka
Výchozí nastavení je, že každý (Veřejný přístup) může najít, prohlížet a upravovat objekty metadat.
-
Otevřete aplikaci Údržba a najděte typ objektu metadat chcete upravit.
-
In the object list, click the context menu and select Sharing settings.
-
(Optional) Add users or user groups: search for a user or a user group and select it. The user or user group is added to the list.
-
Změňte nastavení sdílení pro skupiny přístupu, které chcete upravit.
-
Can edit and view: The access group can view and edit the object.
-
Může pouze zobrazit: Přístupová skupina může zobrazit objekt.
-
No access (only applicable to Public access): The public won't have access to the object.
-
-
Change data sharing settings for the access groups you want to modify.
-
Can capture data: The access group can view and capture data for the object.
-
Can view data: The access group can view data for the object.
-
No access: The access group won't have access to data for the object.
-
-
Klikněte na Zavřít.
Odstraňte objekty metadat
Poznámka
Datový prvek a další objekty datových prvků můžete odstranit, pouze pokud k samotnému datovému prvku nejsou přidružena žádná data.
Varování
Jakákoli sada dat, kterou ze systému odstraníte, je nenávratně ztracena. Odebrány budou také všechny formuláře pro zadávání údajů a formuláře oddílů, které mohly být vyvinuty. Před odstraněním jakékoli datové sady se ujistěte, že jste vytvořili zálohu své databáze, pro případ, že byste ji v určitém okamžiku potřebovali obnovit.
-
Otevřete aplikaci Údržba a najděte typ objektu metadat které chcete smazat.
-
V seznamu objektů klikněte na nabídku možností a vyberte Odstranit.
-
Klikněte na Potvrdit.
Zobrazit podrobnosti o objektech metadat
-
Otevřete aplikaci Údržba a najděte typ objektu metadat které chcete zobrazit.
-
In the object list, click the options menu and select Show details.
Přeložte objekty metadat
DHIS2 poskytuje funkce pro překlady obsahu databáze, například datových prvků, skupin datových prvků, indikátorů, skupin indikátorů nebo organizačních jednotek. Tyto prvky můžete přeložit na libovolný počet národních prostředí. Národní prostředí představuje konkrétní geografickou, politickou nebo kulturní oblast.
Tip
Chcete-li aktivovat překlad, otevřete aplikaci Nastavení systému a klikněte na > Vzhled a vyberte jazyk.
-
Otevřete aplikaci Údržba a najděte typ objektu metadat you want to translate.
-
V seznamu objektů klikněte na nabídku možností a vyberte Přeložit.
Tip
If you want to translate an organisation unit level, click directly on the Translate icon next to each list item.
-
Vyberte národní prostředí.
-
Zadejte Název, Zkrácený název a Popis.
-
Klikněte Uložit.
Správa indikátorů
O indikátorech
An indicator is a formula that can consist of multiple data elements, constants, organisation unit group counts and mathematical operators. The indicator consist typically of a numerator and denominator. You use indicators to calculate coverage rates, incidence and other values that are a result of data element values that have been entered into the system. Calculated totals do not have a denominator.
Poznámka
Nikdy nezadáváte hodnoty indikátorů přímo v DHIS2, vypočítáváte je.
An indicator formula can consist of mathematical operators, for example plus and minus; functions (see below); and of the following elements:
Tabulka: Indikační prvky
| Indikační prvek | Typ | Popis |
|---|---|---|
| Konstantní | Součást | Konstanty jsou číselné hodnoty, které zůstávají stejné pro všechny výpočty indikátorů. To je užitečné, abyste měli jediné místo pro změnu hodnot, které se mohou časem měnit. Konstanty jsou použity PO agregaci hodnot datových prvků. |
| Datové prvky | Součást | Datové prvky jsou nahrazeny datovou hodnotou zachycenou pro datový prvek. |
| Dny | Operátor | "Days" je speciální operátor, který vždy poskytuje počet dní pro výpočet daného indikátoru. Například: pokud chcete vypočítat „Procento doby, kdy byla vakcinační chladnička nefunkční“, můžete čitatele definovat jako: ("Days-"Počet dní, kdy byla k dispozici vakcinační chladnička"")/"Days" Pokud by byla chladnička k dispozici 25 dní v červnu, indikátor by se vypočítal takto: (30-25/25)*100 = 17 % Pokud chcete vypočítat celkovou částku za 1. čtvrtletí, počet dní ("Days") bude: 31+28+31 = 90 Parametrem „Days“ bude vždy počet dní v zájmovém období. |
| Počítá se organizační jednotka | Součást | Skupiny organizačních jednotek můžete použít ve vzorcích. Nahradí je počet organizačních jednotek ve skupině. Během agregace se organizační jednotky ve skupině protnou s požadovanou částí hierarchie organizačních jednotek. To vám umožní použít v ukazatelích počet veřejných zařízení v konkrétním okrese. To je užitečné například při vytváření průzkumů a sestav infrastruktury zařízení. |
| Programy | Součást | Kliknutím na Programy a výběrem programu zobrazíte všechny datové prvky, atributy a indikátory související s konkrétním programem. Komponenty programu, které zahrnete do vzorce, budou mít přiřazenou značku programu. |
Ve vzorci indikátoru můžete použít následující funkce:
Tabulka: Funkce indikátoru
| Funkce indikátoru | Argumenty | Popis |
|---|---|---|
| contains | (expr, sub1, ...) | Searches an expression for one or more substrings. Returns true if the expression contains all the substrings. For example, the following are all true: contains("abcd", "abcd"); contains("abcd", "b"); and contains("abcd", "ab", "bc"). Comparisons are case-sensitive. |
| containsItems | (expr, item1, ...) | Searches an expression for one or more items. The expression is made up of comma-separated elements. containsItems returns true if every item exactly matches an element in the expression. For example, containsItems("abcd", "abcd") and containsItems("ab,cd", "ab", "cd") are true, but containsItems("abcd", "b") and containsItems("abcd", "ab", "bc") are false. Comparisons are case-sensitive. containsItems can be used for multi-valued data elements to see if an item is contained in the data element values. |
| if | (boolean-expr, true-expr, false-expr) | Vyhodnotí logický výraz a pokud true vrátí hodnotu true výrazu, pokud false vrátí hodnotu falešného výrazu. Argumenty musí dodržovat pravidla pro jakýkoli výraz indikátoru. |
| is | (expr1 in expression [, expression ...]) | Returns true if expr1 is equal to any of the following expressions, otherwise false. |
| isNull | (element) | Vrátí true, pokud chybí hodnota prvku (null), jinak false. |
| isNotNull | (element) | Vrátí true, pokud hodnota prvku nechybí (není null), jinak false. |
| firstNonNull | (element [, element ...]) | Vrátí hodnotu prvního prvku, který nechybí (není null). Lze zadat libovolný počet argumentů. Jakýkoli argument může být také číselný nebo řetězcový literál, který bude vrácen, pokud všechny předchozí objekty mají chybějící hodnoty. |
| největší | (expression [, expression ...]) | Vrátí největší (nejvyšší) hodnotu zadaných výrazů. Lze uvést libovolný počet argumentů. |
| nejméně | (expression [, expression ...]) | Vrátí nejnižší (nejnižší) hodnotu zadaných výrazů. Lze uvést libovolný počet argumentů. |
| log | (expression [, base ]) | Vrátí přirozený logaritmus (základ e) číselného výrazu. Pokud je jako druhý argument zadáno celé číslo, vrátí logaritmus pomocí této báze. |
| log10 | (výraz) | Vrátí běžný logaritmus (základ 10) číselného výrazu. |
| null | Nevrací žádný výsledek. Například if( #{FH8ab5Rog83}<0, null, 1 ) nevrátí nic, pokud je hodnota datového prvku menší než 0, jinak 1. | |
| removeZeros | (výraz) | Pokud je hodnota výrazu 0, nevrátí nic, jinak vrátí hodnotu výrazu. |
| subExpression | (výraz) | Evaluates part of an expression before aggregating. See Indicator SubExpressions below. |
| [periodInYear] | The number of this period within the year (1, 2, 3, ...). For examples, see the Indicator Year-to-date section below. | |
| [yearlyPeriodCount] | The count of periods of this type within the year. For examples, see the Indicator Year-to-date section below. | |
| .aggregationType | (typ agregace) | Přepíše výchozí typ agregace datových prvků pro agregovaná data (nikoli pro data programu). |
| .maxDate | (rrrr-mm-dd) | Pro datový prvek (ne data programu) hodnota z období končících v nebo před maximálním datem. |
| .minDate | (rrrr-mm-dd) | Pro datový prvek (nikoli programová data), hodnota z období počínaje minimálním datem nebo po něm. |
| .periodOffset | (integer constant) | Placed after a data value or expression, returns the value from a period offset relative to the reported period. It can be nested. Note that this shifts data only for aggregate data, not tracker or event data. See examples below. |
| .yearToDate() | Summs the values of all periods from the start of the yaer through the current period. Note that any weekly period is considered to be part of the current year if it has four or more days in the year. For examples, see the Indicator Year-to-date section below. |
Valid aggregation types:
| Typ agregace | Popis |
|---|---|
| AVERAGE | Average value in both period and organisation unit hierarchy |
| AVERAGE_SUM_ORG_UNIT | Average value, sum in organisation unit hierarchy |
| COUNT | Count of values |
| FIRST | First value, sum in organisation unit hierarchy |
| FIRST_AVERAGE_ORG_UNIT | First value, average in organisation unit hierarchy |
| LAST | Last value, sum in organisation unit hierarchy |
| LAST_AVERAGE_ORG_UNIT | Last value, average in organisation unit hierarchy |
| LAST_IN_PERIOD | Last value in period, sum in organisation unit hierarchy |
| LAST_IN_PERIOD_AVERAGE_ORG_UNIT | Last value in period, average in organisation unit hierarchy |
| MAX | Maximální hodnota |
| MIN | Minimální hodnota |
| NONE | No aggregation is performed in any dimension |
| SUM | Sum of values in both period and organisation unit hierarchy |
| STDEEV | Standard deviation (population-based) of values |
| VARIANCE | Variance (population-based) of values |
Příklady funkcí .aggregationType, .maxDate, .minDate a .periodOffset:
| Indikátorový výraz | Prostředek |
|---|---|
| #{FH8ab5Rog83}.aggregationType(COUNT) | count of values |
| #{FH8ab5Rog83}.aggregationType(LAST) - #{FH8ab5Rog83}.aggregationType(FIRST) | rozdíl mezi první a poslední hodnotou |
| #{FH8ab5Rog83}.maxDate(2021-6-30) | hodnoty do 30. června-2021 |
| #{FH8ab5Rog83}.minDate(2021-1-1) | hodnoty od 1. ledna-2021 |
| #{FH8ab5Rog83}.minDate(2021-1-1) .maxDate(2021-6-30) | hodnoty mezi 1. lednem-2021 a 30. červnem-2021 |
| #{FH8ab5Rog83}.periodOffset(-1) | hodnotu z předchozího období |
| #{FH8ab5Rog83}.periodOffset(+1) | hodnotu z následujícího období |
| #{FH8ab5Rog83}.periodOffset(1) | hodnotu z následujícího období |
| #{FH8ab5Rog83} - 2 * D{IpHINAT79UW.uf3svrmp8Oj}.periodOffset(-1) | datový prvek FH8ab5Rog83 z vykazovaného období minus dvakrát programový datový prvek IpHINAT79UW.uf3svrmp8Oj z období před |
| ( #{FH8ab5Rog83} - #{QOlfIKgNJ3D2} ).periodOffset(-2) | datový prvek FH8ab5Rog83 ze 2 předchozích období minus datový prvek QOlfIKgNJ3D2 ze 2 předchozích období |
| #{FH8ab5Rog83}.periodOffset(-2) + #{FH8ab5Rog83}.periodOffset(-1) | datový prvek FH8ab5Rog83 ze 2 předchozích období plus hodnota z 1 předchozího období |
| ( #{FH8ab5Rog83}.periodOffset(-1) + #{FH8ab5Rog83} ).periodOffset(-1) | datový prvek FH8ab5Rog83 ze 2 období před plus hodnota z 1 období před (všimněte si, že funkce jsou vnořené) |
| N{IndicatorID}.periodOffset(-1) | indicator value from the period before (applies to aggregate data in the indicator) |
Indicator SubExpressions
When fetching data for a data element, indicators usually aggregate the data before evaluating it in the expression. For example, consider the indicator expression:
if( #{nYahlae7fe6} > 10, 1, 0 )
If the data element has aggregation type SUM, this will sum all the values of the data element nYahlae7fe6 for the relevant period and then test to see if the sum is greater than 10. It will return 1 if the sum of all the data element values is greater than 10, otherwise it will return 0.
Sometimes you may wish to evaluate a data value in an expression before aggregating it. For example, you may want to show at a district level how many facilities within the district have a data value greater than 10. This can be done by using the subExpression function as follows:
subExpression( if( #{nYahlae7fe6} > 10, 1, 0 ) )
This will test each data element value to see if it is greater than 10. If it is greater than 10, the if statement will return 1, otherwise 0. Then, assuming that data element nYahlae7fe6 has aggregation type SUM, it will sum the 1's and 0's, resulting in a count of how many data elements had a value greater than 10.
SubExpression notes:
-
An example such as the one above will sum the 1's and 0's only if the data element has an aggregation type of SUM. If the data element has a different aggregation type and you want to sum the 1's and 0's, you can override the aggregation type inside the subexpression by using the
.aggregationType()function as follows:subExpression( if( #{nYahlae7fe6} > 10, 1, 0 ) ).aggregationType(SUM)
-
A SubExpression may reference only one data element, but it may reference it multiple times. For example:
subExpression( if( #{nYahlae7fe6} > 10 && #{nYahlae7fe6} <= 20, 1, 0 ) )
-
A SubExpression may reference a data element with a category option combination and/or an attribute option combination, but it must be exactly the same reference each time. For example:
subExpression( if( #{nYahlae7fe6.beec4Dewah8} > 10 && #{nYahlae7fe6.beec4Dewah8} <= 20, 1, 0 ) )
-
If you wish to evaluate an expression before aggregating that involves other types of data such as program data, or that involves more than one data element, category option combination or attribute option combination, you can use a Predictor to do so and store the result as a different data element. Then you can reference the predicted data element in an indicator or directly in analytics.
Indicator Year-to-date
Indicators can compute year-to-date values using the expression elements yearToDate(), [periodInYear], and [yearlyPeriodCount].
In the examples below, #{a} can be: #{dataElementUID}, or any valid indicator expression item that returns a data value such as #{dataElementUID.catOptionComboUid}, I{programIndicatorUID}, N{indicatorUID}, etc.
| Indikátorový výraz | Prostředek |
|---|---|
| #{a} | current period value |
| #{a}.yearToDate() | sum of values year to date. For example, if the period is March gives the value for Jan+Feb+Mar |
| #{a}.yearToDate() / [periodInYear] | average year-to-date value. For example, if the period is March gives the value for Jan+Feb+Mar / 3 |
| #{a} - | difference between current period and average year to date |
| #{b} * [periodInYear] / [yearlyPeriodCount] | If #{b} represents the annual target population (for example, the number of people who should be vaccinated during this year), then this can show the number of people who should be vaccinated by the current period. For example, in February this gives #{b} * 2 / 12. |
Notes on [yearlyPeriodCount]
For monthly periods, [yearlyPeriodCount] is always 12, for quarters is always 4, etc. There are two advantages of using [yearlyPeriodCount] rather than hard-coding numbers like 12 or 4:
-
For weekly periods [yearlyPeriodCount] will be 52 or 53 depending on the year. For biweekly periods it will be 26 or 27.
-
If the user chooses a different period type in analytics, [periodInYear] and [yearlyPeriodCount] will adjust accordingly. For example if monthly data is collected, the user can choose to report monthly where [periodInYear] is 1: Jan, 2: Feb, ..., and [yearlyPeriodCount] is 12; or the user can report quarterly where [periodInYear] is 1: Q1, 2: Q2, ..., and [yearlyPeriodCount] is 4.
Notes on missing data
.yearToDate() returns a value if there is any data in the year before or during the period. For example, if the values of #{a} are:
Jan: (no data)
Feb: 1
Mar: 2
Apr: (no data)
May: 3
Jun: (no data)
then the values of #{a}.yearToDate() are:
Jan: (no data)
Feb: 1
Mar: 3
Apr: 3
May: 6
Jun: 6
V aplikaci Údržba spravujete následující objekty indikátorů:
Tabulka: Objekty indikátorů v aplikaci Údržba
| Typ objektu | Dostupné funkce |
|---|---|
| Indikátor | Vytvářejte, upravujte, klonujte, sdílejte, odstraňujte, zobrazujte podrobnosti a překládejte |
| Typ indikátoru | Vytvářejte, upravujte, klonujte, odstraňujte, zobrazujte podrobnosti a překládejte |
| Skupina indikátorů | Vytvářejte, upravujte, klonujte, sdílejte, odstraňujte, zobrazujte podrobnosti a překládejte |
| Sada skupin indikátorů | Vytvářejte, upravujte, klonujte, sdílejte, odstraňujte, zobrazujte podrobnosti a překládejte |
Pracovní postup
-
Vytvořte typy indikátorů.
-
Vytvořte indikátory.
-
Vytvořte skupiny indikátorů.
-
Vytvořte sady skupin indikátorů.
Vytvořte nebo upravte typ indikátoru

Indicator types define a factor that is applied during aggregation. Indicator values that are calculated during a data mart export or report table generation process will appear properly formatted, and will therefore not require an additional multiplier (for example 100 in the case of percent) for the values to appear correctly formatted.
Note
As of version 2.4 of DHIS2, the "Calculated data element" object has been deprecated. Instead, you can create a calculated data element by creating an indicator type with a factor of "1" and by setting the "Number" option to "Yes". The effect of setting the "Number" option to "Yes" will be that the indicator will effectively not have a denominator. You will therefore only be able to define a numerator, which will serve as the formula of the calculated data element.
-
Open the Maintenance app and click Indicator > Indicator type.
-
Klikněte na tlačítko Přidat.
-
In the Name field, type the name of the indicator type, for example "Per cent", "Per thousand", "Per ten thousand".
-
Zadejte faktor.
The factor is the numeric factor that will be multiplied by the indicator formula during the calculation of the indicator.
-
Klikněte Uložit.
Vytvořte nebo upravte indikátor
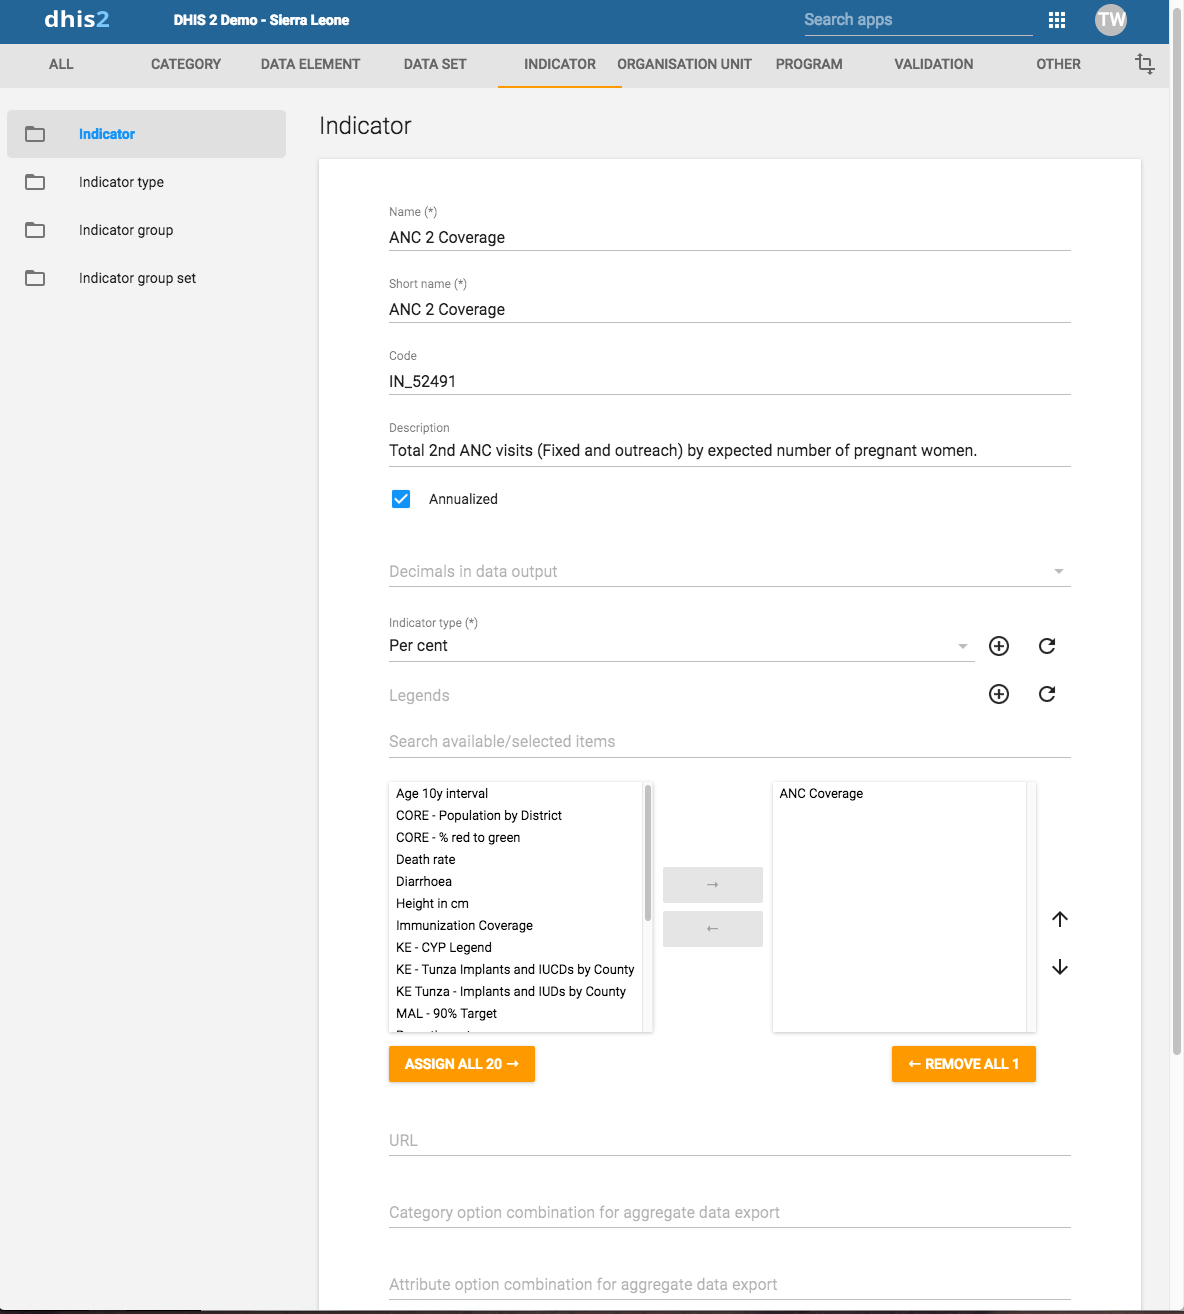
-
Open the Maintenance app and click Indicator > Indicator.
-
Klikněte na tlačítko Přidat.
-
In the Name field, type the full name of the indicator, for example "Incidence of confirmed malaria cases per 1000 population".
-
In the Short name field, type an abbreviated name of the indicator, for example "Inc conf. malaria per 1000 pop".
The short name must be less than or equal to 25 characters, including spaces.
-
(Volitelné) V poli Kód přiřaďte kód.
V mnoha zemích je indikátorům přiřazen kód.
-
(Volitelné) V poli Barva přiřaďte barvu k opětovnému zadání indikátoru.
-
(Volitelné) V poli Ikona přiřaďte ikonu, která ilustruje význam indikátoru.
-
In the Description field, type a brief, informative description of the indicator and how it is calculated.
-
If you want to apply an annualization factor during the calculation of the indicator, select Annualized.
Typically, an annualized indicator's numerator is multiplied by a factor of 12, and the denominator is for instance a yearly population figure. This allows for monthly coverage values to be calculated with yearly population figures.
-
Vyberte počet desetinných míst ve výstupu dat.
-
Vyberte typ indikátoru.
This field determines a factor that will automatically be applied during the calculation of the indicator. Possible choices are determined by the indicator types. For example, a "Percent" indicator will automatically be multiplied by a factor of 100 when exported to the data mart, so that it will display as a percentage.
-
(Volitelné) Přiřaďte jednu nebo více legend.
-
In the URL field, enter a link, for example a link to an indicator registry, where a full metadata description of the indicator can be made available.
-
(Optional) Enter a Category option combination for aggregate data export..
You use this setting to map aggregated data exported as raw data to another server. Typically you do this type of data exchange mapping when you want to create anonymous aggregated data from patient data recorded in programs (event data).
-
(Optional) Enter an Attribute option combination for aggregate data export..
You use this setting to map aggregated data exported as raw data to another server. Typically you do this type of data exchange mapping when you want to create anonymous aggregated data from patient data recorded in programs (event data).
-
If applicable, enter custom attributes values, for example Classification or Collection method.
Note
You create custom attributes in the Maintenance app: Other > Attributes.
-
Klikněte na Upravit čitatel.
-
Zadejte jasný popis čitatele.
-
Define the numerator by double-clicking components in the right-hand field. The components then appears as part of the formula in the left-hand field. Add mathematical operators by double-clicking the icons below the left-hand field.
You formula must be mathematically valid. This includes correct use of parentheses when necessary.
-
Kliknutím na Hotovo uložíte všechny změny do čitatele.
-
-
Klikněte na Upravit jmenovatele.
-
Zadejte jasný popis jmenovatele.
-
Define the denominator by double-clicking components in the right-hand field. The components then appears as part of the formula in the left-hand field. Add mathematical operators by double-clicking the icons below the left-hand field.
You formula must be mathematically valid. This includes correct use of parentheses when necessary.
-
Kliknutím na Hotovo uložíte všechny změny jmenovatele.
-
-
If applicable, select compulsory indicator group sets, for example Human resources.
Note
You'll only see indicator group sets in this form if you've created them and set them to Compulsory.
You create indicator group sets in the Maintenance app: Indicator > Indicator group set.
-
Klikněte Uložit.
Vytvořte nebo upravte skupinu indikátorů

-
Open the Maintenance app and click Indicator > Indicator group.
-
Klikněte na tlačítko Přidat.
-
Zadejte název.
-
Vyberte indikátory a přiřaďte je.
-
Klikněte Uložit.
Vytvořte nebo upravte sadu skupin indikátorů

Indicator group sets create combined groups of similar indicators. For example, you might have a group of indicators called "Malaria" and "Leishmaniasis". Both of these groups could be combined into a group set called "Vector-borne diseases". Indicator groups sets are used during analysis of data to combine similar themes of indicators.
-
Open the Maintenance app and click Indicators > Indicator group.
-
Klikněte na tlačítko Přidat.
-
Vyplňte formulář:
- Název
- Krátký název
- Kód
- Popis
- Povinný
-
Vyberte skupiny indikátorů a přiřaďte je.
Available indicator groups are displayed in the left panel. Indicator groups that are currently members of the indicator group set are displayed in the right hand panel.
-
Klikněte Uložit.
Clone metadata objects
Klonování datového prvku nebo jiných objektů může ušetřit čas při vytváření mnoha podobných objektů.
-
Otevřete aplikaci Údržba a najděte typ objektu metadat který chcete klonovat.
-
V seznamu objektů klikněte na nabídku možností a vyberte Klonovat.
-
Upravte požadované možnosti.
-
Klikněte Uložit.
Změňte nastavení sdílení pro objekty metadat
Objektům metadat můžete přiřadit různá nastavení sdílení, například organizační jednotky a atributy sledovaných entit. Tato nastavení sdílení určují, kteří uživatelé a skupiny uživatelů mohou zobrazit nebo upravit objekt metadat.
Některé objekty metadat také umožňují změnit nastavení sdílení zadávání dat pro objekt. Tato další nastavení určují, kdo může pomocí metadat zobrazit nebo zadat data do polí formuláře.
Poznámka
Výchozí nastavení je, že každý (Veřejný přístup) může najít, prohlížet a upravovat objekty metadat.
-
Otevřete aplikaci Údržba a najděte typ objektu metadat chcete upravit.
-
In the object list, click the context menu and select Sharing settings.
-
(Optional) Add users or user groups: search for a user or a user group and select it. The user or user group is added to the list.
-
Změňte nastavení sdílení pro skupiny přístupu, které chcete upravit.
-
Can edit and view: The access group can view and edit the object.
-
Může pouze zobrazit: Přístupová skupina může zobrazit objekt.
-
No access (only applicable to Public access): The public won't have access to the object.
-
-
Change data sharing settings for the access groups you want to modify.
-
Can capture data: The access group can view and capture data for the object.
-
Can view data: The access group can view data for the object.
-
No access: The access group won't have access to data for the object.
-
-
Klikněte na Zavřít.
Odstraňte objekty metadat
Poznámka
Datový prvek a další objekty datových prvků můžete odstranit, pouze pokud k samotnému datovému prvku nejsou přidružena žádná data.
Varování
Jakákoli sada dat, kterou ze systému odstraníte, je nenávratně ztracena. Odebrány budou také všechny formuláře pro zadávání údajů a formuláře oddílů, které mohly být vyvinuty. Před odstraněním jakékoli datové sady se ujistěte, že jste vytvořili zálohu své databáze, pro případ, že byste ji v určitém okamžiku potřebovali obnovit.
-
Otevřete aplikaci Údržba a najděte typ objektu metadat které chcete smazat.
-
V seznamu objektů klikněte na nabídku možností a vyberte Odstranit.
-
Klikněte na Potvrdit.
Zobrazit podrobnosti o objektech metadat
-
Otevřete aplikaci Údržba a najděte typ objektu metadat které chcete zobrazit.
-
In the object list, click the options menu and select Show details.
Přeložte objekty metadat
DHIS2 poskytuje funkce pro překlady obsahu databáze, například datových prvků, skupin datových prvků, indikátorů, skupin indikátorů nebo organizačních jednotek. Tyto prvky můžete přeložit na libovolný počet národních prostředí. Národní prostředí představuje konkrétní geografickou, politickou nebo kulturní oblast.
Tip
Chcete-li aktivovat překlad, otevřete aplikaci Nastavení systému a klikněte na > Vzhled a vyberte jazyk.
-
Otevřete aplikaci Údržba a najděte typ objektu metadat you want to translate.
-
V seznamu objektů klikněte na nabídku možností a vyberte Přeložit.
Tip
If you want to translate an organisation unit level, click directly on the Translate icon next to each list item.
-
Vyberte národní prostředí.
-
Zadejte Název, Zkrácený název a Popis.
-
Klikněte Uložit.
Spravovat organizační jednotky
V této části se naučíte, jak:
-
Create a new organisation unit and build up the organisation unit hierarchy
-
Create organisation unit groups, group sets, and assign organisation units to them
-
Upravit hierarchii organizační jednotky
O organizačních jednotkách
The organisation unit hierarchy defines the organisation structure of DHIS2, for example how health facilities, administrative areas and other geographical areas are arranged with respect to each other. It is the where dimension of DHIS2, similar to how periods represent the when dimension.
The organisation unit hierarchy is built up by parent-child relations. In DHIS2, each of these nodes is an organisation unit. A country might for example have eight provinces, and each province might have a number of districts as children. Normally, the lowest levels consist of facilities where data is collected. Data collecting facilities can also be located at higher levels, for example national or provincial hospitals. Therefore, you can create skewed organisation trees in DHIS2.
-
Můžete mít pouze jednu organizační hierarchii současně.
-
V hierarchii můžete mít libovolný počet úrovní.
Typically national organisation hierarchies in public health have four to six levels.
-
You can create additional classifications by using organisation groups and organisation group sets.
For example to create parallel administrative boundaries to the health care sector.
-
It is recommended to use organisation unit groups to create a non-geographical hierarchy.
-
An organisation unit can only be a member of a single organisation unit group within an organisation unit group set.
-
An organisation unit group can be part of multiple organisation unit group sets.
-
The organisation unit hierarchy is the main vehicle for data aggregation on the geographical dimension.
-
When you close an organisation unit, you can't register or edit events to this organisation unit in the Event Capture and Tracker Capture apps.
Important
You can change the organisation unit hierarchy after you've created it, even organisation units that collect data. However, DHIS2 always uses the latest hierarchy for data aggregation. So if you change the hierarchy, you loose the temporal representation of the hierarchy across time.
District A is sub-divided into District B and District C. Facilities which belonged to District A are reassigned to District B and C. Any historical data, which you entered before the split occurred, is still registered as belonging to District B and C, not to the obsolete District A.
In the Maintenance app, you manage the following organisation unit objects:
Tabulka: Objekty organizační jednotky v aplikaci Údržba
| Typ objektu | Dostupné funkce |
|---|---|
| Organizační jednotka | Vytvářejte, upravujte, klonujte, odstraňujte, zobrazujte podrobnosti a překládejte |
| Skupina organizační jednotky | Vytvářejte, upravujte, klonujte, sdílejte, odstraňujte, zobrazujte podrobnosti a překládejte |
| Sada skupin organizačních jednotek | Vytvářejte, upravujte, klonujte, sdílejte, odstraňujte, zobrazujte podrobnosti a překládejte |
| Úroveň organizační jednotky | Upravit a přeložit |
| Operace hierarchie | Přesuňte organizační jednotky |
Pracovní postup
Doporučený pracovní postup je:
-
Vytvořte organizační jednotky.
-
Vytvořte skupiny organizačních jednotek.
-
Vytvořte sady skupin organizačních jednotek.
Vytvořte nebo upravte organizační jednotku

You add organisation units to the hierarchy one by one, either as a root unit or as a child of a selected organisation unit. You can only have one root unit.
-
Open the Maintenance app and click Organisation unit > Organizační jednotka.
-
Klikněte na tlačítko Přidat.
-
Select which organisation unit your new organisation unit will belong to:
-
Klikněte na Nadřazená organizační jednotka.
-
In the organisation unit tree, locate the parent organisation unit and select it. Your selection is marked in yellow.
Tip
Click the arrows to expand the organisation unit tree.
-
Klikněte na Vybrat.
-
-
Zadejte název organizační jednotky.
Každá organizační jednotka musí mít jedinečný název.
-
Zadejte zkrácený název pro organizační jednotku.
Typically, the short name is an abbreviation of the full organisation unit name. This attribute is often used in reports to display the name of the organisation unit, where space is limited.
-
(Volitelné) Přiřaďte kód.
V mnoha zemích je organizačním jednotkám přidělen kód.
-
(Volitelné) Nahrajte / odeberte obrázek organizační jednotky
-
(Volitelné) Zadejte popis organizační jednotky.
-
Vyberte Datum zahájení.
The opening dates control which organisation units that existed at a point in time, for example when analysing historical data.
-
Je-li to relevantní, vyberte Datum ukončení.
-
In the Comment field, enter any additional information that you would like to add.
-
(Optional) In the URL field, enter a link to an external web site that has additional information about the organisation unit.
-
Zadejte kontaktní údaje:
-
Kontaktní osoba
-
Adresa
-
E-mail
-
Telefonní číslo
-
-
(Volitelné) Zadejte Zeměpisnou šířku a Zeměpisnou délku.
You must have latitude and longitude values to create maps in the Maps app. Then your organisation units can be represented as points on a map, for example a health facility. Without this information, the Maps app will not work.
It might be more efficient to import coordinates later as a batch job for all organisation units using the Import-Export app. You also use the Import-Export app to create polygons. A polygon is an organisation unit that represent an administrative boundary.
-
Pokud je to možné, vyberte Datové Sady a přiřaďte je.
Note
You control whether a user should be able to assign data sets to an organisation unit in the System Settings app:
Open the System Settings app, click Access and select Allow assigning object to related objects during add or update.
-
Pokud je to možné, vyberte Programy a přiřaďte je.
Note
You control whether a user should be able to assign programs to an organisation unit in the System Settings app:
Open the System Settings app, click Access and select Allow assigning object to related objects during add or update.
-
If applicable, enter custom attributes values, for example HR identifier.
Note
You configure the custom attributes in the Maintenance app:
Open the Maintenance app and click Other > Attribute.
-
Klikněte Uložit.
Vytvořte nebo upravte skupinu organizační jednotky
Organisation unit groups allow you to classify related organisation units into a common theme. You can for example group all organisation units that are hospitals in an Hospital group.
-
Open the Maintenance app and click Organisation unit > Organisation unit group.
-
Klikněte na tlačítko Přidat.
-
Vyplňte formulář:
-
Name: Provide a precise, unique and descriptive name for the organisation unit group.
-
Short name: The short name should be less than 25 characters. Typically, the short name is an abbreviation of the full organisation unit name. This attribute is used in certain places in DHIS2 where space is limited.
-
Kód
-
Symbol: Select a symbol which will be used to display the organisation unit (points only) when the layer is displayed in the Maps app.
-
-
In the organisation tree, click the organisation units you want to add to the organisation unit group.
You can locate an organisation unit in the tree by expanding the branches (click on the arrow symbol), or by searching for it by name.
Vybrané organizační jednotky se zobrazí oranžově.
-
Klikněte Uložit.
Vytvořte nebo upravte sadu skupin organizačních jednotek
Organisation unit group sets allows you to create additional classifications of organisation units. The group sets create new dimensions so that you can make a more detailed data analysis. You an easily filter, organise or aggregate data by groups within a group set.
-
Můžete mít libovolný počet sad skupin organizačních jednotek.
-
The default organisation unit group sets are Type and Ownership.
-
An organisation unit can only be a member of a single organisation unit group within an organisation unit group set.
-
An organisation unit group can be part of multiple organisation unit group sets.
-
You can define whether an organisation unit group set is compulsory or not, which will affect the completeness of the data. Compulsory means that all organisation units must be member of a group in that group set.
Note
In the Data integrity part of the Data administration app you can verify if you've accidentally assigned the same organisation unit to multiple groups within the same group set. In this app you also find information about organisation units that are not members of a compulsory organisation unit group set.
-
Open the Maintenance app and click Organisation unit > Organisation unit group set.
-
Klikněte na tlačítko Přidat.
-
Vyplnit:
-
Name: Provide a precise name for the organisation unit group set.
-
Short name: Provide a short name for the organisation unit group set.
-
Kód
-
Description: Describe what the organisation unit group set measures or captures.
-
-
If you want all organisation units to be members of a group within the group set, select Compulsory.
-
(Volitelné) Vyberte Datová dimenze.
If you select **Data dimension**, the group set will be available to the analytics as another dimension, in addition to the standard dimensions of "Period" and "Organisation unit". -
(Volitelné) Vyberte Zahrnout do analytiky subhierarchii.
If you select this, a sub-organisation unit will inherit the organisation unit group property from its closest "parent" organisation unit. Any property on the sub-organisation unit will override the inherit value.
If an organisation unit have no associated organisation unit group, the organisation unit can inherit its closest parent's organisation unit group. If none of the parent organisation unit groups have an organisation unit group for a given org unit group set, the result will still be "blank", but if at least one parent has an organisation unit group, sub-organisation unit will inherit it.
include subhierarchy in analytics" is enabled, which means the org units inherit their closest parents org unit group IF the org unit is white (no org unit group associated with it).
-
Vyberte skupiny organizačních jednotek a přiřaďte je.
In the left-hand list, you find the available organisation unit groups. Use the arrows to move selected groups between the two lists.
If there are no organisation unit groups in the left-hand list, click Add new. In the form that opens, create the organisation units group you need. When you're done, click Refresh values.
Note
An organisation unit can only be a member of a single organisation unit group within an organisation unit group set.
-
Click Save.

Chcete analyzovat data na základě vlastnictví zařízení. Všechna zařízení mají vlastníka, takže musíte zajistit, aby všechny organizační jednotky získaly tuto klasifikaci. K tomu můžete použít možnost Povinné:
-
Create a group for each ownership type, for example "MoH", "Private" and "Faith-based".
-
Přiřaďte všechna zařízení v databázi jedné z těchto skupin.
-
Create an organisation unit group set called "Ownership" and select Compulsory.
-
Assign the organisation unit groups "MoH", "Private" and "Faith-based" to the "Ownership" organisation group set.
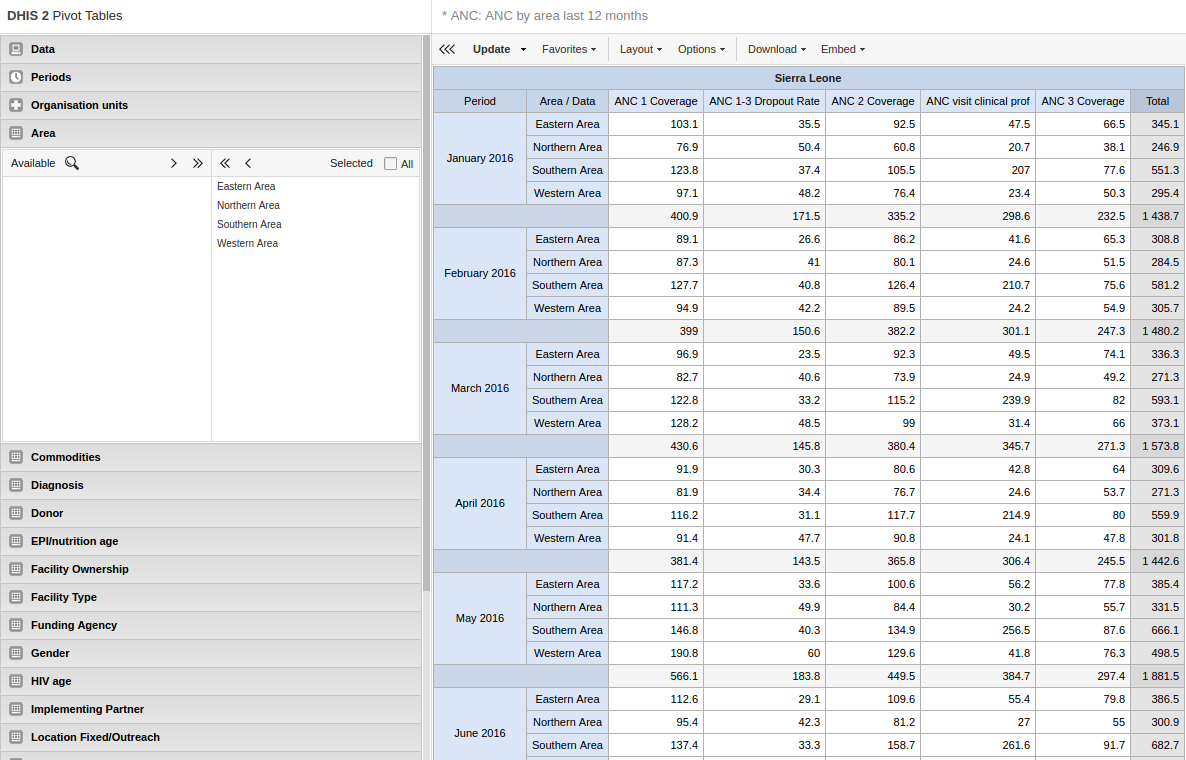

Group you organisation unit in two ways and aggregate data on these two parallel hierarchies
Slouží k agregaci dat (pouze v analytických aplikacích)
An additional setting to the organisation unit group set, creates a dynamic "membership" to a organisation unit group set.
Hierarchii organizačních jednotek nezměníte
Škálovatelné a dynamické
Dynamické zahrnutí hierarchie
Dynamická dodatečná klasifikace
Přiřaďte názvy na úrovni organizačních jednotek
When you add children to an organisation unit, DHIS2 automatically creates a new organisation unit level if necessary. The system also assigns a generic name to this level, for example "Level 5". You can replace the generic name with a contextual name, for example "Country", "Province", "District" or "Health Facility". DHIS2 uses the contextual names anywhere levels are referred to, for example in the Maps app.
-
Open the Maintenance app and click Organisation unit > Úroveň organizační jednotky.
The loading time of the list depends on the depth of the organisation unit hierarchy tree.
-
Pro úrovně organizační jednotky, které chcete upravit, zadejte název.
-
Vyberte počet úrovní offline.
Note
You configure the default value in the System Settings app:
Open the System Settings app, click General and select a level in the Max offline organisation unit levels list.
-
Klikněte Uložit.
Přesuňte organizační jednotky v rámci hierarchie
You can move organisation units within in the hierarchy by changing the parent of a selected organisation unit.
-
Open the Maintenance app and click Organisation unit > Hierarchy operations.
-
In the left-hand hierarchy tree, select the organisation unit(s) you want to move.
Note
If the selected organisation unit is has sub-organisation units, all of them move to the new parent organisation unit.
-
In the right-hand hierarchy tree, select which organisation unit you want to move the selected organisation unit(s) to.
-
Click Move x organisation units, where x stands for the number of organisation units you have selected.
Your changes are immediately reflected in the left-hand side hierarchy tree.
Zavřete organizační jednotku
Když zavřete organizační jednotku, nemůžete registrovat ani upravovat události v této organizační jednotce v aplikacích Zachycení Událostí a Tracker Capture.
-
Open the Maintenance app and click Organisation unit > Organizační jednotka.
-
V seznamu objektů klikněte na nabídku možností a vyberte Upravit.
-
Vyberte Datum ukončení.
-
Klikněte Uložit.
Clone metadata objects
Klonování datového prvku nebo jiných objektů může ušetřit čas při vytváření mnoha podobných objektů.
-
Otevřete aplikaci Údržba a najděte typ objektu metadat který chcete klonovat.
-
V seznamu objektů klikněte na nabídku možností a vyberte Klonovat.
-
Upravte požadované možnosti.
-
Klikněte Uložit.
Změňte nastavení sdílení pro objekty metadat
Objektům metadat můžete přiřadit různá nastavení sdílení, například organizační jednotky a atributy sledovaných entit. Tato nastavení sdílení určují, kteří uživatelé a skupiny uživatelů mohou zobrazit nebo upravit objekt metadat.
Některé objekty metadat také umožňují změnit nastavení sdílení zadávání dat pro objekt. Tato další nastavení určují, kdo může pomocí metadat zobrazit nebo zadat data do polí formuláře.
Poznámka
Výchozí nastavení je, že každý (Veřejný přístup) může najít, prohlížet a upravovat objekty metadat.
-
Otevřete aplikaci Údržba a najděte typ objektu metadat chcete upravit.
-
In the object list, click the context menu and select Sharing settings.
-
(Optional) Add users or user groups: search for a user or a user group and select it. The user or user group is added to the list.
-
Změňte nastavení sdílení pro skupiny přístupu, které chcete upravit.
-
Can edit and view: The access group can view and edit the object.
-
Může pouze zobrazit: Přístupová skupina může zobrazit objekt.
-
No access (only applicable to Public access): The public won't have access to the object.
-
-
Change data sharing settings for the access groups you want to modify.
-
Can capture data: The access group can view and capture data for the object.
-
Can view data: The access group can view data for the object.
-
No access: The access group won't have access to data for the object.
-
-
Klikněte na Zavřít.
Odstraňte objekty metadat
Poznámka
Datový prvek a další objekty datových prvků můžete odstranit, pouze pokud k samotnému datovému prvku nejsou přidružena žádná data.
Varování
Jakákoli sada dat, kterou ze systému odstraníte, je nenávratně ztracena. Odebrány budou také všechny formuláře pro zadávání údajů a formuláře oddílů, které mohly být vyvinuty. Před odstraněním jakékoli datové sady se ujistěte, že jste vytvořili zálohu své databáze, pro případ, že byste ji v určitém okamžiku potřebovali obnovit.
-
Otevřete aplikaci Údržba a najděte typ objektu metadat které chcete smazat.
-
V seznamu objektů klikněte na nabídku možností a vyberte Odstranit.
-
Klikněte na Potvrdit.
Zobrazit podrobnosti o objektech metadat
-
Otevřete aplikaci Údržba a najděte typ objektu metadat které chcete zobrazit.
-
In the object list, click the options menu and select Show details.
Přeložte objekty metadat
DHIS2 poskytuje funkce pro překlady obsahu databáze, například datových prvků, skupin datových prvků, indikátorů, skupin indikátorů nebo organizačních jednotek. Tyto prvky můžete přeložit na libovolný počet národních prostředí. Národní prostředí představuje konkrétní geografickou, politickou nebo kulturní oblast.
Tip
Chcete-li aktivovat překlad, otevřete aplikaci Nastavení systému a klikněte na > Vzhled a vyberte jazyk.
-
Otevřete aplikaci Údržba a najděte typ objektu metadat you want to translate.
-
V seznamu objektů klikněte na nabídku možností a vyberte Přeložit.
Tip
If you want to translate an organisation unit level, click directly on the Translate icon next to each list item.
-
Vyberte národní prostředí.
-
Zadejte Název, Zkrácený název a Popis.
-
Klikněte Uložit.
Manage validation rules
O pravidlech ověřování
A validation rule is based on an expression. The expression defines a relationship between data element values. The expression forms a condition with certain logical criteria.
Výraz se skládá z:
-
Levá strana
-
Pravé strany
-
Operátoru
A validation rule asserting that the total number of vaccines given to infants is less than or equal to the total number of infants.
Levá a pravá strana musí vracet číselné hodnoty.
In the Maintenance app, you manage the following validation rule objects:
| Typ objektu | Co můžeš udělat |
|---|---|
| Pravidlo ověření | Vytvářejte, upravujte, klonujte, odstraňujte, zobrazujte podrobnosti a překládejte |
| Skupina ověřovacích pravidel | Vytvářejte, upravujte, klonujte, odstraňujte, sdílejte, zobrazujte podrobnosti a překládejte |
| Oznámení o ověření | Vytvářejte, upravujte, klonujte, odstraňujte, zobrazujte podrobnosti a překládejte |
O posuvných oknech
Můžete použít posuvná okna ke seskupení dat napříč více obdobími na rozdíl od výběru dat pro jedno období. Posuvná okna mají velikost, to znamená počet dní, které mají být pokryty, počáteční a koncový bod. Níže uvedený příklad ukazuje data sledování nemocí:.
-
The data in the orange section, selects data based on the current period. There is a threshold, which is calculated once for each week or period, and this is shown in the "Result" section.
-
The data in the blue section is the sliding window. It selects data from the past 7 days. The "Result" shows the total number of confirmed cases of a disease.
-
The validation rule makes sure users are notified when the total number of cases breaks the threshold for the period.

Tabulka: Různé chování ověřovacích pravidel
| S posuvnými okny | Bez posuvných oken |
|---|---|
| Používá se pouze pro data událostí. | Používá se pro data událostí a agregovaná data. |
| Výběr dat je založen na pevném počtu dní (periodType). | Výběr dat je vždy založen na období. |
| The position of the sliding window is always relative to the period being compared. | Data is always selected for the same period as the period being compared. |
See also: How to use sliding windows when you're Creating or editing a validation rule.
O skupinách pravidel ověření
A validation rule group allows you to group related validation rules. When you run a validation rule analysis, you can choose to run all of the validation rules in your system, or just the validation rules in one group.
O oznámeních o ověření
You can configure a validation rule analysis to automatically send notifications about validation errors to selected user groups. These messages are called validation notifications. They are sent via the internal DHIS2 messaging system.
You can send validation rule notifications as individual messages or as message summaries. This is useful, for example, if you want to send individual messages for high-priority disease outbreaks, and summaries for low-priority routine data validation errors.
About validation rule functions
You can use the following functions in a validation rule left side or right side:
Tabulka: Funkce ověřovacího pravidla
| Funkce ověřovacího pravidla | Argumenty | Popis |
|---|---|---|
| contains | (expr, sub1, ...) | Searches an expression for one or more substrings. Returns true if the expression contains all the substrings. For example, the following are all true: contains("abcd", "abcd"); contains("abcd", "b"); and contains("abcd", "ab", "bc"). Comparisons are case-sensitive. |
| containsItems | (expr, item1, ...) | Searches an expression for one or more items. The expression is made up of comma-separated elements. containsItems returns true if every item exactly matches an element in the expression. For example, containsItems("abcd", "abcd") and containsItems("ab,cd", "ab", "cd") are true, but containsItems("abcd", "b") and containsItems("abcd", "ab", "bc") are false. Comparisons are case-sensitive. containsItems can be used for multi-valued data elements to see if an item is contained in the data element values. |
| if | (boolean-expr, true-expr, false-expr) | Vyhodnotí logický výraz a pokud true vrátí hodnotu true výrazu, pokud false vrátí hodnotu falešného výrazu. Argumenty musí dodržovat pravidla pro jakýkoli výraz indikátoru. |
| is | (expr1 in expression [, expression ...]) | Returns true if expr1 is equal to any of the following expressions, otherwise false. |
| isNull | (element) | Vrátí true, pokud chybí hodnota prvku (null), jinak false. |
| isNotNull | (element) | Vrátí true, pokud hodnota prvku nechybí (není null), jinak false. |
| firstNonNull | (element [, element ...]) | Vrátí hodnotu prvního prvku, který nechybí (není null). Lze zadat libovolný počet argumentů. Jakýkoli argument může být také číselný nebo řetězcový literál, který bude vrácen, pokud všechny předchozí objekty mají chybějící hodnoty. |
| největší | (expression [, expression ...]) | Vrátí největší (nejvyšší) hodnotu zadaných výrazů. Lze uvést libovolný počet argumentů. |
| nejméně | (expression [, expression ...]) | Vrátí nejnižší (nejnižší) hodnotu zadaných výrazů. Lze uvést libovolný počet argumentů. |
| log | (expression [, base ]) | Vrátí přirozený logaritmus (základ e) číselného výrazu. Pokud je jako druhý argument zadáno celé číslo, vrátí logaritmus pomocí této báze. |
| log10 | (výraz) | Vrátí běžný logaritmus (základ 10) číselného výrazu. |
| null | Nevrací žádný výsledek. Například if( #{FH8ab5Rog83}<0, null, 1 ) nevrátí nic, pokud je hodnota datového prvku menší než 0, jinak 1. | |
| orgUnit.ancestor | (orgUnitUid [, orgUnitUid ...]) | Vrátí hodnotu true, pokud je organizační jednotka podřízeným některé z (1 nebo více) organizačních jednotek, v opačném případě hodnotu false. |
| orgUnit.dataSet | (dataSetUid [, dataSetUid ...]) | Vrátí hodnotu true, pokud je organizační jednotka přiřazena k některé z (1 nebo více) sad dat, v opačném případě je false. |
| orgUnit.group | (ouGroupUid [, ouGroupUid ...]) | Vrátí hodnotu true, pokud je organizační jednotka členem kterékoli z (1 nebo více) skupin organizačních jednotek, jinak hodnotu false. |
| orgUnit.program | (programUid [, programUid ...]) | Vrací hodnotu true, pokud je organizační jednotka přiřazena k některému z (1 nebo více) programů, v opačném případě vrací hodnotu false. |
| removeZeros | (výraz) | Pokud je hodnota výrazu 0, nevrátí nic, jinak vrátí hodnotu výrazu. |
Vytvořte nebo upravte ověřovací pravidlo
-
Open the Maintenance app and click Validation > Validation rule.
-
Klikněte na tlačítko Přidat.
-
Zadejte Název.
Název musí být mezi pravidly ověření jedinečný.
-
(Volitelné) V poli Kód přiřaďte kód.
-
(Volitelné) Zadejte Popis.
-
Vyberte Důležitost: Vysoká, Střední nebo Nízká.
-
Vyberte Typ období.
-
Select an Operator: Compulsory pair, Equal to, Exclusive pair, Greater than, Greater than or equal to or Not equal to.
The Compulsory pair operator allows to require that data values must be entered for a form for both left and right sides of the expression, or for neither side. This means that you can require that if one field in a form is filled, then one or more other fields must also be filled.
The Exclusive pair allows to assert that if any value exist on the left side then there should be no values on the right side (or vice versa). This means that data elements which compose the rule on either side should be mutually exclusive from each other, for a given time period / organisation unit /attribute option combo.
-
Vytvořte levou stranu výrazu:
-
Klikněte na Levá strana.
-
Select Sliding window if you want to view data relative to the period you are comparing. See also About validation rules.
-
Select a Missing value strategy. This selection sets how the system evaluates a validation rule if data is missing.
Option Description Skip if any value is missing The validation rule will be skipped if any of the values which compose the expression are missing. This is the default option.
Always select this option you use the Exclusive pair or Compulsory pair operator.Skip if all values are missing The validation rule will be skipped only if all of the operands which compose it are missing. Never skip The validation rule will never be skipped in case of missing data, and all missing operands will be treated effectively as a zero. -
Type a Description.
-
Build an expression based on the available data elements, program objects, organisation units, counts and constants.
In the right pane, double-click the data objects you want to include in the expression. Combine with the mathematical operators located below the left pane.
-
Click Save.
-
-
Vytvořte pravou stranu výrazu:
-
Klikněte na Pravá strana.
-
Select a Missing value strategy. This selection sets how the system evaluates a validation rule if data is missing.
Option Description Skip if any value is missing The validation rule will be skipped if any of the values which compose the expression are missing. This is the default option.
Always select this option you use the Exclusive pair or Compulsory pair operator.Skip if all values are missing The validation rule will be skipped only if all of the operands which compose it are missing. Never skip The validation rule will never be skipped in case of missing data, and all missing operands will be treated effectively as a zero. -
Select Sliding window if you want to view data relative to the period you are comparing. See also About validation rules.
-
Type a Description.
-
Build an expression based on the available data elements, program objects, organisation units, counts and constants.
In the right pane, double-click the data objects you want to include in the expression. Combine with the mathematical operators located below the left pane.
-
Click Save.
-
-
(Optional) Choose which Organisation unit levels this rule should be evaluated for. Leaving this empty will cause the validation rule to be evaluated at all levels.
-
(Optional) Click Skip this rule during form validation to avoid triggering this rule while doing data entry
-
Klikněte Uložit.
Vytvořte nebo upravte skupinu ověřovacích pravidel
-
Open the Maintenance app and click Validation > Validation rule group.
-
Klikněte na tlačítko Přidat.
-
Zadejte Název.
-
(Volitelné) V poli Kód přiřaďte kód.
-
(Volitelné) Zadejte Popis.
-
Double-click the Validation rules you want to assign to the group.
-
Klikněte Uložit.
Vytvořte nebo upravte oznámení o ověření
-
Open the Maintenance app and click Validation > Validation notification.
-
Klikněte na tlačítko Přidat.
-
Zadejte Název.
-
(Volitelné) V poli Kód přiřaďte kód.
-
Vyberte Pravidla ověření.
-
Vyberte Skupiny uživatelů příjemců.
-
(Volitelné) Vyberte Upozornit uživatele pouze v hierarchii.
If you select this option, the system will filter the recipient users. (The system derives the recipient users from the recipient user groups.) The filter is based on which organisation unit the recipient user belongs to. The users linked to organisation units which are ancestors of the organisation unit where the violation took place will receive validation notifications. The system will ignore other users and these users won't receive validation notifications.
-
Vytvořte šablonu zprávy:
-
Vytvořte šablonu subjektu.
Double-click the parameters in the Template variables field to add them to your subject.
-
Vytvořte šablonu zprávy.
Double-click the parameter names in the Template variables field to add them to your message.
-
-
Klikněte Uložit.
Clone metadata objects
Klonování datového prvku nebo jiných objektů může ušetřit čas při vytváření mnoha podobných objektů.
-
Otevřete aplikaci Údržba a najděte typ objektu metadat který chcete klonovat.
-
V seznamu objektů klikněte na nabídku možností a vyberte Klonovat.
-
Upravte požadované možnosti.
-
Klikněte Uložit.
Změňte nastavení sdílení pro objekty metadat
Objektům metadat můžete přiřadit různá nastavení sdílení, například organizační jednotky a atributy sledovaných entit. Tato nastavení sdílení určují, kteří uživatelé a skupiny uživatelů mohou zobrazit nebo upravit objekt metadat.
Některé objekty metadat také umožňují změnit nastavení sdílení zadávání dat pro objekt. Tato další nastavení určují, kdo může pomocí metadat zobrazit nebo zadat data do polí formuláře.
Poznámka
Výchozí nastavení je, že každý (Veřejný přístup) může najít, prohlížet a upravovat objekty metadat.
-
Otevřete aplikaci Údržba a najděte typ objektu metadat chcete upravit.
-
In the object list, click the context menu and select Sharing settings.
-
(Optional) Add users or user groups: search for a user or a user group and select it. The user or user group is added to the list.
-
Změňte nastavení sdílení pro skupiny přístupu, které chcete upravit.
-
Can edit and view: The access group can view and edit the object.
-
Může pouze zobrazit: Přístupová skupina může zobrazit objekt.
-
No access (only applicable to Public access): The public won't have access to the object.
-
-
Change data sharing settings for the access groups you want to modify.
-
Can capture data: The access group can view and capture data for the object.
-
Can view data: The access group can view data for the object.
-
No access: The access group won't have access to data for the object.
-
-
Klikněte na Zavřít.
Odstraňte objekty metadat
Poznámka
Datový prvek a další objekty datových prvků můžete odstranit, pouze pokud k samotnému datovému prvku nejsou přidružena žádná data.
Varování
Jakákoli sada dat, kterou ze systému odstraníte, je nenávratně ztracena. Odebrány budou také všechny formuláře pro zadávání údajů a formuláře oddílů, které mohly být vyvinuty. Před odstraněním jakékoli datové sady se ujistěte, že jste vytvořili zálohu své databáze, pro případ, že byste ji v určitém okamžiku potřebovali obnovit.
-
Otevřete aplikaci Údržba a najděte typ objektu metadat které chcete smazat.
-
V seznamu objektů klikněte na nabídku možností a vyberte Odstranit.
-
Klikněte na Potvrdit.
Zobrazit podrobnosti o objektech metadat
-
Otevřete aplikaci Údržba a najděte typ objektu metadat které chcete zobrazit.
-
In the object list, click the options menu and select Show details.
Přeložte objekty metadat
DHIS2 poskytuje funkce pro překlady obsahu databáze, například datových prvků, skupin datových prvků, indikátorů, skupin indikátorů nebo organizačních jednotek. Tyto prvky můžete přeložit na libovolný počet národních prostředí. Národní prostředí představuje konkrétní geografickou, politickou nebo kulturní oblast.
Tip
Chcete-li aktivovat překlad, otevřete aplikaci Nastavení systému a klikněte na > Vzhled a vyberte jazyk.
-
Otevřete aplikaci Údržba a najděte typ objektu metadat you want to translate.
-
V seznamu objektů klikněte na nabídku možností a vyberte Přeložit.
Tip
If you want to translate an organisation unit level, click directly on the Translate icon next to each list item.
-
Vyberte národní prostředí.
-
Zadejte Název, Zkrácený název a Popis.
-
Klikněte Uložit.
Spravovat atributy
O atributech
You can use metadata attributes to add additional information to metadata objects. In addition to the standard attributes for each of these objects it may be useful to store information for additional attributes, for example the collection method for a data element.
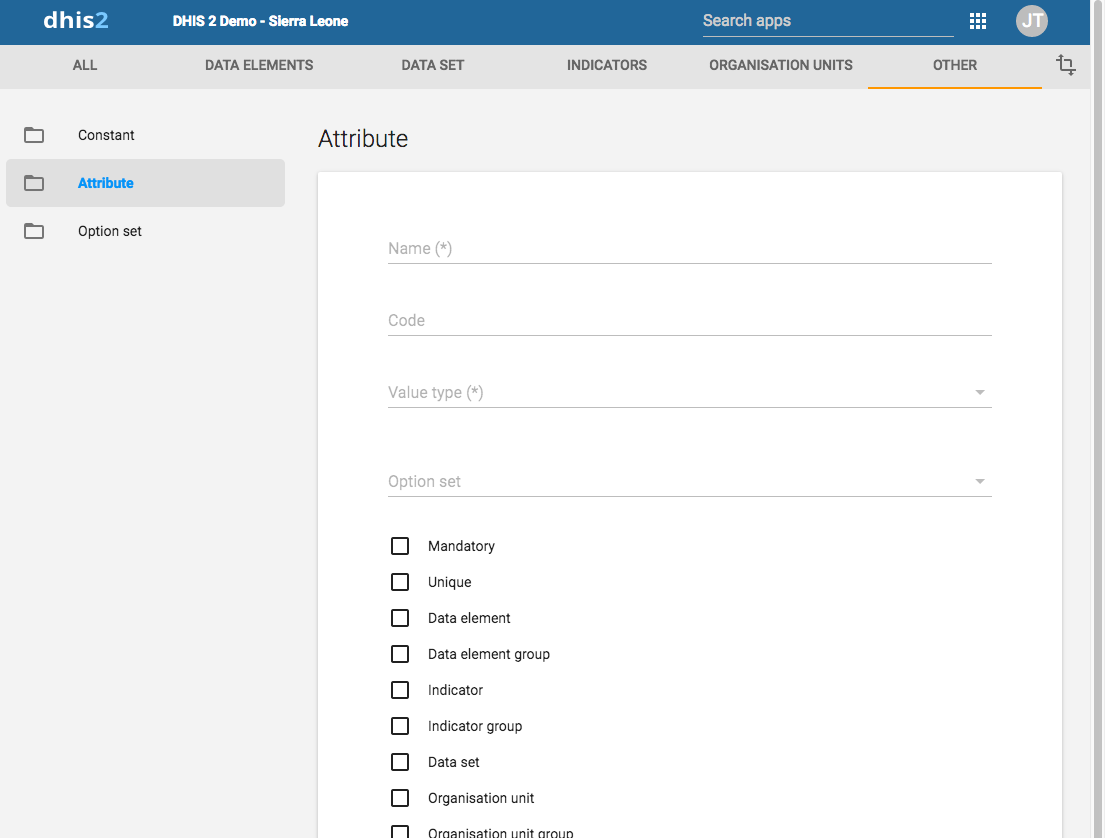
V aplikaci Údržba spravujete následující objekty atributů:
Tabulka: Atributy objektů v aplikaci Údržba
| Typ objektu | Dostupné funkce |
|---|---|
| Atribut | Vytvářejte, upravujte, klonujte, odstraňujte, zobrazujte podrobnosti a překládejte |
Vytvořte nebo upravte atribut
-
Otevřete aplikaci Údržba a klikněte na Atribut.
-
Klikněte na tlačítko Přidat.
-
Do pole Název zadejte název atributu.
Každý atribut musí mít jedinečný název
-
(Volitelné) V poli Kód přiřaďte kód.
-
Vyberte typ hodnoty.
If the value supplied for the attribute does not match the value type you will get a warning.
-
Vyberte sadu možností.
-
Vyberte požadované možnosti, například:
-
Select Mandatory if you want an object to always have the dynamic attribute.
-
Select Unique if you want the system to enforce that values are unique for a specific object type.
-
-
Klikněte Uložit.
The dynamic attribute is now available for the objects you assigned it to.
Clone metadata objects
Klonování datového prvku nebo jiných objektů může ušetřit čas při vytváření mnoha podobných objektů.
-
Otevřete aplikaci Údržba a najděte typ objektu metadat který chcete klonovat.
-
V seznamu objektů klikněte na nabídku možností a vyberte Klonovat.
-
Upravte požadované možnosti.
-
Klikněte Uložit.
Odstraňte objekty metadat
Poznámka
Datový prvek a další objekty datových prvků můžete odstranit, pouze pokud k samotnému datovému prvku nejsou přidružena žádná data.
Varování
Jakákoli sada dat, kterou ze systému odstraníte, je nenávratně ztracena. Odebrány budou také všechny formuláře pro zadávání údajů a formuláře oddílů, které mohly být vyvinuty. Před odstraněním jakékoli datové sady se ujistěte, že jste vytvořili zálohu své databáze, pro případ, že byste ji v určitém okamžiku potřebovali obnovit.
-
Otevřete aplikaci Údržba a najděte typ objektu metadat které chcete smazat.
-
V seznamu objektů klikněte na nabídku možností a vyberte Odstranit.
-
Klikněte na Potvrdit.
Zobrazit podrobnosti o objektech metadat
-
Otevřete aplikaci Údržba a najděte typ objektu metadat které chcete zobrazit.
-
In the object list, click the options menu and select Show details.
Přeložte objekty metadat
DHIS2 poskytuje funkce pro překlady obsahu databáze, například datových prvků, skupin datových prvků, indikátorů, skupin indikátorů nebo organizačních jednotek. Tyto prvky můžete přeložit na libovolný počet národních prostředí. Národní prostředí představuje konkrétní geografickou, politickou nebo kulturní oblast.
Tip
Chcete-li aktivovat překlad, otevřete aplikaci Nastavení systému a klikněte na > Vzhled a vyberte jazyk.
-
Otevřete aplikaci Údržba a najděte typ objektu metadat you want to translate.
-
V seznamu objektů klikněte na nabídku možností a vyberte Přeložit.
Tip
If you want to translate an organisation unit level, click directly on the Translate icon next to each list item.
-
Vyberte národní prostředí.
-
Zadejte Název, Zkrácený název a Popis.
-
Klikněte Uložit.
Spravujte konstanty
O konstantách
Konstanty jsou statické hodnoty, které lze uživatelům zpřístupnit pro použití v datových prvcích a indikátorech. Některé ukazatele, například „Míra ochrany za několik let“, závisí na konstantách, které se v průběhu času obvykle nemění.
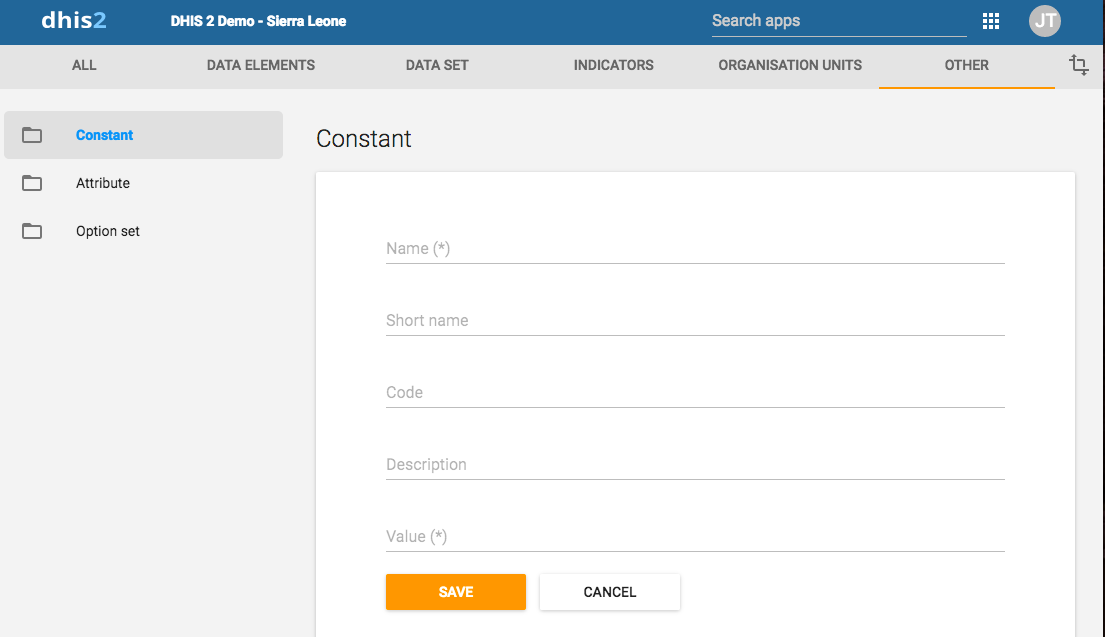
V aplikaci Údržba spravujete následující konstantní objekty:
Tabulka: Konstantní objekty v aplikaci Údržba
| Typ objektu | Dostupné funkce |
|---|---|
| Konstantní | Vytvářejte, upravujte, klonujte, sdílejte, odstraňujte, zobrazujte podrobnosti a překládejte |
Vytvořte nebo upravte konstantu
-
Otevřete aplikaci Údržba a klikněte na Jiné > Konstantní.
-
Klikněte na tlačítko Přidat.
-
Do pole Název zadejte název konstanty.
-
(Optional) In the Short name field, type an abbreviated name of the constant.
-
(Volitelné) V poli Kód přiřaďte kód.
-
In the Description field, type a brief, informative description of the constant.
-
V poli Hodnota definujte hodnotu konstanty.
-
Klikněte Uložit.
Konstanta je nyní k dispozici pro použití.
Clone metadata objects
Klonování datového prvku nebo jiných objektů může ušetřit čas při vytváření mnoha podobných objektů.
-
Otevřete aplikaci Údržba a najděte typ objektu metadat který chcete klonovat.
-
V seznamu objektů klikněte na nabídku možností a vyberte Klonovat.
-
Upravte požadované možnosti.
-
Klikněte Uložit.
Změňte nastavení sdílení pro objekty metadat
Objektům metadat můžete přiřadit různá nastavení sdílení, například organizační jednotky a atributy sledovaných entit. Tato nastavení sdílení určují, kteří uživatelé a skupiny uživatelů mohou zobrazit nebo upravit objekt metadat.
Některé objekty metadat také umožňují změnit nastavení sdílení zadávání dat pro objekt. Tato další nastavení určují, kdo může pomocí metadat zobrazit nebo zadat data do polí formuláře.
Poznámka
Výchozí nastavení je, že každý (Veřejný přístup) může najít, prohlížet a upravovat objekty metadat.
-
Otevřete aplikaci Údržba a najděte typ objektu metadat chcete upravit.
-
In the object list, click the context menu and select Sharing settings.
-
(Optional) Add users or user groups: search for a user or a user group and select it. The user or user group is added to the list.
-
Změňte nastavení sdílení pro skupiny přístupu, které chcete upravit.
-
Can edit and view: The access group can view and edit the object.
-
Může pouze zobrazit: Přístupová skupina může zobrazit objekt.
-
No access (only applicable to Public access): The public won't have access to the object.
-
-
Change data sharing settings for the access groups you want to modify.
-
Can capture data: The access group can view and capture data for the object.
-
Can view data: The access group can view data for the object.
-
No access: The access group won't have access to data for the object.
-
-
Klikněte na Zavřít.
Odstraňte objekty metadat
Poznámka
Datový prvek a další objekty datových prvků můžete odstranit, pouze pokud k samotnému datovému prvku nejsou přidružena žádná data.
Varování
Jakákoli sada dat, kterou ze systému odstraníte, je nenávratně ztracena. Odebrány budou také všechny formuláře pro zadávání údajů a formuláře oddílů, které mohly být vyvinuty. Před odstraněním jakékoli datové sady se ujistěte, že jste vytvořili zálohu své databáze, pro případ, že byste ji v určitém okamžiku potřebovali obnovit.
-
Otevřete aplikaci Údržba a najděte typ objektu metadat které chcete smazat.
-
V seznamu objektů klikněte na nabídku možností a vyberte Odstranit.
-
Klikněte na Potvrdit.
Zobrazit podrobnosti o objektech metadat
-
Otevřete aplikaci Údržba a najděte typ objektu metadat které chcete zobrazit.
-
In the object list, click the options menu and select Show details.
Přeložte objekty metadat
DHIS2 poskytuje funkce pro překlady obsahu databáze, například datových prvků, skupin datových prvků, indikátorů, skupin indikátorů nebo organizačních jednotek. Tyto prvky můžete přeložit na libovolný počet národních prostředí. Národní prostředí představuje konkrétní geografickou, politickou nebo kulturní oblast.
Tip
Chcete-li aktivovat překlad, otevřete aplikaci Nastavení systému a klikněte na > Vzhled a vyberte jazyk.
-
Otevřete aplikaci Údržba a najděte typ objektu metadat you want to translate.
-
V seznamu objektů klikněte na nabídku možností a vyberte Přeložit.
Tip
If you want to translate an organisation unit level, click directly on the Translate icon next to each list item.
-
Vyberte národní prostředí.
-
Zadejte Název, Zkrácený název a Popis.
-
Klikněte Uložit.
Spravovat sady možností
O sadách možností
Option sets provide a pre-defined drop-down (enumerated) list for use in DHIS2. You can define any kind of options.
An option set called "Delivery type" would have the options: "Normal", "Breach", "Caesarian" and "Assisted".

Tabulka: Objekty sady možností v aplikaci Údržba
| Typ objektu | Dostupné funkce |
|---|---|
| Sada možností | Vytvářejte, upravujte, klonujte, sdílejte, odstraňujte, zobrazujte podrobnosti a překládejte |
| Skupina možností | Vytvářejte, upravujte, klonujte, sdílejte, odstraňujte, zobrazujte podrobnosti a překládejte |
| Sada skupin možností | Vytvářejte, upravujte, klonujte, sdílejte, odstraňujte, zobrazujte podrobnosti a překládejte |
Vytvořte nebo upravte sadu možností
Important
Option sets must have a code as well as a name. You can change the names but you can't change the codes. Both names and codes of all options must be unique, even across different option sets.
-
Otevřete aplikaci Údržba a klikněte na Jiné > Sada možností.
-
Klikněte na tlačítko Přidat.
-
Na kartě Primární podrobnosti definujte sadu možností:
-
Do pole Název zadejte název konstanty.
-
V poli Kód přiřaďte kód.
-
Vyberte typ hodnoty.
-
Klikněte Uložit.
-
-
U každé možnosti, kterou potřebujete, proveďte následující úkoly:
-
Klikněte na kartu Možnosti.
-
Klikněte na tlačítko Přidat.
-
Type a Name and a Code. Optionally also select a Color and an Icon which will be used for this option in the data capture apps.
-
Třídit možnosti podle názvu, kódu / hodnoty nebo ručně.
-
Klikněte Uložit.
-
Vytvořte nebo upravte skupinu možností
You can group and classify options within an option set by using option groups. This way you can create a subset of options in an option set. The main purpose of this is to be able to filter huge option sets into smaller, related parts.
Možnosti, které jsou seskupeny, lze skrýt nebo zobrazit společně v nástroji pro sledování a zachycení událostí pomocí pravidel programu.
Poznámka
Po vytvoření nelze změnit Sadu možností vybranou ve Skupině možností.
-
Otevřete aplikaci Údržba a klikněte na Jiné > Skupina možností.
-
Klikněte na tlačítko Přidat.
-
Vyplňte formulář:
- Název
- Krátký název
- Kód
- Sada možností
-
Jakmile je vybrána sada možností, můžete přiřadit možnosti, které chcete seskupit.
-
Klikněte Uložit.
Vytvořte nebo upravte sadu skupin možností
Option group sets allows you to categorise multiple option groups into a set. The main purpose of the option group set is to add more dimensionality to your captured data for analysis.
Poznámka
Po vytvoření nelze změnit sadu možností vybranou v skupině možností.
-
Otevřete aplikaci Údržba a klikněte na Jiné > Sada skupin možností.
-
Klikněte na tlačítko Přidat.
-
Vyplňte formulář:
- Název
- Kód
- Popis
- Sada možností
-
Datová dimenze
If you select Data dimension, the group set will be available to the analytics as another dimension, in addition to the standard dimensions of "Period" and "Organisation unit".
-
Vyberte skupiny možností a přiřaďte je.
Dostupné skupiny možností se zobrazují na levém panelu. Skupiny možností, které jsou aktuálně členy sady skupin možností, se zobrazují na pravém panelu.
- Klikněte Uložit.
Clone metadata objects
Klonování datového prvku nebo jiných objektů může ušetřit čas při vytváření mnoha podobných objektů.
-
Otevřete aplikaci Údržba a najděte typ objektu metadat který chcete klonovat.
-
V seznamu objektů klikněte na nabídku možností a vyberte Klonovat.
-
Upravte požadované možnosti.
-
Klikněte Uložit.
Změňte nastavení sdílení pro objekty metadat
Objektům metadat můžete přiřadit různá nastavení sdílení, například organizační jednotky a atributy sledovaných entit. Tato nastavení sdílení určují, kteří uživatelé a skupiny uživatelů mohou zobrazit nebo upravit objekt metadat.
Některé objekty metadat také umožňují změnit nastavení sdílení zadávání dat pro objekt. Tato další nastavení určují, kdo může pomocí metadat zobrazit nebo zadat data do polí formuláře.
Poznámka
Výchozí nastavení je, že každý (Veřejný přístup) může najít, prohlížet a upravovat objekty metadat.
-
Otevřete aplikaci Údržba a najděte typ objektu metadat chcete upravit.
-
In the object list, click the context menu and select Sharing settings.
-
(Optional) Add users or user groups: search for a user or a user group and select it. The user or user group is added to the list.
-
Změňte nastavení sdílení pro skupiny přístupu, které chcete upravit.
-
Can edit and view: The access group can view and edit the object.
-
Může pouze zobrazit: Přístupová skupina může zobrazit objekt.
-
No access (only applicable to Public access): The public won't have access to the object.
-
-
Change data sharing settings for the access groups you want to modify.
-
Can capture data: The access group can view and capture data for the object.
-
Can view data: The access group can view data for the object.
-
No access: The access group won't have access to data for the object.
-
-
Klikněte na Zavřít.
Odstraňte objekty metadat
Poznámka
Datový prvek a další objekty datových prvků můžete odstranit, pouze pokud k samotnému datovému prvku nejsou přidružena žádná data.
Varování
Jakákoli sada dat, kterou ze systému odstraníte, je nenávratně ztracena. Odebrány budou také všechny formuláře pro zadávání údajů a formuláře oddílů, které mohly být vyvinuty. Před odstraněním jakékoli datové sady se ujistěte, že jste vytvořili zálohu své databáze, pro případ, že byste ji v určitém okamžiku potřebovali obnovit.
-
Otevřete aplikaci Údržba a najděte typ objektu metadat které chcete smazat.
-
V seznamu objektů klikněte na nabídku možností a vyberte Odstranit.
-
Klikněte na Potvrdit.
Zobrazit podrobnosti o objektech metadat
-
Otevřete aplikaci Údržba a najděte typ objektu metadat které chcete zobrazit.
-
In the object list, click the options menu and select Show details.
Přeložte objekty metadat
DHIS2 poskytuje funkce pro překlady obsahu databáze, například datových prvků, skupin datových prvků, indikátorů, skupin indikátorů nebo organizačních jednotek. Tyto prvky můžete přeložit na libovolný počet národních prostředí. Národní prostředí představuje konkrétní geografickou, politickou nebo kulturní oblast.
Tip
Chcete-li aktivovat překlad, otevřete aplikaci Nastavení systému a klikněte na > Vzhled a vyberte jazyk.
-
Otevřete aplikaci Údržba a najděte typ objektu metadat you want to translate.
-
V seznamu objektů klikněte na nabídku možností a vyberte Přeložit.
Tip
If you want to translate an organisation unit level, click directly on the Translate icon next to each list item.
-
Vyberte národní prostředí.
-
Zadejte Název, Zkrácený název a Popis.
-
Klikněte Uložit.
Spravujte legendy
O legendách
You can create, edit, clone, delete, show details and translate legends to make the maps you're setting up for your users meaningful. You create maps in the Maps app.
Note
Continuous legends must consist of legend items that end and start with the same value, for example: 0-50 and 50-80. Do not set legend items like this: 0-50 and 51-80. This will create gaps in your legend.
Vytvořte nebo upravte legendu
Poznámka
V legendě není povoleno mít mezery.
Není povoleno mít překrývající se položky legendy.
-
Otevřete aplikaci Údržba a klikněte na Jiné > Legenda.
-
Klikněte na tlačítko Přidat.
-
Do pole Název zadejte název legendy.
-
(Volitelné) V poli Kód přiřaďte kód.
-
Vytvořte položky legendy, které chcete mít ve své legendě:
-
Vyberte Počáteční hodnota a Konečná hodnota.
-
Vyberte Počet položek legendy.
-
Vyberte barevné schéma.
-
Klikněte na Vytvořit položky legendy.
Tip
Click the options menu to edit or delete a legend item.
-
-
(Volitelné) Přidejte další položky legendy:
-
Klikněte na tlačítko Přidat.
-
Zadejte název a vyberte počáteční hodnotu, koncovou hodnotu a barvu.
-
Klikněte OK.
-
-
(Volitelné) Změňte barevné škály.
-
Click the colour scale to view a list of color scale options, and select a color scale.
-
To customize a color scale, click the add button. In the Edit legend item dialog, click the color scale button and hand-pick colors, or enter your color values.
-
-
Klikněte Uložit.
| Položka legendy | Počáteční hodnota | Koncová hodnota |
|---|---|---|
| Nízké špatné | 0 | 50 |
| Medium | 50 | 80 |
| Vysoké dobré | 80 | 100 |
| Příliš vysoké | 100 | 1000 |
Clone metadata objects
Klonování datového prvku nebo jiných objektů může ušetřit čas při vytváření mnoha podobných objektů.
-
Otevřete aplikaci Údržba a najděte typ objektu metadat který chcete klonovat.
-
V seznamu objektů klikněte na nabídku možností a vyberte Klonovat.
-
Upravte požadované možnosti.
-
Klikněte Uložit.
Změňte nastavení sdílení pro objekty metadat
Objektům metadat můžete přiřadit různá nastavení sdílení, například organizační jednotky a atributy sledovaných entit. Tato nastavení sdílení určují, kteří uživatelé a skupiny uživatelů mohou zobrazit nebo upravit objekt metadat.
Některé objekty metadat také umožňují změnit nastavení sdílení zadávání dat pro objekt. Tato další nastavení určují, kdo může pomocí metadat zobrazit nebo zadat data do polí formuláře.
Poznámka
Výchozí nastavení je, že každý (Veřejný přístup) může najít, prohlížet a upravovat objekty metadat.
-
Otevřete aplikaci Údržba a najděte typ objektu metadat chcete upravit.
-
In the object list, click the context menu and select Sharing settings.
-
(Optional) Add users or user groups: search for a user or a user group and select it. The user or user group is added to the list.
-
Změňte nastavení sdílení pro skupiny přístupu, které chcete upravit.
-
Can edit and view: The access group can view and edit the object.
-
Může pouze zobrazit: Přístupová skupina může zobrazit objekt.
-
No access (only applicable to Public access): The public won't have access to the object.
-
-
Change data sharing settings for the access groups you want to modify.
-
Can capture data: The access group can view and capture data for the object.
-
Can view data: The access group can view data for the object.
-
No access: The access group won't have access to data for the object.
-
-
Klikněte na Zavřít.
Odstraňte objekty metadat
Poznámka
Datový prvek a další objekty datových prvků můžete odstranit, pouze pokud k samotnému datovému prvku nejsou přidružena žádná data.
Varování
Jakákoli sada dat, kterou ze systému odstraníte, je nenávratně ztracena. Odebrány budou také všechny formuláře pro zadávání údajů a formuláře oddílů, které mohly být vyvinuty. Před odstraněním jakékoli datové sady se ujistěte, že jste vytvořili zálohu své databáze, pro případ, že byste ji v určitém okamžiku potřebovali obnovit.
-
Otevřete aplikaci Údržba a najděte typ objektu metadat které chcete smazat.
-
V seznamu objektů klikněte na nabídku možností a vyberte Odstranit.
-
Klikněte na Potvrdit.
Zobrazit podrobnosti o objektech metadat
-
Otevřete aplikaci Údržba a najděte typ objektu metadat které chcete zobrazit.
-
In the object list, click the options menu and select Show details.
Přeložte objekty metadat
DHIS2 poskytuje funkce pro překlady obsahu databáze, například datových prvků, skupin datových prvků, indikátorů, skupin indikátorů nebo organizačních jednotek. Tyto prvky můžete přeložit na libovolný počet národních prostředí. Národní prostředí představuje konkrétní geografickou, politickou nebo kulturní oblast.
Tip
Chcete-li aktivovat překlad, otevřete aplikaci Nastavení systému a klikněte na > Vzhled a vyberte jazyk.
-
Otevřete aplikaci Údržba a najděte typ objektu metadat you want to translate.
-
V seznamu objektů klikněte na nabídku možností a vyberte Přeložit.
Tip
If you want to translate an organisation unit level, click directly on the Translate icon next to each list item.
-
Vyberte národní prostředí.
-
Zadejte Název, Zkrácený název a Popis.
-
Klikněte Uložit.
Přiřaďte legendu indikátoru nebo datovému prvku
You can assign a legend to an indicator or a data element in the Maintenance app, either when you create the object or edit it. When you then select the indicator or data element in the Maps app, the system automatically selects the assigned legend.
Viz také
Spravujte prediktory
O prediktorech
A predictor defines how to generate an aggregate data value from an expression containing aggregate and/or event data. The predicted value may be based on:
-
Data ze stejného období jako predikovaná hodnota a / nebo
-
Data z období předcházejících předpokládané hodnotě
Data ze stejného období
A predictor can use data from the same period as the predicted value. For example, you can count the number of organisation units having a non-zero value of a data element by using a predictor expression such as:
if( #{ji7o0ILHuU2} != 0, 1, 0 )When you run this predictor at the organisation unit level where the data is collected, it will store 1 as the predicted value if the data element has a nonzero value for that organisation unit, otherwise 0. (If the data element that you predict into does not store zeros, then zeros will not be stored in the database, to save space.) You can then sum this predicted value in analytics at a higher organisation unit level, to count the number of organisation units with a nonzero value that are under each organisation unit in the report.
Údaje z předchozích období
A predictor will use data from previous periods when you specify an aggregation function such as sum() or avg(). For example, the following generator expression identifies a value that is the average plus twice the standard deviation of previous period data:
avg( #{ji7o0ILHuU2} ) + 2 * stddev( #{ji7o0ILHuU2} )Data ze stejného a předchozího období
A predictor expression can access data both from same period as the prediction and previous periods by accessing data both within an agregate function (for previous periods), and outside any aggregate function (for the same period). For example, an expression like the following can be used to take a balance of something from the previous period (#{KOh02hHko7C}), add to that the net change in this period (#{ji7o0ILHuU2}), resulting in the balance for this period:
sum( #{KOh02hHko7C} ) + #{ji7o0ILHuU2}The first data value is inside an aggregate expression (sum) to indicate that it is sampling previous period data (even if there is only one previous period), while the second data value is not in an aggreate function to indicate that it is referencing data from the same period.
If you want to, a predictor's output data element can be referenced in the same predictor's expression. For instance, the expression in this example could be used to predict the balance in a period, and then combine that value with the change in the next period to compute the balance for the next period. When a predictor is run across multiple periods, the periods are processed in chronological order, and the result from an earlier period may be used as input for a later period.
Úrovně organizačních jednotek prediktorů
You need to select one or more organisation unit levels for a predictor's output. All values generated by the predictor are stored for organisation units at the level(s) you select. Each item in the predictor expression is the sum of the value stored for that organisation unit (if any) plus any values stored in organisation units below that one (if any).
Poznámka
Při konfiguraci prediktoru je nutné zvolit jednu nebo více úrovní organizačních jednotek, na kterých budou predikovaná data vystupovat. Pokud není vybrána žádná úroveň, nebudou generovány žádné predikované hodnoty.
Upozornění
Pokud chcete predikované hodnoty použít v analytických výkazech nebo k jiným predikcím, nevyberte více než jednu úroveň organizační jednotky. Pokud vyberete více než jednu úroveň, predikce na vyšší úrovni (úrovních) budou zahrnovat také všechna data použitá v predikcích na nižší úrovni (úrovních). Pokud jsou predikce z více úrovní následně použity v analytice nebo ve výrazech jiných prediktorů, může to vést k dvojímu započtení, protože predikované hodnoty pro vyšší úroveň zahrnují predikované hodnoty z nižší úrovně.
Můžete vybrat více úrovní organizačních jednotek, pokud použijete předpokládané hodnoty pouze v pravidlech ověřování. Například při sledování nemoci můžete mít upozornění na ověřovací pravidlo, pokud je skutečná hodnota vyšší než rozsah očekávaných hodnot pro dané období na základě údajů z předchozího období. Chcete-li to provést, můžete vytvořit prediktor pro výpočet průměru plus dvojnásobek standardní odchylky dat z předchozího období. K porovnání této nejvyšší očekávané hodnoty se skutečnou hodnotou můžete použít ověřovací pravidlo. Pravidlo prediktoru a ověření můžete spustit na více úrovních, abyste zjistili různé scénáře vypuknutí. V jednom scénáři může dojít k významnému nárůstu v jednom zařízení, které přesahuje jeho očekávané rozmezí, ale okres obsahující toto zařízení nemusí překročit jeho očekávané rozmezí, protože hodnoty okresů jsou kombinovány s mnoha dalšími zařízeními. V dalším scénáři může dojít k mírnému nárůstu v několika zařízeních, který nepřekročí očekávané rozmezí pro každé zařízení (protože směrodatná odchylka pro každé zařízení může být vysoká), ale překročí očekávané rozmezí pro okres (protože směrodatná odchylka pro okres jako celek může být nižší).
If you want to generate predictions at multiple levels, you could also use different predictors at different levels. For example, you might want to be alerted if the value at one level exceeds the average plus twice the standard deviation, but alerted at another level if it exceeds the average plus 1.8 times the standard deviation. If you want, you could configure the different predictors to have the same output data element. If you use the same output data element, this will still work with validaiton rules at different organisaiton unit levels, but you also must be careful not to use the results in analytics or in other predictor calculations to avoid double counting.
V aplikaci Údržba spravujete následující objekty prediktorů:
Tabulka: Predictor objekty v aplikaci Údržba
| Typ objektu | Dostupné funkce |
|---|---|
| Prediktor | Vytvářejte, upravujte, klonujte, odstraňujte, zobrazujte podrobnosti a překládejte |
Vzorkování předchozích období
Predictors can generate data values for periods that are in the past, present, or future. These values are based on data from the predicted period, and/or sampled data from periods previous to the predicted period.
If you need data only from the same period in which the prediction is made, then you don't need to read this section. This section describes how to sample data from periods previous to the predicted period.
Sekvenční počet vzorků
Prediktor Sekvenční počet vzorků udává počet bezprostředních předchozích období k výběru. Například pokud je typ období prediktoru Týdně a Sekvenční počet vzorků je 4, to znamená vzorkování z předchozích 4 týdnů bezprostředně předcházející týden predikované hodnoty. Předpokládaná hodnota pro 9. týden by tedy používala vzorky z 5., 6., 7. a 8. týdne:

If a predictor's period type is Monthly and the Sequential sample count is 4, this means to sample four previous months immediately preceding the predicted value month. So the predicted value for May would use samples from weeks January, February, March, and April:

The Sequential sample count can be greater than the number of periods in a year. For example, if you want to sample the 24 months immediately preceding the predicted value month, set the Sequential sample count to 24:

Počet postupných přeskočení
A predictor's Sequential skip count tells how many periods should be skipped immediately previous to the predicted value period, within the Sequential sample count. This could be used, for instance, in outbreak detection to skip one or more immediately preceding samples that might in fact contain values from the beginning of an outbreak that you are trying to detect.
For example, if the Sequential sample count is 4, but the Sequential skip count is 2, then the two samples immediately preceding the predicted period will be skipped, resulting in only two periods being sampled:

Počet ročních vzorků
A predictor's Annual sample count gives the number of previous years for which samples should be collected at the same time of year. This could be used, for instance, for disease surveillance in cases where the expected incidence of the disease varies during the year and can best be compared with the same relative period in previous years. For example, if the Annual sample count is 2 (and the Sequential sample count is zero), then samples would be collected from periods in the immediately preceding two years, at the same time of year.

Sekvenční a roční počet vzorků se počítá společně
You can use the sequential and annual sample counts together to collect samples from a number of sequential periods over a number of past years. When you do this, samples will be collected in previous years during the period at the same time of year as the predicted value period, and also in previous years both before and after the same time of year, as determined by the Sequential sample count number.
For example, if the Sequential sample count is 4 and the Annual sample count is 2, samples will be collected from the 4 periods immediately preceding the predicted value period. In addition samples will be collected in the previous 2 years for the corresponding period, as well as 4 periods on either side:

Počty sekvenčních, ročních a přeskočených vzorků dohromady
You can use the Sequential skip count together with the sequential and annual sample counts. When you do this, the Sequential skip count tells how many periods to skip in the same year as the predicted value period. For example, if the Sequential sample count is 4 and the Sequential skip count is 2, then the two periods immediately preceding the predicted value period period will be skipped, but the two periods before that will be sampled:

If the Sequential skip count is equal to or greater than the Sequential sample count, then no samples will be collected for the year containing the predicted value period; only periods from past years will be sampled:

Přeskočení Ukázkového testu
You can use the Sample skip test to skip samples from certain periods that would otherwise be included, based on the results of testing an expression within those periods. This could be used, for instance, in disease outbreak detection, where the sample skip test could identify previous disease outbreaks, to exclude those samples from the prediction of a non-outbreak baseline expected value.
The Sample skip test is an expression that should return a value of true or false, to indicate whether or not the period should be skipped. It can be an expression that tests any data values in the previous period. For example, it could test for a data value that was explicitly entered to indicate that a previous period should be skipped. Or it could compare a previously predicted value for a period with the actual value recorded for that period, to determine if that period should be skipped.
Any periods for which the Sample skip test is true will not be sampled. For example:

Predictors and category option combinations (disaggregations)
The category option combination (disaggregation) for predictor output data is chosen in one of three ways:
- Default category option combination.
If the predictor's output data element has no disaggregations (category combination "None", also known as the default category combination), then all predictor output data will be made in the default category option combination. In this case, predictor output data is not disaggregated.
- Fixed category option combination
If the predictor's output data element has a category combination other than "None", you can choose a fixed disaggregation for the predictor "Output category option combo". If you do so, all output from this predictor will have this category option combination.
For example, if the output data element has a category combination of "Sex and Age", you can decide that all predictor output will go to a category option combination such as "Female under 5", "Male 5 - 10", or any other.
- Use the input category option combo (available in v40.1 and following)
If the predictor's output data element has a category combination other than "None", you can choose "Predict according to input category option combo" as the value for "Output category option combo". If you do so, a different prediction is made for each category option combo in the output data element's category combination (that is, one prediction for "Female under 5", a second for "Male under 5", a third for "Female 5 - 10", and so on).
(In v40.1, this feature is enabled by selecting the choice "\<no value>" for "Output category option combo".)
> **Tip**
>
> In some installations, the options in a category may have changed over time.
For example, a category "Age" may have had three options "1-5", "6-10", and "over 10",
but then was changed to only have two options "10 and under" and "over 10".
Historical data may have values with any of these options.
To use a predictor with such data, you can define another category
such as "Reporting Age" with all the options ever used, such as "1-5", "6-10",
"10 and under", and "over 10". Use this category in the category combination
for the predictor's output data element. This means that all the input category
options will be reflected in the output.
>
> If you then want a single report for the output data that covers
all the disaggregations, you can use category option groups
in a category option group set. For example use a category option group
"10 and under" that contains category options "1-5", "6-10", and "10 and under".
Predictors and attribute option combinations
If the input data to a prediction has attribute option combinations, a different prediction will be made for each attribute option combination where there is data.
For example, you could use attribute option combinations to represent different projects on your system. The predictor will generate a value with the attribute option combination for Project A when it finds input data for Project A; it will generate a value with the attribute option combination for Project B when it finds input data for Project B; and so on.
For any input data without attribute option combinations (in other words, with the default attribute option combination), predictions are generated using the default attribute option combination. If you don't use attribute option combinations in the data, they will not be used in predictor output data.
If you use attribute option combinations and also "Predict according to input category option combo", there will be a separate prediction for each combination of disaggregation and attribute option combination. For example, there could be a prediction for Project A data for "Female under 5", a prediction for Project A data for "Male under 5", a prediction for Project B data for "Female under 5", and so on.
Vytvořte nebo upravte prediktor
-
Otevřete aplikaci Údržba a klikněte na Jiné > Predictor.
-
Klikněte na tlačítko Přidat.
-
Do pole Název zadejte název prediktoru.
-
(Volitelné) V poli Kód přiřaďte kód.
-
(Volitelné) Zadejte Popis.
-
Select an Output data element. Values generated by this predictor are stored as aggregate data associated with this data element and the predicted period.
The value is rounded according to the value type of the data element: If the value type is an integer type, the predicted value is rounded to the nearest integer. For all other value types, the number is rounded to four significant digits. (However if there are more than four digits to the left of the decimal place, they are not replaced with zeros.)
-
(Optional) Select an Output category option combo. This dropdown will only show if the selected data element has a category combination other than "None". If so, you can select which disaggregation category option combo you would like to output to, or you can select "Predict according to input category option combo" (see the discussion above).
-
Vyberte Typ období.
-
Assign one or more organisation unit levels. The output value will be assigned to an organisation unit at this level (or these levels). For aggregate data, the input values depends on the selection below; organisation units providing data. For tracker based data, the input values will come from the organisation unit to which the output is assigned, or from any level lower under the output organisation unit.
-
Organizační jednotky poskytující data řídí, odkud pocházejí vstupní hodnoty pro souhrnná data. Pokud je "pouze na vybraných úrovních", jsou zahrnuty pouze organizační jednotky na vybraných úrovních. Pokud je vybrána možnost "Na vybraných úrovních a všech úrovních níže", jsou zahrnuty také organizační jednotky na vybrané úrovni (vybraných úrovních) a všechny níže uvedené organizační jednotky.
-
Vytvořte generátor. Generátor je výraz, který se používá k výpočtu předpokládané hodnoty.
-
Zadejte Popis výrazu generátoru.
-
Vyberte strategii Chybějící hodnota. Tento výběr nastavuje, jak systém vyhodnotí ověřovací pravidlo, pokud chybí data.
Možnost Popis Pokud nějaká hodnota chybí, přeskočit Pravidlo ověření bude přeskočeno, pokud některá z hodnot, které tvoří výraz, chybí. Toto je výchozí možnost.
Tuto možnost vyberte vždy, použijete-li operátor Exkluzivní pár nebo Povinný pár.Pokud všechny hodnoty chybí, přeskočit Pravidlo ověření bude přeskočeno, pouze pokud chybí všechny hodnoty, které jej tvoří. Nikdy přeskočit Pravidlo ověření nebude nikdy přeskočeno v případě chybějících dat a se všemi chybějícími hodnotami bude zacházeno efektivně jako s nulou. -
Zadejte výraz generátoru. Výraz můžete vytvořit výběrem datových prvků pro agregovaná data nebo programových datových prvků, atributů nebo indikátorů. Počty organizačních jednotek ještě nejsou podporovány.
Chcete-li použít vzorkovaná data z minulého období, měli byste uzavřít všechny položky, které vyberete, do jedné z následujících agregovaných funkcí (tyto názvy funkcí rozlišují velká a malá písmena):
Agregátní funkce Významy avg(x) Průměrná (mean) hodnota x count(x) Počet hodnot x max(x) Maximální hodnota x median(x) Střední hodnota x min(x) Minimální hodnota x percentileCont (p, x) Souvislý percentil x, kde p je percentil jako číslo s plovoucí desetinnou čárkou mezi 0 a 1. Například p = 0 vrátí nejnižší hodnotu, p = 0,5 vrátí medián, p = 0,75 vrátí 75. percentil, p = 1 vrátí nejvyšší hodnotu atd. Souvislé znamená, že hodnota bude v případě potřeby interpolována. Například percentileCont (0,5, #{FTRrcoaog83}) vrátí 2,5, pokud jsou vzorkované hodnoty datového prvku FTRrcoaog83 1, 2, 3 a 4. stddev(x) Standardní odchylka x. Tato funkce je ekvivalentní stddevSamp. Pro větší přehlednost doporučujeme místo toho použít funkci stddevSamp. stddevPop(x) Standardní odchylka populace x: sqrt( sum( (x - avg(x))^2 ) / n ) stddevSamp(x) Ukázková standardní odchylka x: sqrt( sum( (x - avg(x))^2 ) / ( n - 1 ) ). Všimněte si, že tato hodnota není vypočítána, pokud existuje pouze jeden vzorek. sum(x) Součet hodnot x Note
Any items inside an aggregate function will be evaluated for all sampled past periods, and then combined according to the formula inside the aggregate function. Any items outside an aggregate function will be evaluated for the period in which the prediction is being made.
You can build more complex expressions by clicking on (or typing) any of the elements below the expression field: ( ) * / + - Days. Constant numbers may be added by typing them. The Days option inserts [days] into the expression which resolves to the number of days in the period from which the data came.
You can also use the following non-aggregating functions in your expression, either inside aggregate functions, or containing aggregate functions, or independent of aggregate functions:
Function Means contains(expr, sub1, ...) Searches an expression for one or more substrings. Returns true if the expression contains all the substrings. For example, the following are all true: contains("abcd", "abcd"); contains("abcd", "b"); and contains("abcd", "ab", "bc"). Comparisons are case-sensitive. containsItems(expr, item1, ...) Searches an expression for one or more items. The expression is made up of comma-separated elements. containsItems returns true if every item exactly matches an element in the expression. For example, containsItems("abcd", "abcd") and containsItems("ab,cd", "ab", "cd") are true, but containsItems("abcd", "b") and containsItems("abcd", "ab", "bc") are false. Comparisons are case-sensitive. containsItems can be used for multi-valued data elements to see if an item is contained in the data element values. if(test, valueIfTrue, valueIfFalse) Evaluates test which is an expression that evaluates to a boolean value -- see Boolean expression notes below. If the test is true, returns the valueIfTrue expression. If it is false, returns the valueIfFalse expression. is(expr1 in expression [, expression ...]) Returns true if expr1 is equal to any of the following expressions, otherwise false. isNull(item) Returns the boolean value true if the item is null (missing), otherwise returns false. The item can be any selected item from the right (data element, program data element, etc.). isNotNull(item) Returns true if the item value is not missing (not null), otherwise false. firstNonNull(item [, item ...]) Returns the value of the first item that is not missing (not null). Can be provided any number of arguments. Any argument may also be a numeric or string literal, which will be returned if all the previous items have missing values. greatest(expression [, expression ...]) Returns the greatest (highest) value of the expressions given. Can be provided any number of arguments. least(expression [, expression ...]) Returns the least (lowest) value of the expressions given. Can be provided any number of arguments. log(expression [, base ]) Returns the natural logarithm (base e) of the numeric expression. If an integer is given as a second argument, returns the logarithm using that base. log10(expression) Returns the common logarithm (base 10) of the numeric expression. normDistCum(x [,mean [,stddev]]) Returns the cumulative distribution function (CDF) value for x given the normalized distribution described by the mean and stddev. Equivalent to Excel NORM.DIST(x,mean,stddev,TRUE) or LibreOffice NORMDIST(x,mean,stddev,1). If stddev is not given, it is computed from past sampled values of x. If neither mean nor stddev are given, they are computed from past sampled valeus of x. See examples. normDistDen(x [,mean [,stddev]]) Returns the probability density function (PDF) value for x given the normalized distribution described by the mean and stddev. Equivalent to Excel NORM.DIST(x,mean,stddev,FALSE) or LibreOffice NORMDIST(x,mean,stddev,0). If stddev is not given, it is computed from past sampled values of x. If neither mean nor stddev are given, they are computed from past sampled valeus of x. See examples. null Returns no result. For example, if( #{FH8ab5Rog83}<0, null, 1 ) returns nothing if the data element value is less than 0, otherwise 1. orgUnit.ancestor(orgUnitUid [, orgUnitUid ...]) Returns true if the organisation unit is a descendant of any of the (1 or more) organisation units, otherwise false. orgUnit.dataSet(dataSetUid [, dataSetUid ...]) Returns true if the organisation unit is assigned to any of the (1 or more) data sets, otherwise false. orgUnit.group(ouGroupUid [, ouGroupUid ...]) Returns true if the organisation unit is a member of any of the (1 or more) organisation unit groups, otherwise false. orgUnit.program(programUid [, programUid ...]) Returns true if the organisation unit is assigned to any of the (1 or more) programs, otherwise false. removeZeros(expression) Returns nothing if the expression value is 0, otherwise returns the expression value. .maxDate(yyyy-mm-dd) For a data element (not program data), value from periods ending on or before a maximum date. .minDate(yyyy-mm-dd) For a data element (not program data), value from periods starting on or after a minimum date. Boolean expression notes: A boolean expression must evaluate to true or false. The following operators may be used to compare two values resulting in a boolean expression: \<, >, !=, ==, >=, and \<=. The following operators may be used to combine two boolean expressions: && or the keyword and (logical and), and || or the keyword or (logical or). The unary operator ! or the keyword not may be used to negate a boolean expression.
Generator expression examples:
Generator expression Means sum(#{FTRrcoaog83.tMwM3ZBd7BN}) Sum of the sampled values of data element FTRrcoaog83 and category option combination (disaggregation) tMwM3ZBd7BN avg(I{GSae40Fyppf}) + 2 * stddevSamp(I{GSae40Fyppf}) Average of the sampled values of of program indicator GSae40Fyppf plus twice its sample standard deviation sum(D{IpHINAT79UW.eMyVanycQSC}) / sum([days]) Sum of all sampled values of data element eMyVanycQSC from porgram IpHINAT79UW divided by the number of days in all sample periods (resulting in the overall average daily value) sum(#{FTRrcoaog83}) + #{T7OyqQpUpNd} Sum of all sampled values of data element FTRrcoaog83 plus the value of data element T7OyqQpUpNd in the period being predicted for (includes all disaggregations) 1.2 * A{IpHINAT79UW.RKLKz1H20EE} 1.2 times the value of attribute RKLKz1H20EE of program IpHINAT79UW, in the period being predicted for if(isNull(#{T7OyqQpUpNd}), 0, 1) If the data element T7OyqQpUpNd is null in the period being predicted, then 0, otherwise 1 if(is(#{jeiTh8ahyae} in 'NEGATIVE','UNKNOWN'), 0, 1) If the data element jeiTh8ahyae has value 'NEGATIVE' or 'UNKNOWN' then 0, otherwise 1 percentileCont(0.5, #{T7OyqQpUpNd}) Continuous 50th percentile of the sampled values for data element T7OyqQpUpNd. Note that this is the same as median(#{T7OyqQpUpNd}) if(count(#{T7OyqQpUpNd}) == 1, 0, stddevSamp(#{T7OyqQpUpNd})) If there is one sample value present for data element T7OyqQpUpNd, then 0, otherwise the sample standard deviation of these sample values. (Note that if no samples are present then the stddevSamp returns no value, so no value is predicted.) normDistCum(#{T7OyqQpUpNd}) The cumulative distribution function for the current period value of data element T7OyqQpUpNd based on the normalized distribution defined by the mean and standard deviation of past sampled periods of data element T7OyqQpUpNd normDistCum( #{T7OyqQpUpNd}, median(#{T7OyqQpUpNd}) ) The cumulative distribution function for the current period value of data element T7OyqQpUpNd based on the distribution defined by the median (instead of the mean) and standard deviation of past sampled periods of data element T7OyqQpUpNd normDistCum( #{T7OyqQpUpNd}, median(#{T7OyqQpUpNd}) ) The cumulative distribution function for the current period value of data element T7OyqQpUpNd based on the distribution defined by the median (instead of the mean) and standard deviation of past sampled periods of data element T7OyqQpUpNd normDistCum( #{T7OyqQpUpNd}, avg(#{T7OyqQpUpNd}), stddev(#{T7OyqQpUpNd}) ) Same as normDistCum( #{T7OyqQpUpNd} ) normDistDen( #{T7OyqQpUpNd}, avg(#{IKahz1Quie3}), stddev(#{IKahz1Quie3}) ) The probability density function for the current period value of data element T7OyqQpUpNd based on the distribution defined by the mean and standard deviation of past sampled periods of the different data element IKahz1Quie3 normDistDen( median(#{T7OyqQpUpNd}), avg(#{IKahz1Quie3}), stddev(#{IKahz1Quie3}) ) The probability density function for the median of past sampled values of data element T7OyqQpUpNd based on the distribution defined by the mean and standard deviation of past sampled periods of the different data element IKahz1Quie3 #{T7OyqQpUpNd}.minDate(2022-10-1) Value on or after 1-Oct-2022 #{T7OyqQpUpNd}.maxDate(2022-12-31) Value on or before 31-Dec-2022 #{T7OyqQpUpNd}.minDate(2022-10-1).maxDate(2022-12-31) Value bewteen 1-Oct-2022 and 31-Dec-2022
-
-
(Optional) Create a Sample skip test. The sample skip test tells which previous periods if any to exclude from the sample.
-
Zadejte Popis testu přeskočení.
-
Enter the sample skip test expression. You can build the expression by selecting data elements for aggregate data, or program data elements, attributes or indicators. Organisation unit counts are not yet supported. As with the generator function, you may click on (or type) any of the elements below the expression field: ( ) * / + - Days.
The non-aggregating functions described above for generator expressions may also be used in skip tests.
The expression must evaluate to a boolean value of true or false. See Boolean expression notes above.
Příklady testovacích výrazů přeskočení:
Skip test expression Means #{FTRrcoaog83} > #{M62VHgYT2n0} The value of data element FTRrcoaog83 (sum of all disaggregations) is greater than the value of data element M62VHgYT2n0 (sum of all disaggregations) #{uF1DLnZNlWe} > 0 The value of data element uF1DLnZNlWe (sum of all disaggregations) is greater than the zero #{FTRrcoaog83} > #{M62VHgYT2n0} || #{uF1DLnZNlWe} > 0 The value of data element FTRrcoaog83 (sum of all disaggregations) is greater than the value of data element M62VHgYT2n0 (sum of all disaggregations) or the value of data element uF1DLnZNlWe (sum of all disaggregations) is greater than the zero
-
-
Zadejte hodnotu Sekvenční počet vzorků.
This is for how many sequential periods the calculation should go back in time to sample data for the calculations.
-
Zadejte hodnotu Roční počet vzorků.
This is for how many years the calculation should go back in time to sample data for the calculations.
-
(Volitelné) Zadejte hodnotu Sekvenční počet přeskočení.
This is how many sequential periods, immediately preceding the predicted value period, should be skipped before sampling the data.
-
Klikněte Uložit.
Predictions by Data Element Group
You can use a single predictor to operate on all the data elements in a group instead of a different predictor for each data element. This can be used, for example, in logistics management when a data element is used for each commodity and a category option combination is used for each count related to that commodity.
The syntax is:
forEach ?de in :DEG:degUid --> main expression
where:
| part | prostředek |
|---|---|
| forEach | required keyword at the start of the expression |
| ?de | any variable name starting with '?', then one letter, then optionally any number of additional letters or digits (case sensitive). Examples: ?de, ?X, ?dataElement, etc. |
| in | required keyword |
| :DEG:degUid | the notation :DEG: followed by the UID of the data element group containing the data elements to be processed |
| → | required before the main expression |
| main expression | the expression to operate on each data element in the group. Within this expression use the variable name (such as ?de) as a placeholder for each data element |
The predictor will execute once for each data element in the data element group. For each data element, instances of the variable in the main expression are replaced by that data element. The same data element is also used as the predictor output data element. The predicted value will be written to that data element using the configured output category option combination.
The predictor must be configured with an output data element, but it is effectively ignored when the predictor is run. It is suggested that you configure the predictor with one of the data elements in the data element group that the predictor will use. That way you can select a valid output category option combination for that data element.
At the time the predictor is created, the data element group must contain at least one data element of the type that you will use. (The data type of the data element is used during syntax checking of the predictor.)
Example 1
You have data elements that represent various commodities, all belonging to a data element group with UID aIMu0nieph7.
You have category option combinations with the following UIDs:
| category option combo | prostředek |
|---|---|
Gvoecom5muL | Stock balance at start of period |
CWa6eew5uco | Restock during period |
nthohhie8Ba | Used during period |
Faey8Iphooy | Lost, damaged, expired, or stolen during period |
The following predictor generator expression will compute the stock balance at the beginning of the next period as ( starting balance + restock - used - lost ):
forEach ?de in :DEG:aIMu0nieph7 -->
sum( #{?de.Gvoecom5muL} + #{?de.CWa6eew5uco} - #{?de.nthohhie8Ba} - #{?de.Faey8Iphooy} )
The predictor configuration includes:
| property | value |
|---|---|
| Output data element | one of the data elements in the group |
| Output category option combo | Stock balance at start of period (Gvoecom5muL) |
| Organisation units providing data | At selected level(s) only |
| Sekvenční počet vzorků | 1 |
| Počet ročních vzorků | 0 |
The predictor will execute once for each data element in the data element group. Because the aggregation function sum() is used in the predictor generator expression, all the values in the expression will be fetched from the previous period (since the sequential sample count is 1). The predictor will write out the starting balance for each data element for the periods within the predictor run start and end date, for organisation units at the selected level(s).
Predictions are always made forward through time. The starting balance predicted for one period can be used as an input to compute the starting balance of the following period.
Example 2
If you want to make predictions for the same period as the input data, just omit the aggregation function such as sum(). Adding to the previous example, say you have another category option combination that computes the net inventory change during the period:
| category option combo | prostředek |
|---|---|
Hpiek8IefoS | Stock change during the period |
You can use the following expression to compute the inventory change as ( restock - used - lost ):
forEach ?de in :DEG:aIMu0nieph7 -->
#{?de.CWa6eew5uco} - #{?de.nthohhie8Ba} - #{?de.Faey8Iphooy}
The output category option combo is:
| property | value |
|---|---|
| Output category option combo | Stock change during the period (Hpiek8IefoS) |
Since there is no aggregation function such as sum() around the expression elements, the input data is taken from the same period as the predictor output.
Vytvořte nebo upravte skupinu prediktorů
-
Open the Maintenance app and click Other > Predictor group.
-
Klikněte na tlačítko Přidat.
-
Zadejte název. Toto pole musí být jedinečné.
-
(Optional) In the Code field, assign a code. This field needs to be unique.
-
(Volitelné) Zadejte Popis.
-
Poklepejte na Prediktory, které chcete skupině přiřadit.
-
Klikněte Uložit.
Clone metadata objects
Klonování datového prvku nebo jiných objektů může ušetřit čas při vytváření mnoha podobných objektů.
-
Otevřete aplikaci Údržba a najděte typ objektu metadat který chcete klonovat.
-
V seznamu objektů klikněte na nabídku možností a vyberte Klonovat.
-
Upravte požadované možnosti.
-
Klikněte Uložit.
Odstraňte objekty metadat
Poznámka
Datový prvek a další objekty datových prvků můžete odstranit, pouze pokud k samotnému datovému prvku nejsou přidružena žádná data.
Varování
Jakákoli sada dat, kterou ze systému odstraníte, je nenávratně ztracena. Odebrány budou také všechny formuláře pro zadávání údajů a formuláře oddílů, které mohly být vyvinuty. Před odstraněním jakékoli datové sady se ujistěte, že jste vytvořili zálohu své databáze, pro případ, že byste ji v určitém okamžiku potřebovali obnovit.
-
Otevřete aplikaci Údržba a najděte typ objektu metadat které chcete smazat.
-
V seznamu objektů klikněte na nabídku možností a vyberte Odstranit.
-
Klikněte na Potvrdit.
Zobrazit podrobnosti o objektech metadat
-
Otevřete aplikaci Údržba a najděte typ objektu metadat které chcete zobrazit.
-
In the object list, click the options menu and select Show details.
Přeložte objekty metadat
DHIS2 poskytuje funkce pro překlady obsahu databáze, například datových prvků, skupin datových prvků, indikátorů, skupin indikátorů nebo organizačních jednotek. Tyto prvky můžete přeložit na libovolný počet národních prostředí. Národní prostředí představuje konkrétní geografickou, politickou nebo kulturní oblast.
Tip
Chcete-li aktivovat překlad, otevřete aplikaci Nastavení systému a klikněte na > Vzhled a vyberte jazyk.
-
Otevřete aplikaci Údržba a najděte typ objektu metadat you want to translate.
-
V seznamu objektů klikněte na nabídku možností a vyberte Přeložit.
Tip
If you want to translate an organisation unit level, click directly on the Translate icon next to each list item.
-
Vyberte národní prostředí.
-
Zadejte Název, Zkrácený název a Popis.
-
Klikněte Uložit.
Spravujte nabízené zprávy
O nabízených zprávách
Push reports allows you to increase awareness and usage of data analysis by sending reports with charts, tables and maps directly to users e-mail addresses.
-
Nabízená zpráva získává svůj obsah ze stávajících ovládacích panelů.
-
A push report lists the dashboard items in the same order as on the ovládací panel.
-
A push report can only contain dashboard items with charts, maps or tables.
-
You create the push report and its schedule in the Maintenance app.
-
The Title and Message parameters you set up in the Maintenance app, are included in each report. The Name you give the report is not included in the report. Instead, the name is used to identify the push analysis object in the system. This way a report can be named one thing, and the title of the report can be another.
-
When you run a push report job, the system compiles a list of recipients from the user groups you've selected. The system then generates a report for each member of the selected user groups. Each of the dashboard items are generated specifically for each user. This means that the data included in the report reflects the data the user has access to. All users could therefore get the same report (if all the data is "static") or custom reports (if all the data is "dynamic"), or a combination of the two.
-
Push reports are sent by e-mail to the recipients, not through the internal DHIS2 messaging system. If a user doesn't have a valid e-mail, or if the job fails, no e-mails are sent. In this case, the problem is logged on the server.
Note
The data generated in the push reports is public so verify that you don't include any sensitive data.

V aplikaci Údržba spravujete následující objekty nabízených sestav:
Tabulka: Objekty nabízených sestav v aplikaci Údržba
| Typ objektu | Dostupné funkce |
|---|---|
| Nabízená analýza | Vytvářejte, upravujte, klonujte, odstraňujte, zobrazujte podrobnosti, překládejte, zobrazujte náhledy a spouštějte |
Vytvořte nebo upravte nabízenou zprávu
-
Open the Maintenance app and click Other > Push analysis.
-
Klikněte na tlačítko Přidat.
-
Do pole Název zadejte název naplánovaného přehledu.
This name is not included in the report e-mail. Instead, the name is used to identify the push analysis object in the system.
-
(Volitelné) V poli Kód přiřaďte kód.
-
Přidejte zprávě Nadpis.
Tento název je obsažen v e-mailu se zprávou.
-
(Volitelné) Přidejte Sdělení.
Toto sdělení je obsaženo v e-mailu se zprávou.
-
Vyberte Dashboard, na kterém bude sestava založena.
-
Vyberte a přiřaďte skupiny uživatelů, kterým chcete zprávu odeslat.
-
Select a Scheduling frequency: Daily, Weekly or Monthly.
Note
If you schedule a push report to "Monthly" and "31", the scheduled report job will not run if the month has less than 31 days.
-
(Volitelné) Výběrem možnosti Povolit aktivujete úlohu nabídnuté zprávy.
Úloha se nespustí, dokud ji neaktivujete.
-
Klikněte Uložit.
Náhled nabízených zpráv
-
Open the Maintenance app and click Other > Push analysis.
-
V seznamu nabízených hlášení zpráv vyhledejte nabízenou zprávu, jejíž náhled chcete zobrazit.
-
Klikněte na nabídku možností a vyberte Náhled.
Náhled nové zprávy se otevře v novém okně.
Spusťte úlohy nabízených zpráv
-
Open the Maintenance app and click Other > Push analysis.
-
V seznamu nabízených zpráv vyhledejte nabízenou zprávu, kterou chcete spustit.
-
Klikněte na nabídku možností a vyberte možnost Spustit.
Úloha nabízené zprávy se spustí okamžitě.
Clone metadata objects
Klonování datového prvku nebo jiných objektů může ušetřit čas při vytváření mnoha podobných objektů.
-
Otevřete aplikaci Údržba a najděte typ objektu metadat který chcete klonovat.
-
V seznamu objektů klikněte na nabídku možností a vyberte Klonovat.
-
Upravte požadované možnosti.
-
Klikněte Uložit.
Odstraňte objekty metadat
Poznámka
Datový prvek a další objekty datových prvků můžete odstranit, pouze pokud k samotnému datovému prvku nejsou přidružena žádná data.
Varování
Jakákoli sada dat, kterou ze systému odstraníte, je nenávratně ztracena. Odebrány budou také všechny formuláře pro zadávání údajů a formuláře oddílů, které mohly být vyvinuty. Před odstraněním jakékoli datové sady se ujistěte, že jste vytvořili zálohu své databáze, pro případ, že byste ji v určitém okamžiku potřebovali obnovit.
-
Otevřete aplikaci Údržba a najděte typ objektu metadat které chcete smazat.
-
V seznamu objektů klikněte na nabídku možností a vyberte Odstranit.
-
Klikněte na Potvrdit.
Zobrazit podrobnosti o objektech metadat
-
Otevřete aplikaci Údržba a najděte typ objektu metadat které chcete zobrazit.
-
In the object list, click the options menu and select Show details.
Přeložte objekty metadat
DHIS2 poskytuje funkce pro překlady obsahu databáze, například datových prvků, skupin datových prvků, indikátorů, skupin indikátorů nebo organizačních jednotek. Tyto prvky můžete přeložit na libovolný počet národních prostředí. Národní prostředí představuje konkrétní geografickou, politickou nebo kulturní oblast.
Tip
Chcete-li aktivovat překlad, otevřete aplikaci Nastavení systému a klikněte na > Vzhled a vyberte jazyk.
-
Otevřete aplikaci Údržba a najděte typ objektu metadat you want to translate.
-
V seznamu objektů klikněte na nabídku možností a vyberte Přeložit.
Tip
If you want to translate an organisation unit level, click directly on the Translate icon next to each list item.
-
Vyberte národní prostředí.
-
Zadejte Název, Zkrácený název a Popis.
-
Klikněte Uložit.
Spravujte externí vrstvy mapy
O externích mapových vrstvách
You can customize GIS by including map layers from various sources and combine them with your own data in DHIS2. DHIS2 supports these common map service formats: Web Map Service (WMS), Tile Map Service (TMS), XYZ tiles and Vector tiles (Vector Style).
Vytvořte nebo upravte externí vrstvu mapy
Note
DHIS2 only supports the Web Mercator projection (EPSG:3857) so make sure that the external service supports this projection.
Tabulka: Objekty externí mapové vrstvy v aplikaci Údržba
| Typ objektu | Dostupné funkce |
|---|---|
| Externí mapová vrstva | Vytvářejte, upravujte, klonujte, odstraňujte, zobrazujte podrobnosti a překládejte |
-
Open the Maintenance app and click Other > External map layer.
-
Klikněte na tlačítko Přidat.
-
In the Name field, type a name that describes the content of the external map layer.
Toto je název, který uvidíte v aplikaci Mapy.
-
(Volitelné) V poli Kód přiřaďte kód.
-
Vyberte formát Mapové služby.
DHIS2 podporuje čtyři běžné formáty mapových služeb:
-
Web Map Service (WMS)
Image format: PNG format allows layers to be transparent, JPG format offers better compression and is often faster to load.
Layers: A WMS can contain several individual layers, and you can specify which you want to include (comma separated). Refer to the WMS GetCapabilities document to see the available layers.
-
Tile Map Service (TMS)
-
Dlaždice XYZ (lze použít i pro WMTS)
-
Vektorové dlaždice (vektorový styl)
When Vector Style is chosen, you can then add a value for "Before layer id". It indicates the layer id in the Vector tile (layer) stack at which the user's layers (such as Thematic, Events) will be inserted. If this value isn't set, then the user's layers will be placed on top of the layers in the Vector Style. The map service URL should be to a JSON document that follows the Mapbox GL Style Spec.
-
-
Zadejte URL do mapové služby.
Note
XYZ and TMS URLs must contain placeholders {}, for example: http://{s}.tile.osm.org/{z}/{x}/{y}.png.
-
(Optional) Enter Source of the map layers. The field can contain HTML tags if you want to link to the source.
When you use an external map service it is important to highlight where the data comes from.
-
Vyberte umístění:
-
Bottom - basemap: For the Maps app, this makes the external map layer selectable as the basemap (i.e. as an alternative to the DHIS2 basemaps).
-
Top - overlay: For the Maps app, this allows the external map to be added from the Add Layer selection and placed anywhere above the basemap.
Všimněte si, že vrstvy vektorového stylu lze přidat pouze jako základní mapu.
-
-
(Volitelné) Přidejte legendu.
Legendu můžete přidat dvěma způsoby:
-
Select a predefined Legend to describe the colors of the map layer.
Tip
Click Add new to create legends that you're missing. In the form that opens, create the legends you need. When you're done, click Refresh values.
-
Enter a link to an external image legend in Legend image URL.
These are often provided for WMS. See under LegendURL in the WMS GetCapabilites document.
-
-
Klikněte Uložit.
Clone metadata objects
Klonování datového prvku nebo jiných objektů může ušetřit čas při vytváření mnoha podobných objektů.
-
Otevřete aplikaci Údržba a najděte typ objektu metadat který chcete klonovat.
-
V seznamu objektů klikněte na nabídku možností a vyberte Klonovat.
-
Upravte požadované možnosti.
-
Klikněte Uložit.
Odstraňte objekty metadat
Poznámka
Datový prvek a další objekty datových prvků můžete odstranit, pouze pokud k samotnému datovému prvku nejsou přidružena žádná data.
Varování
Jakákoli sada dat, kterou ze systému odstraníte, je nenávratně ztracena. Odebrány budou také všechny formuláře pro zadávání údajů a formuláře oddílů, které mohly být vyvinuty. Před odstraněním jakékoli datové sady se ujistěte, že jste vytvořili zálohu své databáze, pro případ, že byste ji v určitém okamžiku potřebovali obnovit.
-
Otevřete aplikaci Údržba a najděte typ objektu metadat které chcete smazat.
-
V seznamu objektů klikněte na nabídku možností a vyberte Odstranit.
-
Klikněte na Potvrdit.
Zobrazit podrobnosti o objektech metadat
-
Otevřete aplikaci Údržba a najděte typ objektu metadat které chcete zobrazit.
-
In the object list, click the options menu and select Show details.
Přeložte objekty metadat
DHIS2 poskytuje funkce pro překlady obsahu databáze, například datových prvků, skupin datových prvků, indikátorů, skupin indikátorů nebo organizačních jednotek. Tyto prvky můžete přeložit na libovolný počet národních prostředí. Národní prostředí představuje konkrétní geografickou, politickou nebo kulturní oblast.
Tip
Chcete-li aktivovat překlad, otevřete aplikaci Nastavení systému a klikněte na > Vzhled a vyberte jazyk.
-
Otevřete aplikaci Údržba a najděte typ objektu metadat you want to translate.
-
V seznamu objektů klikněte na nabídku možností a vyberte Přeložit.
Tip
If you want to translate an organisation unit level, click directly on the Translate icon next to each list item.
-
Vyberte národní prostředí.
-
Zadejte Název, Zkrácený název a Popis.
-
Klikněte Uložit.
Manage SQL views
The SQL View functionality of DHIS2 will store the SQL view definition internally, and then materialize the view when requested.
Database administrators must be careful about creating database views directly in the DHIS2 database. For instance, when the resource tables are generated, all of them will first be dropped and then re-created. If any SQL views depend on these tables, an integrity violation exception will be thrown and the process will be aborted.
The SQL views are dropped in reverse alphabetical order based on their names in DHIS2, and created in regular alphabetical order. This allows you to have dependencies between SQL views, given that views only depend on other views which come earlier in the alphabetical order. For instance, "ViewB" can safely depend on "ViewA". Otherwise, having views depending on other view result in an integrity violation error.
Vytváření nového pohledu SQL
To create a new SQL view, click Apps > Maintenance > Other > SQL View and click the Add + button.
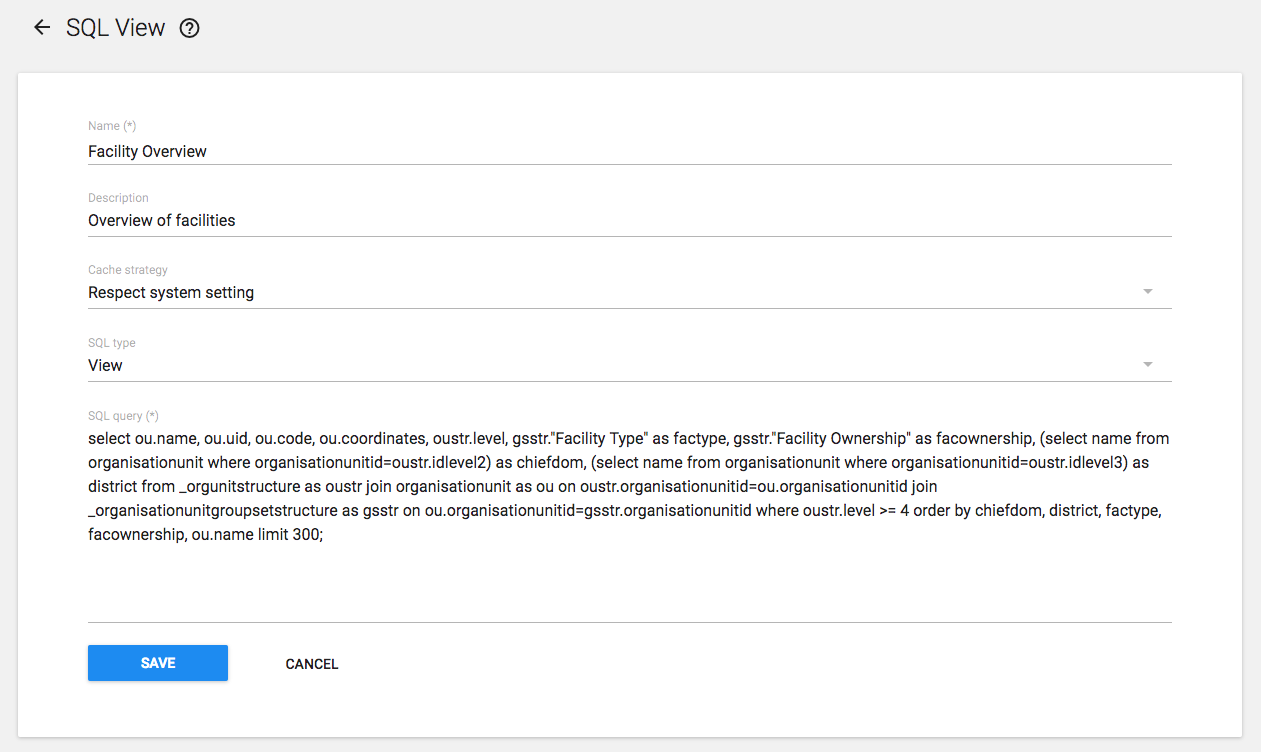
The "Name" attribute of the SQL view will be used to determine the name of the table that DHIS2 will create when the view is materialized by the user. The "Description" attribute allows one to provide some descriptive text about what the SQL view actually does.
Atribut "SQL type" umožňuje vytvoření tří druhů zobrazení: - "Zobrazení" se uloží do databáze a při dotazu se znovu vytvoří - A "Materialized View" is stored in the database and its results are cached in the database - "Dotaz" není uložen v databázi
Konečně "SQL dotaz" by měl obsahovat definici SQL pohledu.
Only SQL "SELECT" statements are allowed and certain sensitive tables (i.e., user information) are not accessible.
Press "Save" to store the SQL view definition. If you created a "View" or a "Materialized View", you must also "Execute query" to finish the creation of the SQL view.
Keep in mind that the the columns returned by the used SELECT statement become table columns, that means they must be of a valid table column type. When functions are used it might be necessary to explicitly cast the result to a type by adding ::{TYPE} after the function.
For example, instead of jsonb_each (which would return a record type that cannot be a column type) use jsonb_each_text and cast the result to text, like in the below sample:
select jsonb_each_text(eventdatavalues)::text from ...
SQL views that call other SQL views
If you wish to make a SQL view that can be called be other SQL views, then its SQL type must be either "View" or a "Materialized View" (not "Query"). It also must have Execute query run on it before being called.
For instance, if you created a view named Data element count with SQL type "View" and this SQL:
select count(*) as count from dataelement;
...then you could run Execute query from the context menu and create a second SQL view named More than 100 data elements with this SQL:
select case when count > 100 then 1 else 0 end as result from _view_data_element_count;
Správa SQL Pohledů
In order to utilize the SQL views, simply click the view and from the context menu, choose "Execute query". Once the process is completed, you will be informed that a table has been created. The name of the table will be provided, and is composed from the "Description" attribute provided in the SQL view definition. Once the view has been generated, you can view it by clicking the view again, and selecting "Show SQL View".
Tip
If you have a view which depends on another view, you should be careful about how the views are named. When analytics is run on the DHIS2 server, all views must be dropped, and are recreated. When analytics starts, the views are dropped in alphabetical order, and then recreated in reverse alphabetical order. Thus, if view A depends on view B, it must appear before view B in alphabetical order. If it appears after view B in alphabetical order, analytics may fail, as the view with dependencies will not be dropped in the correct order.
Manage analytics table hooks
The Analytics Table Hooks functionality of DHIS2 stores SQL code that is run during different phases of the analytics table generation process.
See also /api/analyticsTableHooks in the Developer documentation.
Creating a new analytics table hook
To create a new analytics table hook, click Apps > Maintenance > Other > Analytics table hooks and click the Add + button.
Press "Save" to store the analytics table hook.
Spravujte národní prostředí
It is possible to create custom locales in DHIS2. In addition to the locales available through the system, you might want to add a custom locale such as "English" and "Zambia" to the system. This would allow you to translate metadata objects to local languages, or to account for slight variants between countries which use a common metadata definition.

The locale is composed of a language along with a country. Select the desired values and press "Add". This custom locale will now be available as one of the translation locales in the system.
Úpravy více skupin objektů najednou
Editor skupiny metadat v aplikaci Údržba umožňuje upravovat více skupin objektů najednou. Můžete upravit následující typy objektů:
Tabulka: Typy objektů v editoru skupiny metadat
| Typ objektu | Dostupné funkce |
|---|---|
| Možnost kategorie | |
| Skupina možností kategorie | |
| Datový prvek | Přidat jeden datový prvek do více skupin datových prvků Odebrat jeden datový prvek z více skupin datových prvků |
| Skupina datových prvků | Přidat více datových prvků do jedné skupiny datových prvků Odebrat více datových prvků z jedné skupiny datových prvků |
| Indikátor | Přidat jeden indikátor do více skupin indikátorů Odebrat jeden indikátor z více skupin indikátorů |
| Skupina indikátorů | Přidat více indikátorů do jedné skupiny indikátorů Odebrat více indikátorů z jedné skupiny indikátorů |
Upravte více objektů ve skupině objektů
-
Otevřete aplikaci Údržba a klikněte na Editor skupiny metadat.
-
Klikněte na Správa položek ve skupině.
-
Vyberte typ skupiny objektů, například Skupiny indikátorů.
-
Vyberte skupinu objektů, například HIV.
-
In the left-hand list, select the object(s) you want to add to the object group and click the right arrow.
-
In the right-hand list, select the object(s) you want to remove from the object group and click the left arrow.
Upravte objekt ve více skupinách objektů
-
Otevřete aplikaci Údržba a klikněte na Editor skupiny metadat.
-
Klikněte na Spravovat skupiny pro položku.
-
Vyberte typ objektu, například Indikátory.
-
Vyberte objekt, například ANC LLITN pokrytí.
-
In the left-hand list, select the objects group(s) you want to add the object to and click the right arrow.
-
In the right-hand list, select the object group(s) you want to remove the object from and click the left arrow.