SEMIS end-user manual: individual Tracker data capture (web)
SEMIS version: 2.1
Introduction
This manual guides users and trainers through data capture in the SEMIS web app. It explains student and staff workflows with step-by-step instructions and screenshots.
The student modules are Enrollment, Attendance, Performance, Final Result, and Transfer. The staff modules are Staff Registry, Attendance, Transfer, and Re-enroll.
About SEMIS
SEMIS manages school, student, and staff information in DHIS2. It supports individual records for enrollment, attendance, performance, and other education information.
School data capture includes routine tasks involving many people, such as recording attendance or assessment results for an entire class. SEMIS provides interfaces and bulk operations to simplify these tasks.
Before you begin
Your administrator must install the SEMIS app and configure access and the required settings. If you cannot see the app, contact your administrator.
Important
For the web workflows described in this manual, use a computer, tablet, or phone with an internet connection and a web browser, such as Google Chrome or Mozilla Firefox. Obtain your DHIS2 instance address and individual login credentials from your administrator.
Log in
- Open your web browser.
- Enter the DHIS2 web address provided by your administrator and press Enter.
- Wait for the login page to load.
- Enter your assigned username and password.
- Click Log in.

Note
Enter your credentials exactly as provided, including capital letters and special characters. The interface language follows the language settings configured for your user account.
Log out
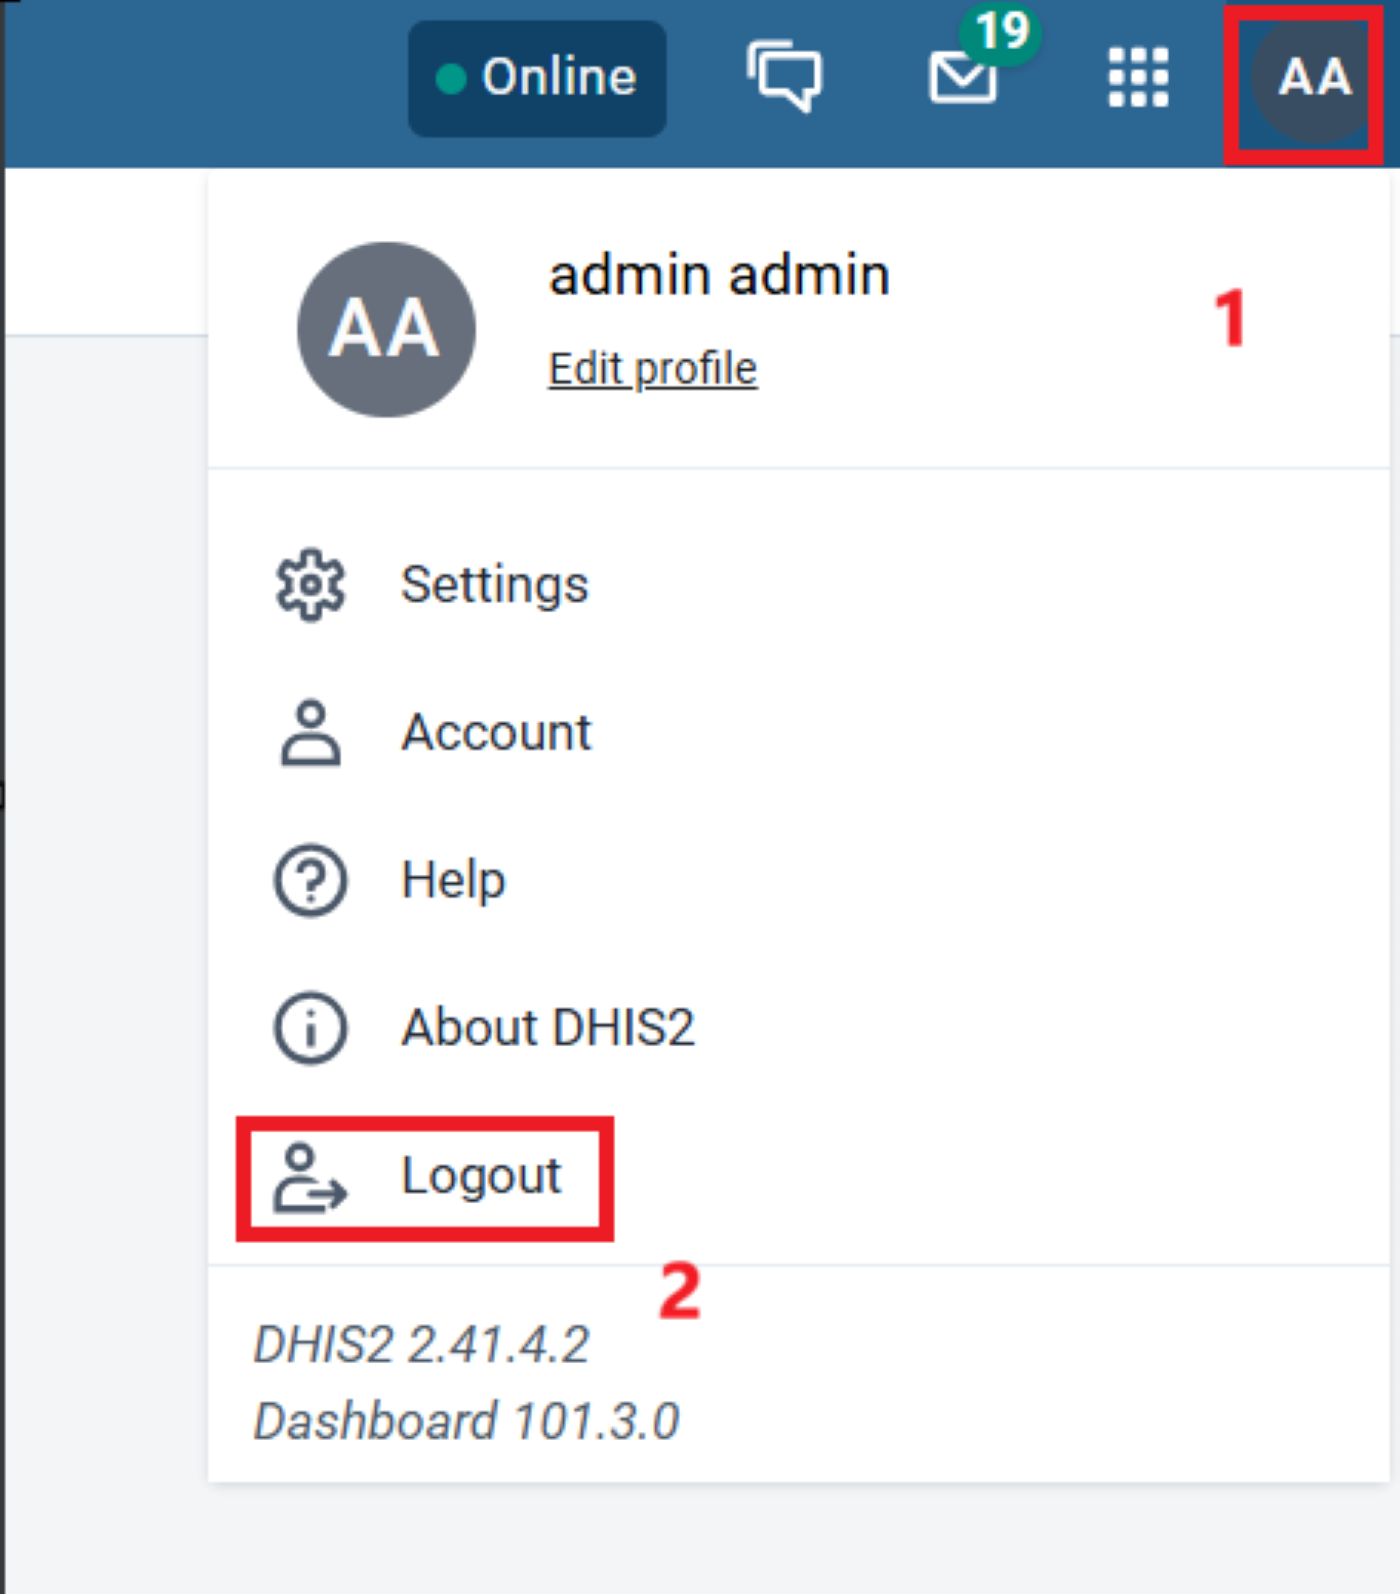
- Click your user account initials in the top-right corner.
- Select Log out.
Open SEMIS
- After logging in, open the App Menu in the top-right corner of DHIS2.
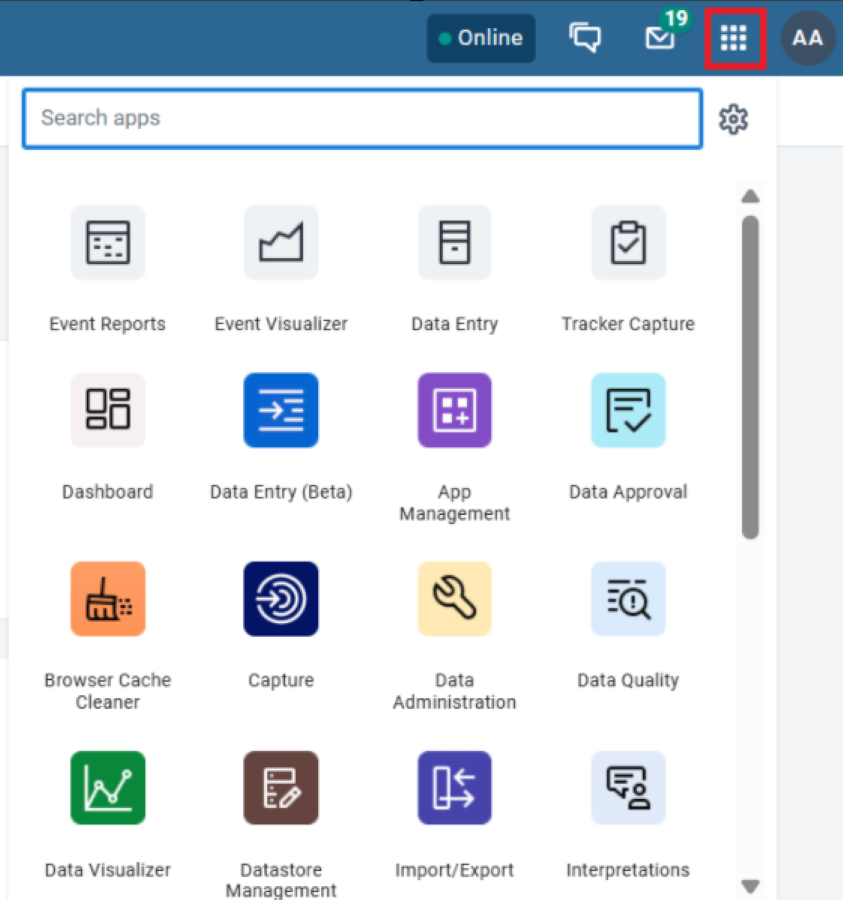
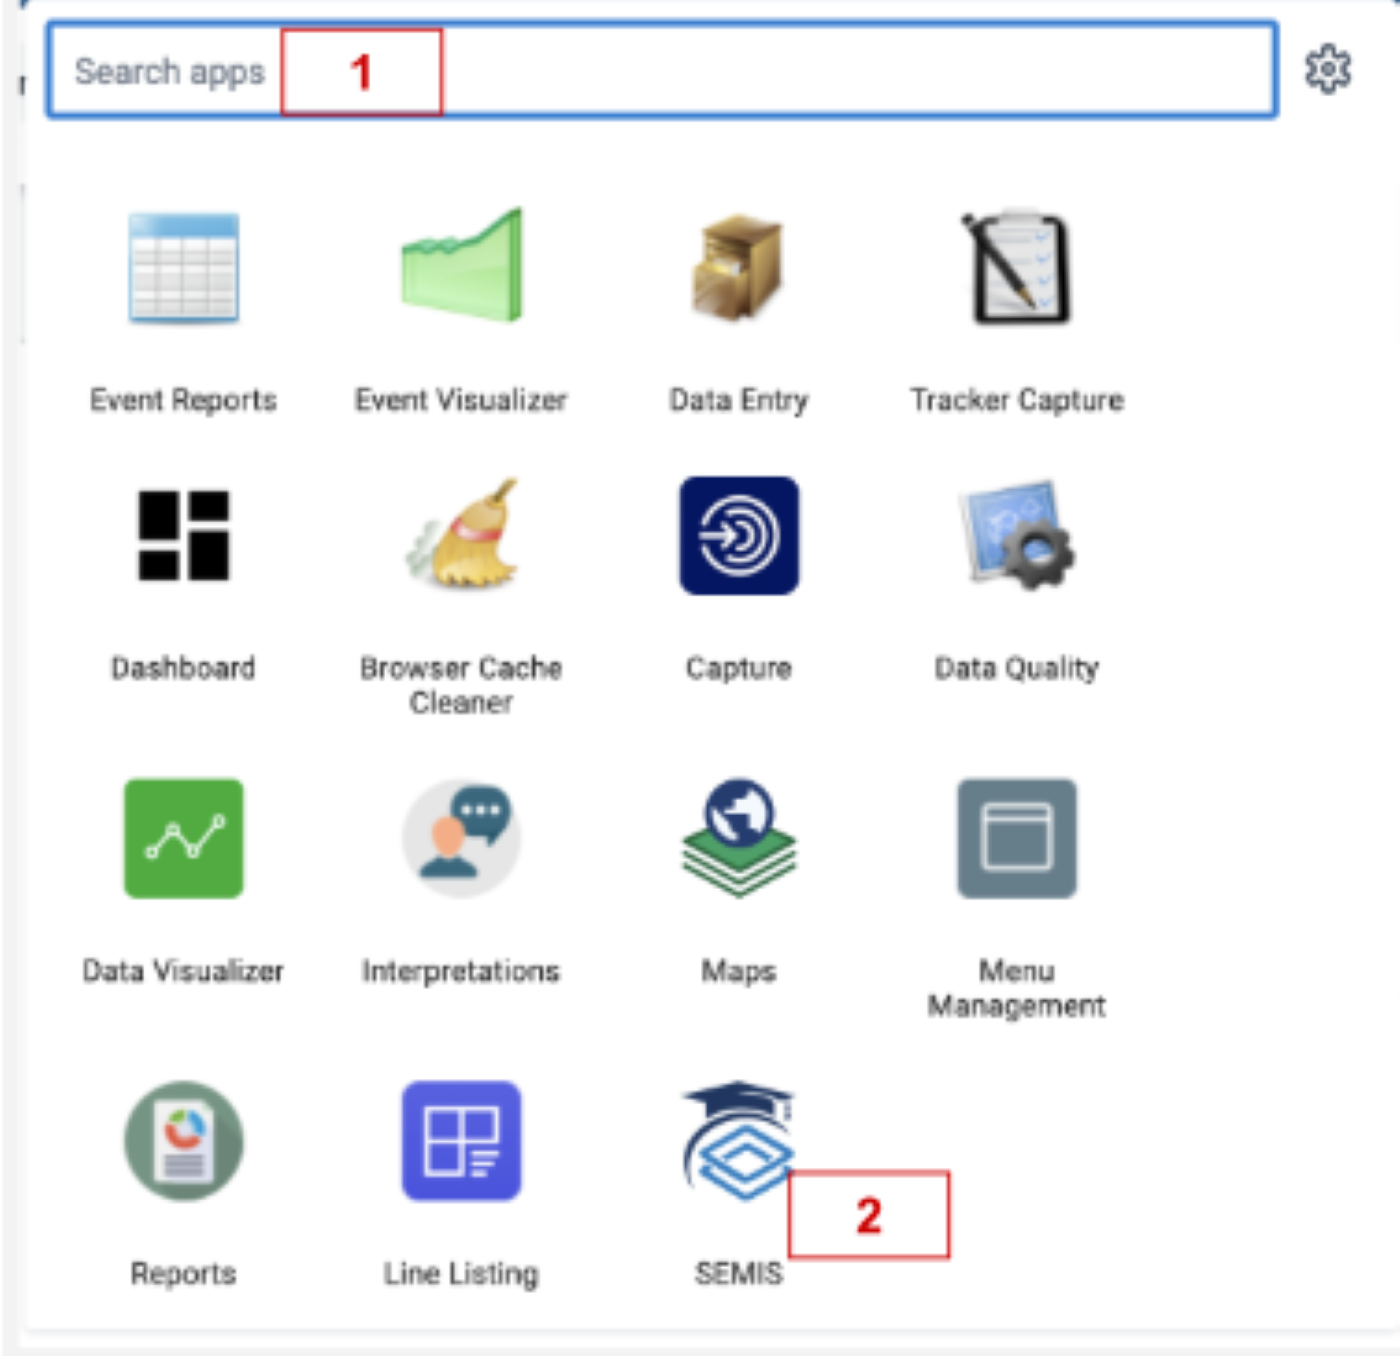
- Search for SEMIS in the search bar, or locate it in the list of applications.
- Click SEMIS to open the app.
Student data entry
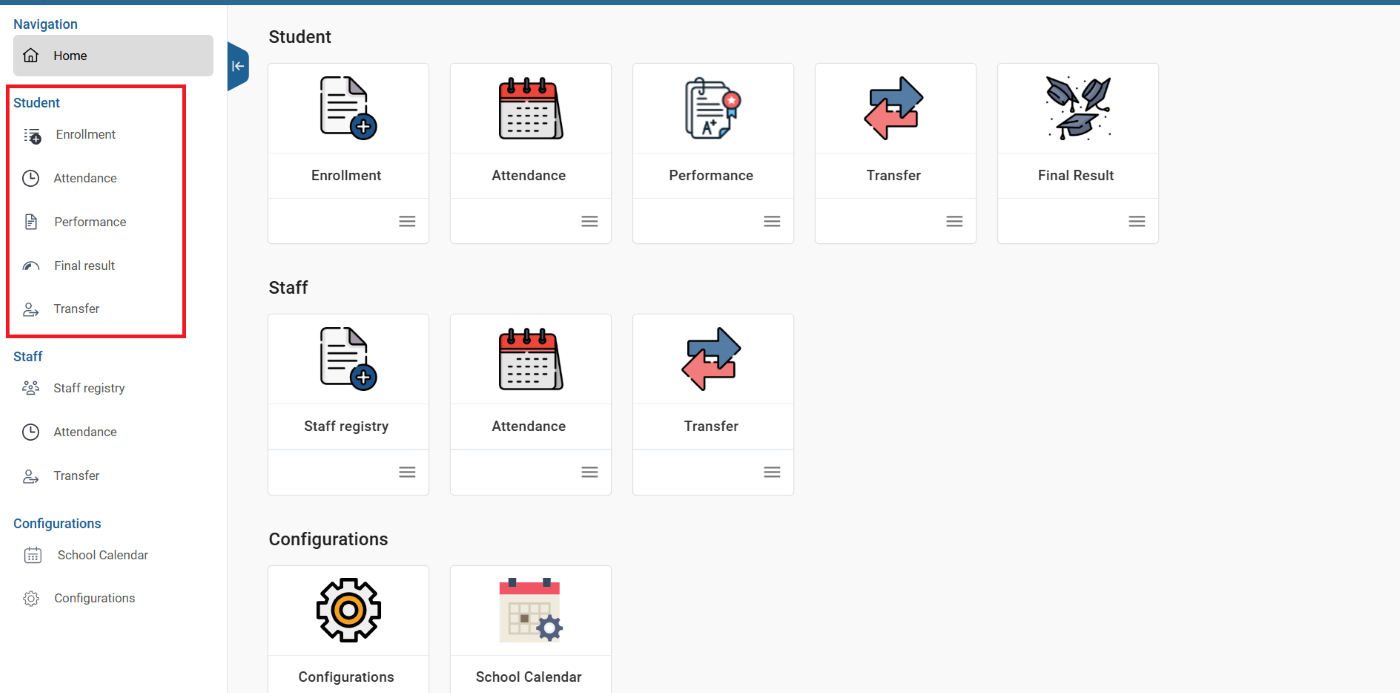
The student program contains five modules:
| Module | Purpose |
|---|---|
| Enrollment | Register new learners and manage their school enrollment details. |
| Attendance | Record daily attendance for learners, including multiple learners on one screen. |
| Performance | Record numeric assessment results for an academic year using the locally configured grading scale. |
| Final Result | Record academic outcomes and promote selected learners to the next grade. |
| Transfer | Move learners between schools while retaining their history; the receiving school reviews the transfer. |
Enrollment
Use Enrollment to register new learners and manage enrollment information.
Important
Register each learner only once as an individual in the system. Registration is different from enrollment in an academic year. Reuse the existing learner record for subsequent academic years, promotions, and transfers instead of creating a duplicate person record.
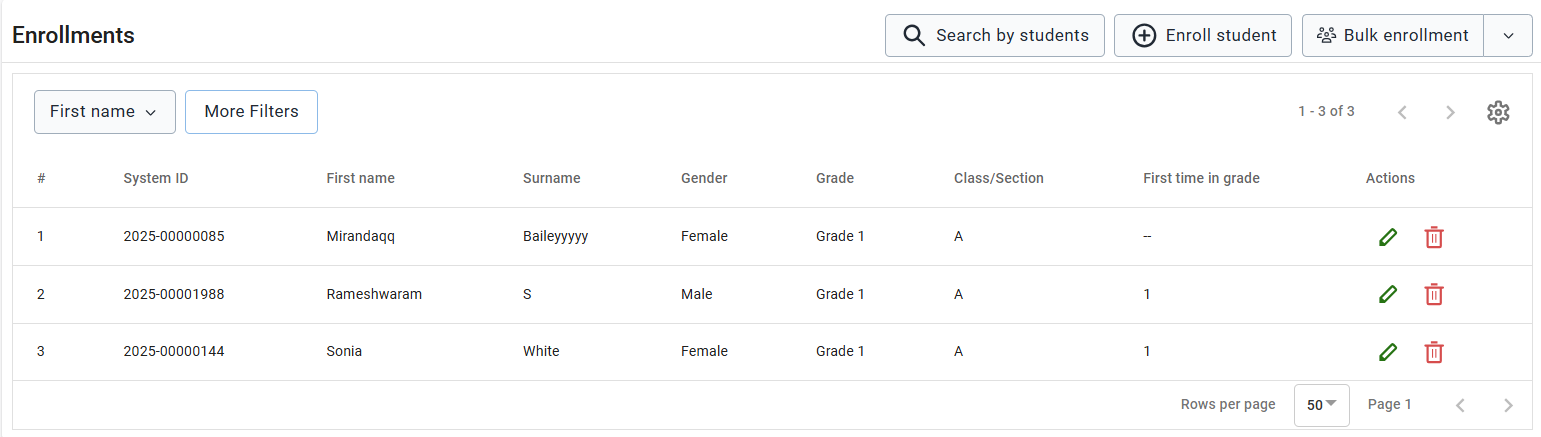
Search for an existing student
Always search before creating a new learner record, including when a learner moves from primary to secondary school.
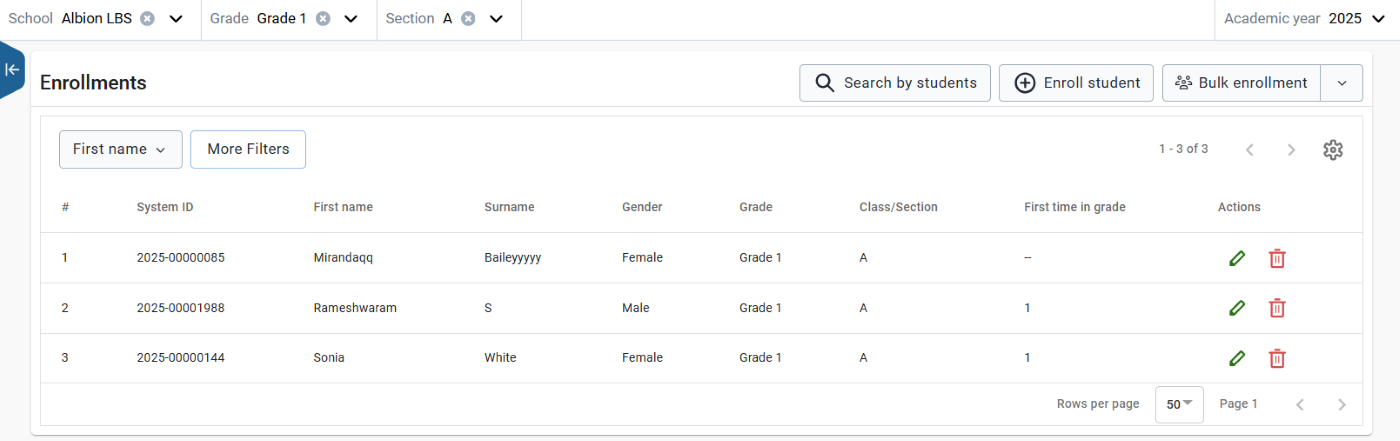
To view the learners in a class:
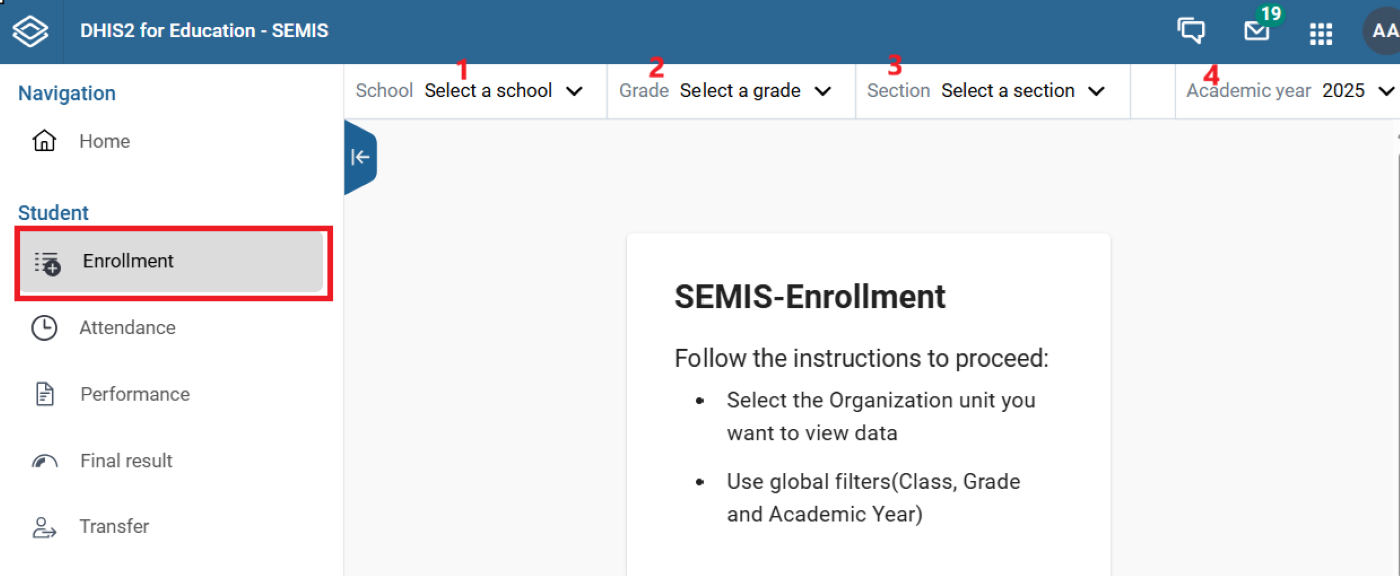
- Select the correct Academic Year.
- Select the School, Grade, and Section or class.
- Review the list of students in the selected class.
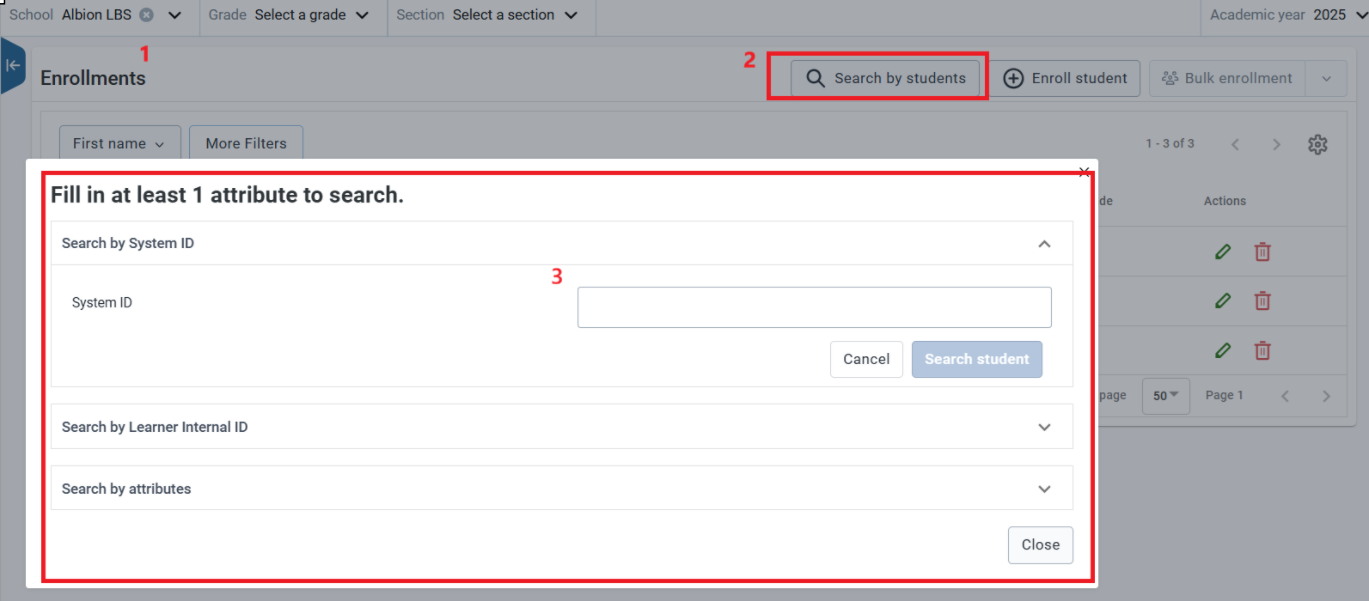
To search for a learner:
- Open Search Student.
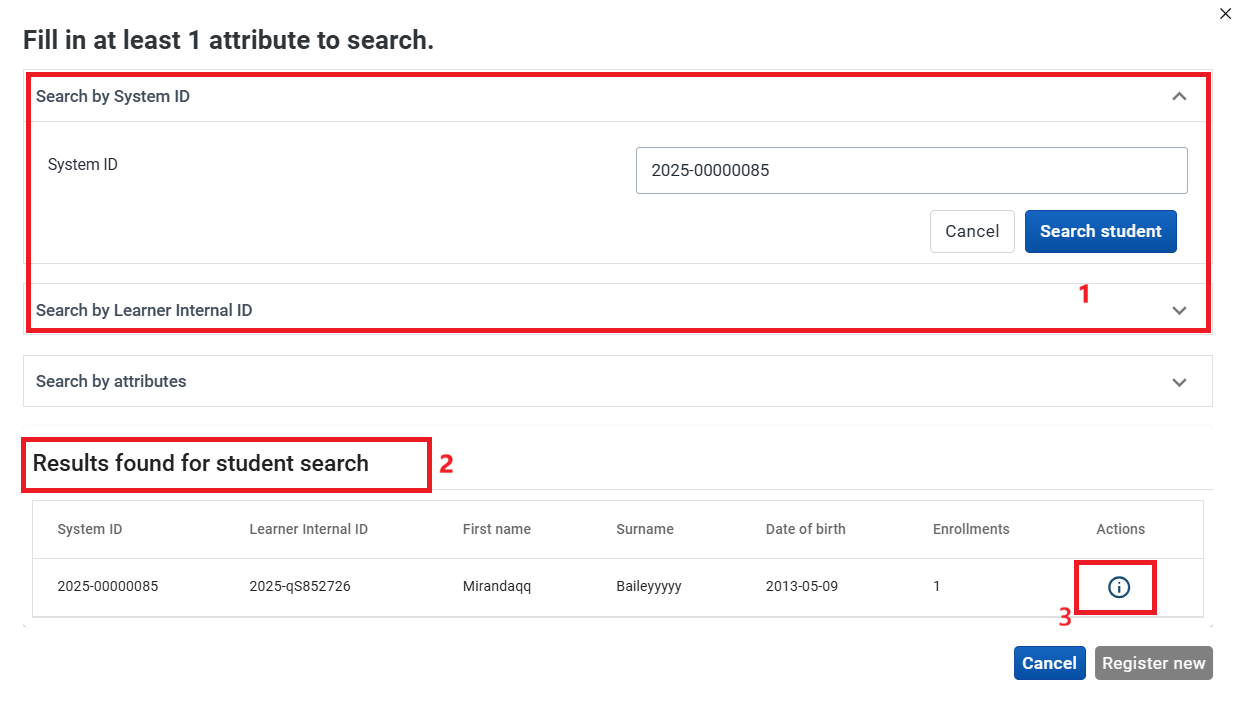
- Complete at least one search field.
- Review the matching learners.
- Use the action in the learner's row to open their enrollment history. Review the schools and academic years already recorded.
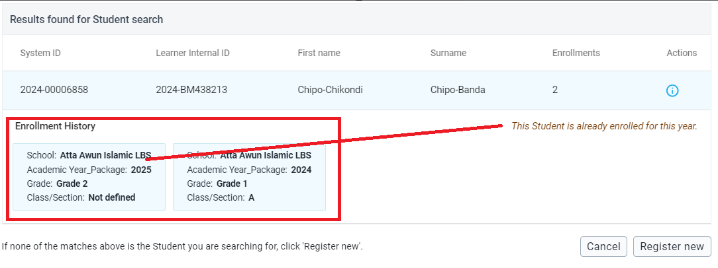
If the learner exists but has no enrollment for the selected academic year, use the available enrollment action for that existing record. Do not create a second learner record. If no existing learner record is found, follow Register a new student.
Available enrollment action:

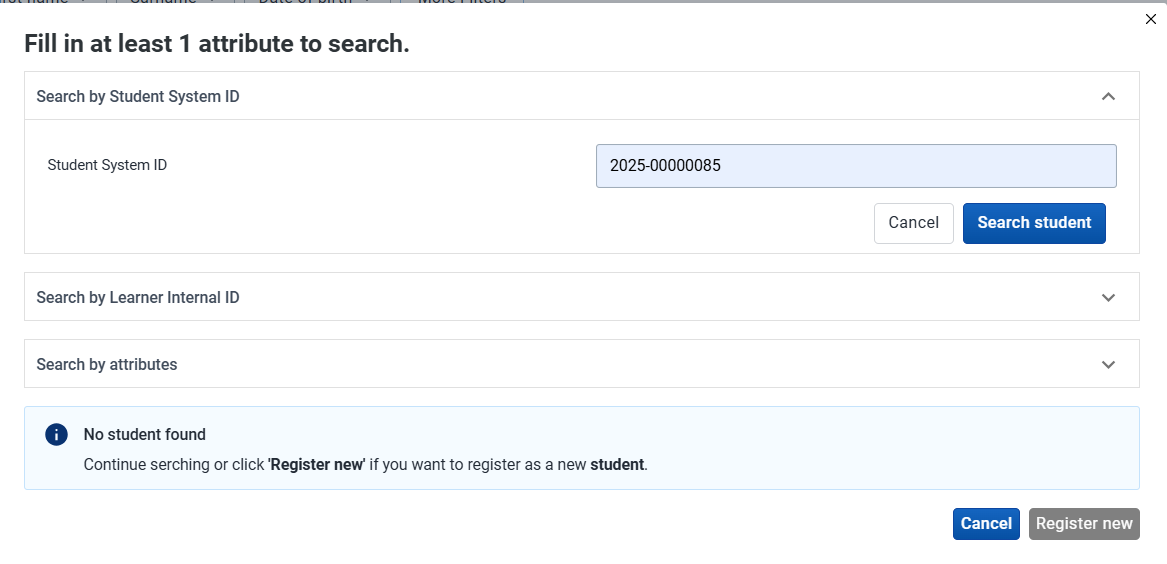
Register a new student
You can register one learner at a time or import several learners using an Excel template.
Register a single student
- Click the registration button shown below.
- Complete the enrollment details, such as Academic Year, Grade, and Class.
- Complete the student profile, including name and date of birth, and the annual profile details.
- Submit the details using the form's save action.
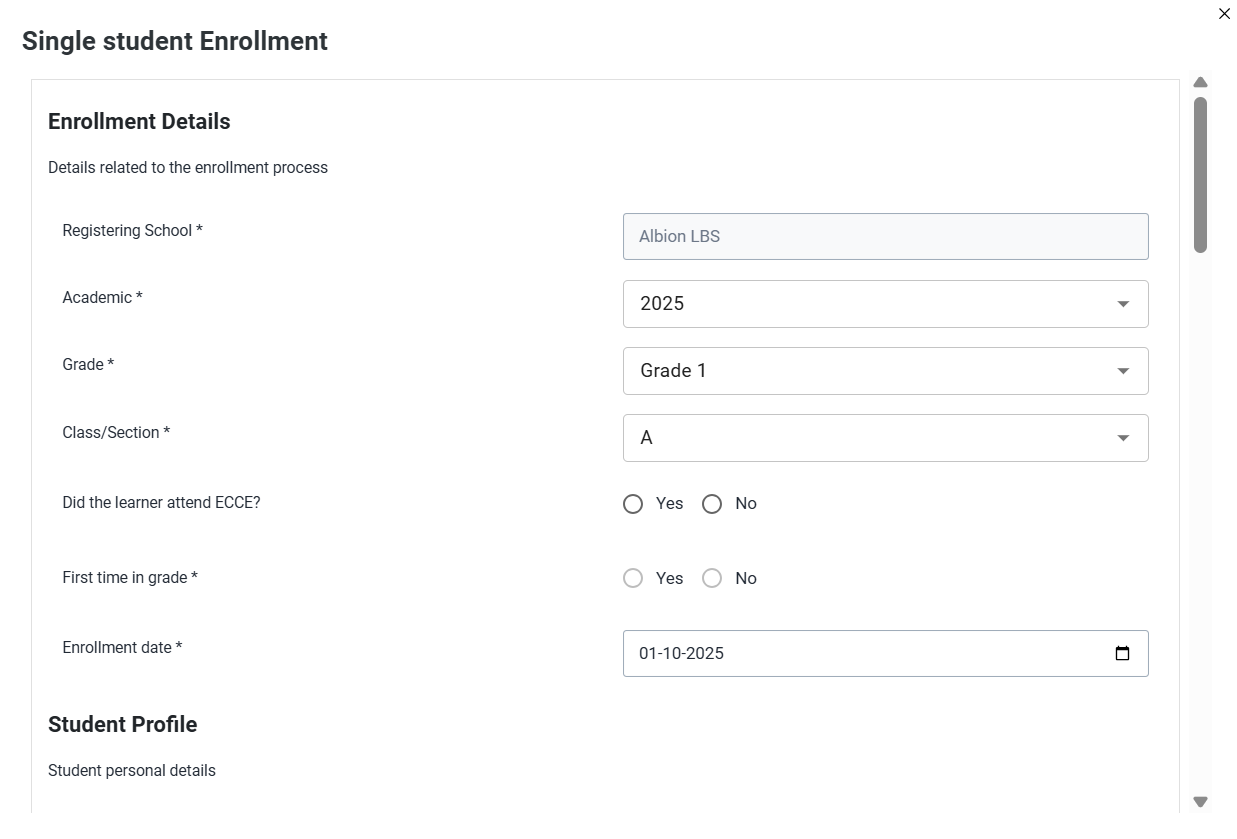
- If you select Save and close, check that the newly enrolled student appears in the list.
Use bulk enrollment
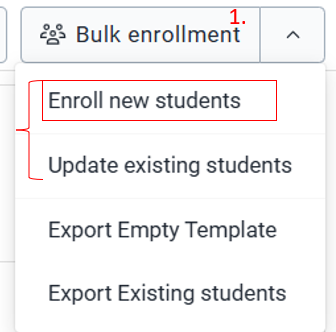
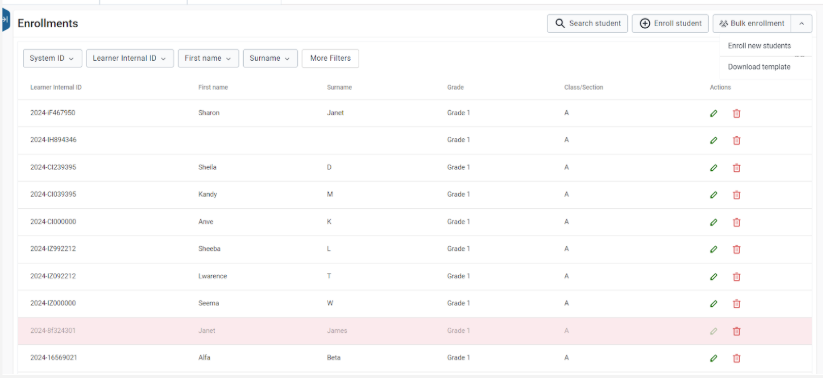
Bulk enrollment provides options to enroll new students or update existing students.
- Open the bulk enrollment area and choose the appropriate operation.
- Click the download-template button.
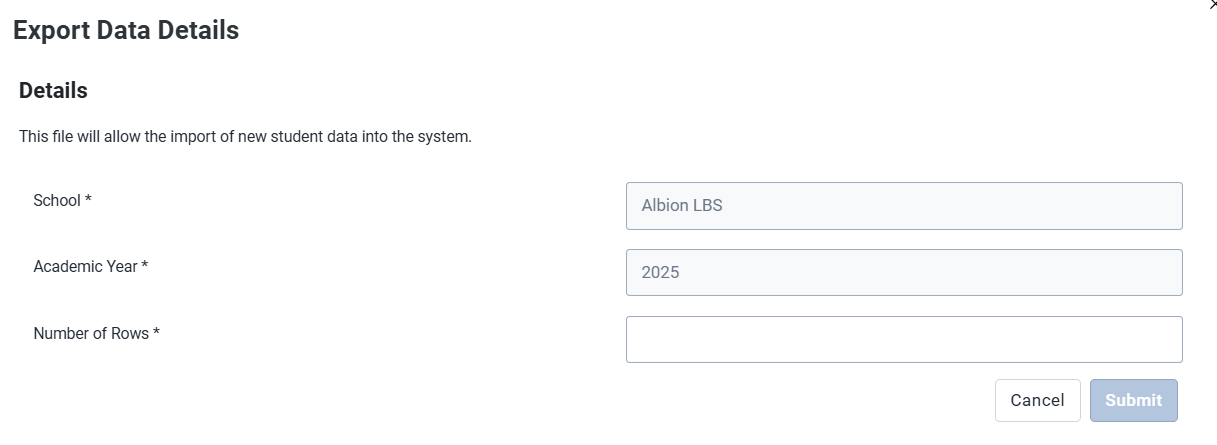
- Enter the number of rows required. Each row represents one student; for example, enter 100 for 100 students.
- Click Submit to download the template.
- Complete the template with the required student information and save the Excel file.
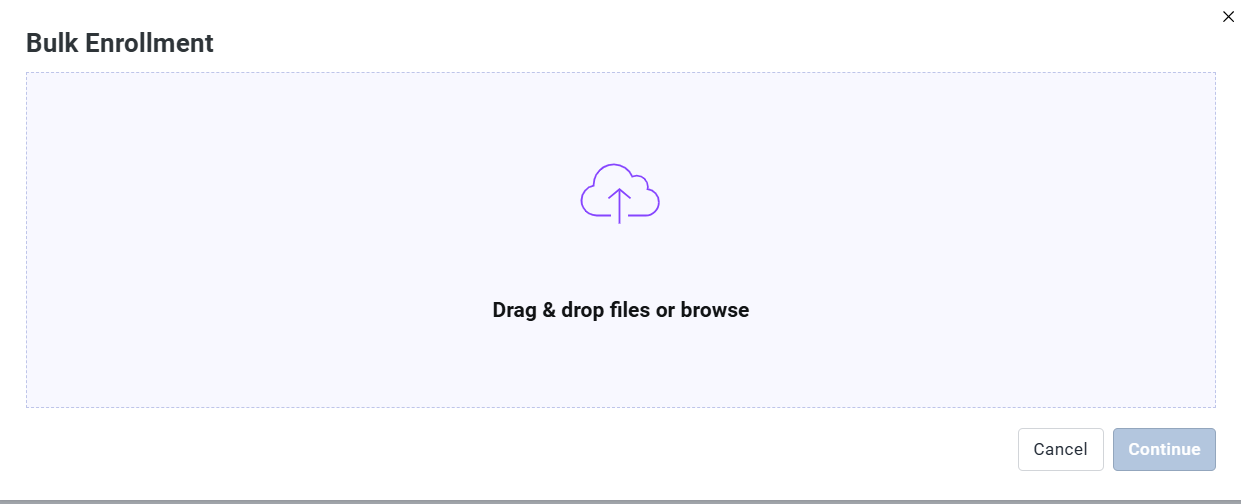
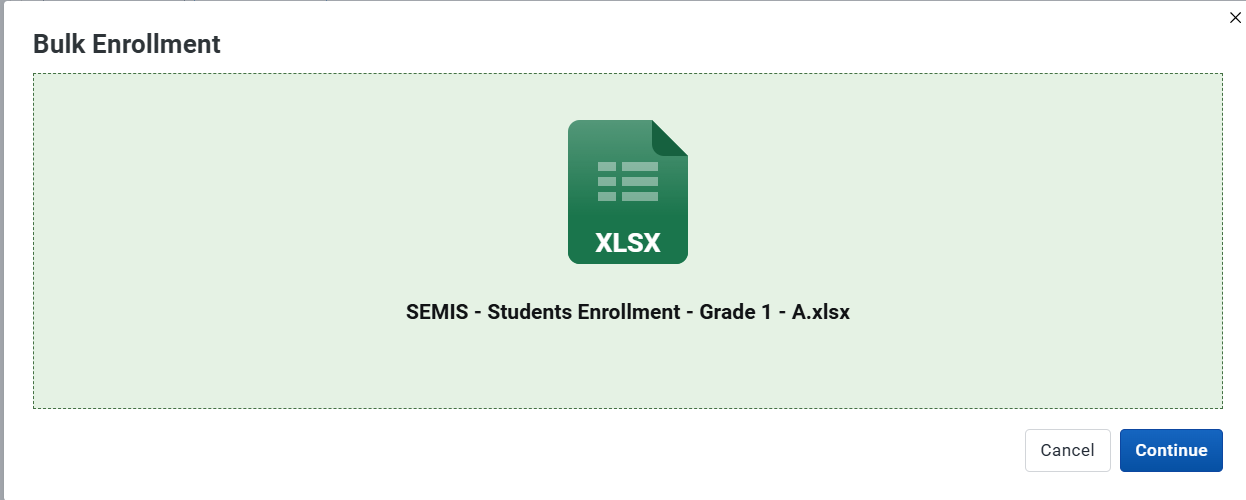
- For new registrations, select Enroll new student and upload or drag the completed file into the dialog.
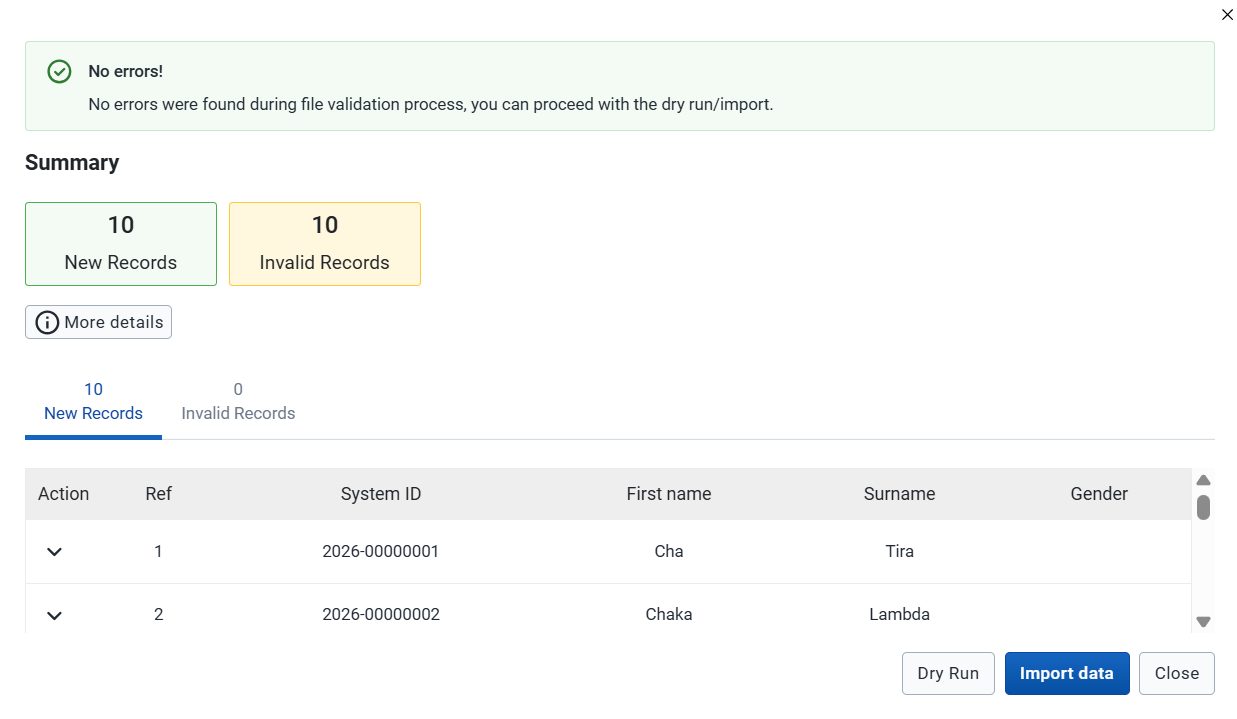
- Click Continue, then use the import action to begin processing the data.
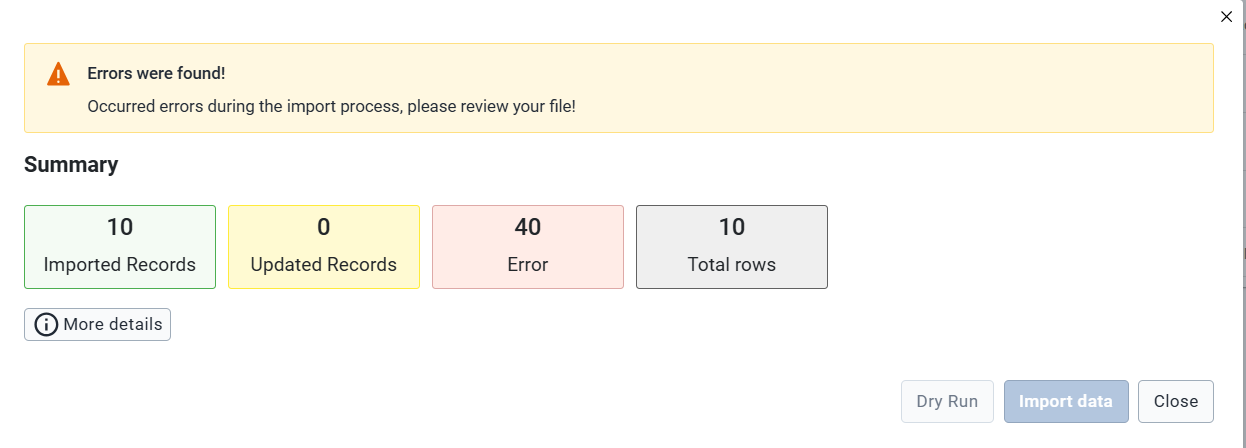
- Review any validation errors or conflicts. Correct the Excel file and upload it again as needed.
- When the data is valid, click Import students to complete the import.
- Check that the imported students appear in the list.
Student attendance
Use Attendance to record attendance for enrolled learners.
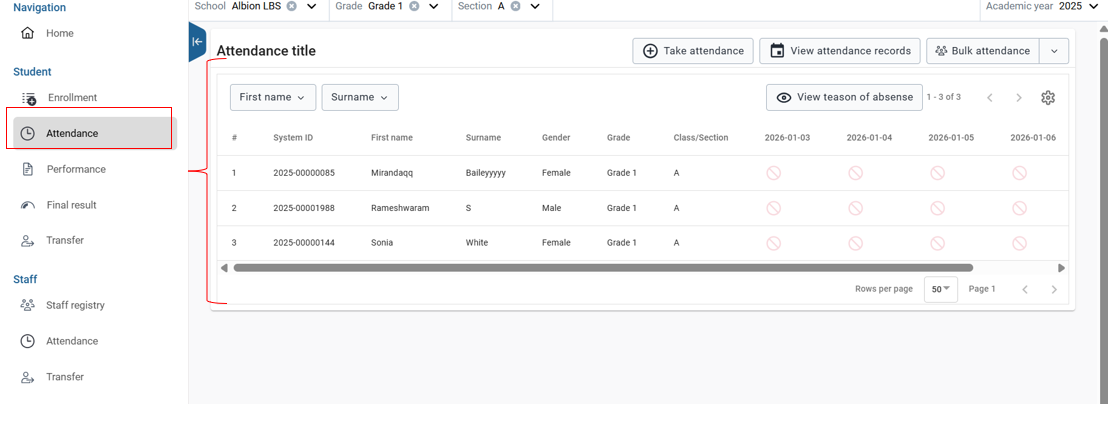
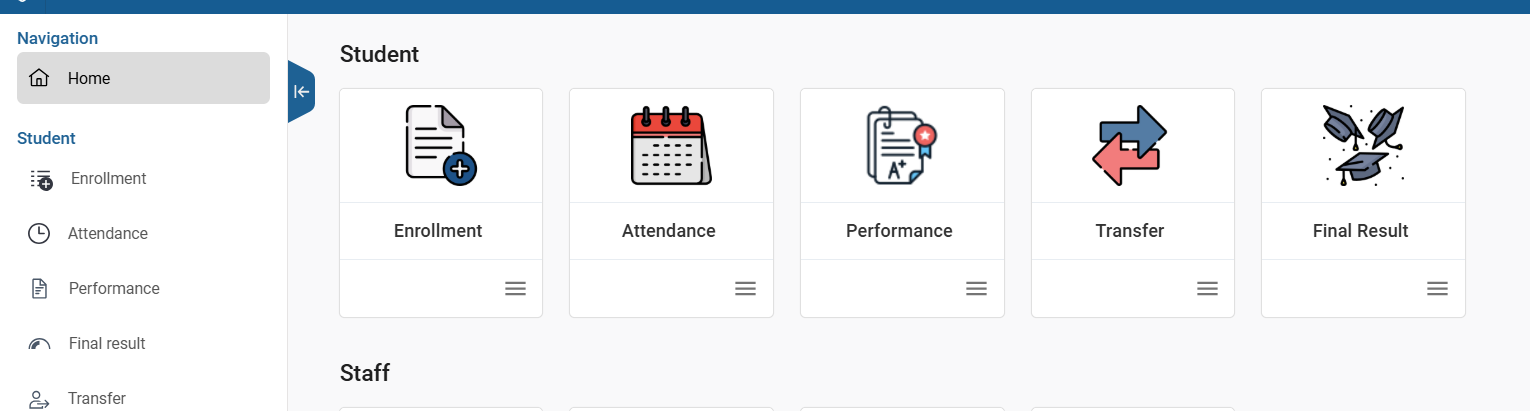
Open the module from the student Attendance tile's three-line menu on the SEMIS home page, or select Attendance from the left-side menu.
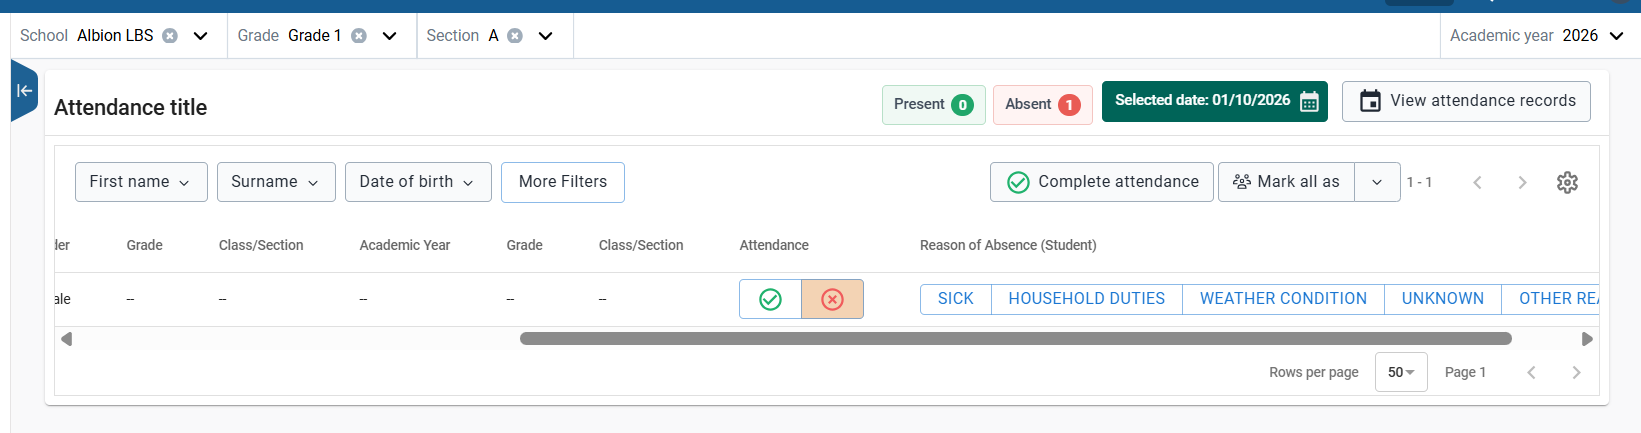
Record student attendance
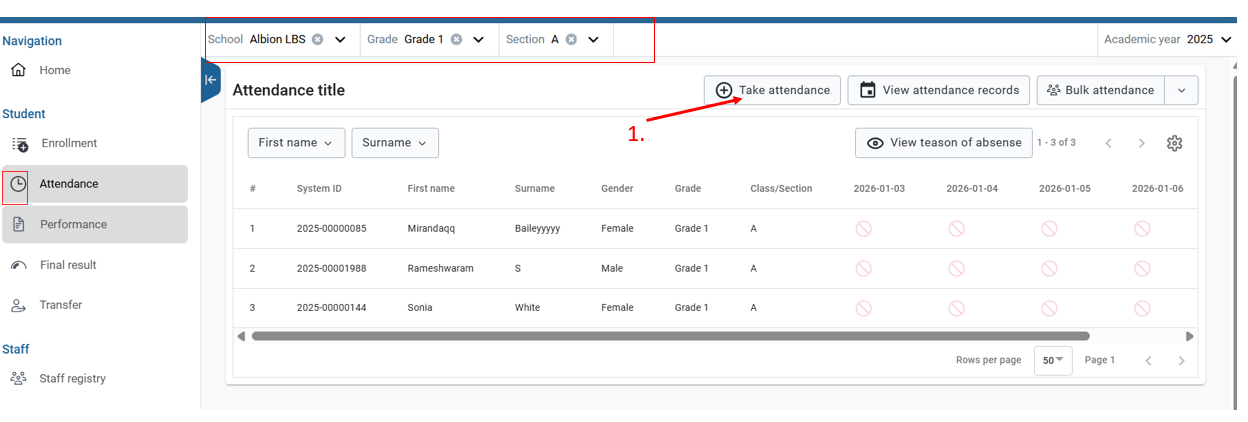
- Select School, Grade, Class, and Academic Year.
- Click Take Attendance to display the enrolled learners.
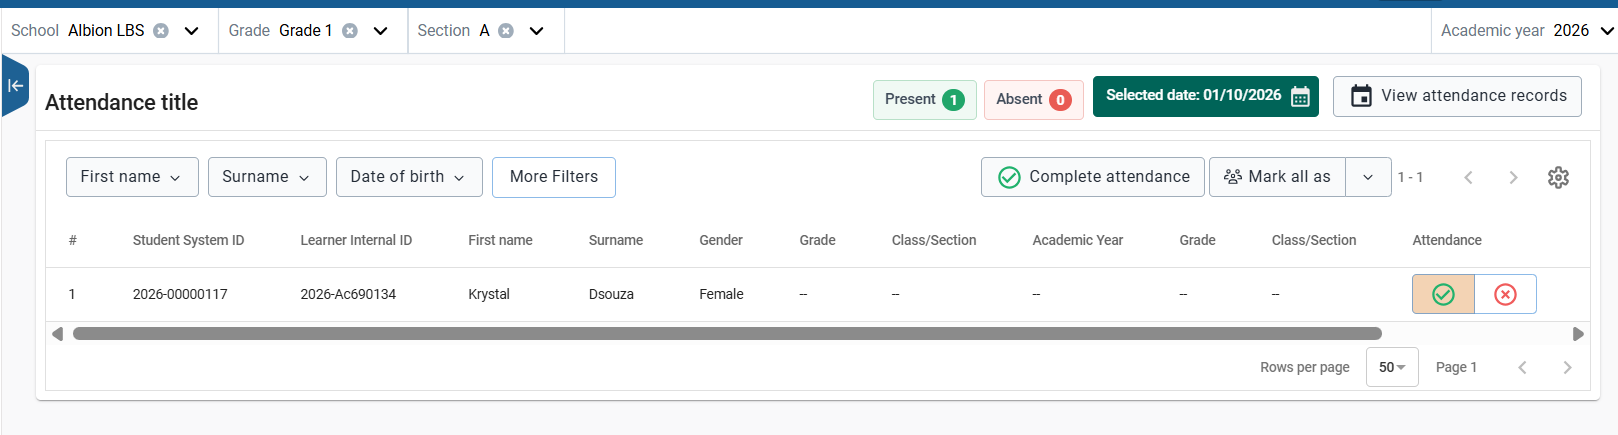
- Check the attendance date.
- Click Start Attendance to mark learners as present for the selected day.
- Mark absent learners as Absent and enter the Reason for Absence.
- Review the total numbers of present and absent learners in the top bar.
Note
The example screenshots show a class with only one enrolled learner. Your list reflects the learners enrolled in the selected class.

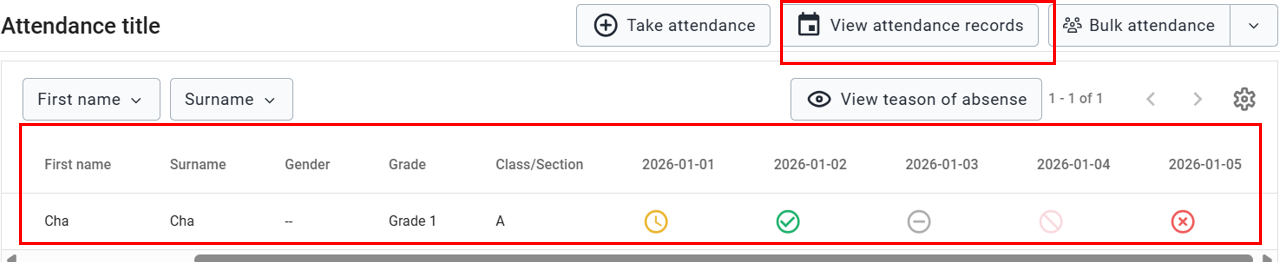
View student attendance records
- Click View Attendance Records.
- In the calendar view, select the end date for the period you want to review.
- Review each learner's attendance status for the displayed dates.
- Click View Reason for Absence to inspect the reason recorded for an absent day.

Import student attendance
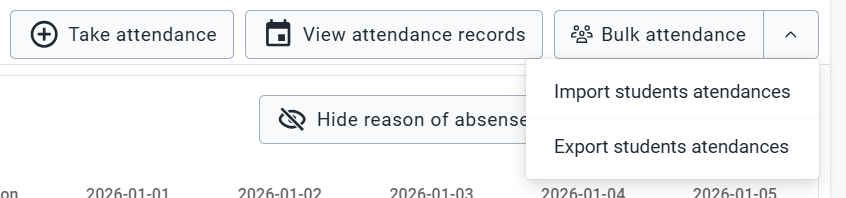
If bulk attendance is used in your implementation:
- Open Bulk Attendance.
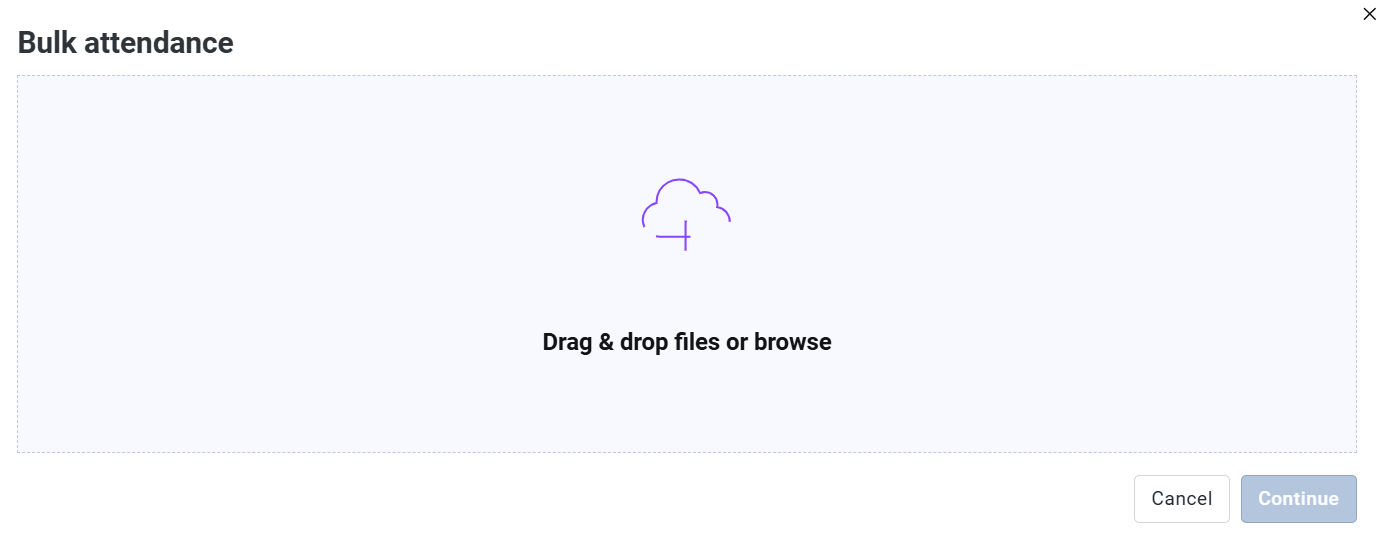
- Select Import Student Attendance.
- Upload the completed attendance file to record attendance in bulk.
Student performance
Use Performance to capture learner scores and results for terms within an academic year.
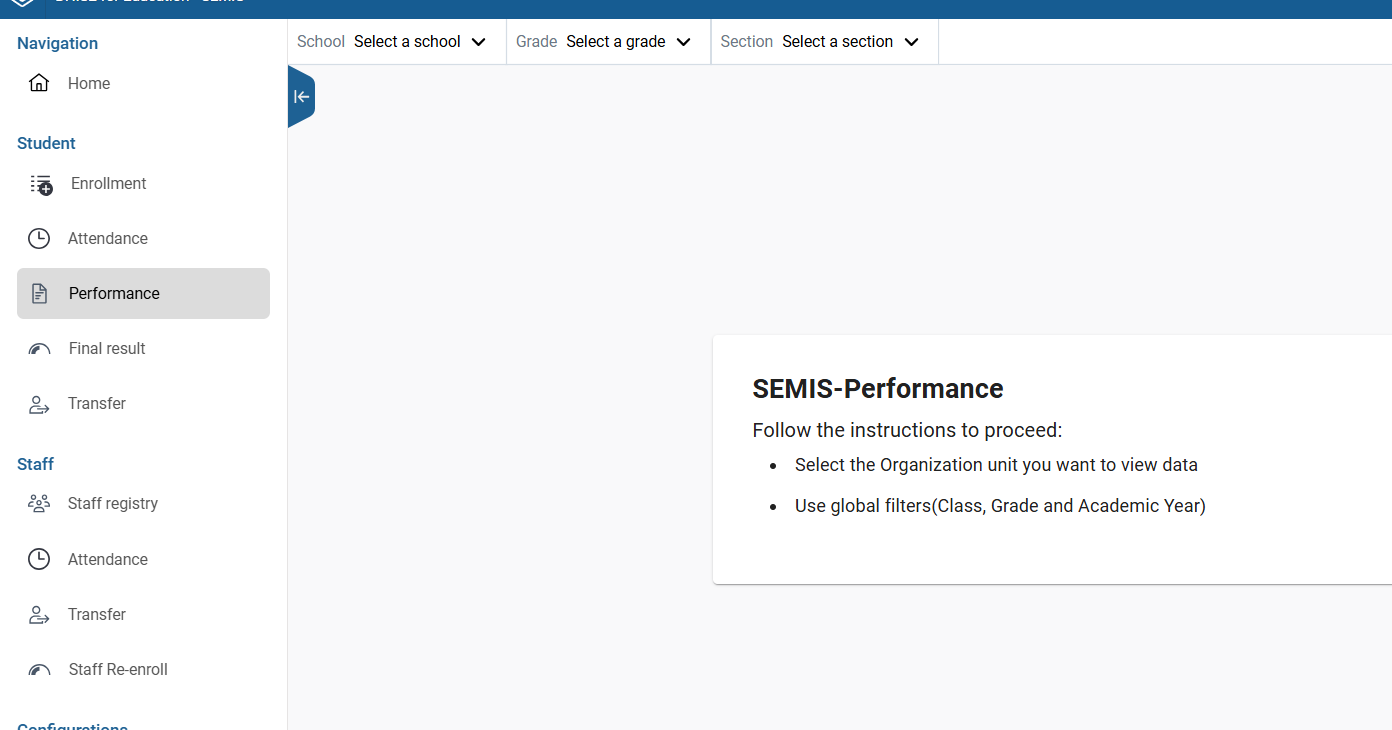
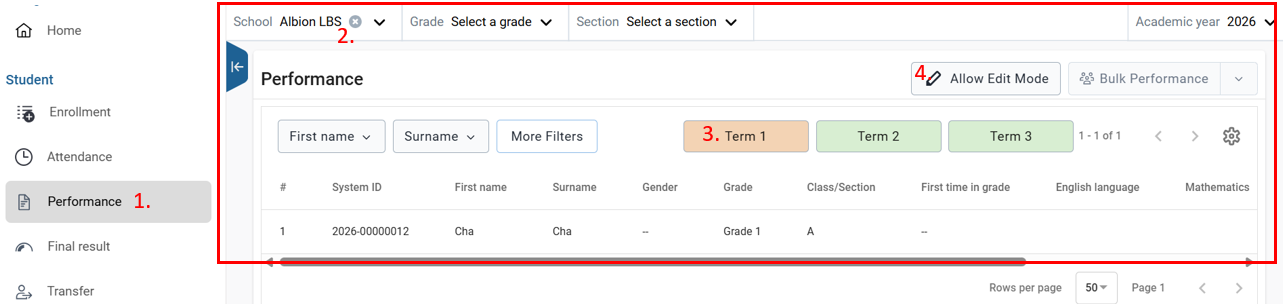
- Open Performance.
- Select the correct Academic Year, School, Grade, and Class.
- Select the required term, such as Term 1, Term 2, or Term 3. In the example, the selected term changes from green to orange.
- Click Allow Edit Mode.
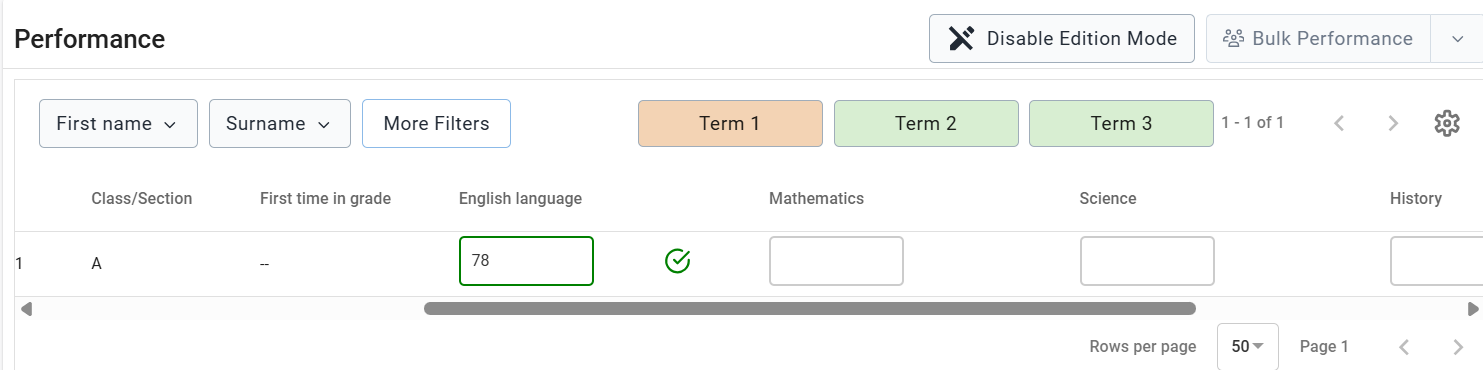
- Enter each score in the cell at the intersection of the learner's row and the subject's column.
- Check the save feedback: a green cell border indicates that the entered value has been saved.
Final results and promotion
Use Final Result to record outcomes and progress learners to the next grade.
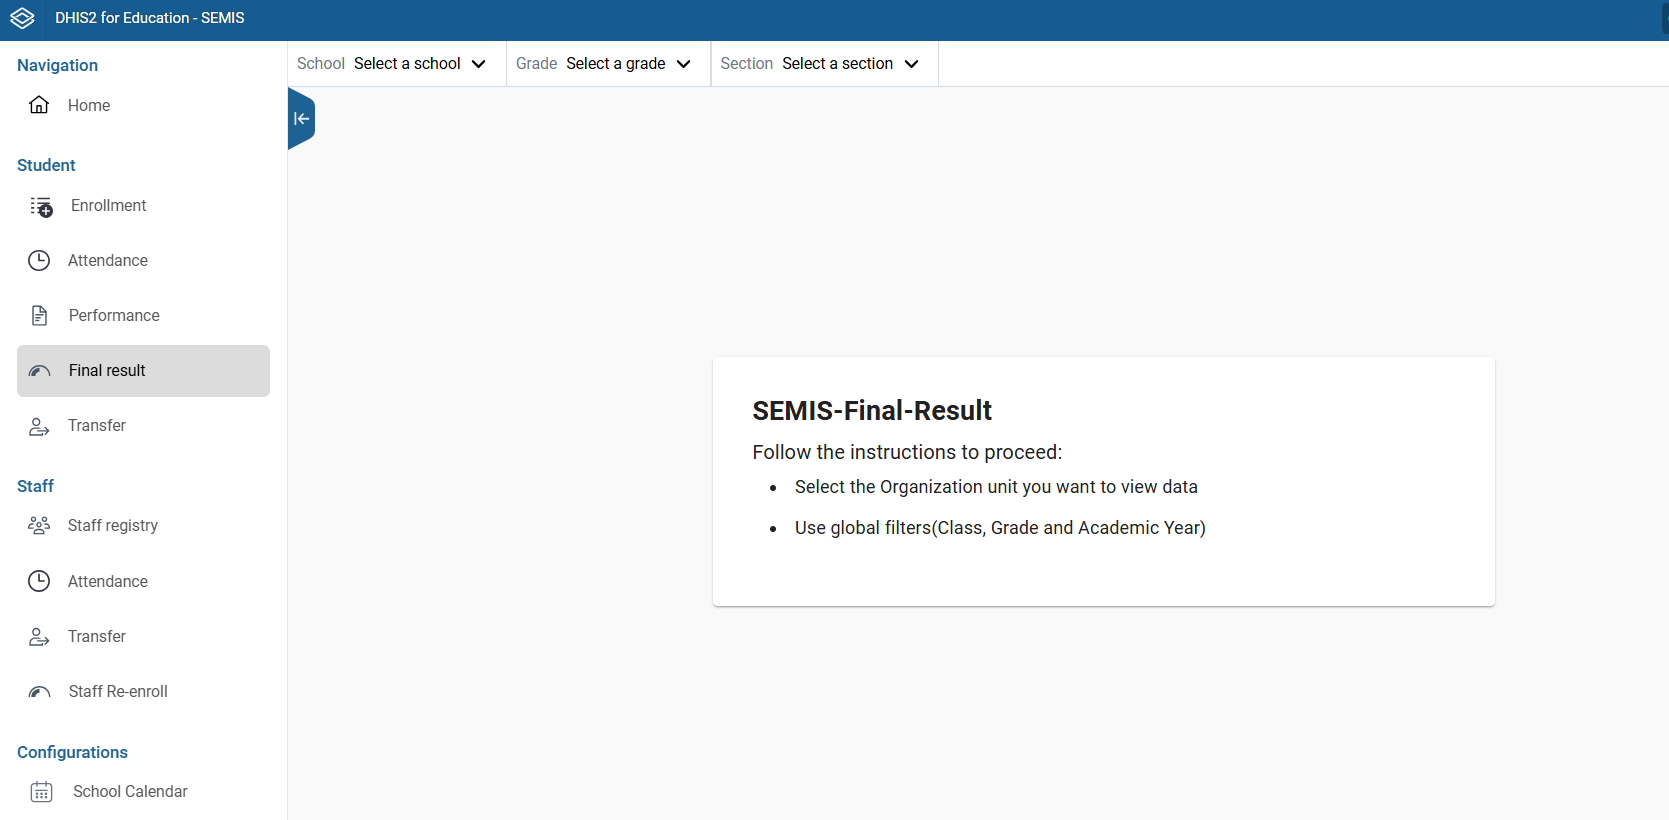
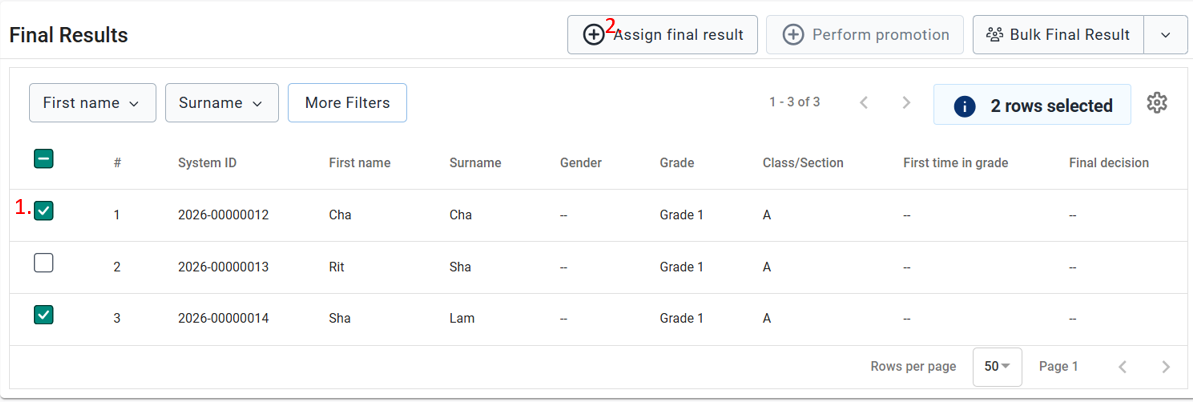
- Select the relevant school, grade, and class.
- Use the checkboxes to select the learners whose results you want to record.
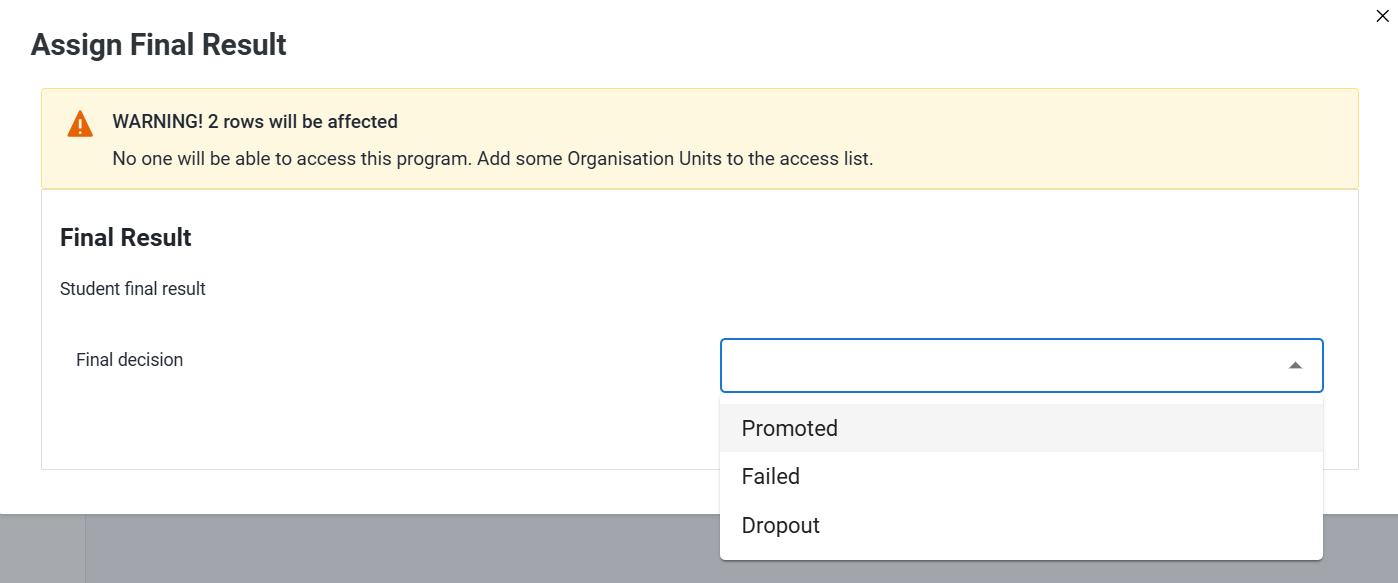
- Assign the appropriate outcome, including promotion, failure, or dropout, as applicable.
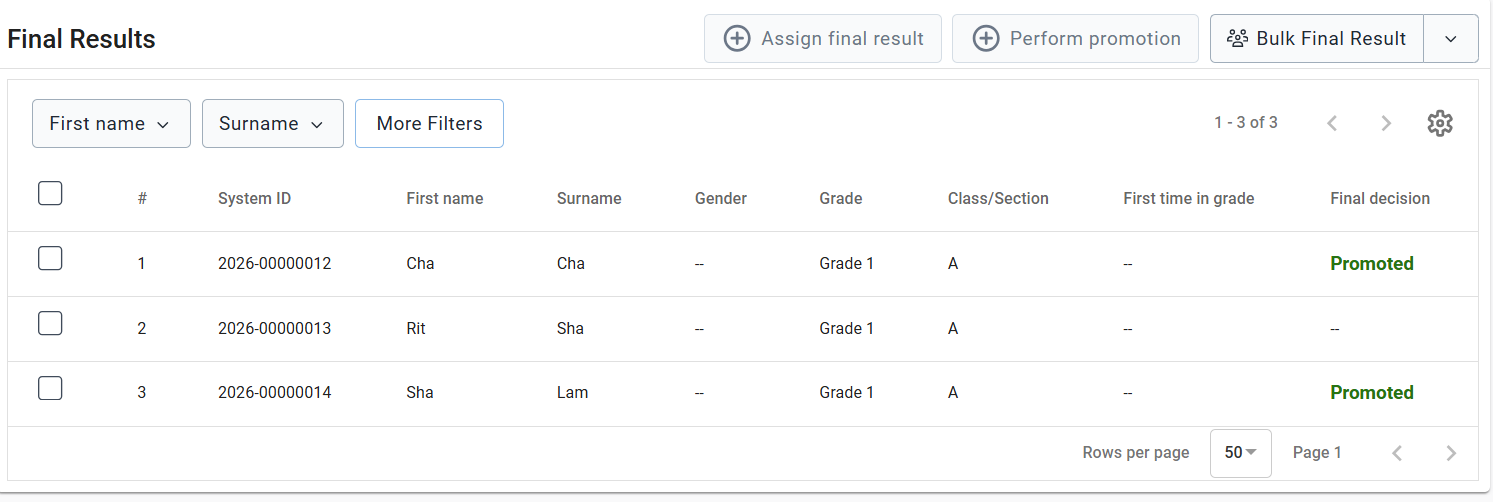
- Click Submit and review the result.
- Select the learners marked for promotion.
- Click Perform Promotion.
- Update the academic year, grade, transfer-in status, first-time-in-grade status, class, and enrollment date for the selected learners.
- Click Perform Promotion to complete the process.
Student transfers
Use Transfer to move learners between schools while retaining their school history.
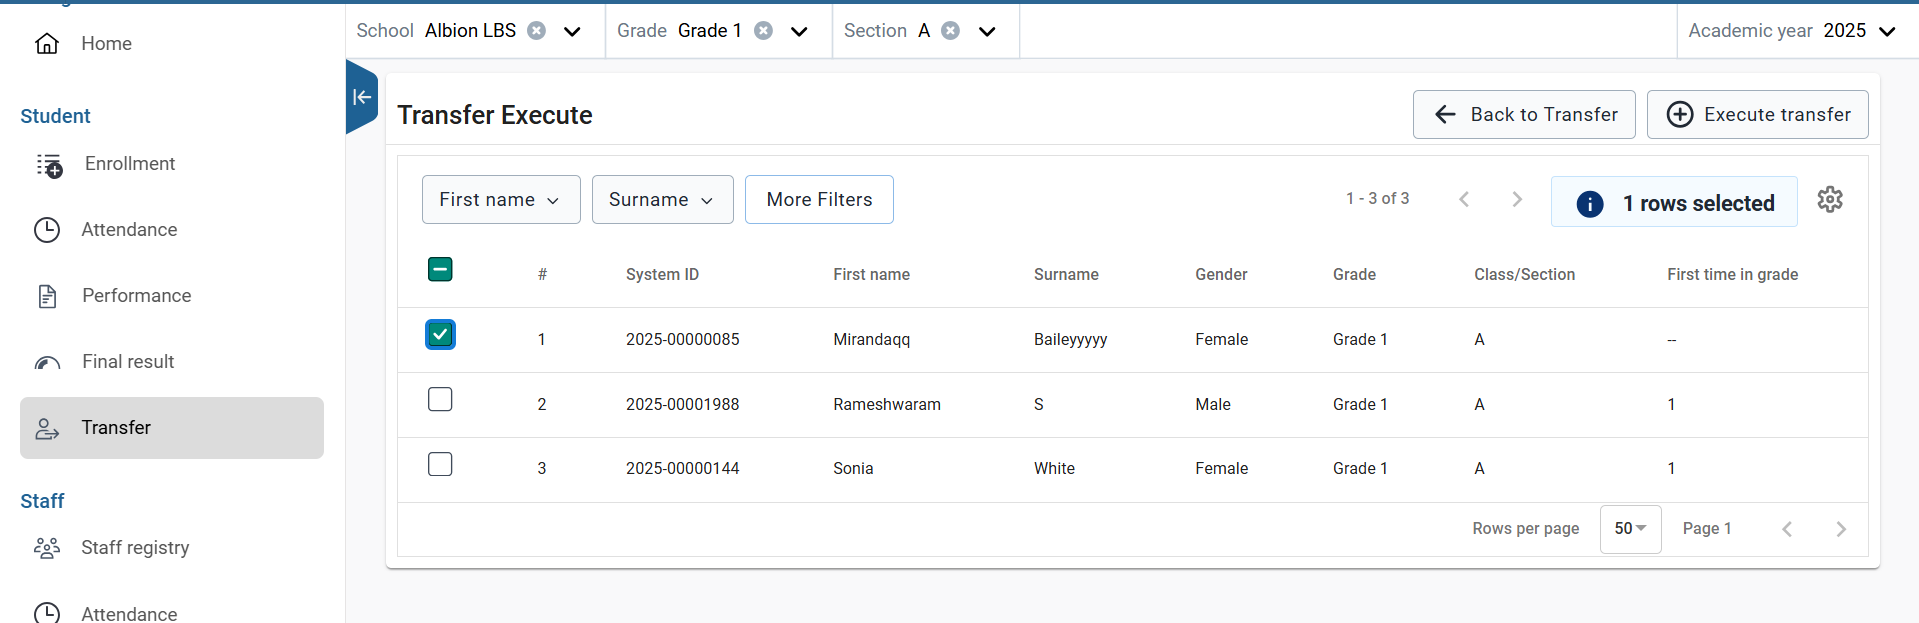
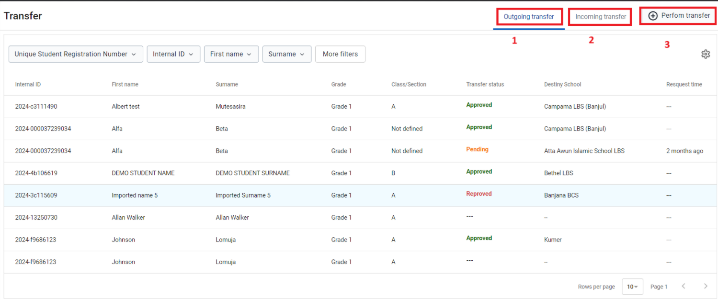
Select the origin school to view the transfer tabs.
| Tab | Purpose |
|---|---|
| Outgoing transfer | View learners transferred from the selected school and the status of each transfer. |
| Incoming transfer | Review learners transferring into the selected school and approve or reject their transfers. |
Initiate an outgoing student transfer
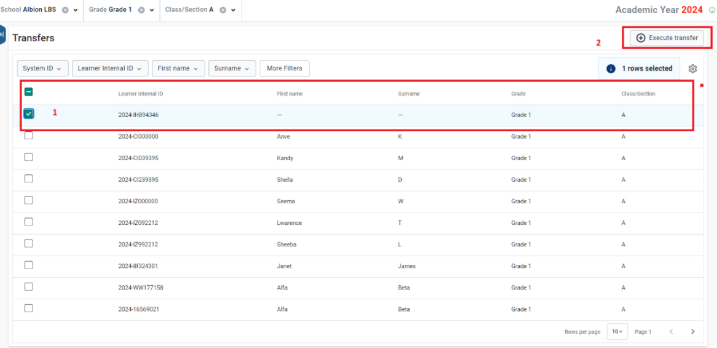
- Click Perform Transfer to display learners at the selected school.
- Filter by grade, class, and academic year as needed.
- Select the checkboxes for learners moving to the same destination school.
- Click Execute Transfer.
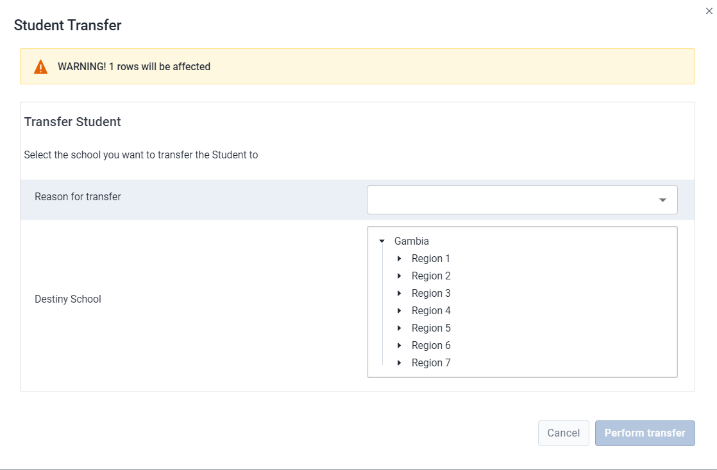
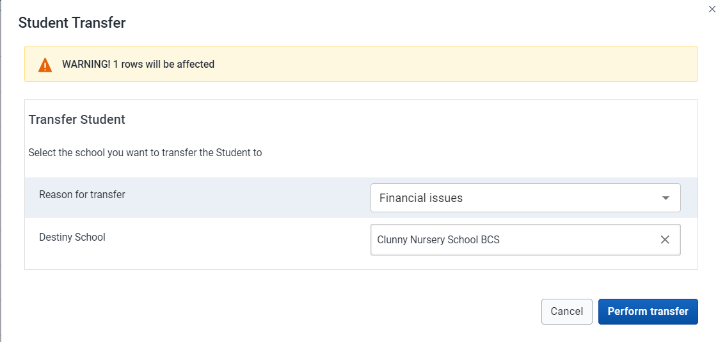
- Select the destination school. Expand the organisation unit hierarchy using the arrows until you reach the school level, then click the school.
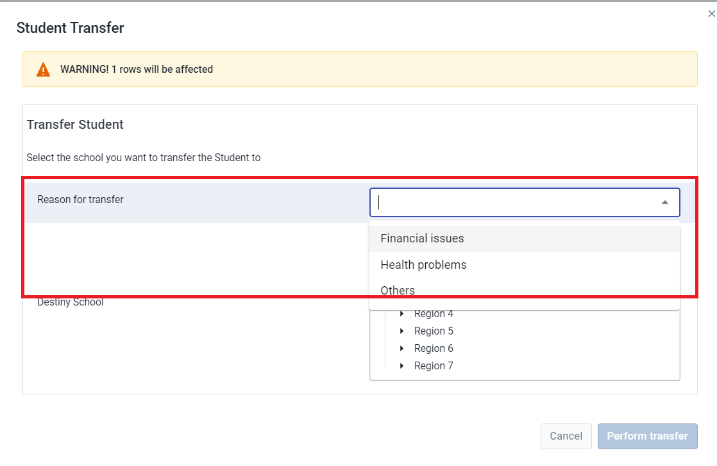
- Select the reason for transfer from the available list.
- Click Perform Transfer.
- Check for the green confirmation message: Transfer executed successfully.
Review incoming student transfers
At the receiving school:
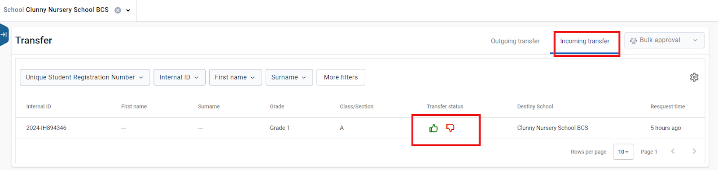
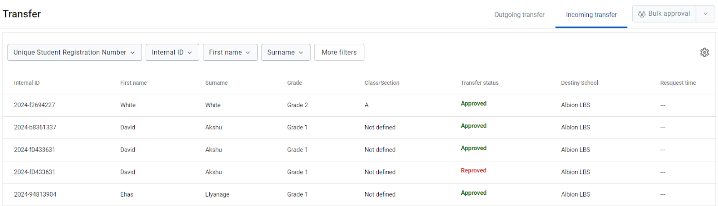
- Open Incoming transfer to review incoming learners.
- In the transfer status column, click the green thumb icon to approve a learner who has joined the school, or the red thumb icon to reject a learner who is not joining.
- After approval, check that the learner appears in the receiving school's learner list and relevant modules.
Staff data entry
The staff program contains four modules:
| Module | Purpose |
|---|---|
| Staff Registry | Register teaching and non-teaching staff and maintain their details. |
| Attendance | Record staff attendance and monitor presence and absences. |
| Transfer | Move staff between schools while retaining their assignment history. |
| Re-enroll | Review staff details and employment status and carry eligible staff forward into a new academic year. |
Staff re-enrollment supports reviewing employment information and updating roles, deployments, contracts, and statuses where these fields are configured. Multiple staff members can be processed together.
Staff registry
Use Staff Registry to register new teaching and non-teaching staff.
Important
Register each staff member only once as an individual. Use the existing staff record for transfers and subsequent academic-year re-enrollments.
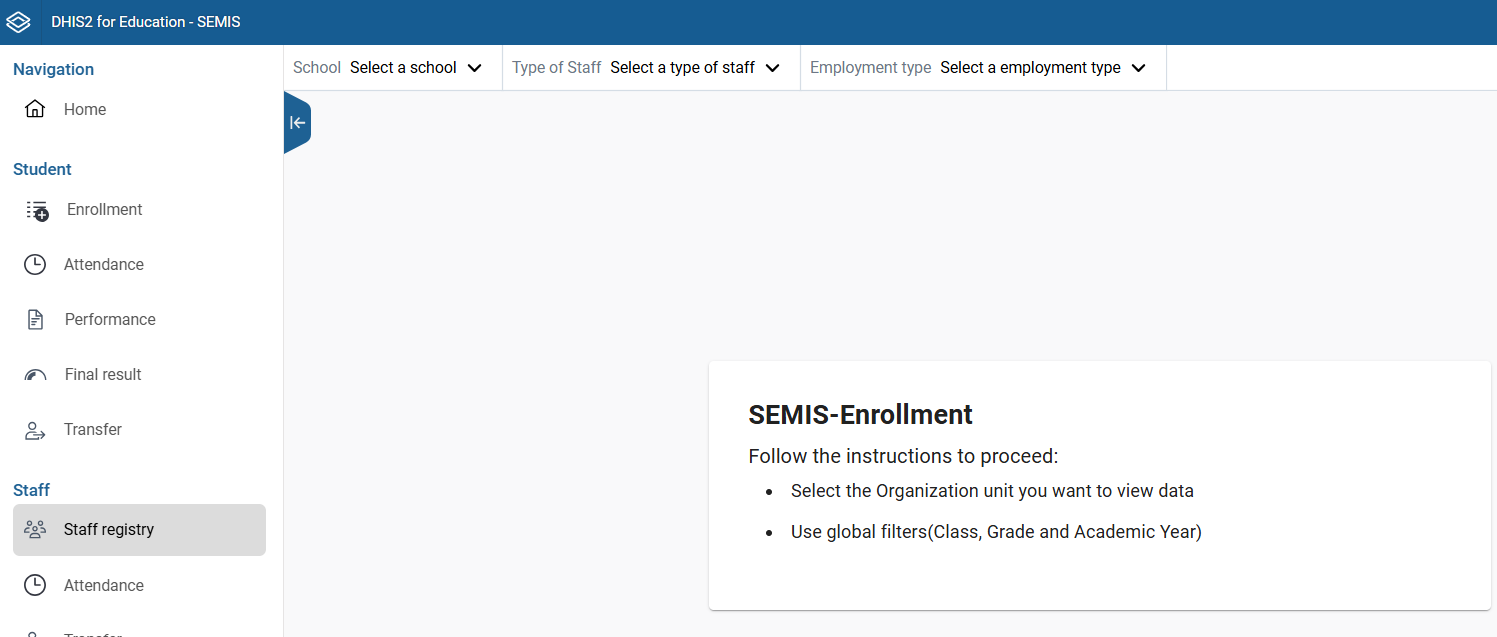
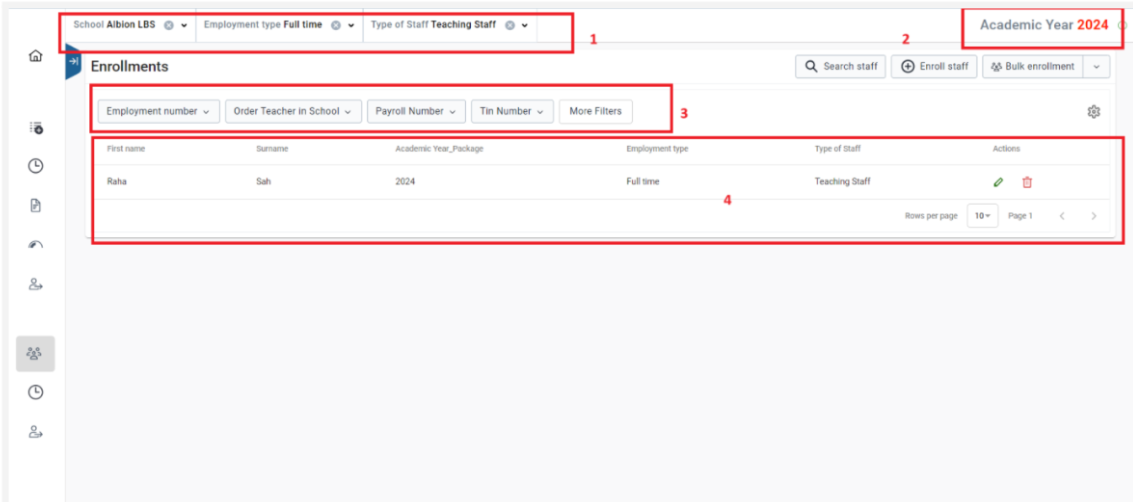
- Select the school where the staff member will be registered. Users assigned to one school will see only that school.
- Select the correct Academic Year.
- Review the staff list.
You can register staff individually or import several staff members using an Excel file.
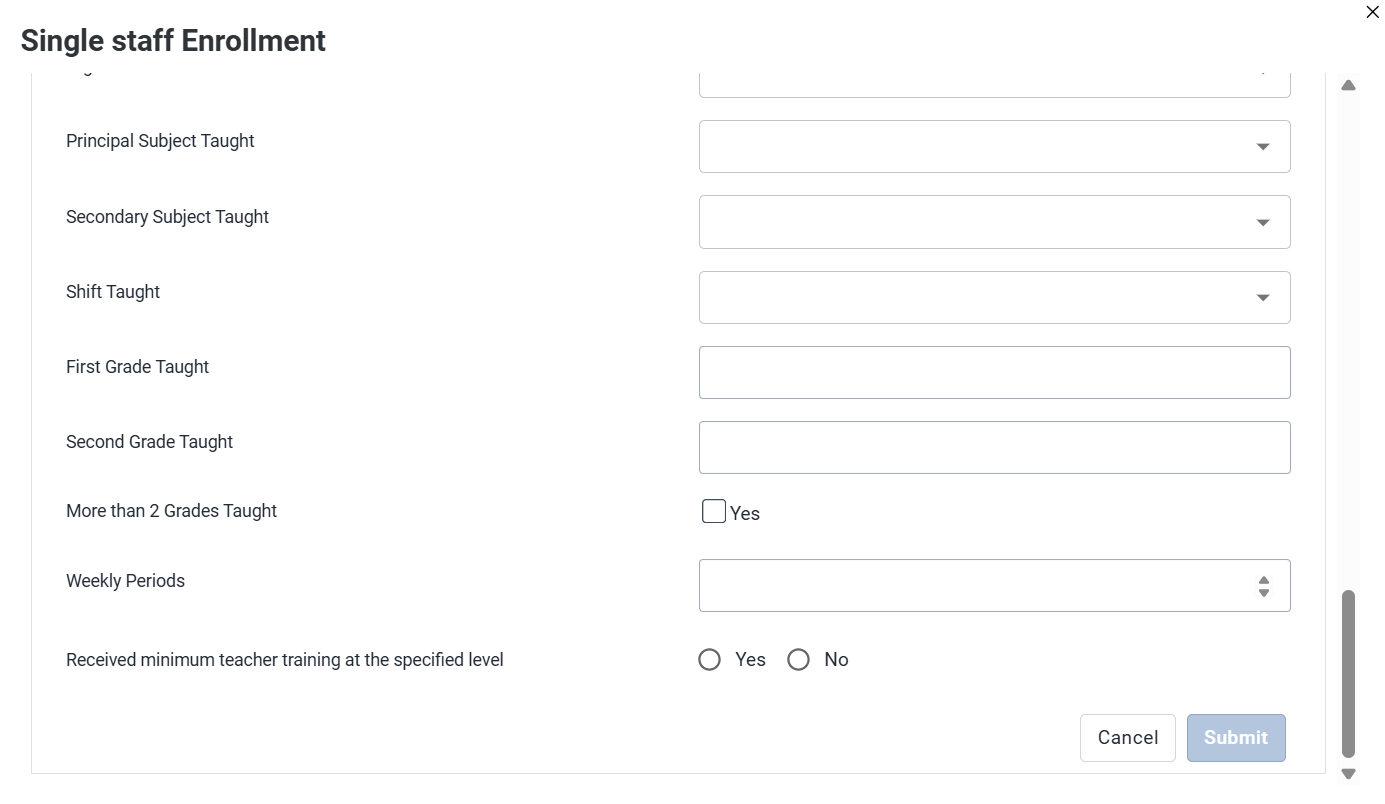
Register a single staff member
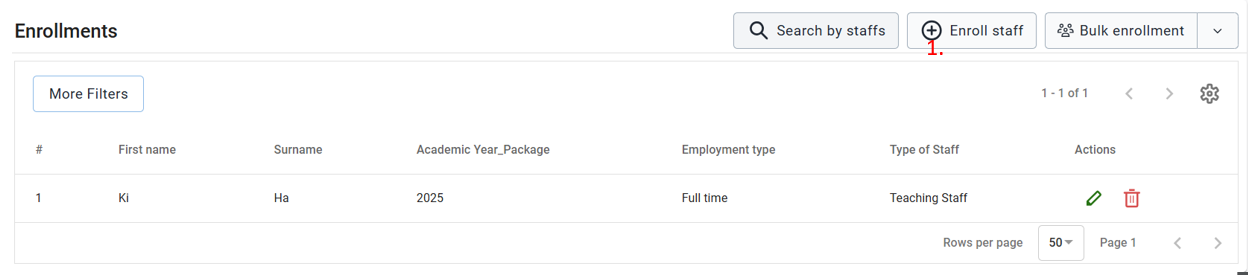
- Click the registration button shown below.
- Enter the staff member's details in the dialog.
- Complete all required fields and click Submit.
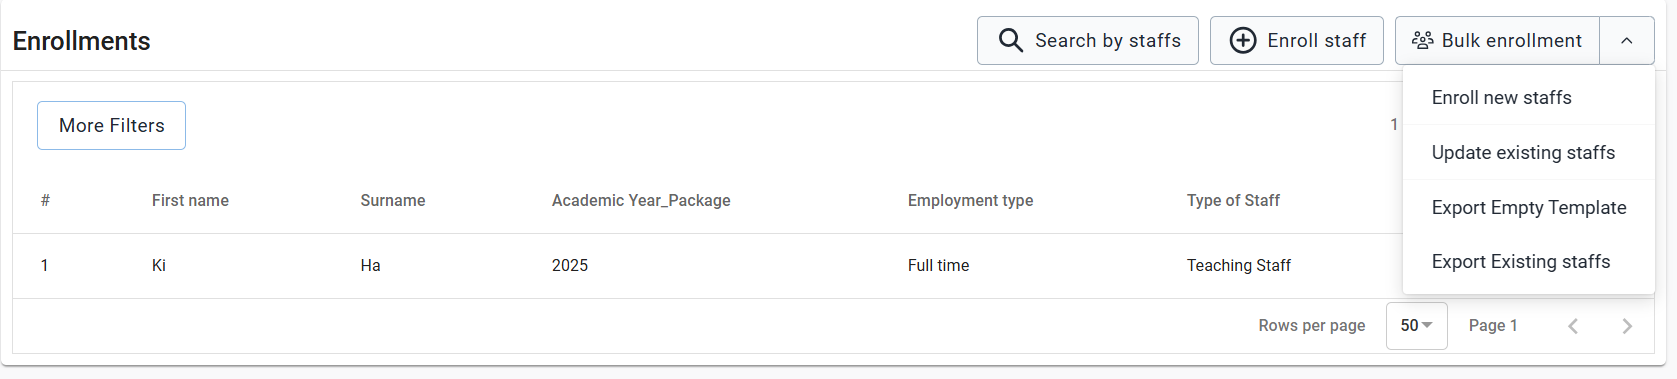
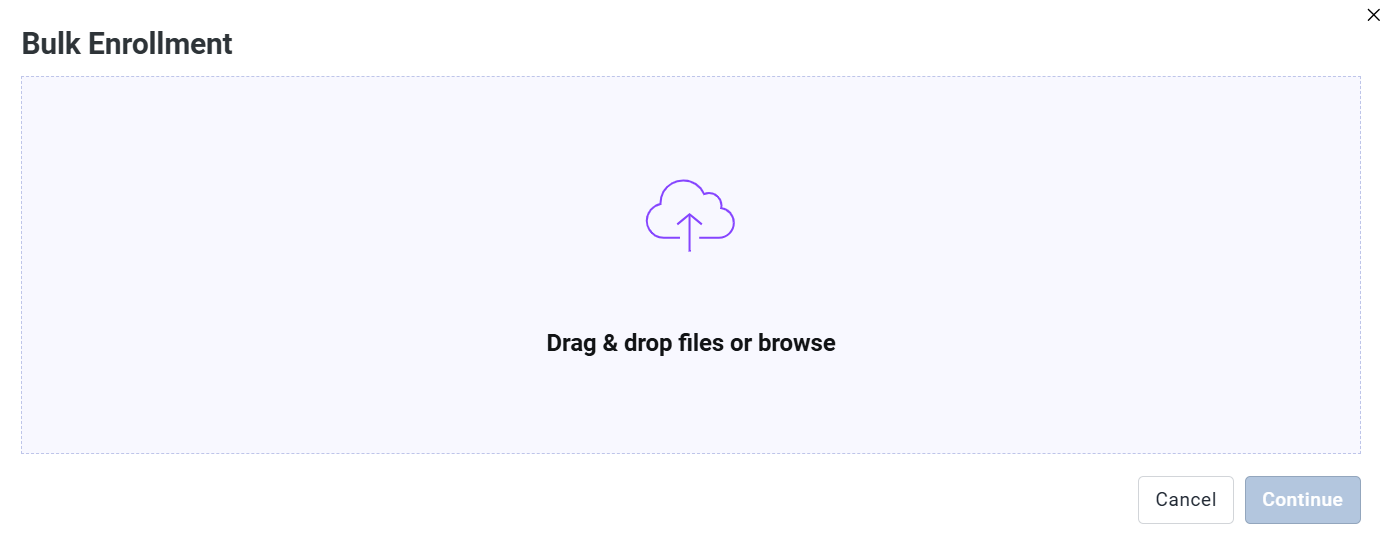
Use bulk staff enrollment
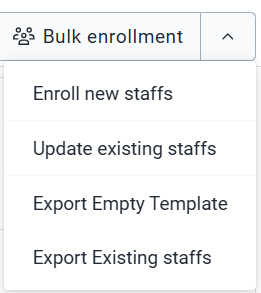
- Click Bulk Enrollment.
- Select Enroll New Staff to add staff, or Update Existing Staff to modify existing records.
- Click Export Empty Template to download the Excel template.
- Complete all required staff information and save the file.
- Upload the completed template.
- Review the uploaded data and correct any errors.
- Submit the file to complete the process.
Staff attendance
Use staff Attendance to record daily attendance for teachers and other staff and review attendance patterns.
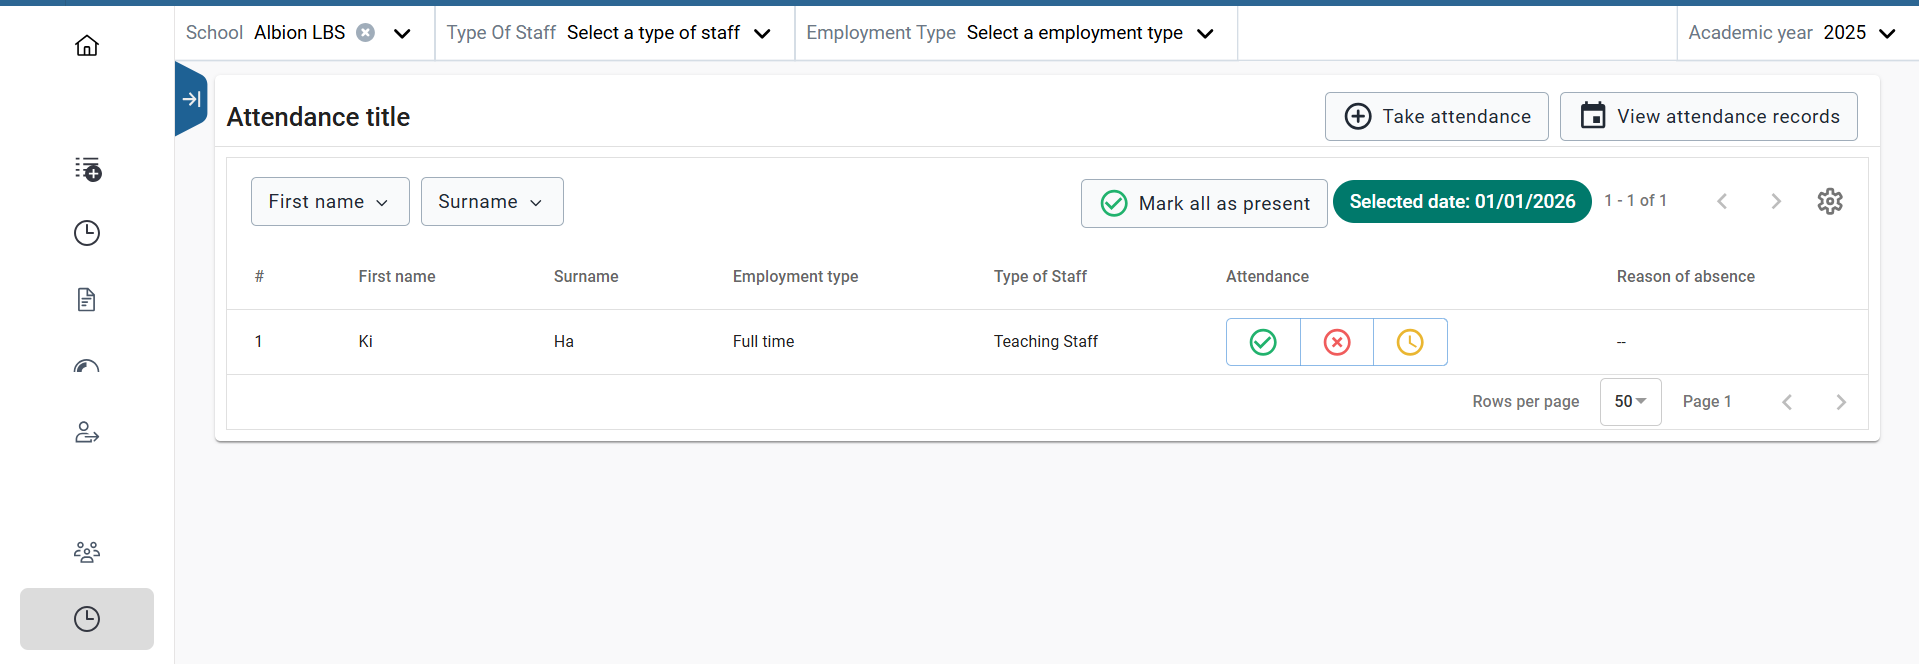
Record staff attendance
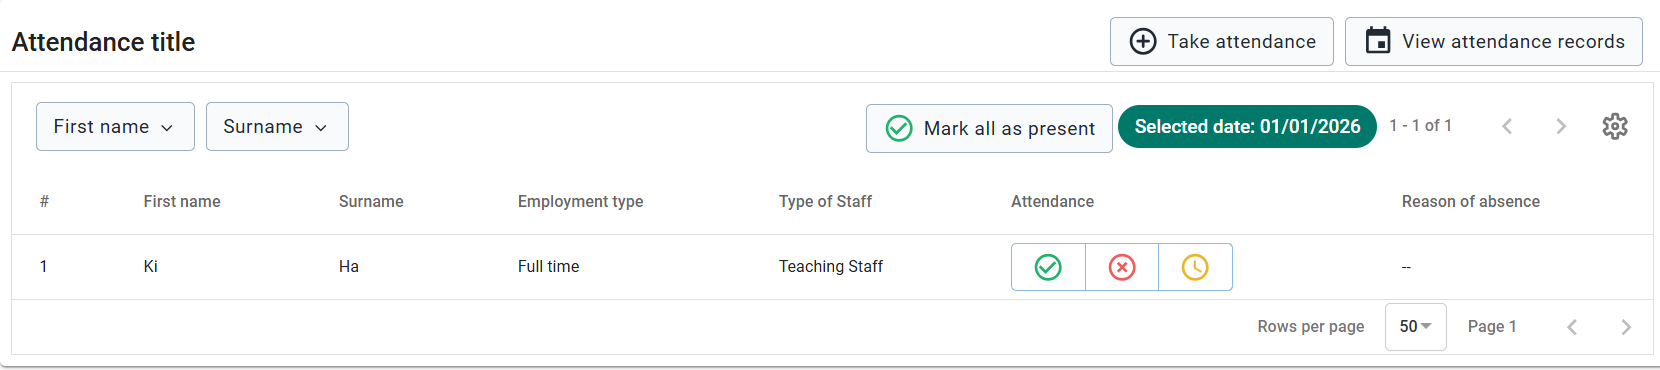
- Select School, Type of Staff, Employment Type, and Academic Year.
- Click Take Attendance.
- Review the staff list, including names, employment types, and staff types.
- Confirm the selected date.
- Click Mark all as present to mark all staff present, or use the individual Present, Absent, and Late options.
- For absent staff, update Reason of Absence.

View staff attendance records
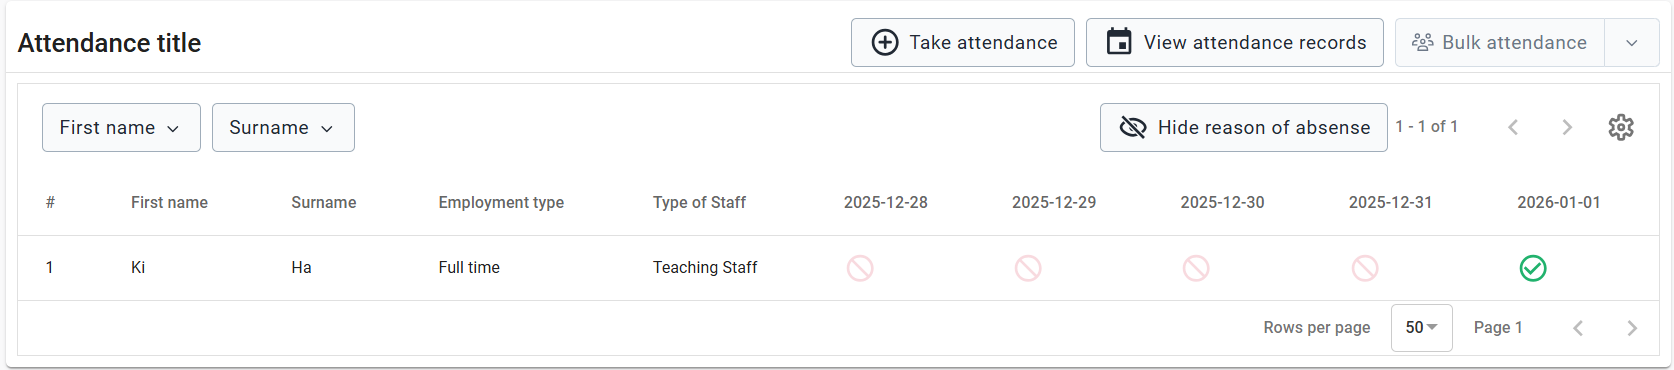
- Click View Attendance Records.
- In the calendar view, select the end date for the period to review.
- Review each staff member's attendance status for the displayed dates.
- Click View Reason for Absence to inspect a recorded absence reason.
Import staff attendance
If bulk attendance is used in your implementation:
- Open Bulk Attendance.
- Select Import Staff Attendance.
- Upload the completed attendance file.
Staff transfers
Use staff Transfer to move staff between schools while retaining their school assignment history.
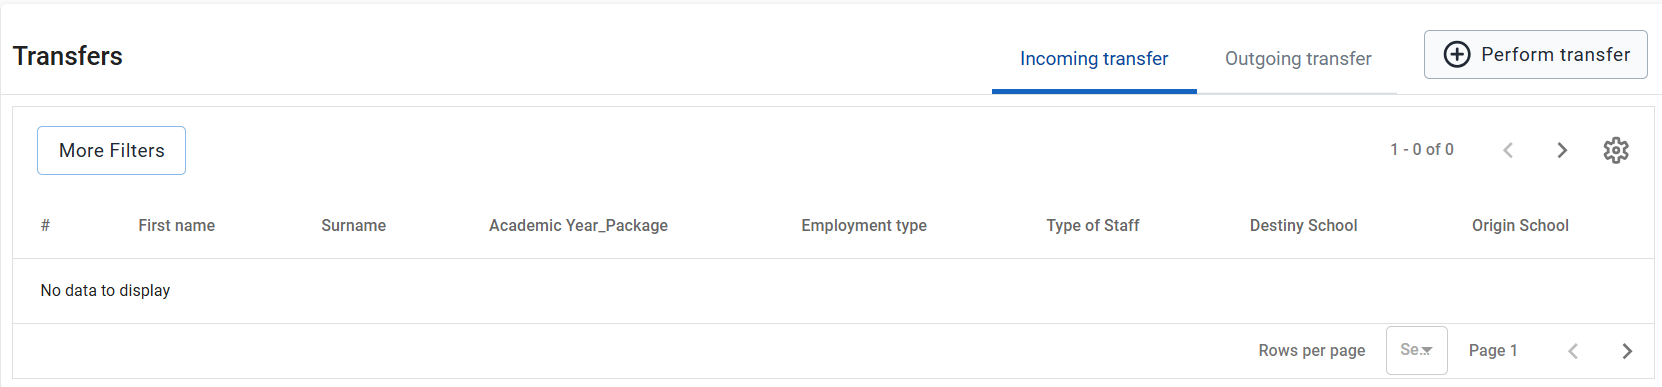
Select the origin school to view the transfer tabs.
| Tab | Purpose |
|---|---|
| Outgoing transfer | View staff transferred from the selected school and their transfer status. |
| Incoming transfer | Review incoming staff and approve or reject their transfers. |
Initiate an outgoing staff transfer
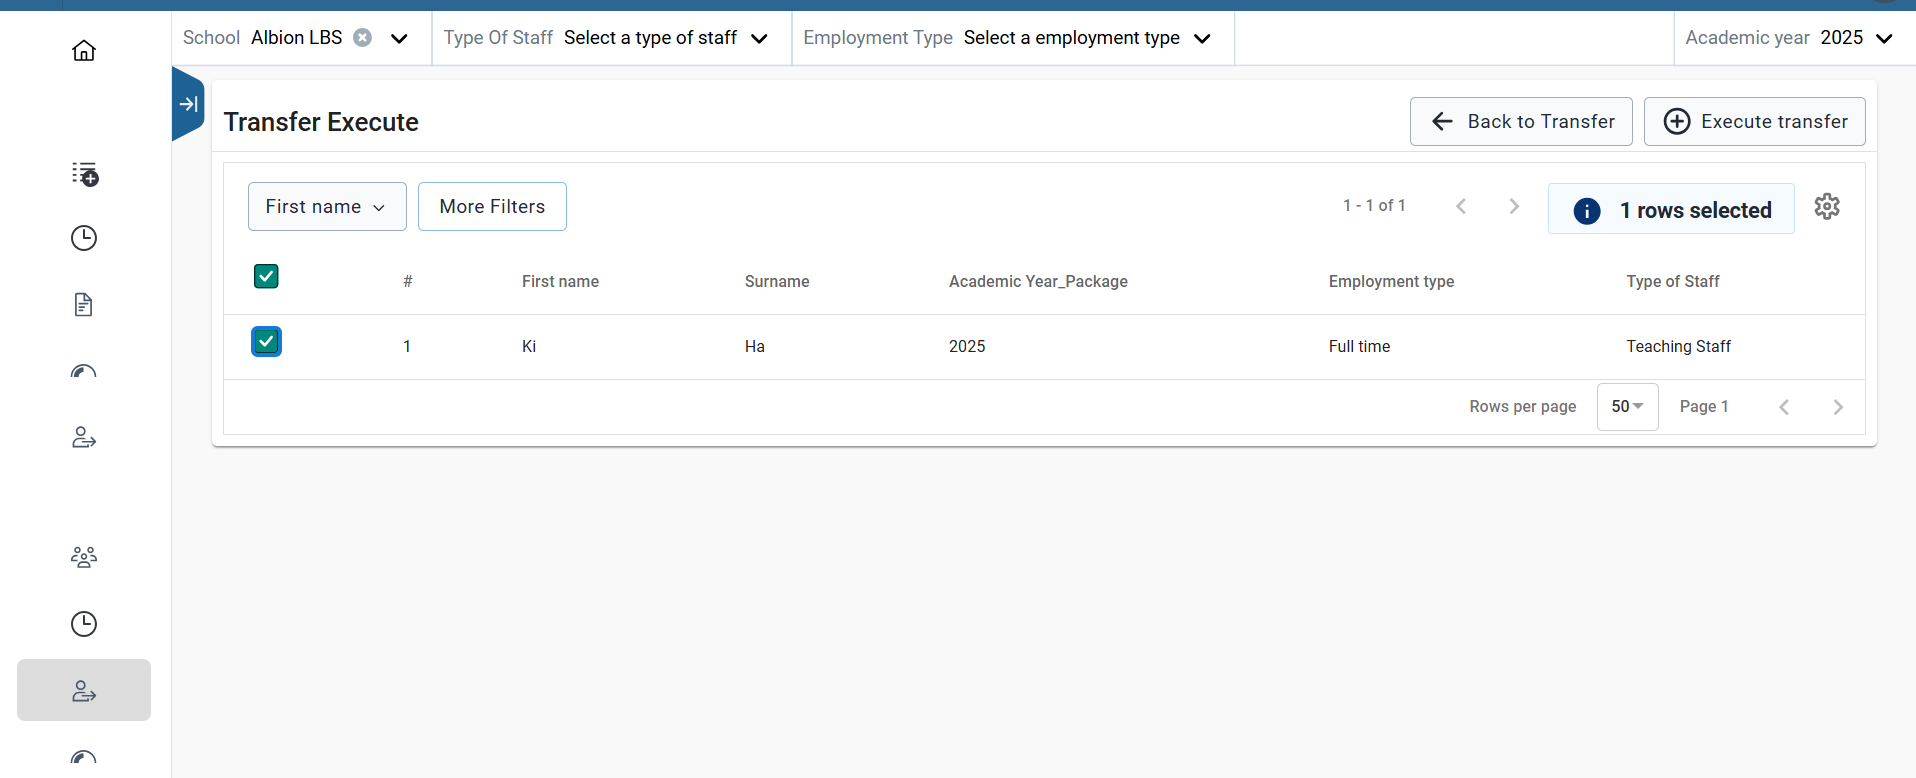
- Click Perform Transfer to display staff from the selected school.
- Filter by Type of Staff, Employment Type, and Academic Year as needed.
- Select the checkboxes for staff moving to the same destination school.
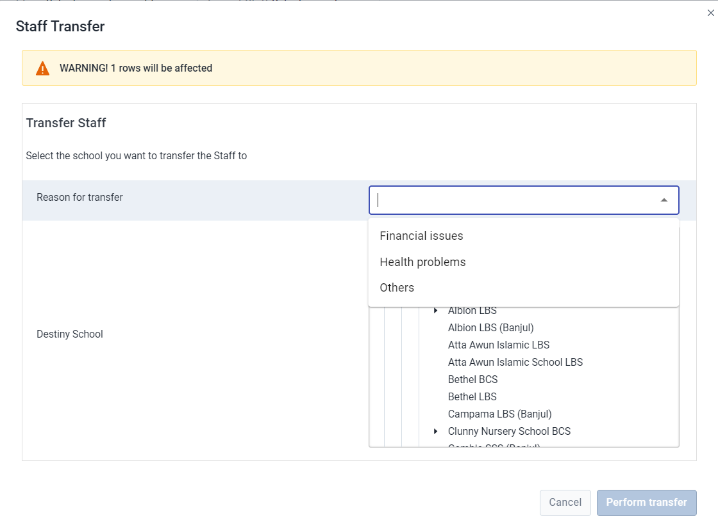
- Click Execute Transfer.
- Expand the organisation unit hierarchy to the school level and select the destination school.
- Select Reason for Transfer from the available list.
- Click Perform Transfer.
- Check for the green confirmation message: Transfer executed successfully.
Review incoming staff transfers
At the receiving school:
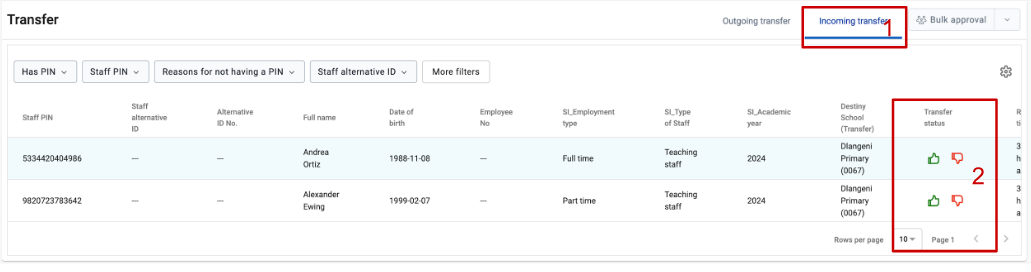
- Open Incoming Transfer.
- In the Transfer Status column, click the green thumb icon to approve a staff member joining the school, or the red thumb icon to reject the transfer.
- After approval, check that the staff member appears in the receiving school's staff list and relevant modules.
Staff re-enrollment
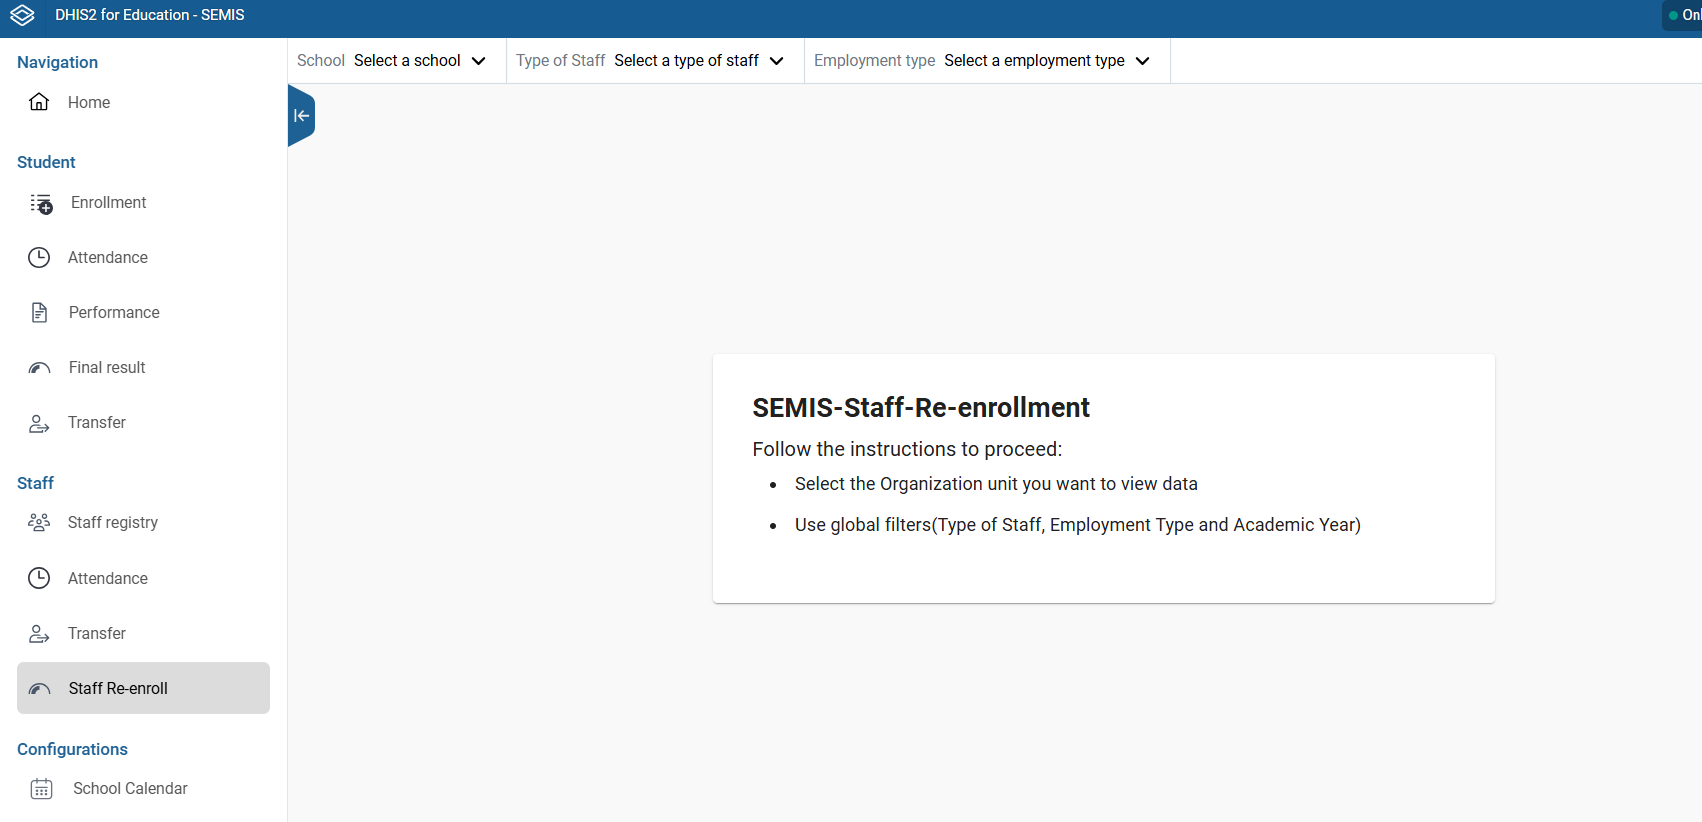
Use Re-enroll to update and confirm staff details at the beginning of each academic year.
Select staff and assign a status
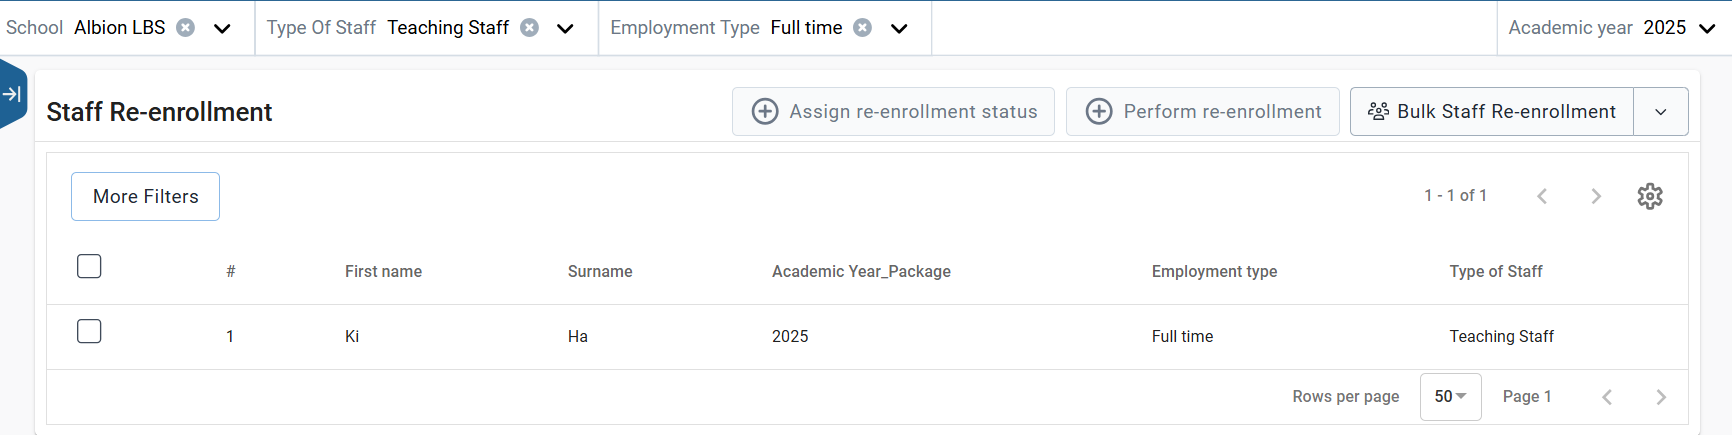
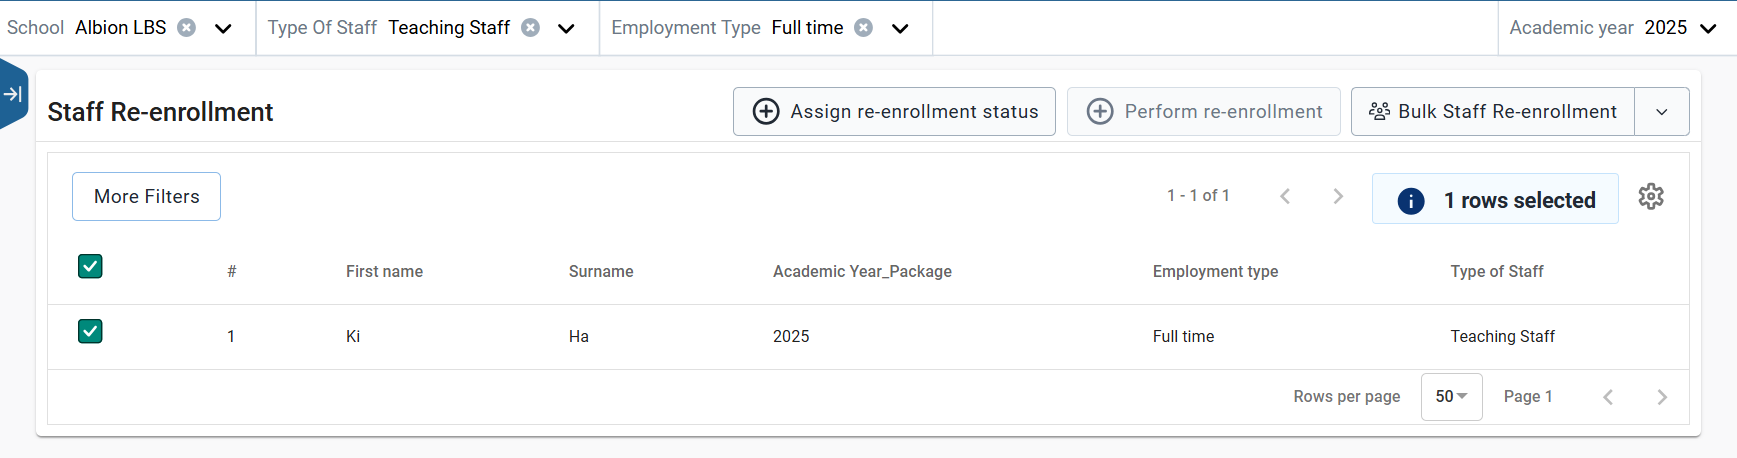
- Select School, Type of Staff, Employment Type, and Academic Year.
- Select the checkbox beside each staff member to re-enroll. Check the number of selected rows.
- Click Assign Re-Enrollment Status.
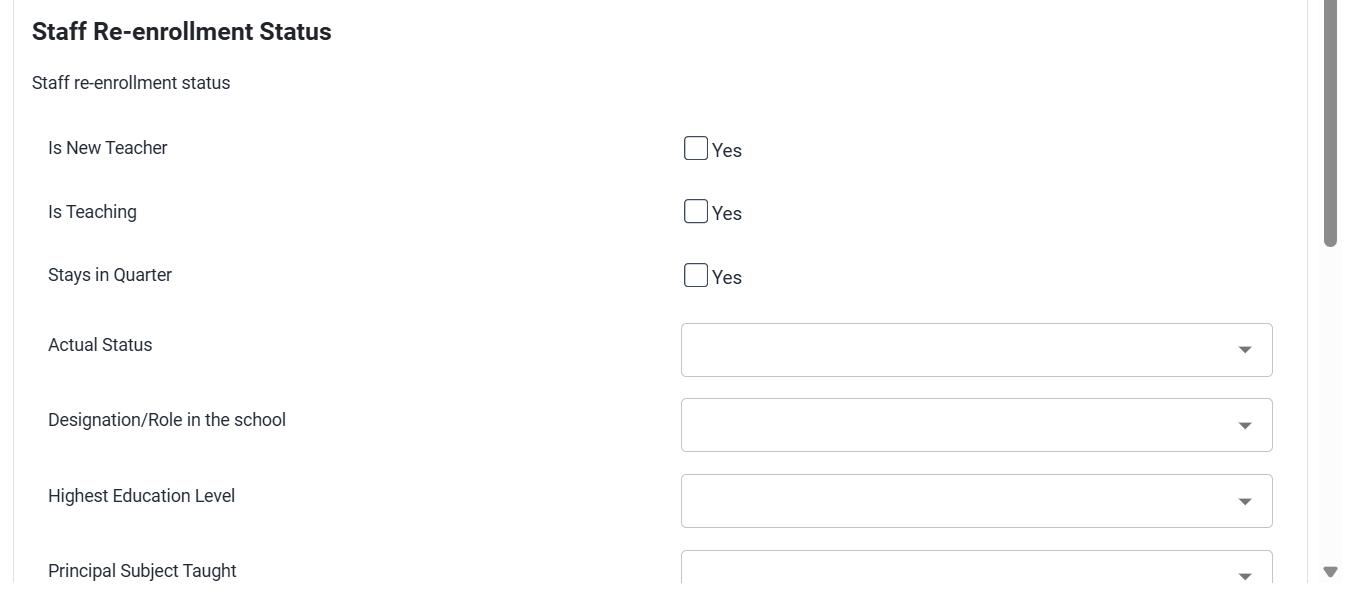
- Choose the appropriate status for the selected staff members.
- Save your selection.
Perform staff re-enrollment
- After assigning the status, click Perform Re-Enrollment.
- Confirm the action when prompted.
- Check the confirmation message indicating that re-enrollment was completed successfully.
Use bulk staff re-enrollment
If bulk staff re-enrollment is used in your implementation:
- Click Bulk Staff Re-Enrollment.
- Download the re-enrollment template, if required.
- Complete the template with the correct staff re-enrollment details.
- Upload the completed file to re-enroll staff in bulk.
School calendar
The School Calendar module allows authorised users to create, view, and edit the academic calendar.
Important
School calendar settings affect the application's workflows. Access is controlled by user roles and permissions; only users with the required administrative rights can manage this module. See the SEMIS configuration manual for configuration details.