Konfigurace DHIS2 pro použití aplikace pro Android
The DHIS2 Android Capture App is fully metadata-driven. This means that the programs, datasets, forms, user access, and even many user interface elements in the app are determined by how the server is configured. Proper metadata and access configuration on the DHIS2 server will ensure that users see the appropriate functionality based on their assigned roles and organization units.
This section outlines how to prepare your DHIS2 instance for Android use and points to relevant configuration tools and documentation resources. For a complete and successful implementation, please read the detailed and updated documentation to get all the information about configuring the DHIS 2 Server for using with the DHIS 2 Android Capture App.
User Setup
To ensure the Android Capture App functions properly for field users, it’s important to prepare not only the metadata but also user roles, access scopes, and program configuration. This section walks through the essential steps to configure users and control what they see and do in the app.
Android users need access to the app through valid credentials and assigned roles. An Android-compatible user should have a dedicated user role, assigned organisation units, and access to at least one program or dataset.
DHIS2 does not require a special user type for Android access — standard users can authenticate, as long as they have been granted the correct authorities and metadata is shared with them appropriately.
Note
To simplify setup in large deployments, consider defining user groups for Android users, and assigning roles and sharing access via those groups.
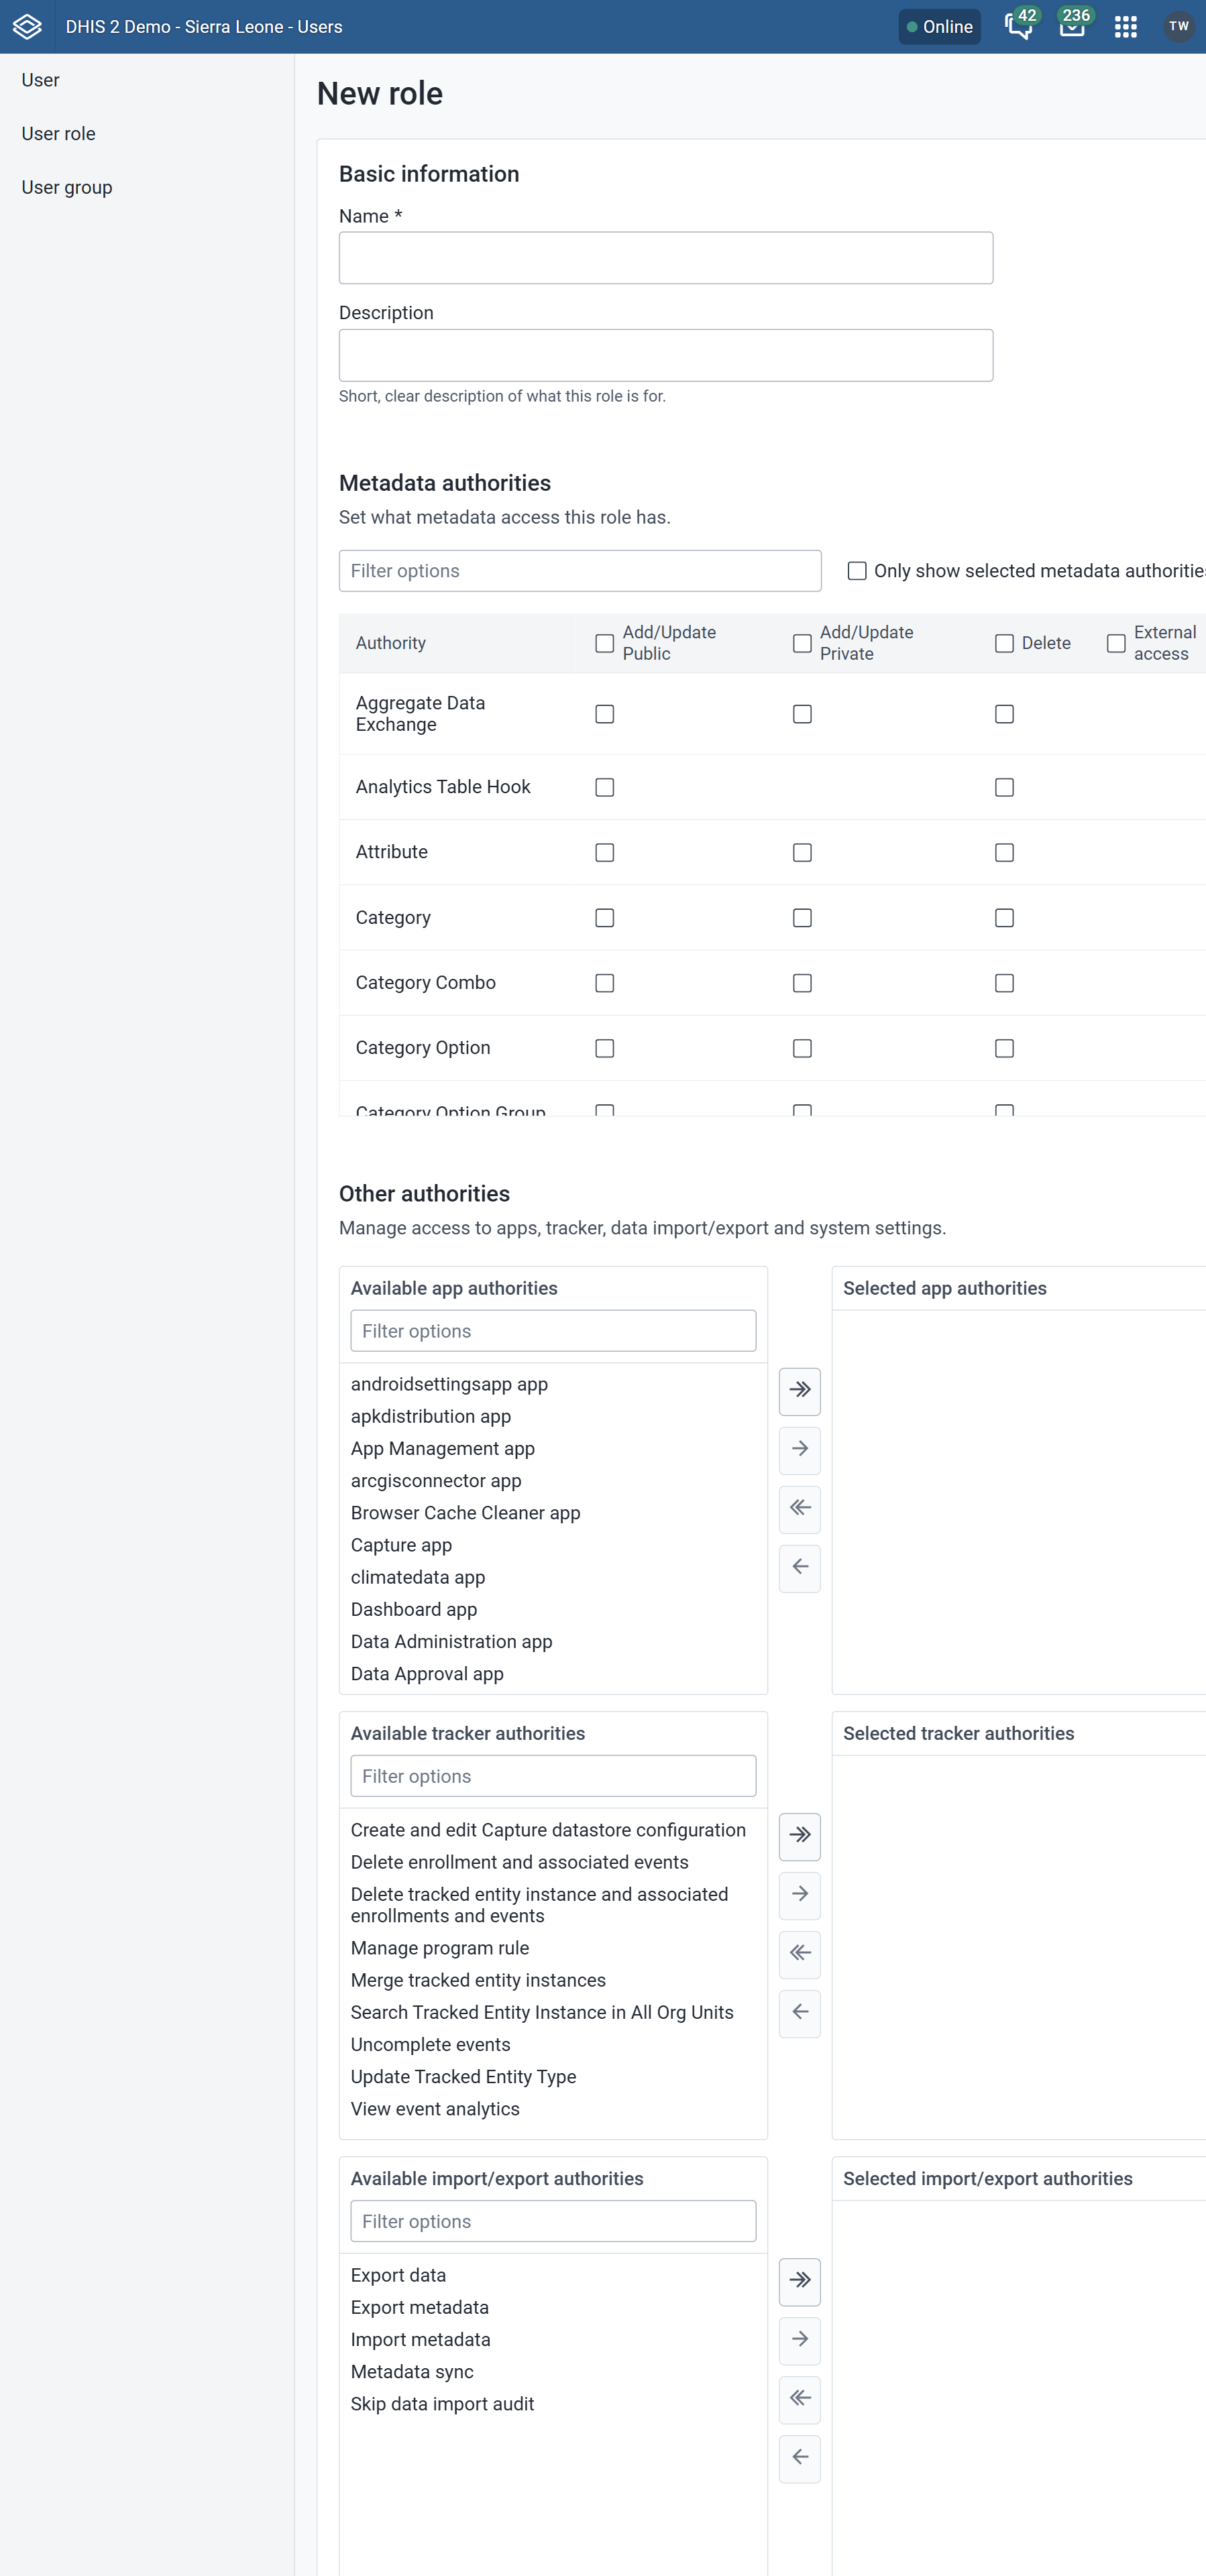
1. Creating User Roles
Před vytvořením uživatele musíte nejdříve definovat roli uživatele DHIS 2. Aplikace DHIS 2 pro Android Capture nevyžaduje žádné z orgánů, které jsou zapouzdřeny v uživatelské roli. Zabezpečení programu nebo datové sady DHIS 2 je nastaveno jako přístup k datům programu nebo datové sady.
Pro účely řešení problémů s laděním webu u vašich uživatelů se doporučuje vytvořit a přiřadit uživatelskou roli s funkcí zachycování dat, která by měla zahrnovat:
- Aplikace Tracker Capture, aplikace pro zachycení událostí a / nebo aplikace pro zadávání dat
- Ovládací panel (pro přihlášení)
- Cache Cleaner (budete muset vyčistit mezipaměť)
Keep roles simple and task-specific. Avoid assigning global admin rights unless necessary, and test the role on a staging server before rollout.
Note
When users enter a TEI and while it is not synced to the server they will be able to delete the TEI and the enrollment even if they have not been asigned the specific authorities. This is by design and to allow users rolling back in case of having entered wrong data (TEI and/or enrollment) and thus preventing it reaching the server and requiring another user with higher privileges to fix the issue.
2. Create user
Za druhé, měli byste vytvořit uživatele, pro kterého budete muset přidat některé základní podrobnosti, jako je uživatelské jméno a přiřadit mu roli.
- Uživatelské jméno: name.android
- Příklad: belen.android
- Přiřazení role uživatele: přiřaďte roli, kterou jste vytvořili v prvním kroku.
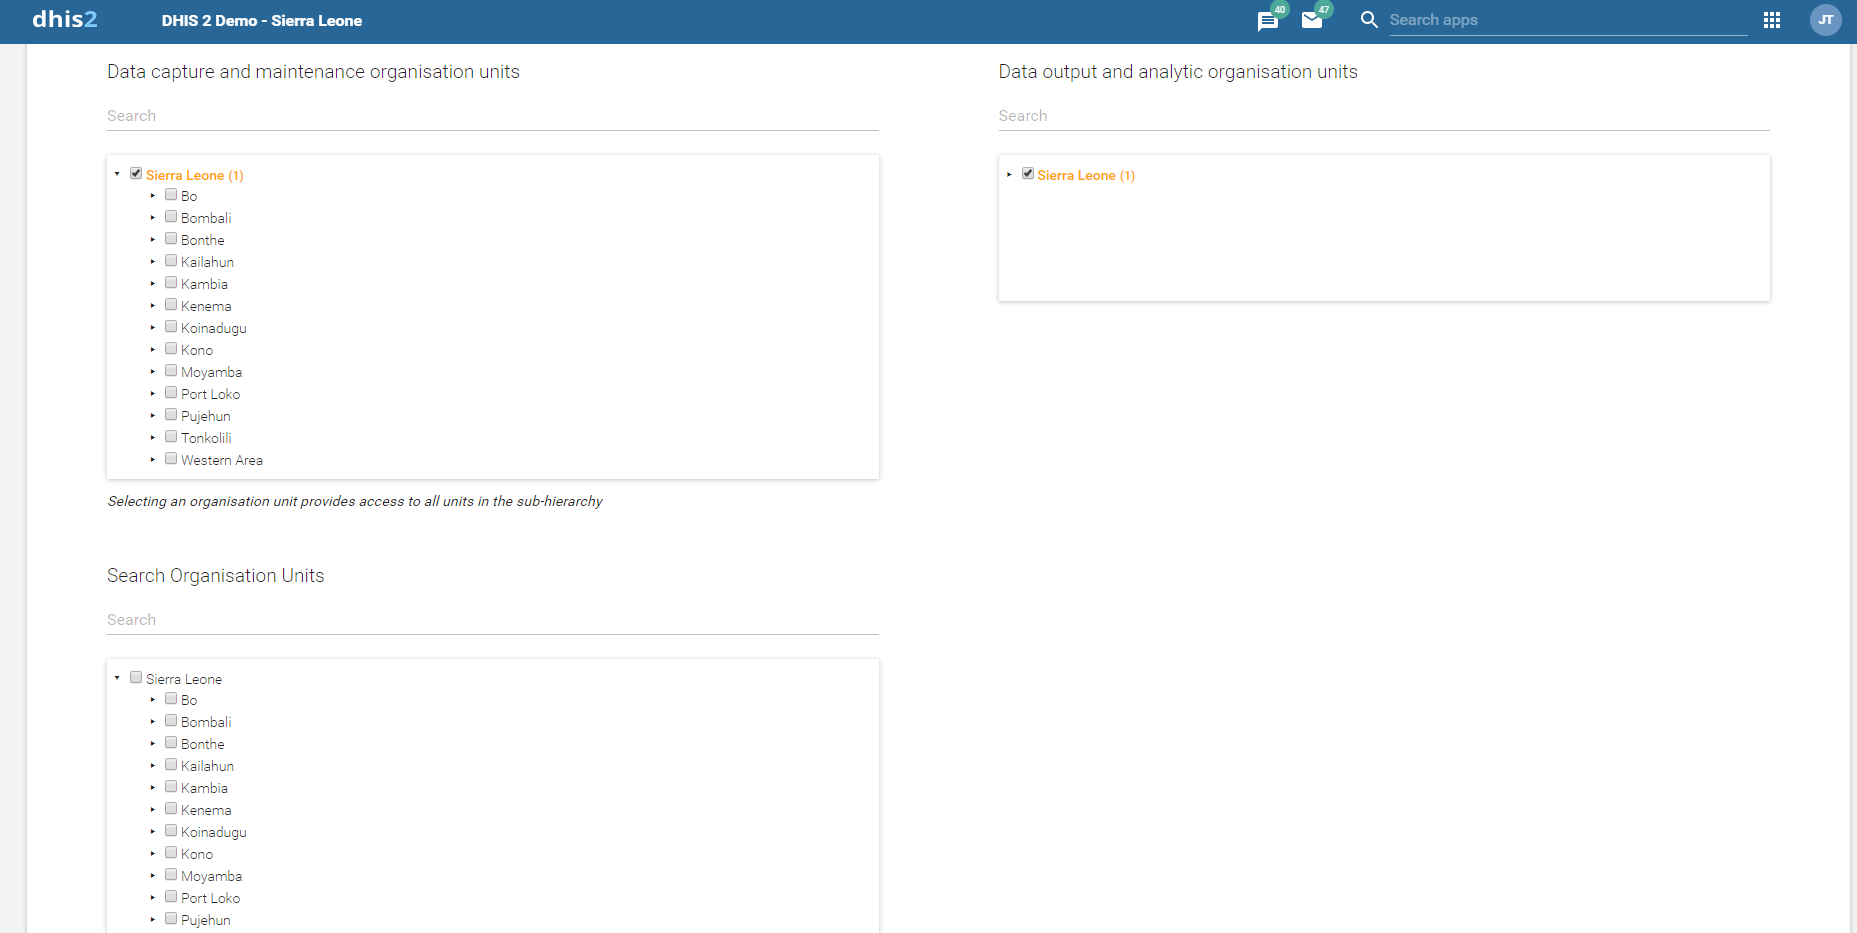
3. Assign Organisation units
Třetím krokem je přiřadit organizační jednotky uživateli, kterého jste právě vytvořili.
Existují tři typy přiřazení organizačních jednotek:
- Zachycení dat: Datové sady a program vytváření TEI, zápisy a události. Data předem stažená v aplikaci při prvním přihlášení budou ta, která patří k těmto organizačním jednotkám.
- Od mobilních uživatelů se neočekává přístup k hierarchii org. jednotek celé země. Maximální počet organizačních jednotek je obtížné nastavit, protože aplikace nestanoví limit, ale prostředky v zařízení (paměť, procesor). Dalo by se říci, že 250 organizačních jednotek by mělo být bezpečných, ale přesto věříme, že je to velmi velké číslo pro případ použití v mobilu.
- Výstup dat: pro analýzu dat. Nelze použít v systému Android.
- Vyhledání org. jednotek: Rozšiřte vyhledávání TEI (je-li online) o další organizační jednotky. Jednotlivé záznamy lze stáhnout pro offline použití.
- Při konfiguraci vyhledávání org. jednotek se ujistěte, že vaše zachycené org. jednotky jsou obsaženy ve vašich vyhledávaných org. jednotkách. Aby to bylo možné, musí být vybrány zachycené org. jednotky stejně jako vyhledávané org. jednotky.
Vizuální konfigurace: Porozumění tomu, co se vykresluje a proč
Form layout
The DHIS2 Android Capture App renders data entry screens based on the structure of the assigned programs and datasets. Each program stage (event) or data set is displayed as a form, and the layout of that form can include sections if they are defined in the metadata. The app does not support custom HTML forms, but it fully supports section-based layouts and program rules (tracker and event programs) for dynamic behavior.
Customizations - Colors and Icons
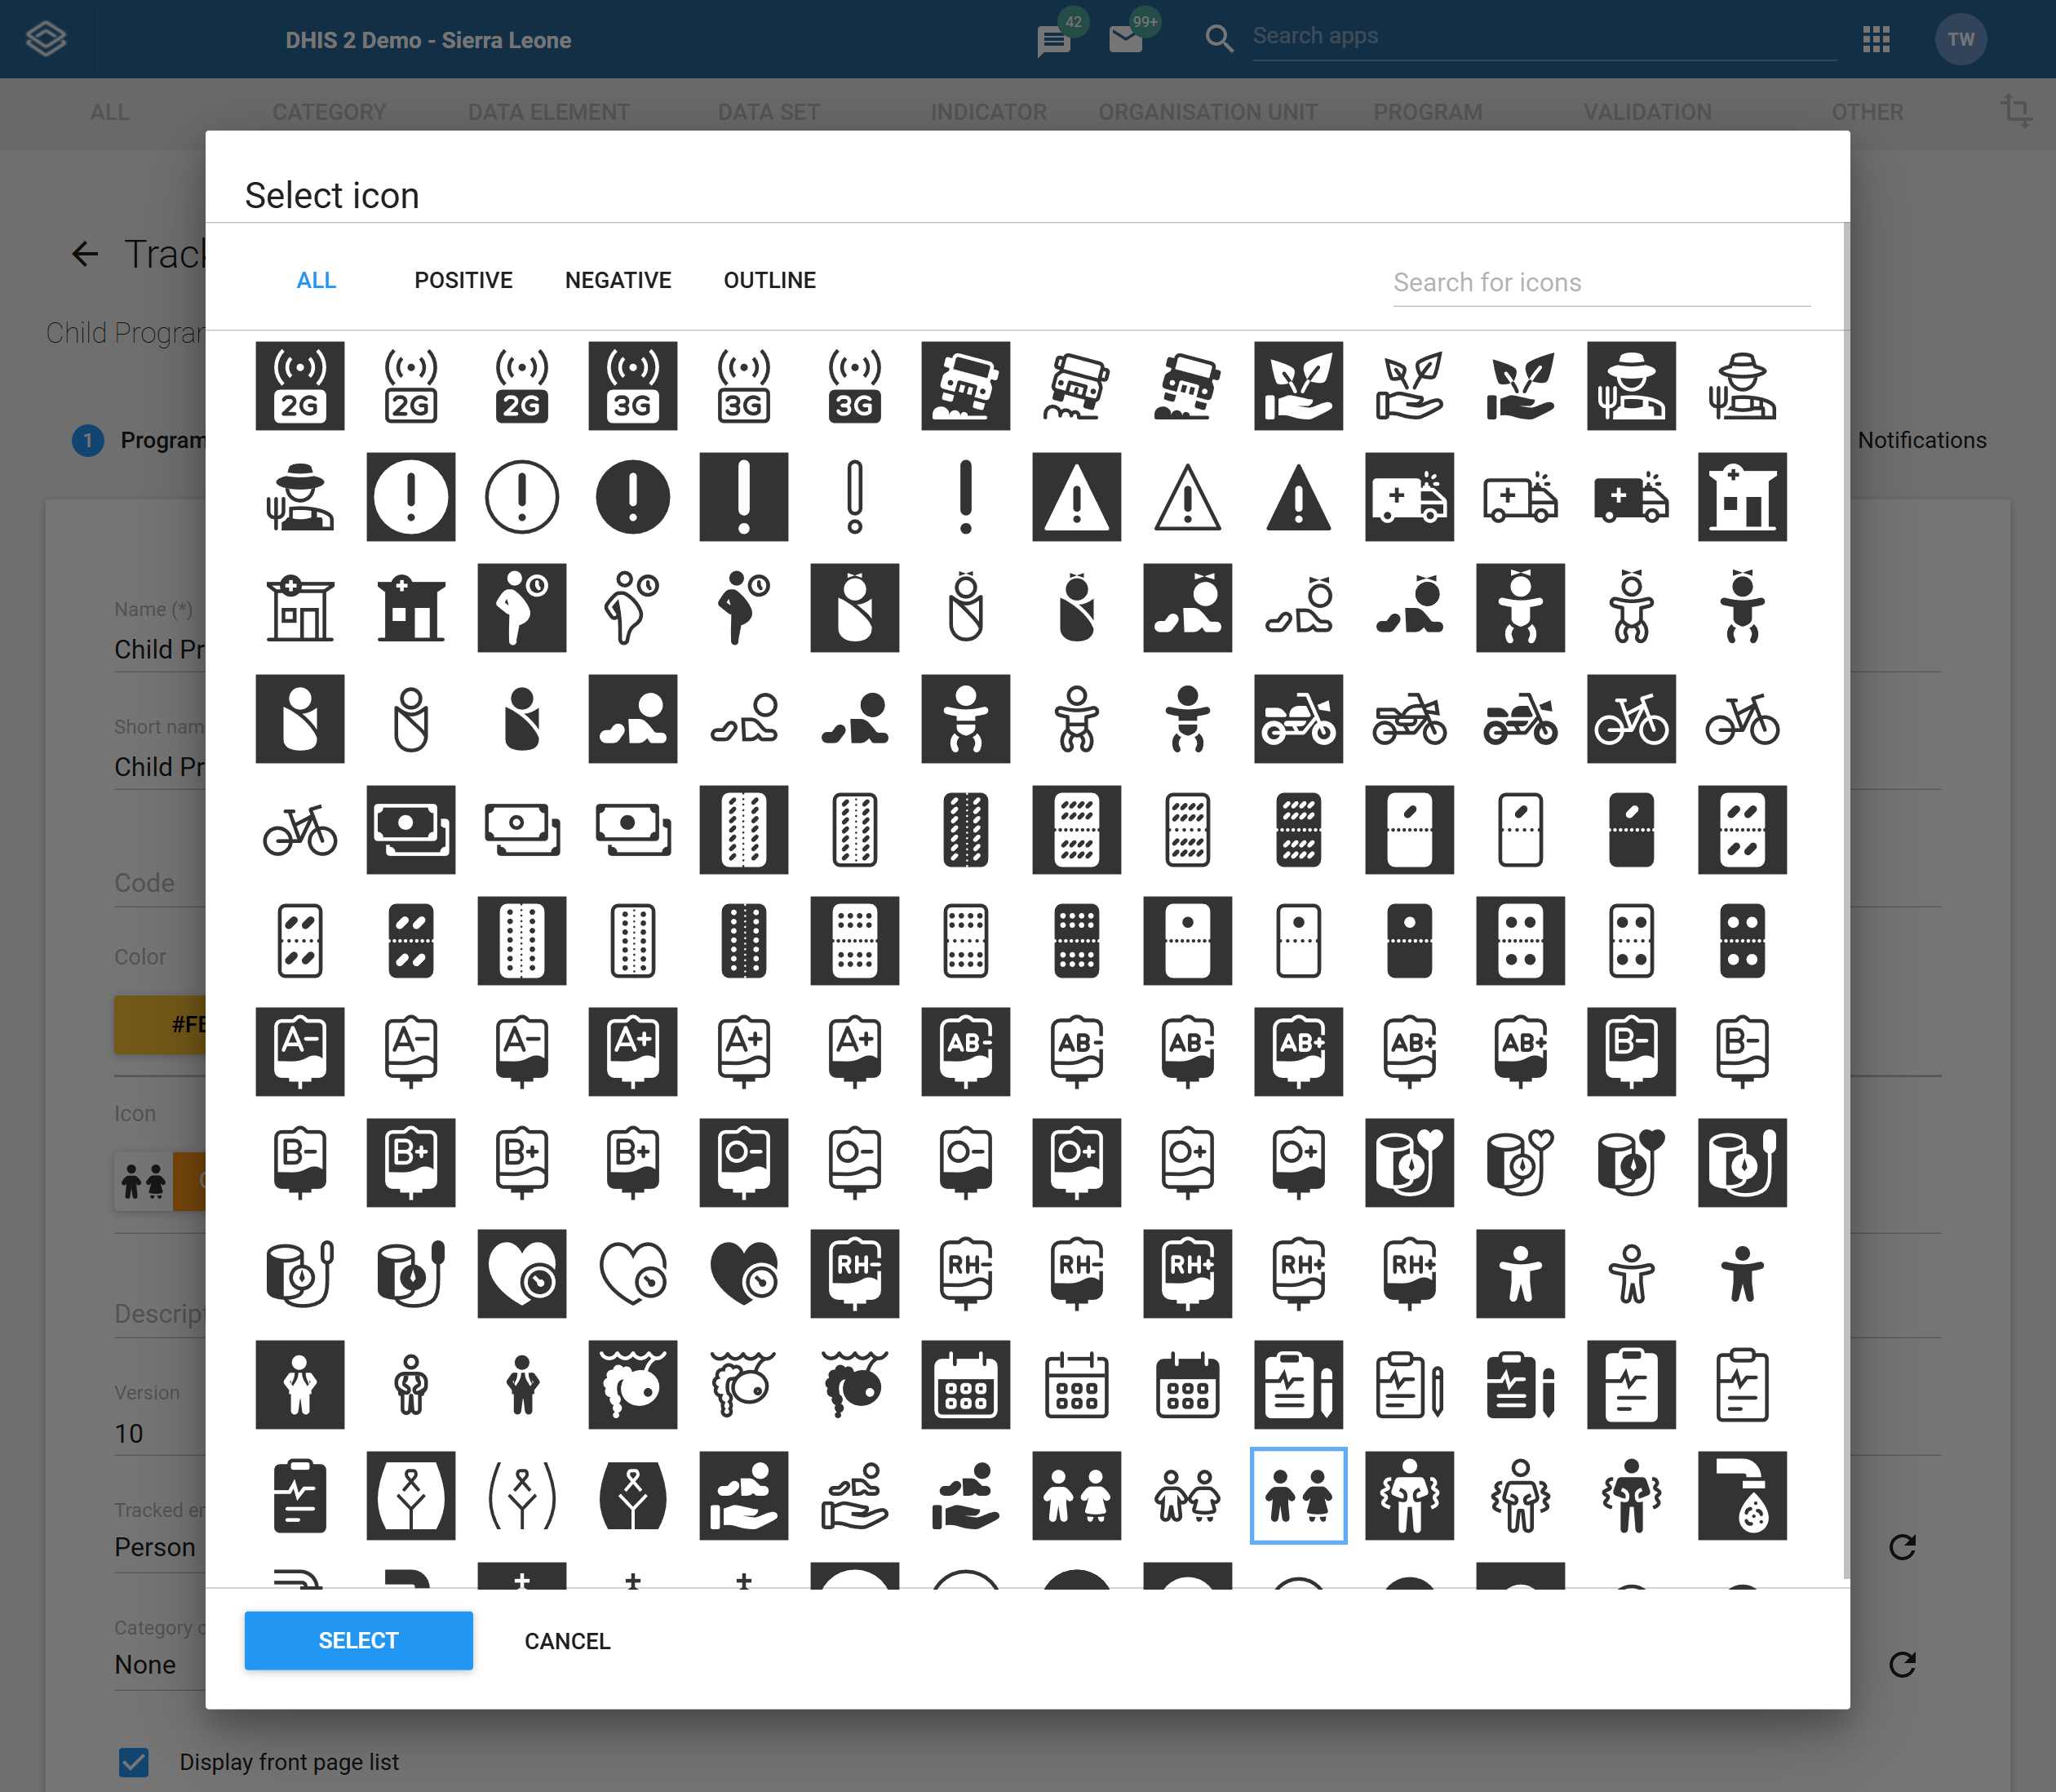
The Android Capture App supports extensive visual customization through the use of icons and colors. These elements improve usability by allowing program and form elements to be visually distinguished and quickly recognized.
Administrators can assign icons and colors to a variety of metadata objects, including programs, program stages, tracked entity types, datasets, data elements, attributes, and option sets. These icons appear throughout the app — in the home screen, data entry forms, dashboards, and filters — to improve navigation and comprehension.
Built-in and Custom Icons
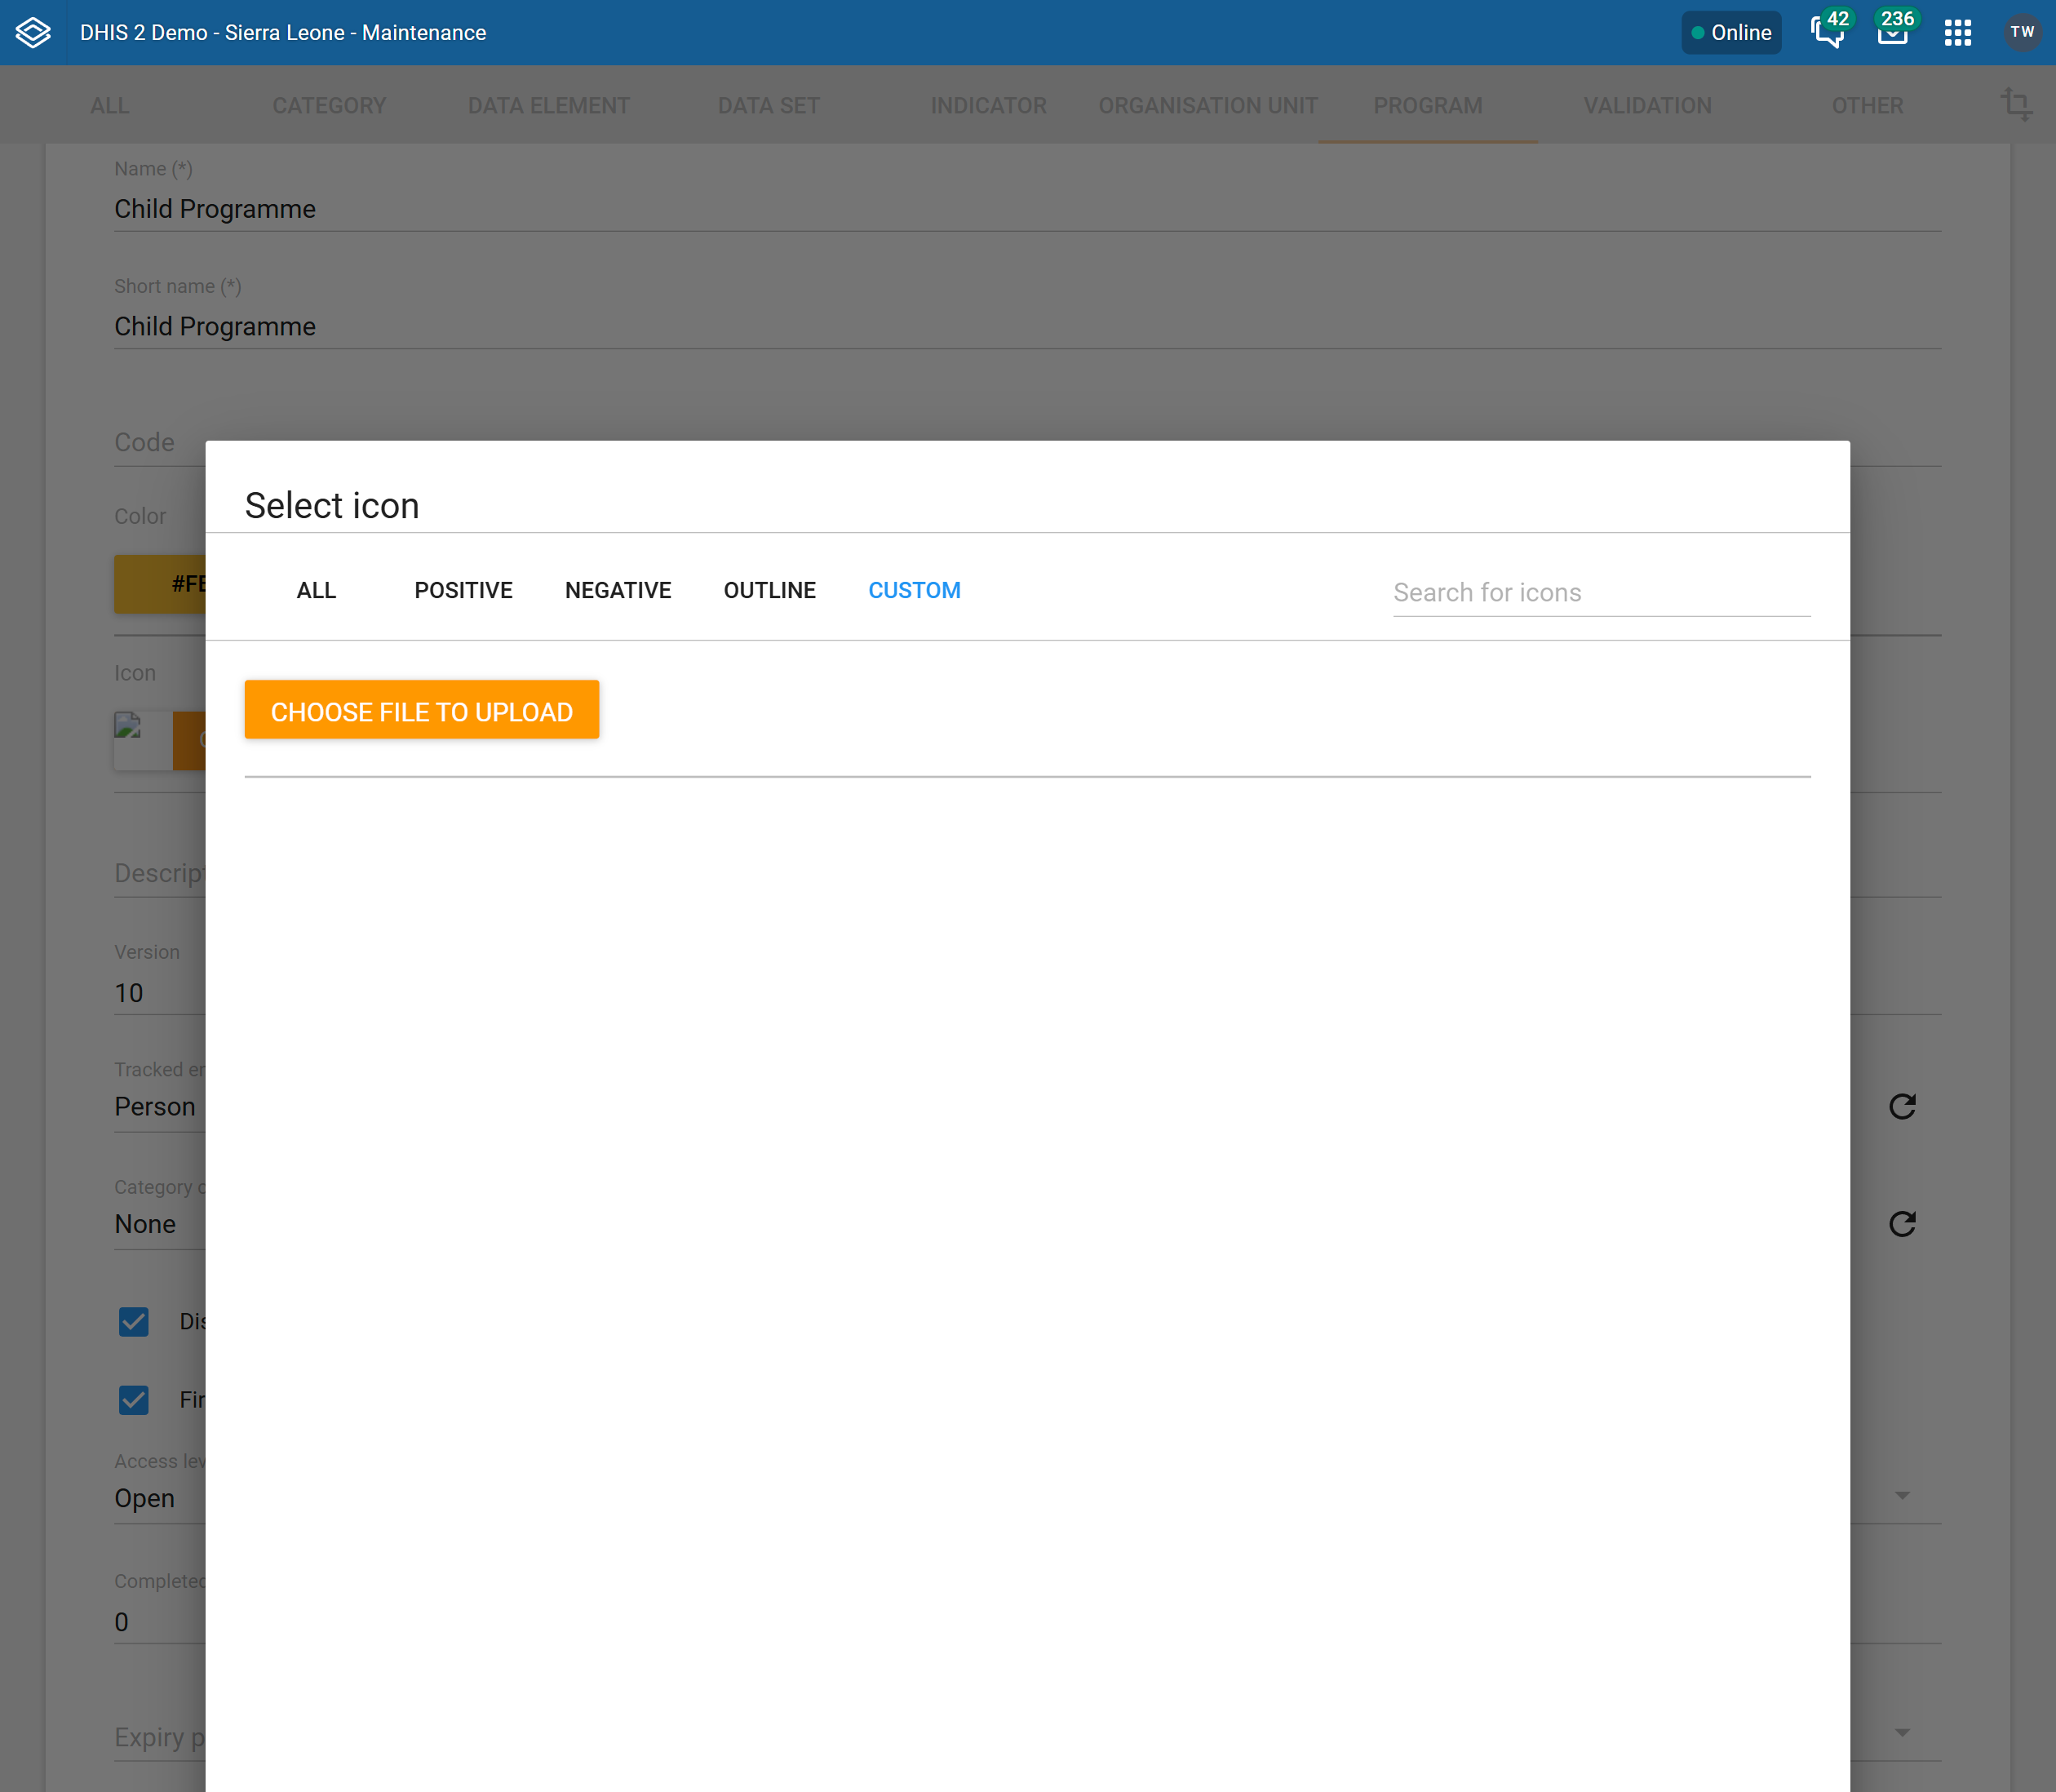
There is an icon library of over four hundred images in DHIS2 instances. As of recent versions, administrators can also upload their own custom icons (e.g., .png or .jpeg) directly via DHIS2. While this increases flexibility, it introduces tradeoffs such as larger metadata payloads and potential sync delays.
For performance reasons, it's recommended to keep custom icons small in size (under 50KB) and only use them where they add clear value (e.g., custom campaign branding or highly specific visual codes).
Metadata Assignments
The following metadata types support color and icon assignment in Android: * Tracked Entity Types * Programs and Program Stages * Datové Sady * Data Elements and Attributes * Indicators and Program Indicators * Option Sets and Options
Rendering Modes for Sections
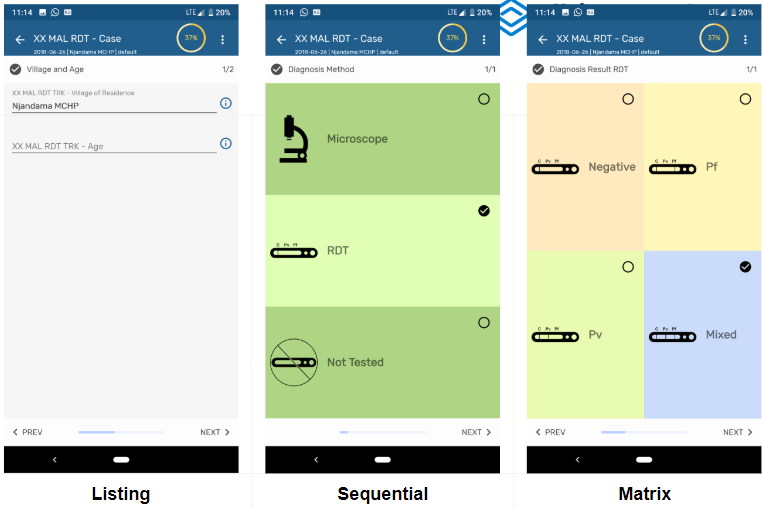
For program stages with sections, Android supports three rendering modes that determine how the fields or options within a section are visually arranged for the user:
-
Listing: elements are shown as a flat list.
-
Sequential: typically means that fields or options are displayed one after another in a vertical list, guiding the user through the form step by step.
-
Matrix: arranges fields or options in a grid or table-like format, allowing for a more compact and comparative view, which can be useful for data that is best visualized in rows and columns.
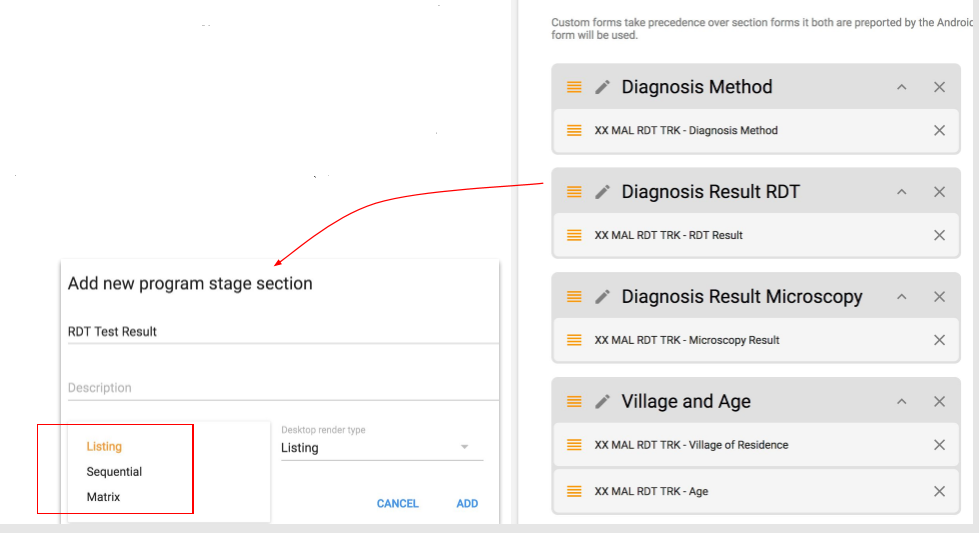
These can be configured in the program stage settings using the mobile rendering type field. Implementers should choose the rendering mode that best matches the complexity and flow of their form, balancing clarity and data entry speed.
A System Administrator can decide the best way to render the information in each program stage section by setting up the mobile rendering type, as shown on the screenshot.
Advanced Behavior Configuration via Android Settings
In addition to form layout and visuals, the Android Settings Web App (ASWA) allows you to control how the app behaves across different contexts and user roles. These settings can be tailored to align with field realities, user capacity, and program complexity. Implementers are encouraged to review these options and apply them based on the specific needs of their workflows.
Some of the most impactful configurable features include:
-
Sync limits and frequency: Define how much data (TEIs, events, datasets) is synced and how often, ensuring performance in bandwidth-limited environments.
-
Map accuracy thresholds: Control the GPS precision required before capturing coordinates — critical for use cases like mobile outreach, campaign site mapping, or logistics.
-
Enable/disable specific actions: Restrict features like referrals, manual geo-location, or dashboard widgets, reducing clutter or enforcing SOPs.
-
Expand/collapse form sections: Improves navigation, especially in long, sectioned forms. Users can focus on one section at a time, minimizing errors.
-
Quick actions in dashboards: Enable shortcuts for common activities like event creation or TEI navigation directly from the dashboard.
-
Filters: Predefine the filters to be displayed across the app.
-
Local analytics: Allow users to view indicators, charts, or summaries based on the data available on their device, supporting feedback and decision-making in disconnected settings.
For more details, see the Android Settings Configuration Guide.
Program Rules & Indicators
Setting Up Program Rules
Program rules allow you to embed real-time logic into the Android app, even while offline. They automatically enforce data validation, default values, conditional display, and other dynamic behaviors, greatly improving data quality and user experience.
Key considerations:
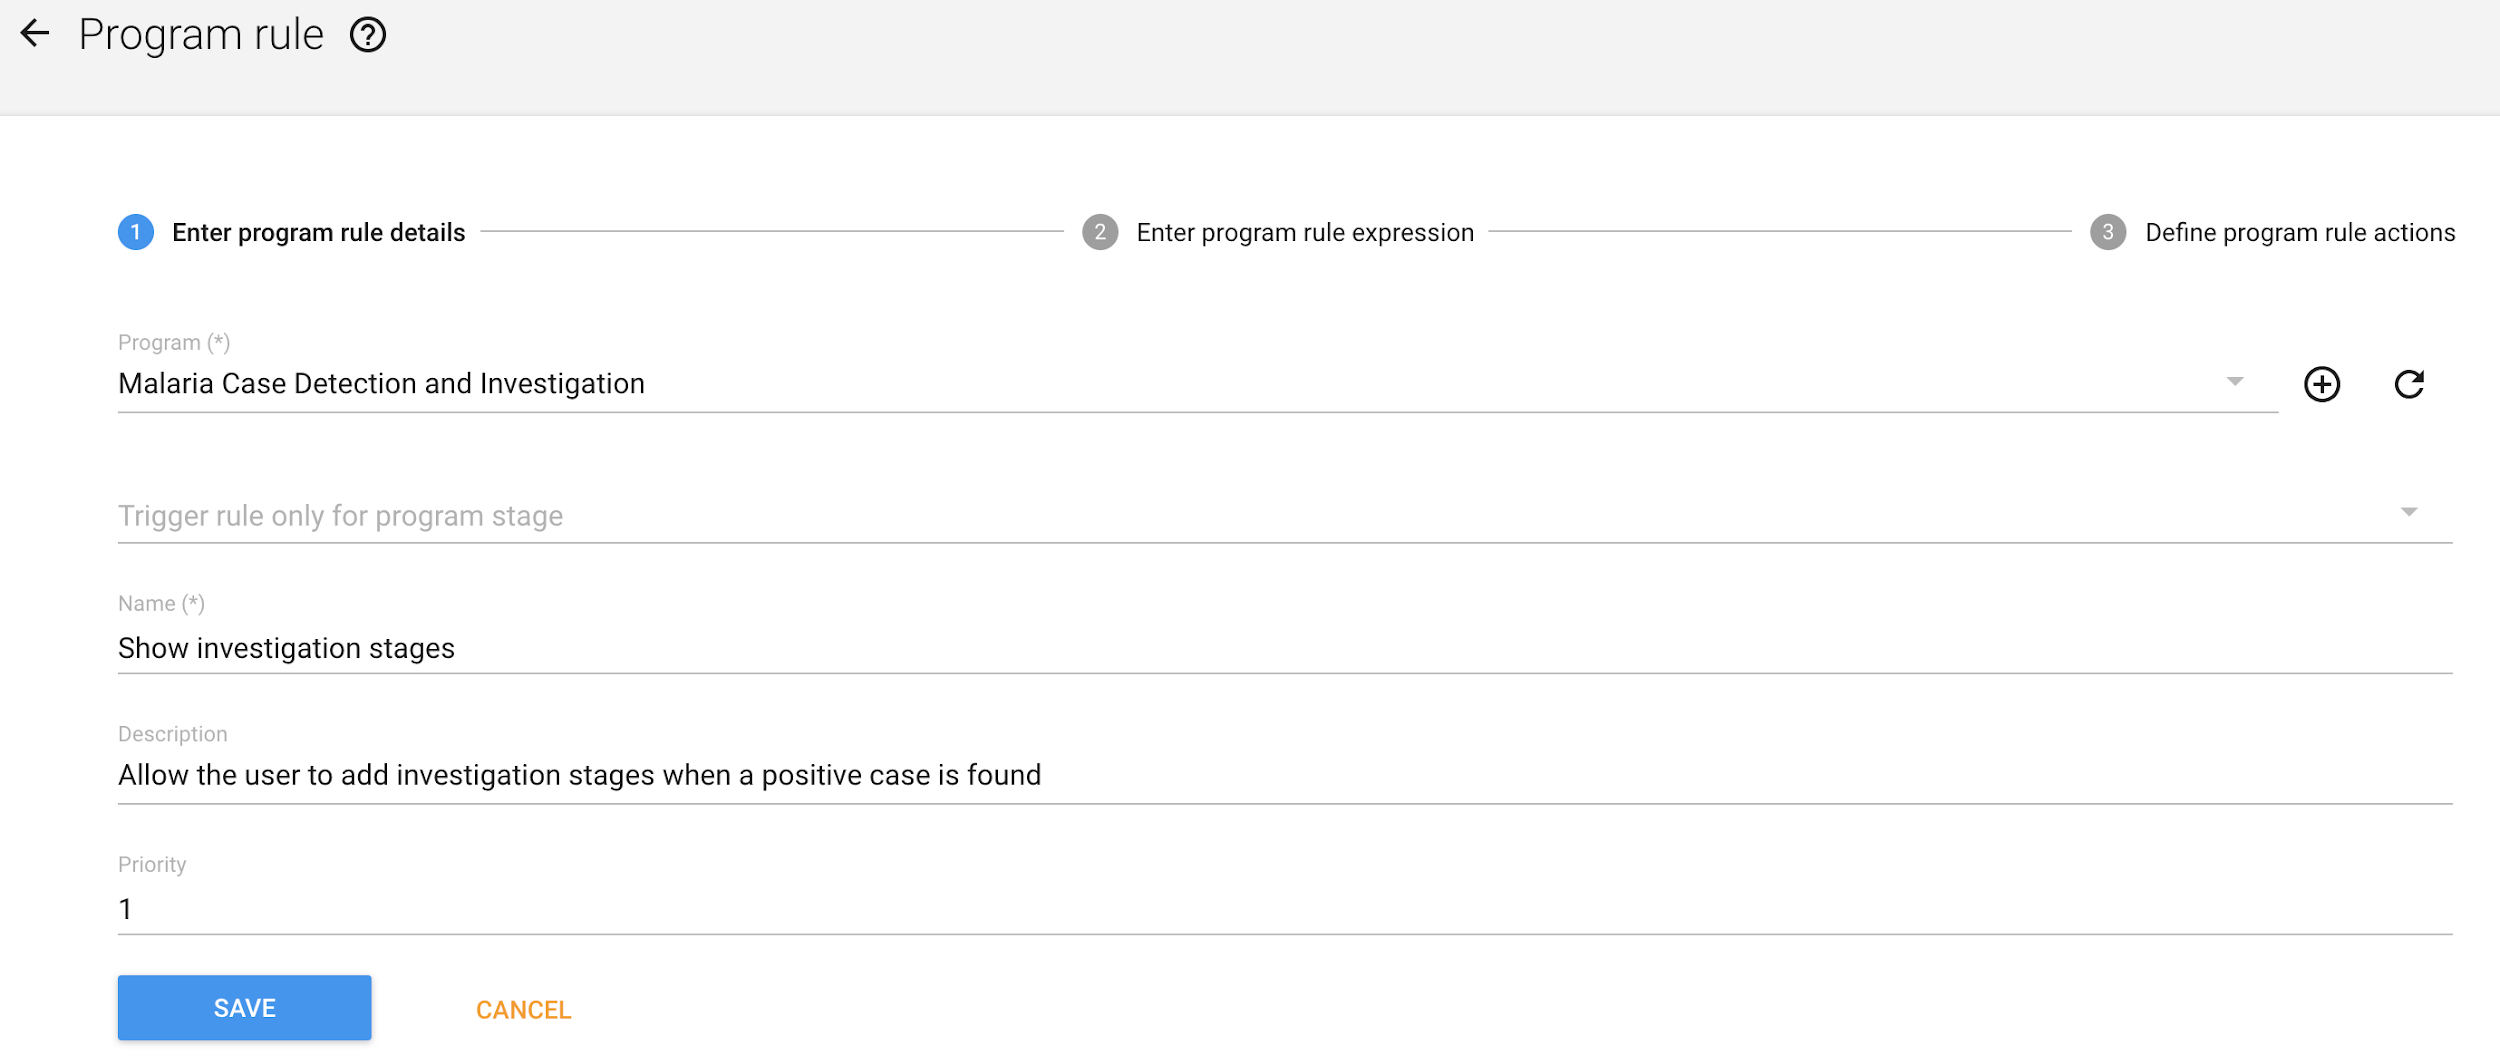
- Rule context and priority: Each rule is defined for a specific program (and optionally a stage), and is executed in ascending order of assigned priority. This ensures deterministic behavior, especially when rules depend on the output of other rules.
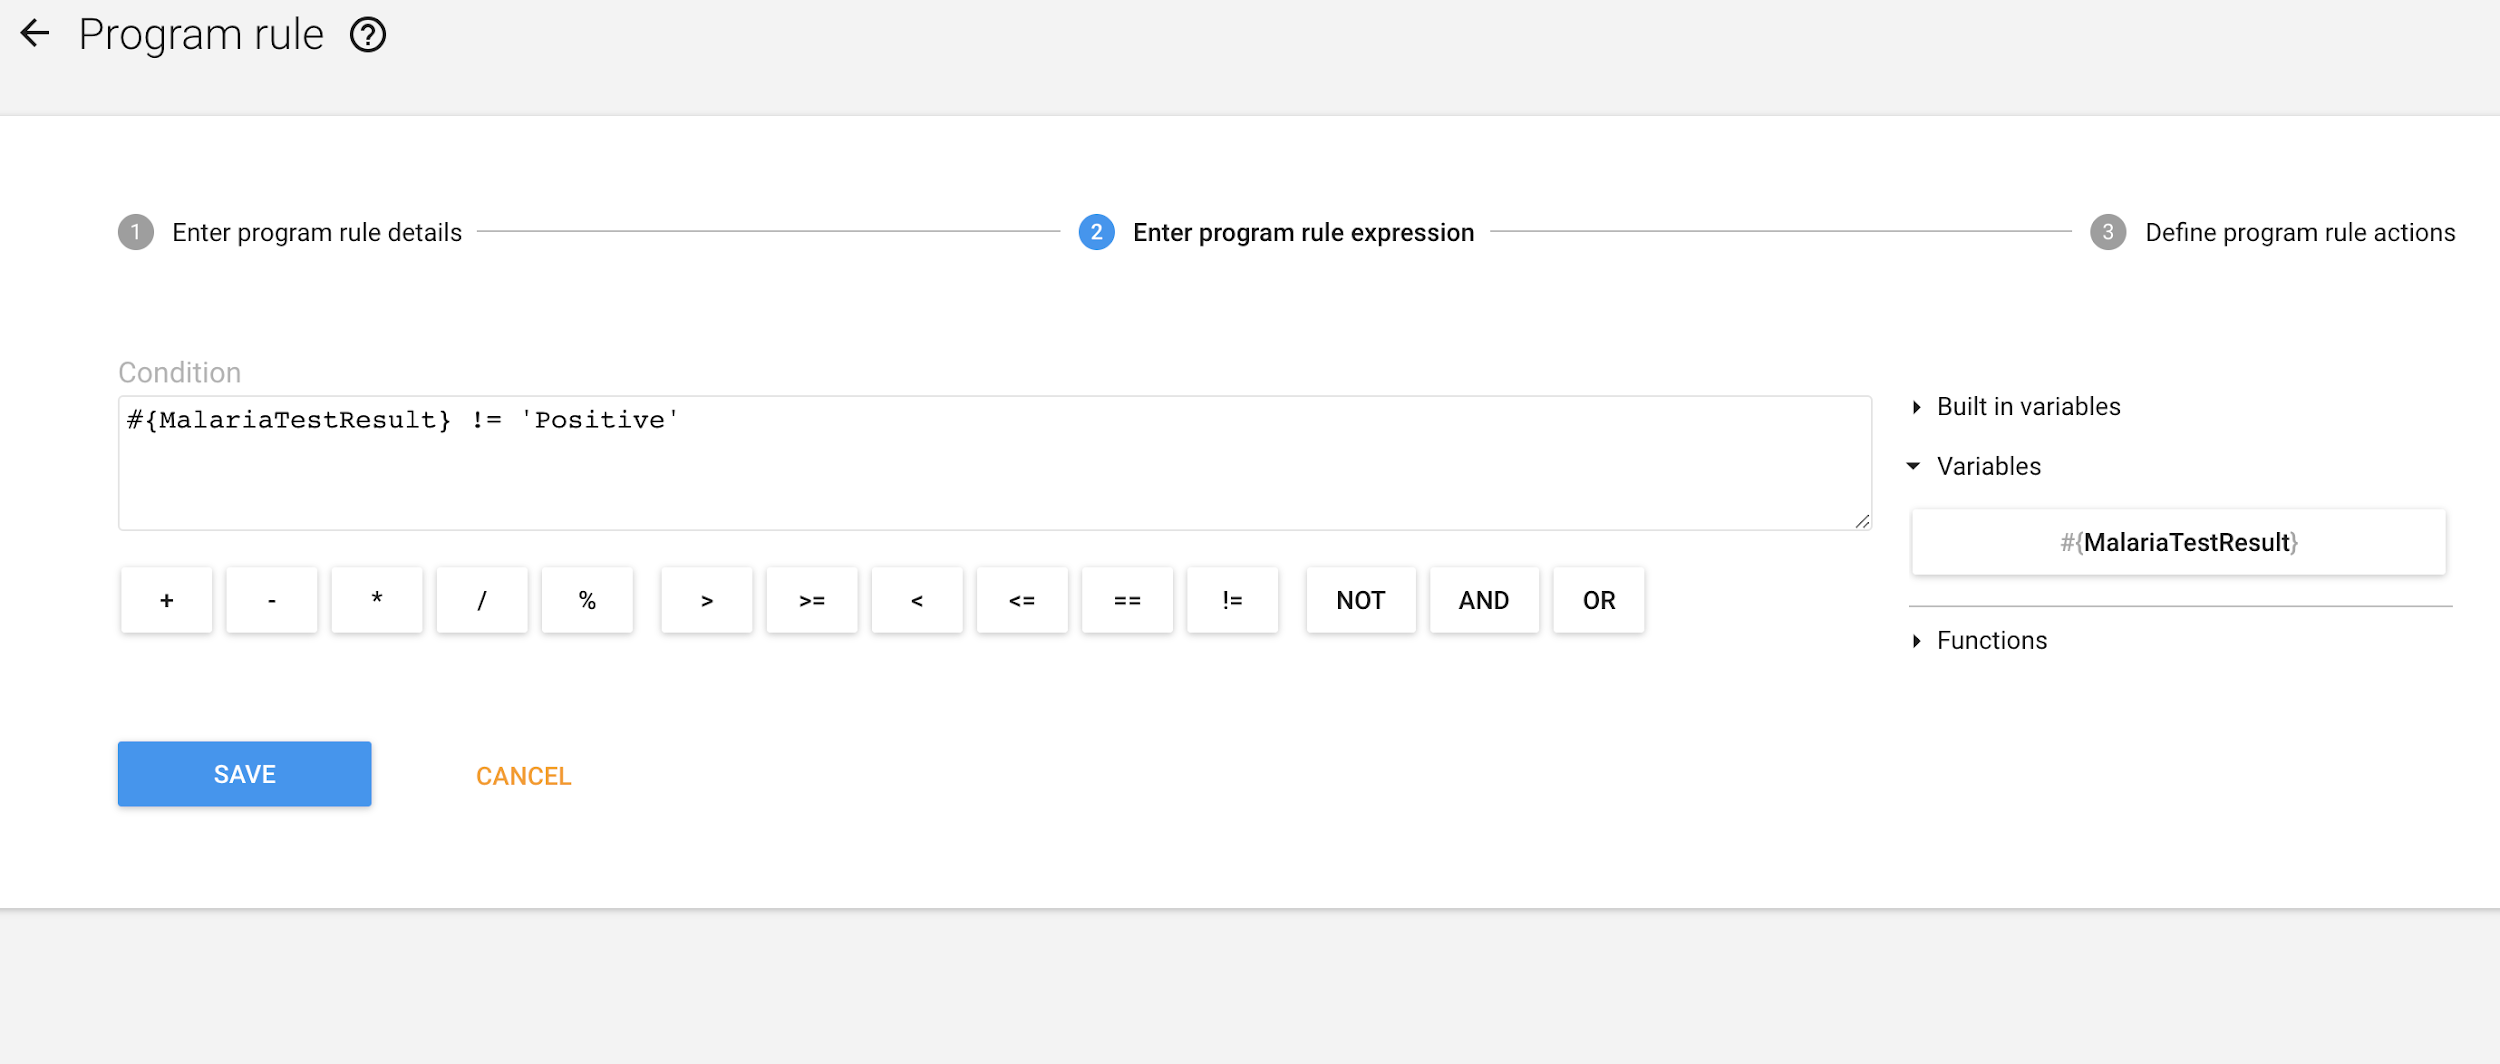
- Use of variables and expressions: You can base rules on attribute or data element values, as well as built-in variables like eventDate, orgUnit, or relative date functions. Be sure to define any custom variables you reference.
Note
We recommend to test the Android App in parallel with the configuration of your program rules, this is to make sure that your changes in the server are properly reflected and working in the app.
Steps to configure a program rule
- Define the context and priority for the execution of the rule.
- Write the program rule expression. Variables have to be defined by the administrator to be able to evaluate information entered for a TEI attribute or a program stage data element.
- Define the action or actions to be executed when the program rule expression is true
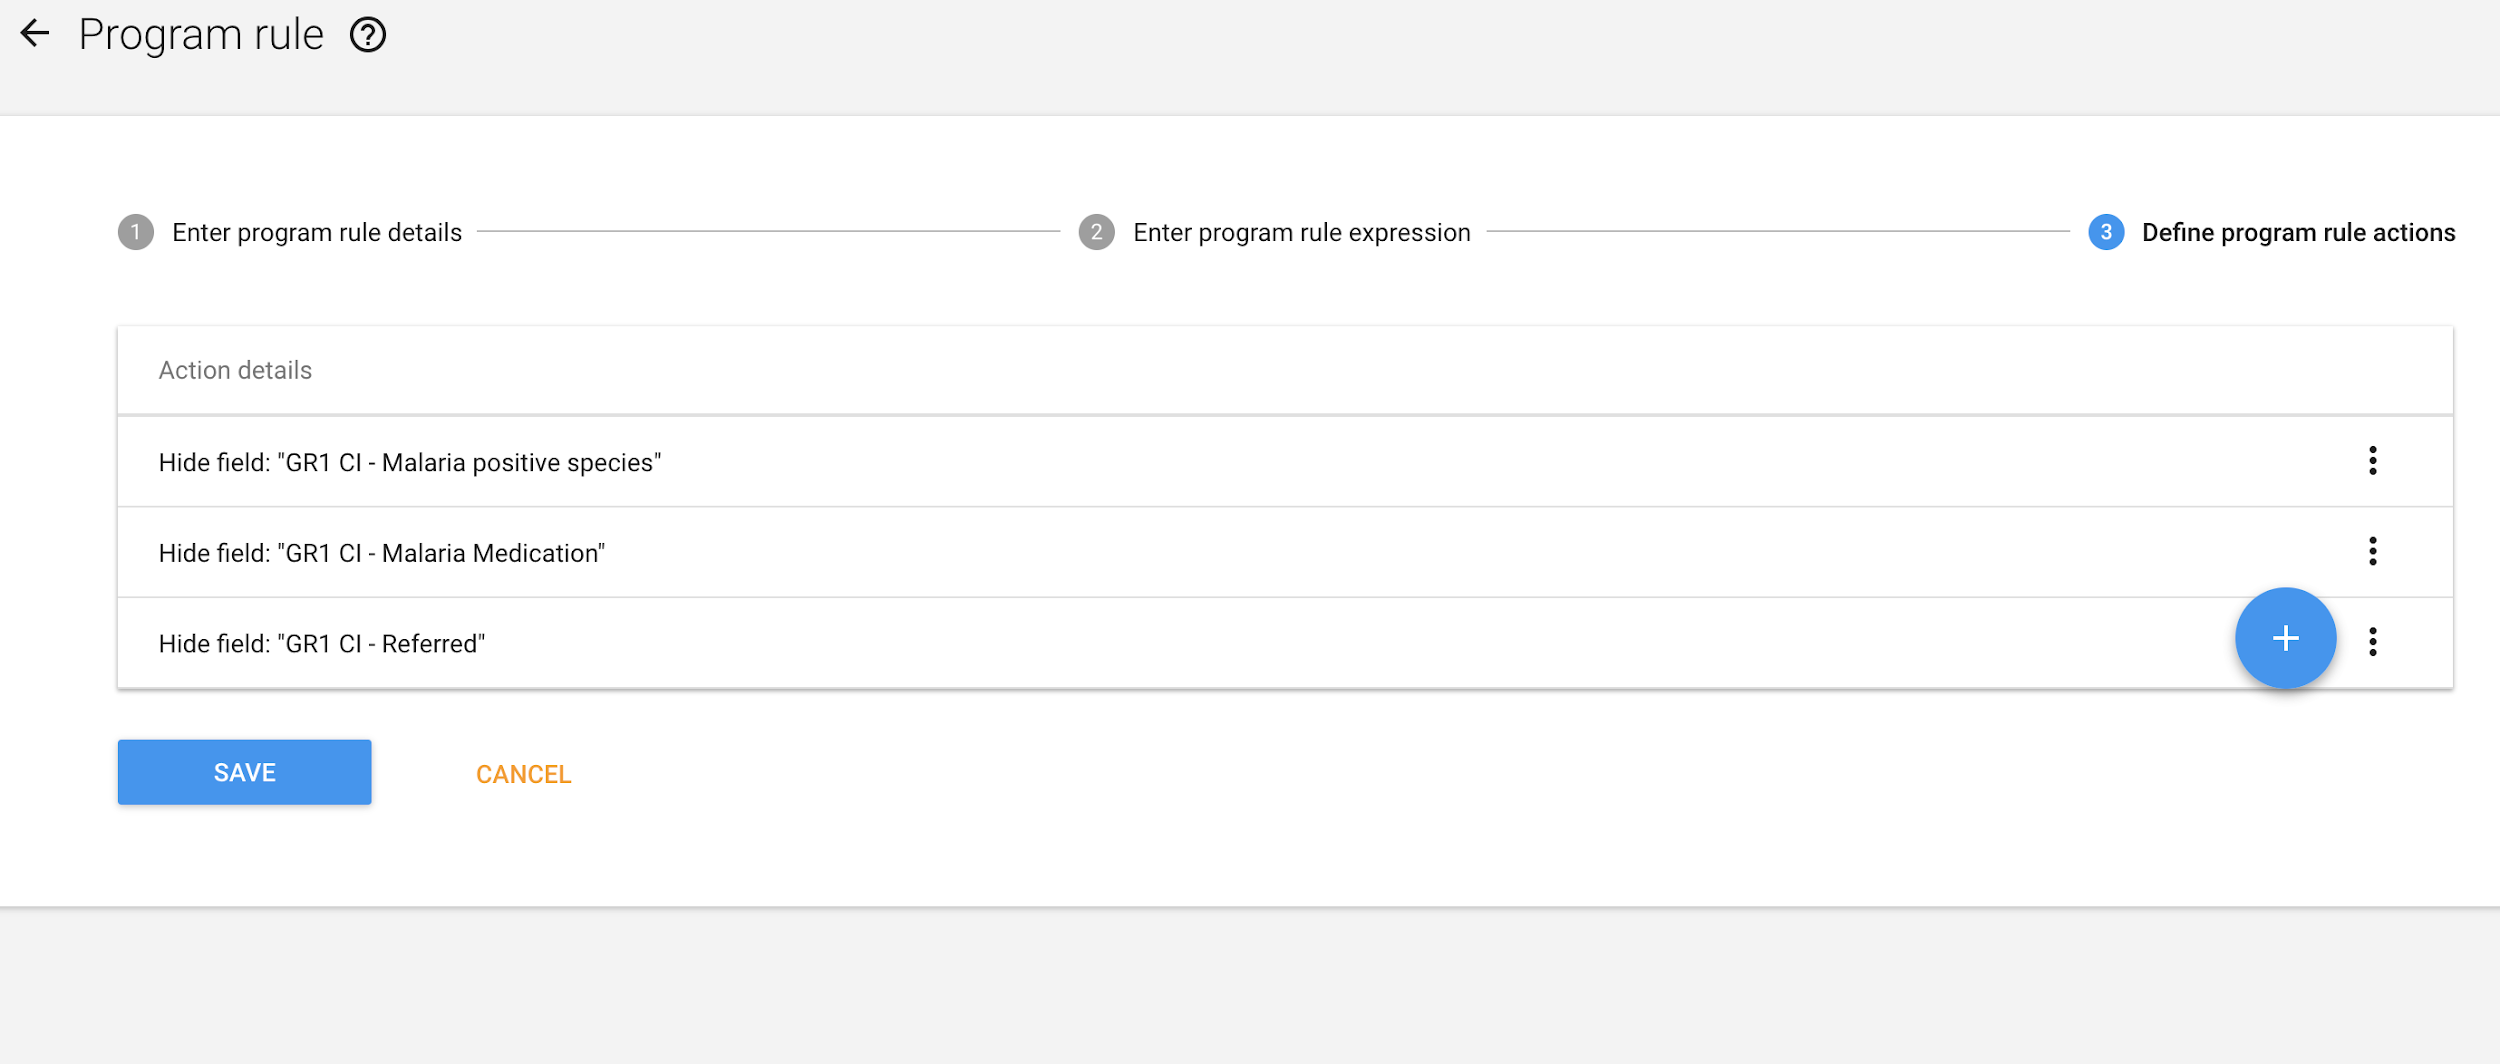
When setting up your program rules you should be aware of what is supported by the DHIS 2 Android app. You can check the updated list in the user guide.
Definování indikátorů a legend programu
Program indicators are used in the Android Capture App to display real-time calculations based on values in a program event or data set. These indicators help users interpret the data they're collecting by surfacing meaningful summaries.
To display a program indicator (events or tracker) in the Android app, ensure the “Display in form” option is enabled in the indicator configuration.
To display indicators in data sets, ensure you assign them during the data set configuration in the maintenance app.
- Using Legends for Visual Feedback *
Legend sets allow you to apply colors to numeric ranges, making it easy to visually flag critical values such as:
- Risk thresholds
- Stock levels
- Survey scores
Legends are supported in the following areas in Android:
- Program Indicators (in Tracker and Event programs)
- Data Elements (in Event programs and Datasets)
You can create legend sets in Maintenance > Other > Legends in the DHIS2 server and then assign them either to a program indicator or to a data element. In the app, legends appear as background color changes or status indicators inside the form, giving users immediate visual cues.
You can check the updated information of what is supported when using program indicators in the user guide.
Vyhrazená ID
In many Tracker programs, a unique identifier — such as a case ID, patient number, or voucher code — must be generated when a new Tracked Entity Instance (TEI) is registered. DHIS2 supports this using Generated Values for Tracked Entity Attributes (TEAs), which follow predefined patterns (e.g. ANC-#####) managed by the server.
Because field users often work offline, the Android app handles this by preloading a pool of reserved IDs, downloaded from the server during sync. These are then assigned locally, even without connectivity.
The number of IDs reserved per tracked entity type is configurable through the Android Settings Web App (ASWA). This setting is crucial for ensuring smooth operation in low-connectivity environments. If ASWA is not configured, the default number of reserved IDs is 100.
Pokaždé, když uživatel použije hodnotu (zaregistruje instanci trasované entity), aplikace:
- Zkontrolujte, zda zbývá dostatek zbývajících hodnot, a podle potřeby doplňte (pokud je k dispozici méně než 50 hodnot).
- Přiřaďte první dostupnou hodnotu instanci trasované entity a odeberte ji ze seznamu dostupných hodnot.
Kdykoli se aplikace synchronizuje, bude:
- Odstraňte rezervované hodnoty, jejichž platnost vypršela.
- Zkontrolujte, zda zbývá dostatek zbývajících hodnot, a podle potřeby doplňte (pokud je k dispozici méně než 50 hodnot).
Hodnota je považována za „prošlou“, když je splněna jedna z následujících podmínek:
- „expiryDate“ je po splatnosti. Ve výchozím nastavení server nastavuje dobu platnosti na 2 měsíce.
- Pokud je atributový vzor závislý na čase, tj. Obsahuje segment `CURRENT_DATE(format)`, aplikace vypočítá další datum vypršení platnosti na základě tohoto vzoru.
Pozor
Pokud používáte automaticky generované jedinečné hodnoty, které obsahují data jako součást vzoru, expiryDate těchto hodnot bude spojeno s tímto vzorem data, což může mít za následek neočekávané chování, pokud vzor není dobře definován.
Příklad: Hodnota UniqueID byla nakonfigurována se vzorem jako CURRENT_DATE(MM)-SEQUENTIAL(###) a dnes je 31. ledna, aplikace by stáhla 100 hodnot (od 01-001 do 01-101 ) umožnit aplikaci pracovat offline a mít dostatek hodnot, ale zítra, 1. února, by aplikace neměla žádné dostupné hodnoty, protože všechny by byly označeny jako prošlé a tak by zobrazila takovou zprávu.
V aplikaci může uživatel také zkontrolovat dostupné hodnoty a znovu je vyplnit v nabídce nastavení.
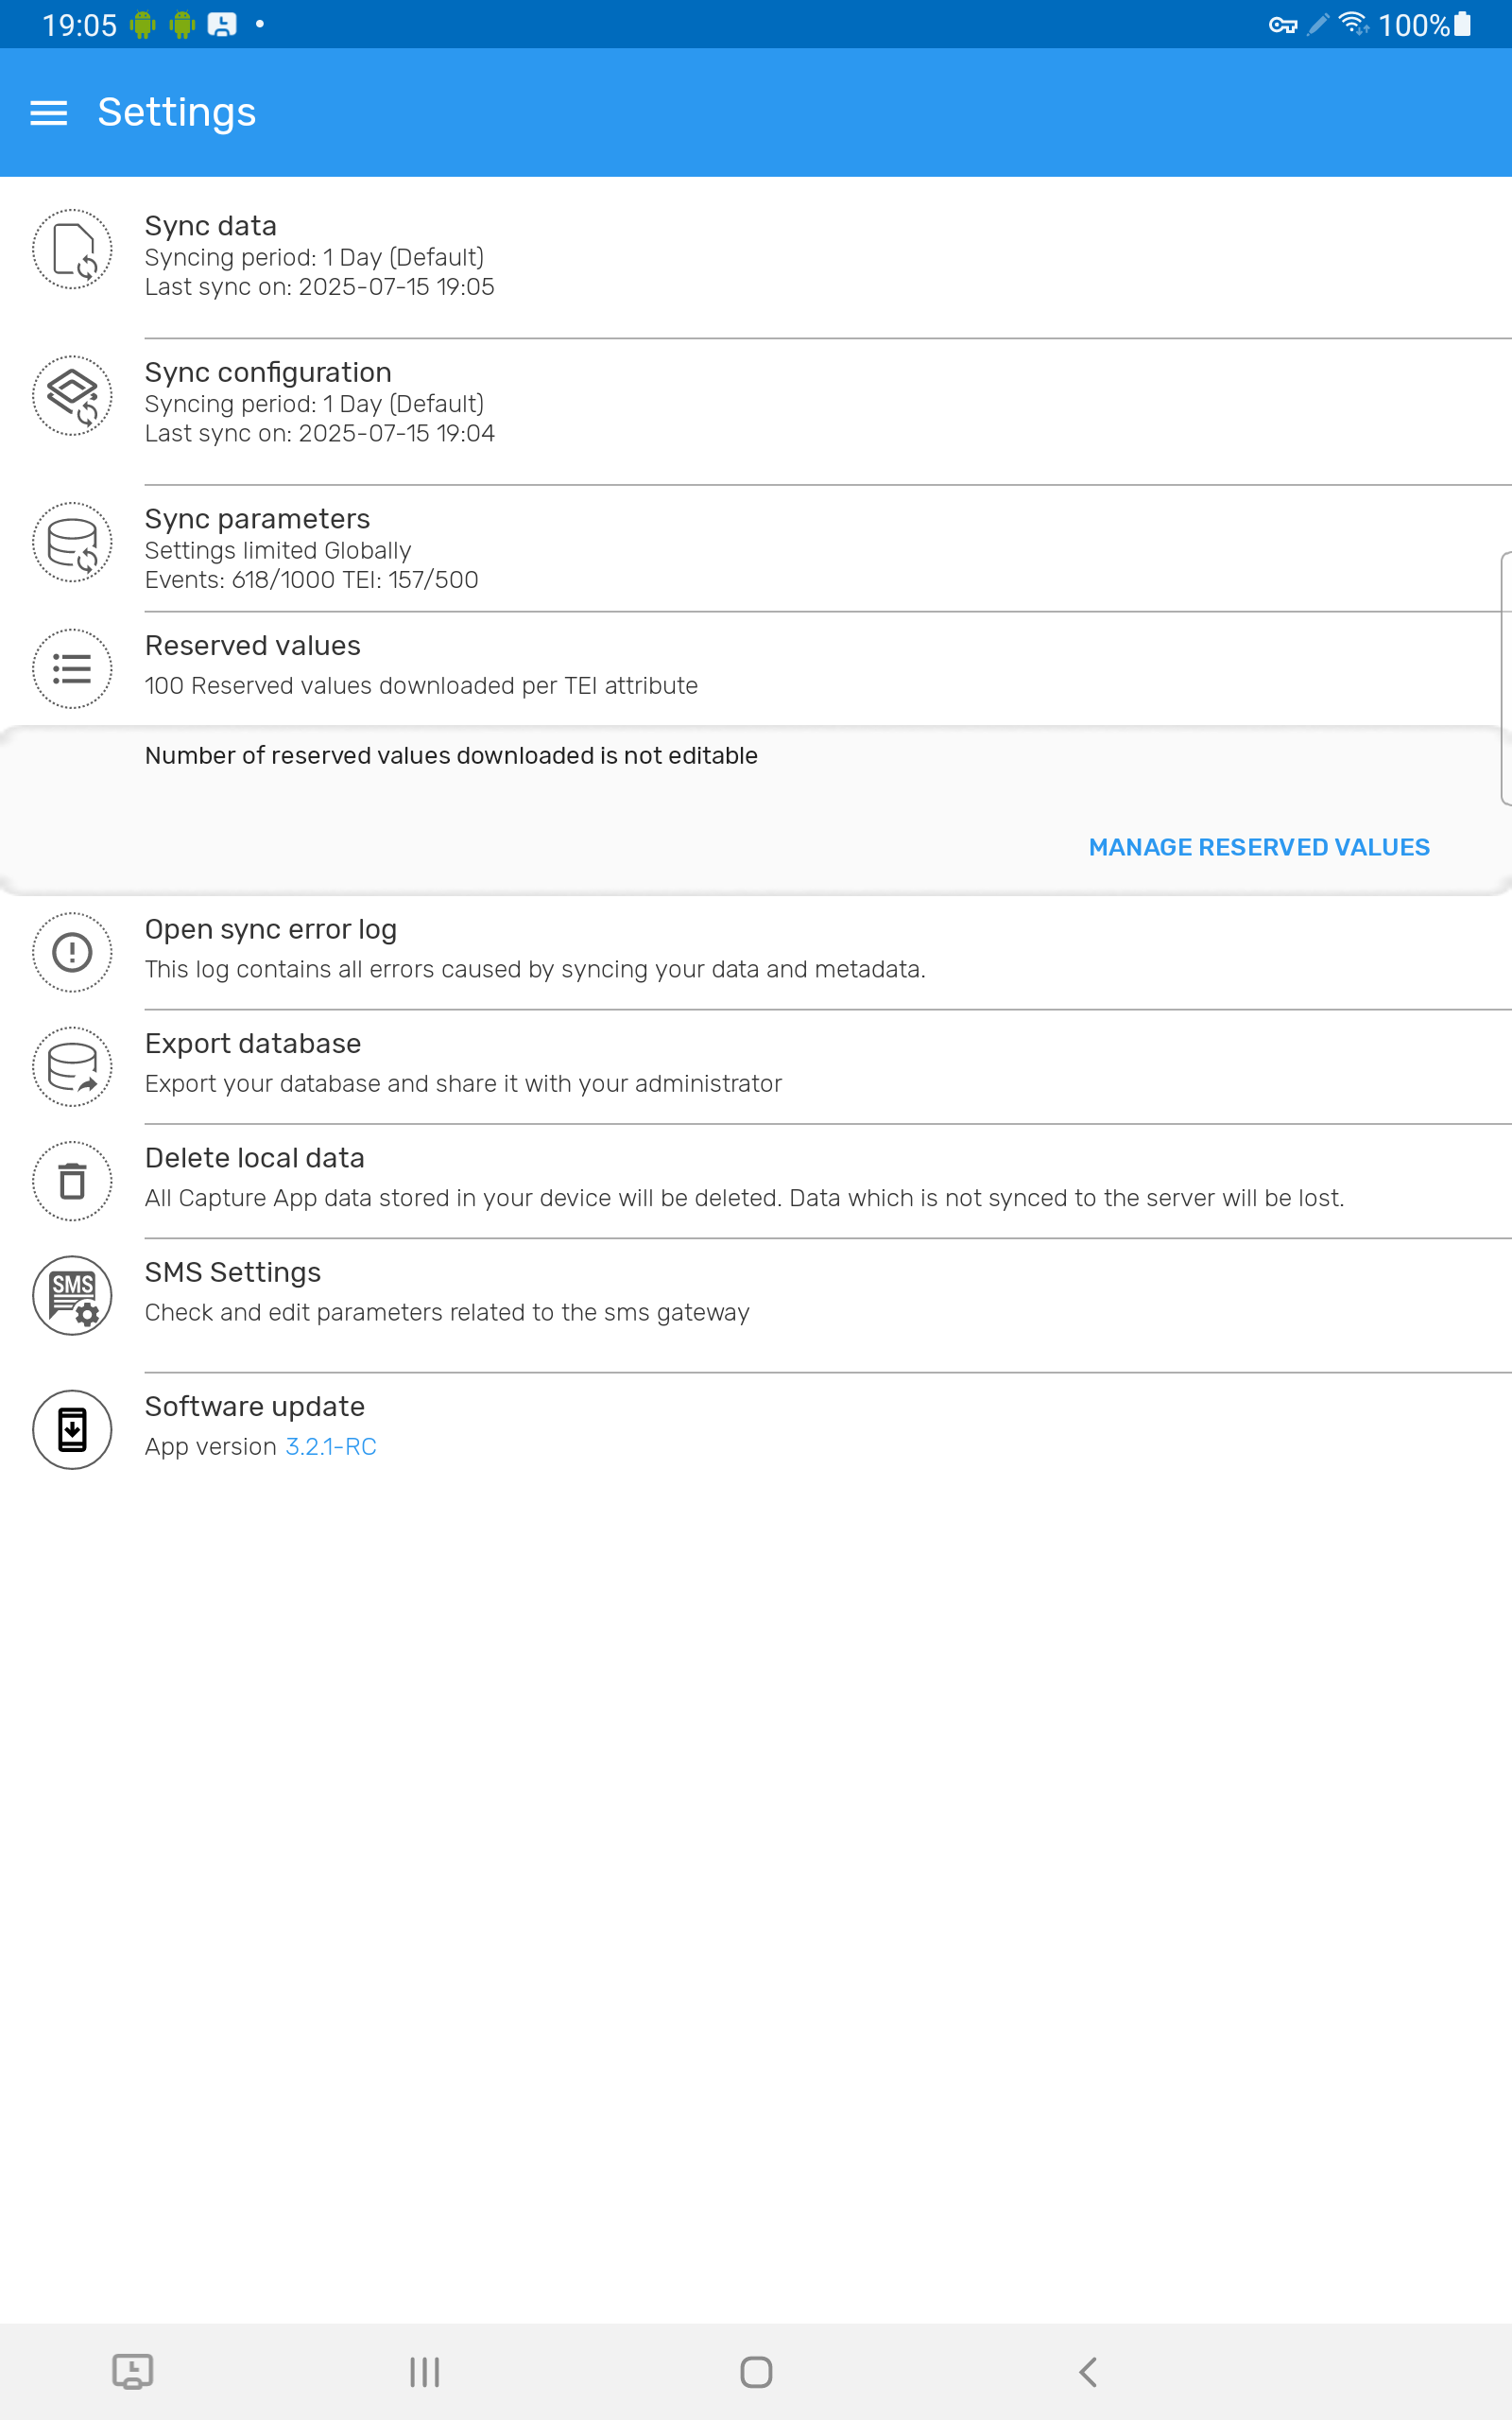
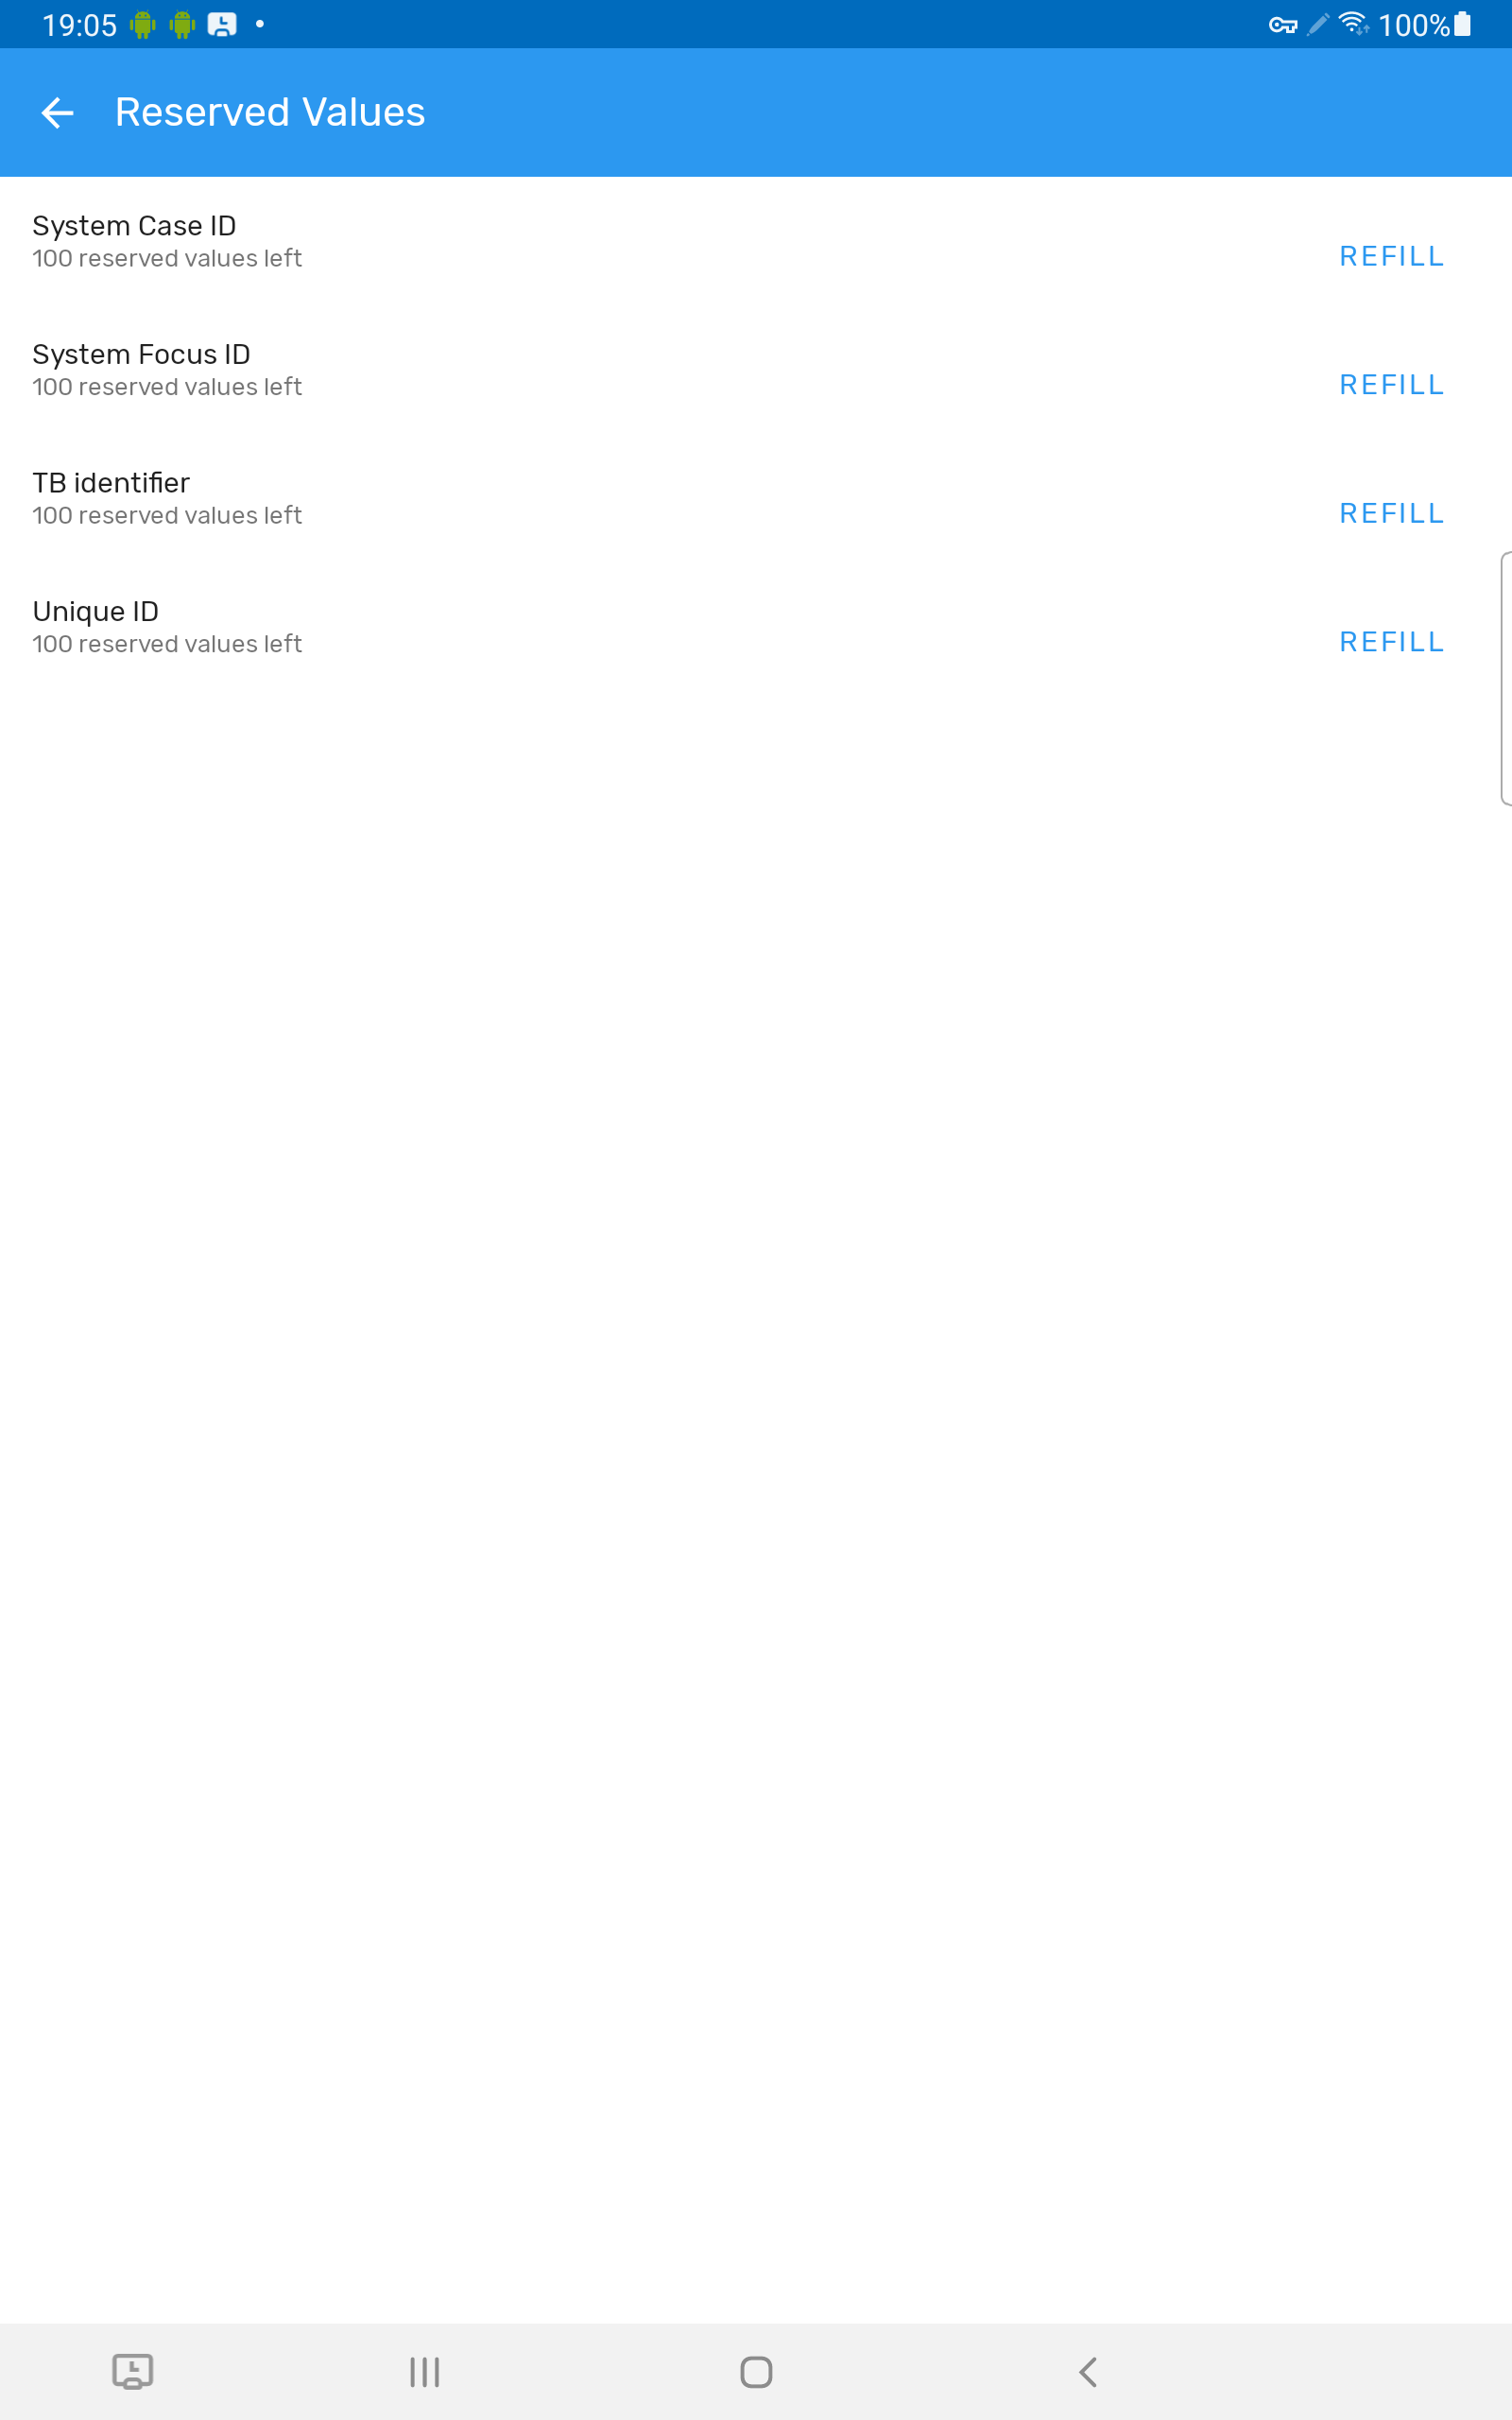
Když aplikaci dojde hodnoty a server nemůže poskytnout další, obdrží uživatel ve formuláři pro zadávání dat zprávu, že již nejsou k dispozici žádné další hodnoty. Měli byste to opravit na straně serveru.