Route
Route
The route API permits DHIS2 web apps to communicate with external HTTP gateways and proxies. It is designed to be a lightweight solution for extending apps that need to exchange data with third-party services (e.g., civil registry). The route endpoint is available on the URL path /api/routes. Routes can be run by issuing an HTTP GET or POST to /api/routes/{id}/run. DHIS2 includes the X-Forwarded-User header in every request sent to the route's target. This header contains the DHIS2 username which initiated the request, allowing the target to react accordingly.
For the examples here we will be using the Echo API from Postman which just returns what you send to it (including body in the case of POST).
Required permissions
In order to configure routes, the logged-in user must either have ALL authority, or the Route authority should be added to the user's role. The authority can be added by heading to the User Management app -> User roles tab, then search for the word "Route" under Metadata authorities. Then you can assign the authorities to the user's role, and save the updates to the role.
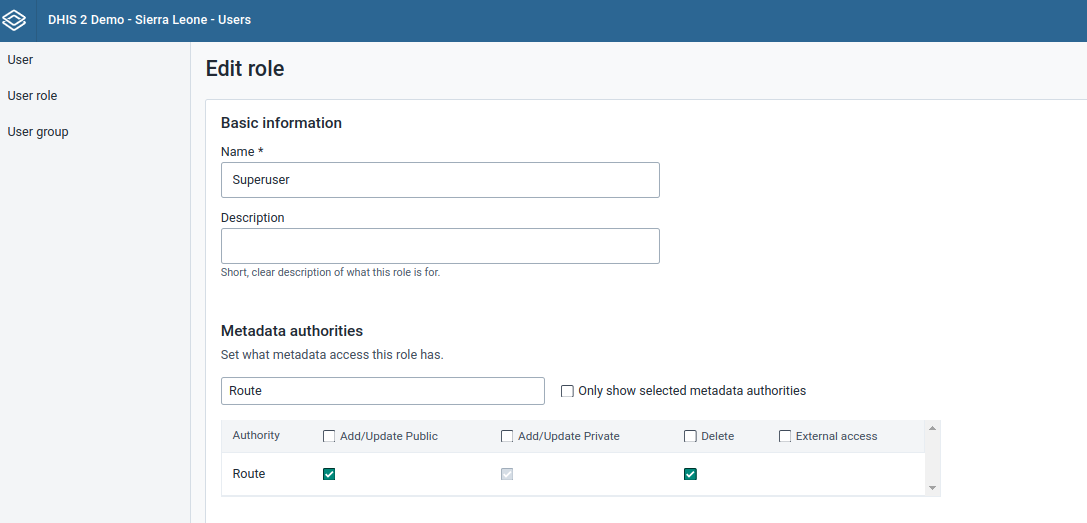
IMPORTANT: After creating a route, all DHIS2 users are able to view and run the route therefore it is highly advisable to edit the route's sharing settings to change the default access.
Starting from DHIS2 versions 40.12, 41.9, and 42.5, the default behaviour is changed such that only the user that created the route together with users having the
ALLauthority can view and run the route. Go to the Running a route with authentication and custom authority section to learn how other users can be allowed run routes.
In addition to authorities, route URLs can only be added or run when the URL has a corresponding entry route.remote_servers_allowed setting found in the dhis.conf as shown below:
route.remote_servers_allowed = https://server1.com/,https://server2.com/
route.remote_servers_allowed is a comma-separated URL pattern list which is set to https://* by default. The DHIS2 administrator should change the default value to a more restricted URL to prevent server-side request forgery (SSRF) attacks. While not recommended for security reasons, one can add wildcard entries to route.remote_servers_allowed which avoids having to enumerate each allowed remote server, for example:
route.remote_servers_allowed = https://*.server1.com/
Note that paths within the URLs are not accepted.
Running a route
The following is an example of a JSON request creating a route:
{
  "name": "Postman Echo",
  "code": "postman",
  "disabled": false,
  "url": "https://postman-echo.com/get"
}
The route can be run from DHIS2 after the above request is sent to the /api/routes API endpoint. You can run the route either with its returned ID or the code assigned to it as demonstrated below:
GET /api/routes/{id}/run
GET /api/routes/postman/run
If you want DHIS2 to POST the request to the route target, use the POST HTTP method when calling the run endpoint instead of the GET HTTP method:
POST /api/routes/postman/run
Running a route with authentication
A number of authentication modes are supported when running routes. These authentication modes add headers or query parameters to the request being routed from DHIS2. DHIS2 encrypts at rest sensitive headers or query parameters when creating a route with an authentication mode. This means that the clear text secrets cannot be read from the database or the Web API. What follows are the supported authentication modes:
http-basic: adds an Authorization header to the route request for HTTP basic access authentication. Here is an example creating a route configured withhttp-basicauthentication:
{
  "name": "Postman Echo",
  "code": "postman-get",
  "disabled": false,
  "url": "https://postman-echo.com/get",
  "auth": {
    "type": "http-basic",
    "username": "admin",
    "password": "admin"
  }
}
api-token: adds an Authorization header for Personal Access Token (PAT) authentication. It is worth noting that PAT authentication is specific to DHIS2 so you might want to consider the more generalapi-headersauthentication mode (described next) should the route's target URL be a non-DHIS2 instance. Here is an example creating a route configured withapi-tokenauthentication:
{
  "name": "Postman Echo",
  "code": "postman-get",
  "disabled": false,
  "url": "https://postman-echo.com/get",
  "headers": {
    "a": "1",
    "b": "2",
    "c": "3"
  },
  "auth": {
    "type": "api-token",
    "token": "74478F79-7B85-424A-9C93-8A6F924AA9F9"
  }
}
api-headers: adds user-defined headers for API authentication. Here is an example creating a route configured withapi-headersauthentication:
{
  "name": "Postman Echo",
  "code": "postman-get",
  "disabled": false,
  "url": "https://postman-echo.com/get",
  "auth": {
    "type": "api-headers",
    "headers": {
      "X-API-KEY": "aXJgm4Kwv1xk9UfFRYIIR8b6mEV1cQz3lcxMQlaQz9lwI35j4ZIUK5T2O2aQDfIY"
    }
  }
}
api-query-params: adds user-defined query parameters for API authentication. Here is an example to creating a route configured withapi-query-paramsauthentication:
{
  "name": "Postman Echo",
  "code": "postman-get",
  "disabled": false,
  "url": "https://postman-echo.com/get",
  "auth": {
    "type": "api-query-params",
    "queryParams": {
      "token": "aXJgm4Kwv1xk9UfFRYIIR8b6mEV1cQz3lcxMQlaQz9lwI35j4ZIUK5T2O2aQDfIY"
    }
  }
}
Running a route with authentication and custom authority
In the example shown below, we are configuring a route with http-basic authentication and assigning a custom authority it:
{
  "name": "Postman Echo",
  "code": "postman-post",
  "disabled": false,
  "url": "https://postman-echo.com/post",
  "auth": {
    "type": "http-basic",
    "username": "admin",
    "password": "admin"
  },
  "authorities": ["MY_CUSTOM_APP"]
}
Custom authorities allows a DHIS2 client that does not have the rights to manage the route to still be able to run it. This enables the route to be run from your app.
Running a route with custom response timeout
For performance reasons, the maximum transfer time for a route response is 5 minutes. When a transfer of the upstream server response body exceeds this limit, the DHIS2 server returns a bad gateway error to the client. On the other hand, the pre-configured timeout for the upstream server response when running a route is 5 seconds. This means that a network-level read taking longer than 5 seconds will result in the DHIS2 server returning a gateway timeout error to the client. However, this timeout can be adjusted when creating or updating a route as demonstrated below:
{
  "name": "Postman Echo",
  "code": "postman-post",
  "disabled": false,
  "url": "https://postman-echo.com/post",
  "responseTimeoutSeconds": 10
}
The minimum permitted response timeout is 1 second while the maximum permitted timeout is 60 seconds. The responseTimeoutSeconds setting should be used with caution since concurrent, long-running routes could degrade DHIS2's overall performance.
IMPORTANT: The response timeout can be customised starting from DHIS2 v40.10 and v41.6. Earlier DHIS2 versions have a response timeout of 10 seconds, except for: * 40.8 ≤ v < 40.10 * 41.4 ≤ v < 41.6
These specific versions have a 30-second response timeout.
Wildcard Routes
It is possible to create "wildcard routes" which support sub-path requests which are then passed through to the upstream service. To do this, the route URL must end with /**. Sub-paths can then be specified by appending them after /run.
{
  "name": "Postman Wildcard",
  "code": "postman-wildcard",
  "disabled": false,
  "url": "https://postman-echo.com/**"
}
After you have sent this to /api/routes you now have your route available for you, and can run it with its returned ID or you can also use code. Note that the sub-paths /get and /post are passed in the URL of the request below, which will trigger requests to https://postman-echo.com/get and https://postman-echo.com/post respectively.
GET /api/routes/{id}/run/get
GET /api/routes/postman-wildcard/run/get
POST /api/routes/{id}/run/post
POST /api/routes/postman-wildcard/run/post
Security Considerations
DHIS2 views the response originating from the upstream server as trusted. The implication is that a route does not validate the data produced from the upstream server. For example, the route client could still receive invalid JSON such as JavaScript code despite the route request holding the application/json content type in its Accept header. When the upstream response is untrusted, then it is the responsibility of the route client (e.g., DHIS2 app) to validate, and possibly sanitise, the data within the route response.
Route Manager App
The Route Manager app is a DHIS2 app available from App Hub that provides a user interface for managing and testing routes:
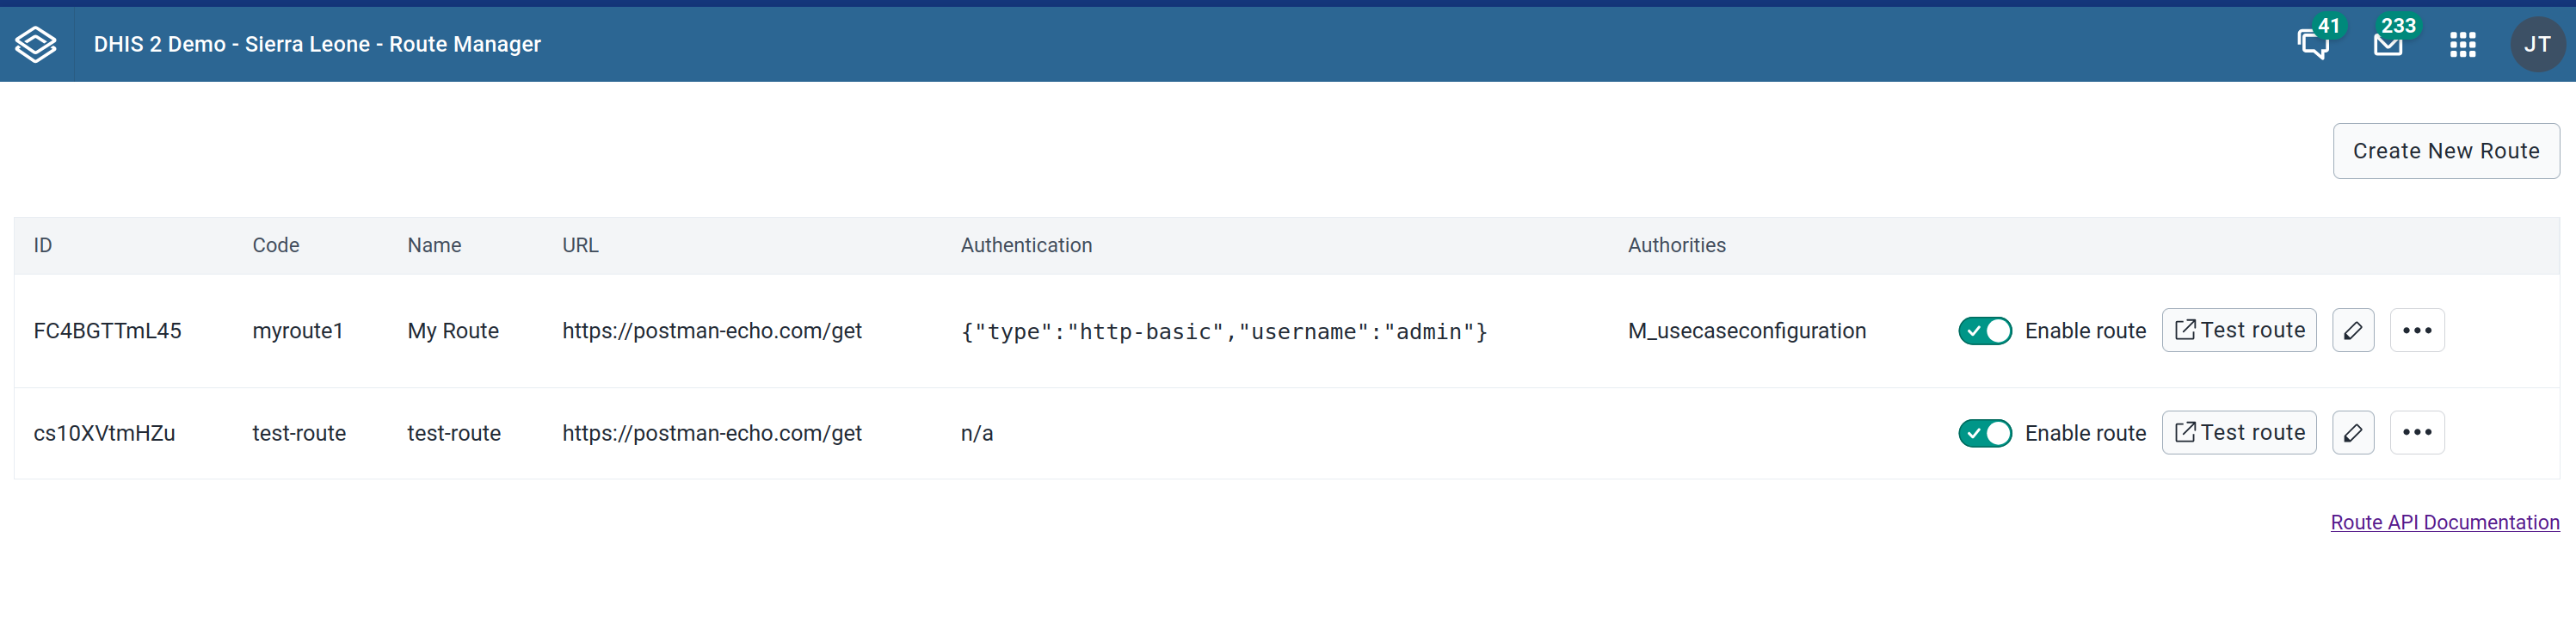
Visit the DHIS2 system maintenance guide to learn more about using Route Manager.